Archives 2023

Understanding The Windows 11 Evaluation Period And Its Implications

Understanding the Windows 11 Evaluation Period and Its Implications

Introduction

In this auspicious occasion, we are delighted to delve into the intriguing topic related to Understanding the Windows 11 Evaluation Period and Its Implications. Let’s weave interesting information and offer fresh perspectives to the readers.

Understanding the Windows 11 Evaluation Period and Its Implications

Windows 11 enterprise Evaluation (90 days) - YouTube

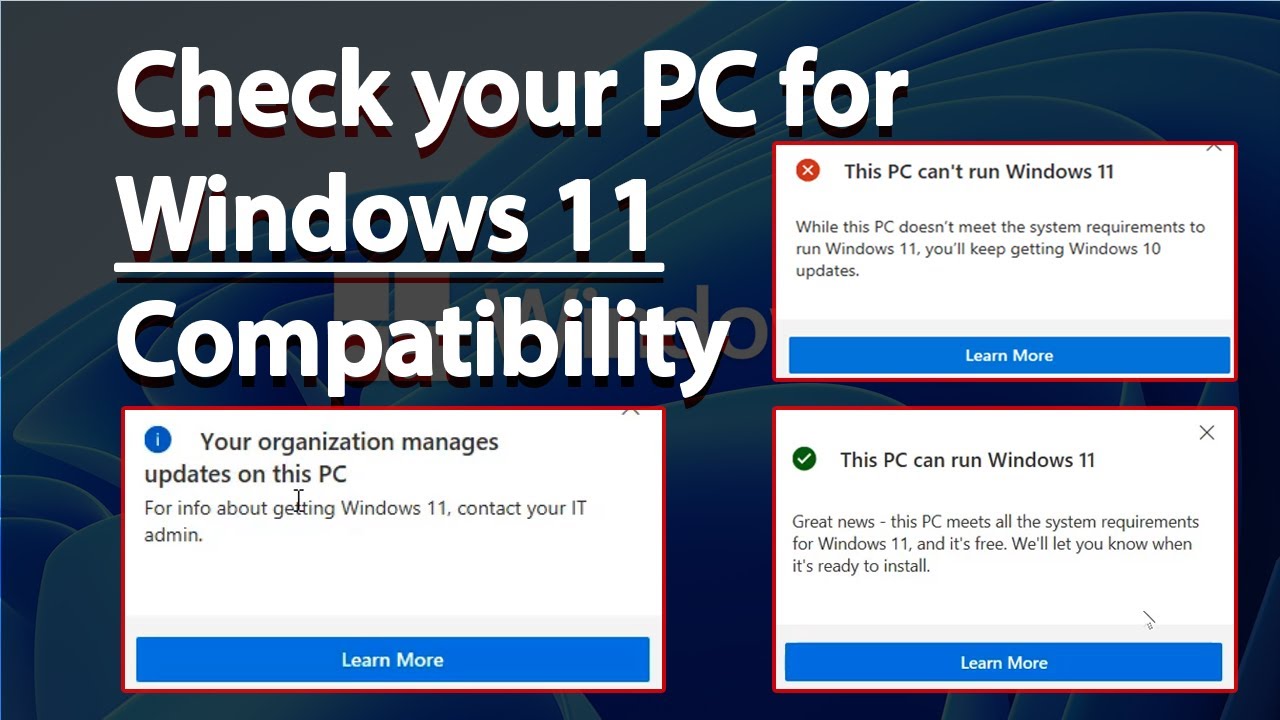
The Windows 11 operating system offers a 10-day evaluation period, allowing users to explore its features and functionalities before committing to a full installation. This trial period provides a valuable opportunity to assess compatibility, performance, and user experience. While this evaluation period can be beneficial, it is crucial to understand the process of reverting to a previous operating system if the user decides against a permanent upgrade.

The Purpose of the Evaluation Period:

The 10-day evaluation period serves several purposes:

  • Assessment: It allows users to test the new features and functionalities of Windows 11 without committing to a full installation.
  • Compatibility Check: Users can determine if their hardware and software are compatible with Windows 11, ensuring a smooth transition.
  • Performance Evaluation: Users can gauge the performance of Windows 11 on their system, assessing factors such as speed, stability, and resource utilization.
  • User Experience Exploration: Users can explore the new user interface, features, and applications to determine if they align with their needs and preferences.

The Process of Reverting to a Previous Operating System:

If a user decides to revert to their previous operating system within the 10-day evaluation period, the process typically involves the following steps:

  1. Backup: It is strongly recommended to create a complete backup of all important data before proceeding with any system changes. This backup serves as a safeguard against potential data loss.
  2. System Restore: Windows provides a built-in system restore feature that allows users to revert to a previous state. This option effectively "rolls back" the system to a point before the Windows 11 installation, restoring the previous operating system.
  3. Clean Installation: If system restore fails or is not an option, a clean installation of the previous operating system may be necessary. This involves formatting the hard drive and reinstalling the desired operating system from scratch.

Factors to Consider Before Reverting:

Before reverting to a previous operating system, users should carefully consider the following factors:

  • Data Loss: Reverting to a previous operating system may result in the loss of any data created or modified during the Windows 11 evaluation period.
  • Software Compatibility: Some software may not be compatible with the previous operating system, requiring users to update or find alternative solutions.
  • System Settings: All system settings, including personal preferences and customizations, will revert to their previous state.
  • Driver Compatibility: Drivers installed for Windows 11 may not be compatible with the previous operating system, potentially causing system instability.

Importance of Understanding the Evaluation Period:

Understanding the Windows 11 evaluation period and its implications is crucial for making informed decisions about upgrading to the new operating system. It allows users to:

  • Avoid Unforeseen Issues: By thoroughly evaluating Windows 11 during the trial period, users can avoid potential problems with compatibility, performance, or user experience.
  • Minimize Data Loss: Creating a backup before the evaluation period helps protect valuable data in case of a system revert.
  • Make Informed Decisions: The evaluation period empowers users to make a well-informed decision about whether Windows 11 meets their needs and expectations.

Frequently Asked Questions:

Q: What happens after the 10-day evaluation period?

A: After the 10-day evaluation period, Windows 11 will automatically activate, and the user will be required to purchase a license to continue using the operating system.

Q: Can I extend the 10-day evaluation period?

A: The 10-day evaluation period is typically fixed and cannot be extended.

Q: What if I don’t like Windows 11 after the evaluation period?

A: If you decide not to keep Windows 11 after the evaluation period, you can revert to your previous operating system using the methods described earlier. However, you may lose data created during the evaluation period.

Q: Is there a way to use Windows 11 without activating it after the evaluation period?

A: While it is possible to use Windows 11 without activation, it will be limited in functionality. Some features may be disabled, and the system may display constant reminders to activate.

Tips for Making the Most of the Evaluation Period:

  • Backup Data: Create a complete backup of all important data before installing Windows 11.
  • Test Compatibility: Ensure your hardware and software are compatible with Windows 11 before proceeding.
  • Explore Features: Take time to explore the new features and functionalities of Windows 11.
  • Monitor Performance: Pay attention to system performance and resource utilization during the evaluation period.
  • Read Reviews: Consult online reviews and forums for insights from other users who have already upgraded to Windows 11.

Conclusion:

The Windows 11 evaluation period provides a valuable opportunity to explore the new operating system before committing to a full installation. Understanding the process of reverting to a previous operating system, considering potential data loss, and making informed decisions based on compatibility, performance, and user experience are crucial for a successful upgrade. By leveraging the evaluation period wisely, users can ensure a smooth transition and a satisfying experience with Windows 11.

Windows 11 22H2 Enterprise Evaluation is available as ISO for testing ��WZor��️ on Twitter: "����Download Windows 11 Enterprise #Evaluation, Version #21H2, (# Windows 11 Review  A Complete Understanding
Microsoft releases new free Windows 11 evaluation virtual machines - Neowin Windows 11: How to Check Your Screen Time - Technipages Buy Understanding WINDOWS 11 Senior Guide: The Complete Step By Step Manual For Beginners And
I just upgraded to windows 11, what happened when the evaluation copy expires? (my windows 10 Microsoft updates free Windows 11 evaluation virtual machines, now come with version 22H2 - The

Closure

Thus, we hope this article has provided valuable insights into Understanding the Windows 11 Evaluation Period and Its Implications. We thank you for taking the time to read this article. See you in our next article!

Windows 11 And Antivirus Protection: A Comprehensive Analysis

Windows 11 and Antivirus Protection: A Comprehensive Analysis

Introduction

In this auspicious occasion, we are delighted to delve into the intriguing topic related to Windows 11 and Antivirus Protection: A Comprehensive Analysis. Let’s weave interesting information and offer fresh perspectives to the readers.

Windows 11 and Antivirus Protection: A Comprehensive Analysis

Best Antivirus for Windows 11 in 2023  Cybernews

Windows 11, Microsoft’s latest operating system, boasts advanced security features designed to protect users from malicious threats. However, even with these built-in safeguards, the ever-evolving landscape of cyber threats necessitates the consideration of additional security measures.

Two prominent names in the antivirus industry, Norton and McAfee, offer comprehensive solutions that extend the security capabilities of Windows 11. This article explores the need for such solutions, delves into the features offered by Norton and McAfee, and provides a comprehensive comparison to guide users in making informed decisions.

Understanding the Need for Enhanced Security

While Windows 11 incorporates robust security features like Windows Defender, a built-in antivirus solution, the dynamic nature of cyber threats demands proactive and multi-layered protection. Here’s why:

  • Evolving Threats: Cybercriminals constantly adapt their tactics, creating new malware, phishing schemes, and ransomware attacks. Windows Defender, while effective, may not always be able to detect and neutralize the latest threats.
  • Vulnerability Exploitation: Malicious actors exploit vulnerabilities in operating systems and software to gain unauthorized access. Antivirus solutions like Norton and McAfee provide real-time protection, identifying and blocking such exploits.
  • Data Protection: Sensitive personal information, financial data, and confidential files are valuable targets for cybercriminals. Antivirus solutions incorporate features like data encryption and anti-theft capabilities to safeguard such data.
  • Phishing and Social Engineering: Sophisticated phishing attempts and social engineering tactics can deceive users into revealing sensitive information or downloading malicious software. Antivirus solutions offer phishing detection and protection against social engineering attacks.

Norton and McAfee: A Comparative Analysis

Both Norton and McAfee are established players in the antivirus industry, offering a range of features and benefits. A detailed comparison helps users understand the nuances of each solution:

Norton

  • Features: Norton offers comprehensive protection against viruses, malware, ransomware, phishing attacks, and other online threats. It includes features like real-time threat detection, vulnerability assessment, data encryption, parental controls, and a secure VPN.
  • Pros: Norton is renowned for its user-friendly interface, robust protection capabilities, and a strong reputation for effectiveness. Its multi-device compatibility allows users to protect multiple devices under a single subscription.
  • Cons: Norton can be resource-intensive, potentially impacting system performance on older or less powerful devices.

McAfee

  • Features: McAfee provides comprehensive security solutions, including antivirus, anti-malware, firewall, data encryption, identity theft protection, and parental controls. It also offers features like web protection, device optimization, and a secure VPN.
  • Pros: McAfee boasts a strong reputation for its comprehensive security suite and its focus on identity theft protection. It offers a wide range of features and is known for its effective anti-ransomware capabilities.
  • Cons: McAfee can be complex to configure and navigate, particularly for less tech-savvy users. Its performance impact on system resources can be noticeable.

Factors to Consider When Choosing an Antivirus Solution

The choice between Norton and McAfee ultimately depends on individual needs and preferences. Consider these factors:

  • Budget: Both Norton and McAfee offer various subscription plans with different features and price points. Determine the level of protection required and select a plan that fits your budget.
  • System Resources: Consider the performance impact of each solution on your device. If you have limited system resources, prioritize solutions with minimal resource consumption.
  • Ease of Use: Choose a solution with a user-friendly interface and intuitive navigation.
  • Features: Identify the specific features you need, such as parental controls, identity theft protection, or a secure VPN.

FAQs

Q: Is Windows Defender sufficient for protecting my Windows 11 device?

A: While Windows Defender offers a solid baseline of protection, it may not be enough to defend against the ever-evolving landscape of cyber threats. Consider a third-party antivirus solution for comprehensive protection.

Q: Do I need both Windows Defender and a third-party antivirus solution?

A: It is generally recommended to use only one antivirus solution at a time. Running multiple antivirus programs simultaneously can lead to conflicts and performance issues.

Q: What are the key differences between Norton and McAfee?

A: Norton is known for its user-friendly interface and robust protection capabilities. McAfee boasts a comprehensive security suite with a strong focus on identity theft protection.

Q: How often should I update my antivirus software?

A: Antivirus software should be updated regularly to ensure it can detect and neutralize the latest threats. Most antivirus solutions provide automatic updates.

Tips for Choosing and Using Antivirus Software

  • Research: Read reviews and compare features of different antivirus solutions before making a decision.
  • Trial Versions: Try out free trial versions of different antivirus programs to experience their features and performance.
  • Regular Updates: Ensure your antivirus software is updated regularly to maintain its effectiveness.
  • Strong Passwords: Use strong passwords for all your accounts and avoid using the same password for multiple accounts.
  • Be Cautious: Be wary of suspicious emails, websites, and attachments. Avoid clicking on links or opening attachments from unknown senders.

Conclusion

Windows 11’s built-in security features provide a solid foundation for protection, but the evolving nature of cyber threats necessitates the use of comprehensive antivirus solutions. Norton and McAfee offer robust protection against various threats, each with its strengths and weaknesses. By carefully evaluating your needs, budget, and system resources, you can choose the antivirus solution that best meets your security requirements and safeguards your Windows 11 device from potential threats.

Does Windows 11 Need Antivirus Software - AddictiveTips 2023 windows 11 antivirus Windows 11 Security Features: Beginner's Guide (Updated 2022)
Windows 11 Virus & Threat Protection  TestingDocs.com Windows 11 Inbuilt Antivirus Windows 11 Free Antivirus l Best Antivirus For Windows 11 Best Windows 11 Antivirus in 2021 - NixLoop
Best Free Antivirus for Windows 11: A Complete Guide - The Knowledge Hub 10 Best Free Windows 11 Antivirus in 2022

Closure

Thus, we hope this article has provided valuable insights into Windows 11 and Antivirus Protection: A Comprehensive Analysis. We thank you for taking the time to read this article. See you in our next article!

The End Of An Era: Understanding The Windows 10 Support Timeline

The End of an Era: Understanding the Windows 10 Support Timeline

Introduction

In this auspicious occasion, we are delighted to delve into the intriguing topic related to The End of an Era: Understanding the Windows 10 Support Timeline. Let’s weave interesting information and offer fresh perspectives to the readers.

The End of an Era: Understanding the Windows 10 Support Timeline

Understanding The Windows-as-a-Service Timeline (As of September 2021)

Microsoft’s Windows 10 operating system has been a mainstay for millions of users worldwide. Its introduction in 2015 marked a significant shift in the company’s approach to software updates, moving away from the traditional, version-based model to a continuous service model. While this approach brought numerous benefits, including regular security updates and feature enhancements, it also introduced a new dynamic: a defined end-of-support date for the operating system.

This article aims to provide a comprehensive understanding of the Windows 10 support timeline, explaining its significance and highlighting the implications for users.

The Importance of Understanding Support End Dates

When Microsoft announces an end-of-support date for a specific version of Windows, it signifies the cessation of critical updates and security patches. This means that the operating system will become increasingly vulnerable to security threats, as Microsoft will no longer release fixes for newly discovered vulnerabilities. Additionally, users will no longer receive technical support from Microsoft for issues or troubleshooting.

Windows 10 Support Timeline

The end-of-support date for Windows 10 varies depending on the specific version or edition. Here’s a breakdown:

  • Windows 10 Home and Pro (released in 2015): Support for these versions officially ended on October 14, 2025.
  • Windows 10 Enterprise and Education (released in 2015): Support for these versions ended on October 14, 2025.
  • Windows 10 versions released after 2015: Each version of Windows 10 released after 2015, including major feature updates like the Anniversary Update or Creators Update, received its own dedicated support period. These support periods typically lasted for 18 months from the date of the release.

It is crucial to note that the end-of-support date for each version of Windows 10 is clearly documented by Microsoft. Users can access this information on the official Microsoft website or through their Windows update settings.

Implications of End-of-Support for Windows 10 Users

The end of support for Windows 10 presents several implications for users:

  • Increased Security Risks: As mentioned earlier, the lack of security updates significantly increases the risk of security breaches and malware infections. This is particularly concerning for users who rely on their computers for sensitive information or financial transactions.
  • Loss of Technical Support: Users will no longer have access to technical support from Microsoft for any issues they encounter with their operating system. This could lead to frustrating troubleshooting experiences and potential downtime.
  • Inability to Access New Features: Users will not receive any new features or updates for their operating system after the end-of-support date. This can limit the functionality of their devices and make them incompatible with newer applications or services.

What to Do When Windows 10 Support Ends?

Users have several options to address the end-of-support for Windows 10:

  • Upgrade to Windows 11: The most straightforward option is to upgrade to Windows 11. This offers the latest security features, performance improvements, and access to new functionalities. However, users must ensure their hardware meets the minimum system requirements for Windows 11.
  • Remain on Windows 10 with Extended Security Updates (ESUs): For organizations or individuals who require extended support for Windows 10, Microsoft offers Extended Security Updates (ESUs). These paid subscriptions provide security updates for up to three years after the end of mainstream support.
  • Switch to a Different Operating System: Users can consider switching to a different operating system, such as Linux or macOS. These operating systems offer alternative environments with their own unique features and security measures.

Frequently Asked Questions (FAQs)

Q: What happens to my data when Windows 10 support ends?

A: The end of support for Windows 10 does not affect your data. Your files, applications, and settings will remain on your device. However, it is always recommended to back up your data regularly to protect against data loss due to unforeseen events.

Q: Can I still use Windows 10 after the end of support?

A: Yes, you can continue to use Windows 10 after the end of support. However, it is strongly discouraged due to the increased security risks. Your device will become increasingly vulnerable to malware and other threats.

Q: Will Microsoft stop selling Windows 10 after the end of support?

A: No, Microsoft will continue to sell Windows 10 after the end of support. However, it will no longer receive any updates or security patches.

Tips for Users with Windows 10

  • Stay Informed: Keep track of the end-of-support dates for your specific version of Windows 10. This information is readily available on the official Microsoft website.
  • Back Up Your Data: Regularly back up your data to protect against data loss. This can be done through cloud storage services, external hard drives, or other backup solutions.
  • Consider Upgrading: Evaluate your hardware and software compatibility with Windows 11. If your device meets the requirements, consider upgrading to the latest operating system.
  • Explore Alternatives: If upgrading is not feasible, explore other operating system options like Linux or macOS.

Conclusion

The end of support for Windows 10 marks a significant milestone in the evolution of the operating system. While it signifies the cessation of updates and technical support, it also presents an opportunity for users to upgrade to newer technologies or explore alternative operating systems. By understanding the implications of end-of-support and taking appropriate steps, users can ensure their devices remain secure and functional. It is crucial for users to stay informed about the support timeline and make informed decisions regarding their computing needs.

Understanding The Windows-as-a-Service Timeline (As of 12/4/18) Don’t Get Caught Off-Guard: Support for Windows 10 1903 Expires Soon Windows 10 & 7 support time-lines! (With images)  Supportive, Windows 10, Timeline
Understanding The Windows 10 Branching Timeline Updat - vrogue.co PPT - The End of an Era: Windows 10 Reaches Final Feature Update PowerPoint Presentation - ID How Microsoft Has Pushed Windows 10 and the Results
A History Of Microsoft Windows Timeline - Bank2home.com Stay Ahead of the Curve! Windows 10 Updates Your Institution Needs to Know

Closure

Thus, we hope this article has provided valuable insights into The End of an Era: Understanding the Windows 10 Support Timeline. We appreciate your attention to our article. See you in our next article!

Navigating Windows 11 Compatibility: A Comprehensive Guide

Navigating Windows 11 Compatibility: A Comprehensive Guide

Introduction

With great pleasure, we will explore the intriguing topic related to Navigating Windows 11 Compatibility: A Comprehensive Guide. Let’s weave interesting information and offer fresh perspectives to the readers.

Windows 11 Compatibility Guide, pc fixe windows 11 - okgo.net

Windows 11, Microsoft’s latest operating system, promises a modern, streamlined experience. However, its compatibility requirements can be a hurdle for some users. This article aims to provide a comprehensive understanding of Windows 11 compatibility, outlining the key factors, potential issues, and solutions to ensure a smooth transition.

Understanding the Compatibility Requirements

Microsoft has established specific hardware and software requirements for Windows 11 to guarantee optimal performance and security. These requirements are designed to ensure that the operating system can leverage the latest technologies and deliver the intended user experience.

Hardware Requirements:

  • Processor: A 1 gigahertz (GHz) or faster, with 2 or more cores, compatible with 64-bit architecture. This ensures sufficient processing power for demanding tasks and multitasking.
  • RAM: At least 4 GB of RAM is required for basic functionality. 8 GB or more is recommended for a smoother experience with multiple applications running concurrently.
  • Storage: A minimum of 64 GB of storage is needed, with at least 8 GB of free space for Windows 11 installation.
  • TPM (Trusted Platform Module): A TPM 2.0 chip is mandatory for security purposes. This chip enhances system security by storing encryption keys and protecting against unauthorized access.
  • Secure Boot: This feature must be enabled in the BIOS/UEFI settings. It prevents malicious software from loading before the operating system starts.
  • Display: A display with a minimum resolution of 1366 x 768 pixels is required. This ensures that the user interface elements are displayed correctly.

Software Requirements:

  • Windows 10 Version 2004 or later: This ensures that the system meets the minimum software prerequisites for a seamless upgrade.
  • Microsoft Account: A Microsoft account is required for initial setup and system activation.

Identifying Compatibility Issues

If your current system does not meet the minimum requirements, you may encounter various issues during installation or after upgrading to Windows 11. These issues can range from incompatibility errors to performance degradation.

  • Installation Errors: The installation process might fail if the hardware or software requirements are not met. Error messages indicating incompatibility will be displayed.
  • Performance Issues: A system that does not meet the minimum requirements may experience slow performance, lagging applications, and frequent crashes.
  • Feature Limitations: Certain features of Windows 11 might not function correctly or be unavailable on systems that do not meet the requirements.

Troubleshooting Compatibility Problems

If you encounter compatibility issues, several troubleshooting steps can be taken to resolve them.

  • Check System Specifications: Verify that your system meets the minimum hardware and software requirements. You can access this information through the System Information tool in Windows.
  • Update Drivers: Ensure that all your drivers are up to date. Outdated drivers can lead to compatibility issues.
  • Upgrade BIOS/UEFI: Update your system’s BIOS or UEFI to the latest version. This can resolve compatibility issues and improve performance.
  • Disable Secure Boot: If you are unable to install Windows 11 due to Secure Boot, temporarily disable it in the BIOS/UEFI settings. However, this is not recommended for security reasons.
  • Check for System Updates: Make sure your Windows 10 installation is up to date. System updates often include compatibility improvements and fixes.
  • Contact Microsoft Support: If you are unable to resolve the issue, contact Microsoft support for assistance.

Alternatives to Upgrading

If your system does not meet the requirements and upgrading is not feasible, consider these alternatives:

  • Remain on Windows 10: Windows 10 will continue to receive security updates until October 2025. You can continue using your current operating system without upgrading.
  • Purchase a New Computer: If your system is outdated and upgrading is not possible, consider purchasing a new computer that meets the Windows 11 requirements.
  • Use a Virtual Machine: Install Windows 11 within a virtual machine on your current system. This allows you to experience the new operating system without affecting your existing setup.

Frequently Asked Questions (FAQs)

Q: Can I upgrade to Windows 11 without meeting all the requirements?

A: While you may be able to install Windows 11 without meeting all the requirements, it is not recommended. You may encounter performance issues, compatibility problems, and security vulnerabilities.

Q: What happens if I upgrade to Windows 11 and then realize my system doesn’t meet the requirements?

A: You can downgrade back to Windows 10 within 10 days of upgrading. However, this may require a clean installation, which means you will lose all your data.

Q: Is it possible to upgrade a system that doesn’t have a TPM 2.0 chip?

A: Microsoft has released a workaround for systems without a TPM 2.0 chip. However, this is not officially supported and may compromise system security.

Q: Can I use Windows 11 on an older computer?

A: While technically possible, it is not recommended. Older computers may lack the hardware capabilities to run Windows 11 efficiently and securely.

Tips for Smooth Windows 11 Compatibility

  • Back Up Your Data: Before upgrading to Windows 11, back up all your important data to an external drive or cloud storage. This will ensure data protection in case of any issues during the upgrade process.
  • Check for System Updates: Make sure your Windows 10 installation is up to date before attempting to upgrade.
  • Run System Diagnostics: Use the built-in system diagnostics tools to check for hardware and software issues that could affect compatibility.
  • Review System Requirements: Carefully review the Windows 11 system requirements to ensure your system meets them.
  • Consider a Clean Installation: If you encounter compatibility issues, consider a clean installation of Windows 11. This involves formatting the hard drive and installing the operating system from scratch.

Conclusion

Windows 11 offers a modern, streamlined experience with enhanced security and features. However, its compatibility requirements can be a barrier for some users. By understanding the key factors, identifying potential issues, and implementing troubleshooting steps, users can ensure a smooth transition to Windows 11. If upgrading is not feasible, exploring alternatives such as remaining on Windows 10, purchasing a new computer, or using a virtual machine can provide viable options. By taking a proactive approach to compatibility, users can embrace the benefits of Windows 11 while ensuring a seamless and secure computing experience.

The Ultimate Guide to Check Windows 11 Compatibility with Your PC - Make Tech Easier Compatibility Test For Windows 11 2024 - Win 11 Home Upgrade 2024 3 Ways to Run Old Programs in Compatibility Mode on Windows 11 - Guiding Tech
How to check PC compatibility to run Windows 11 - Pureinfotech Windows 11 compatibility checker tool - bagsjas The Ultimate Guide To Check Windows 11 Compatibility With Your Pc Images
Windows 11 Compatibility Program Know Your Pc Is Supported Win 11 - Vrogue Compatibility View  Windows 11 Settings - gHacks Tech News

Closure

Thus, we hope this article has provided valuable insights into Navigating Windows 11 Compatibility: A Comprehensive Guide. We hope you find this article informative and beneficial. See you in our next article!

Unruly Cursors: A Guide To Understanding And Resolving Erratic Cursor Behavior

Unruly Cursors: A Guide to Understanding and Resolving Erratic Cursor Behavior

Introduction

In this auspicious occasion, we are delighted to delve into the intriguing topic related to Unruly Cursors: A Guide to Understanding and Resolving Erratic Cursor Behavior. Let’s weave interesting information and offer fresh perspectives to the readers.

Unruly Cursors: A Guide to Understanding and Resolving Erratic Cursor Behavior

Erratic mouse cursor movement Solution [Solved[ - YouTube

The cursor, that ubiquitous blinking line or arrow, is an essential element in our digital interactions. Its smooth and predictable movement is crucial for navigating through documents, interacting with applications, and engaging with the digital world. However, there are times when the cursor’s behavior becomes erratic, jumping around the screen in an unpredictable manner, interrupting workflow and frustrating users. This phenomenon, known as "cursor jumping," can be a perplexing and disruptive issue.

This article delves into the multifaceted nature of cursor jumping, exploring its potential causes, offering practical solutions, and providing a comprehensive understanding of this common digital ailment.

Understanding the Roots of Cursor Jumping

The erratic behavior of the cursor can stem from various sources, ranging from hardware malfunctions to software glitches. A thorough understanding of these potential causes is essential for effectively diagnosing and resolving the issue.

1. Hardware Malfunctions:

  • Faulty Mouse or Touchpad: A malfunctioning mouse or touchpad can be the primary culprit behind cursor jumping. Worn-out buttons, faulty sensors, or internal component failures can all contribute to erratic cursor movement.
  • Damaged or Loose Cables: Damaged or loose cables connecting the mouse or touchpad to the computer can also lead to inconsistent cursor behavior. This is particularly true for older mice that rely on wired connections.
  • Interference: External electromagnetic interference can disrupt the communication between the mouse or touchpad and the computer, causing the cursor to jump around. This interference can originate from nearby electronic devices, wireless networks, or even power lines.

2. Software Issues:

  • Driver Conflicts: Outdated, corrupted, or incompatible mouse or touchpad drivers can lead to cursor jumping. Drivers act as intermediaries between the hardware and the operating system, and their proper functioning is crucial for smooth cursor control.
  • Operating System Errors: Software bugs or errors within the operating system itself can also cause cursor jumping. These errors can disrupt the communication between the operating system and the mouse or touchpad, resulting in erratic cursor behavior.
  • Malware or Viruses: Malicious software, such as viruses or malware, can interfere with system processes, including those responsible for cursor control, leading to cursor jumping.
  • Conflicting Applications: Certain applications, particularly those with demanding resource requirements or known compatibility issues, can interfere with the cursor’s functionality, causing it to jump around.

3. Environmental Factors:

  • Surface Conditions: The surface on which the mouse is used can significantly affect its performance. Uneven surfaces, dust, or other debris can interfere with the mouse’s tracking capabilities, leading to cursor jumping.
  • Ambient Light: Excessive ambient light can interfere with the mouse’s optical sensor, causing the cursor to jump around. This is particularly relevant for optical mice that rely on reflected light for tracking.

Troubleshooting and Resolution Strategies

Once the potential causes of cursor jumping have been identified, a systematic approach to troubleshooting and resolving the issue can be implemented.

1. Hardware Troubleshooting:

  • Check Mouse or Touchpad Connection: Ensure that the mouse or touchpad is properly connected to the computer. Check the cable for any signs of damage or loose connections.
  • Test with a Different Mouse: If possible, test the computer with a different mouse to isolate the issue. If the cursor jumping persists, the problem likely lies with the computer itself.
  • Clean Mouse or Touchpad: Clean the mouse or touchpad thoroughly, removing any dust, debris, or other contaminants that may be interfering with its functionality.
  • Replace Faulty Mouse or Touchpad: If the problem persists despite cleaning and testing, the mouse or touchpad may be faulty and needs to be replaced.

2. Software Troubleshooting:

  • Update Mouse or Touchpad Drivers: Update the mouse or touchpad drivers to the latest version available for your operating system. This can often resolve driver-related conflicts and improve cursor control.
  • Run System Updates: Ensure that your operating system is up to date with the latest patches and updates. These updates often include bug fixes that can address cursor jumping issues.
  • Run System Scan for Malware: Scan your computer for malware using a reputable antivirus program. If malware is detected, remove it immediately.
  • Restart Computer: A simple restart can often resolve temporary software glitches that may be causing cursor jumping.
  • Disable Conflicting Applications: Temporarily disable any applications that are known to cause resource conflicts or have compatibility issues. This can help isolate the source of the problem.

3. Environmental Adjustments:

  • Use a Suitable Mouse Surface: Ensure that you are using a smooth, clean surface for your mouse. Avoid using uneven surfaces, carpets, or surfaces with excessive patterns.
  • Adjust Ambient Light: If using an optical mouse, adjust the ambient light levels to ensure that the sensor is not being overwhelmed by excessive light.

FAQs about Cursor Jumping

Q: My cursor is jumping only in specific applications. What could be the cause?

A: Cursor jumping confined to specific applications suggests a compatibility issue or resource conflict. The application itself might have a bug, or it could be demanding too many resources, leading to performance issues that affect the cursor.

Q: I recently installed a new program and my cursor started jumping. What should I do?

A: The newly installed program could be the culprit. Try uninstalling it and see if the cursor jumping stops. If it does, consider an alternative program or update the installed program to a newer version.

Q: I tried all the troubleshooting steps, but my cursor is still jumping. What else can I do?

A: If all other options fail, consider a clean installation of your operating system. This involves reinstalling the operating system from scratch, potentially resolving deep-rooted software conflicts or errors.

Tips for Preventing Cursor Jumping

  • Regularly Update Drivers: Keep your mouse and touchpad drivers up-to-date to ensure optimal performance and compatibility.
  • Maintain Clean Mouse Surface: Regularly clean your mouse surface to prevent dust, debris, or other contaminants from interfering with the mouse’s tracking capabilities.
  • Avoid Excessive Ambient Light: If using an optical mouse, minimize excessive ambient light to ensure accurate tracking.
  • Use a Quality Mouse: Invest in a high-quality mouse from a reputable brand to ensure reliable performance and durability.

Conclusion

Cursor jumping, while frustrating, is often a solvable issue. By understanding the potential causes, implementing systematic troubleshooting steps, and employing preventive measures, you can regain control of your cursor and enjoy a smooth and seamless digital experience. Remember, a well-behaved cursor is a vital component of a productive and enjoyable computing experience.

OS X erratic cursor movement - YouTube How To Fix Mouse Cursor Jumping In Windows 11 Youtube - vrogue.co Fix: Erratic / not smooth mouse movements in Windows 10
Fixed: strange erratic mouse pointer behavior - moving on its own uncontrollably across the Erratic behavior of the Tab cursor according the layout  MuseScore Erratic behavior of the Tab cursor according the layout  MuseScore
Resolving Cursor Loading Blinking Circle Issue in Windows  Quick Fix Tutorial - YouTube Understanding Cursors: A Comprehensive Guide to Defining and How Cursors Work Test 2024 [July

Closure

Thus, we hope this article has provided valuable insights into Unruly Cursors: A Guide to Understanding and Resolving Erratic Cursor Behavior. We appreciate your attention to our article. See you in our next article!

Unlocking Windows 11’s Full Potential: A Guide To Optimal Performance

Unlocking Windows 11’s Full Potential: A Guide to Optimal Performance

Introduction

With enthusiasm, let’s navigate through the intriguing topic related to Unlocking Windows 11’s Full Potential: A Guide to Optimal Performance. Let’s weave interesting information and offer fresh perspectives to the readers.

Unlocking Windows 11’s Full Potential: A Guide to Optimal Performance

How To Unlock Taskbar Windows 11 Tutorial - YouTube

Windows 11, Microsoft’s latest operating system, boasts numerous improvements and features designed to enhance user experience. However, achieving peak performance requires understanding the nuances of the operating system and its interaction with hardware. This article delves into the key aspects of optimizing Windows 11, exploring various techniques and strategies to unlock its full potential.

Understanding the Importance of Optimization

Optimizing Windows 11 is not merely about achieving faster boot times or smoother application launches. It’s about creating a system that operates efficiently, maximizing resource utilization, and minimizing bottlenecks. This translates to a more responsive and enjoyable user experience, allowing users to focus on their tasks without encountering frustrating delays or performance issues.

Key Areas for Optimization

1. System Resources:

  • CPU: The central processing unit (CPU) is the brain of your computer, handling all calculations and instructions. Optimizing CPU usage involves ensuring that applications are utilizing available resources effectively and avoiding excessive background processes that consume CPU cycles unnecessarily.
  • RAM: Random access memory (RAM) serves as short-term storage for active applications and data. Optimizing RAM usage means ensuring sufficient capacity to accommodate all running programs without resorting to excessive disk swapping, which can significantly slow down the system.
  • Storage: The type and speed of your storage drive significantly impact overall performance. Utilizing a fast SSD (Solid State Drive) for the operating system and frequently accessed applications can dramatically improve boot times and application launch speeds.

2. Background Processes and Services:

  • Startup Programs: Many applications automatically launch at system startup, consuming valuable resources and slowing down boot times. Identifying and disabling unnecessary startup programs can significantly improve system responsiveness.
  • Background Services: Windows 11 runs various background services that perform essential tasks like updates, security checks, and data synchronization. These services can sometimes consume excessive resources. Disabling or adjusting the settings of non-essential background services can free up system resources.

3. System Settings:

  • Power Plan: Windows 11 offers various power plans that prioritize different aspects of performance. Selecting the appropriate power plan for your usage patterns can optimize energy consumption and performance.
  • Visual Effects: Windows 11 offers various visual effects that enhance the user interface. However, these effects can consume significant resources. Disabling or reducing visual effects can improve performance, especially on older or less powerful hardware.

4. Software and Applications:

  • Driver Updates: Outdated or incompatible device drivers can cause performance issues. Regularly updating drivers to the latest versions ensures optimal compatibility and performance.
  • Antivirus Software: While essential for security, antivirus software can sometimes consume significant resources. Choosing a lightweight and efficient antivirus solution can minimize performance impact.
  • Defragmentation and Disk Cleanup: Over time, fragmented files and unused data can accumulate on your hard drive, slowing down access times. Regular defragmentation and disk cleanup can improve storage performance.

5. Hardware Considerations:

  • Hardware Upgrade: If your current hardware is insufficient to handle the demands of Windows 11, consider upgrading components like RAM, storage, or even the CPU.
  • Cooling: Overheating can significantly impact system performance. Ensure adequate cooling solutions are in place, such as fans or liquid cooling systems, to maintain optimal temperatures.

Practical Tips for Optimizing Windows 11

1. Task Manager Analysis:

Utilize the Task Manager to identify resource-intensive applications and processes. Analyze CPU and RAM usage patterns to identify potential bottlenecks and optimize resource allocation.

2. Startup Programs Management:

Use the "Startup" tab in Task Manager to disable unnecessary programs from launching at system startup. This can significantly reduce boot times and improve overall performance.

3. Services Management:

Access the "Services" window (services.msc) to identify and disable non-essential background services. Exercise caution when disabling services, as some may be crucial for system functionality.

4. Power Plan Optimization:

Adjust power plan settings to prioritize performance over energy savings, especially when demanding tasks are required.

5. Visual Effects Reduction:

Navigate to "System" settings > "Display" > "Graphics settings" and adjust visual effects to reduce resource consumption.

6. Driver Updates:

Use the "Device Manager" to identify and update outdated device drivers. Alternatively, utilize the manufacturer’s website to download the latest drivers for your specific hardware.

7. Disk Cleanup and Defragmentation:

Use the built-in "Disk Cleanup" tool to remove temporary files and other unnecessary data. For hard disk drives (HDDs), consider using the "Defragment and Optimize Drives" tool to improve storage performance.

8. Antivirus Optimization:

Consider using a lightweight and efficient antivirus solution that minimizes resource consumption. Optimize antivirus settings to reduce unnecessary scans and background processes.

9. Background Processes Management:

Use the "Settings" app to manage background app activity. Control which applications are allowed to run in the background and access system resources.

10. Hardware Maintenance:

Ensure proper cooling solutions are in place to prevent overheating. Consider dusting out internal components and replacing aging hardware components as necessary.

FAQs on Optimizing Windows 11

Q: Is it safe to disable services in Windows 11?

A: Disabling services can be risky if you are unsure of their purpose. Always research the service before disabling it, and consider creating a system restore point before making any changes.

Q: How can I identify which startup programs are unnecessary?

A: Examine the startup programs list in Task Manager. Look for applications you rarely use or that are not essential for system functionality.

Q: What are the best practices for managing background processes?

A: Use the "Settings" app to control background app activity. Limit the number of applications allowed to run in the background, especially those that consume significant resources.

Q: Does defragmentation still matter with SSDs?

A: Defragmentation is not necessary for SSDs as they use a different storage technology. However, disk cleanup tools can still be beneficial for removing unnecessary data and optimizing storage space.

Q: How do I choose the right power plan for my needs?

A: Consider your usage patterns. If you prioritize performance, select the "High Performance" plan. If you prioritize battery life, choose the "Power Saver" plan.

Conclusion

Optimizing Windows 11 performance is an ongoing process that requires continuous monitoring and adjustments. By understanding the key areas for optimization, implementing practical tips, and addressing potential performance bottlenecks, users can unlock the full potential of Windows 11, creating a system that operates efficiently, reliably, and seamlessly. Remember, a well-optimized system not only enhances user experience but also extends the lifespan of your hardware, ensuring maximum return on investment.

Unlock the Full Potential: Open Windows 11 Administrative Tools - Toptecmag Amazon.com: Windows 11 Guide for Absolute Beginners: 2024 Edition Manual to Mastering Windows 11 Windows 11 Unlocked!!! - YouTube
Unlocking Windows 11: The Ultimate Guide to Finding Your Product Key - YouTube What is Windows 11 in S mode?  Deep Dive Unlocking the Full Potential of Windows + Shift + S in Windows 11: 7 Tips and Tricks - Click
Unlock the Full Potential of Windows 11 Pro with a Genuine Product Key  by Aadiyogiteam  Medium Unlock windows potential control panel demystified – Artofit

Closure

Thus, we hope this article has provided valuable insights into Unlocking Windows 11’s Full Potential: A Guide to Optimal Performance. We thank you for taking the time to read this article. See you in our next article!

Enhancing Windows 10 Performance: A Comprehensive Guide

Enhancing Windows 10 Performance: A Comprehensive Guide

Introduction

With great pleasure, we will explore the intriguing topic related to Enhancing Windows 10 Performance: A Comprehensive Guide. Let’s weave interesting information and offer fresh perspectives to the readers.

Enhancing Windows 10 Performance: A Comprehensive Guide

How to Enhance Your Windows 10 Performance  Cyberogism

Windows 10, despite its widespread use and numerous features, can sometimes experience performance issues. These can range from sluggish application loading to system crashes, hindering productivity and overall user experience. Fortunately, numerous strategies exist to optimize Windows 10, ensuring a smoother, more efficient, and responsive operating system. This article provides a detailed overview of these techniques, covering both basic and advanced optimization methods.

Understanding the Importance of Optimization

Optimizing Windows 10 is crucial for a variety of reasons:

  • Improved System Responsiveness: A well-optimized system boots faster, loads programs quicker, and responds to user inputs with minimal delay, enhancing overall productivity.
  • Increased Efficiency: Optimization reduces resource consumption, allowing the system to perform tasks more efficiently, saving battery life and extending hardware lifespan.
  • Enhanced Security: A clean and optimized system is less vulnerable to malware and other security threats, ensuring data integrity and protecting user privacy.
  • Extended Hardware Lifespan: By reducing strain on the system, optimization can prolong the lifespan of hardware components, delaying the need for costly upgrades.
  • Improved User Experience: A smooth, responsive, and efficient operating system enhances the overall user experience, making daily tasks enjoyable and productive.

Common Causes of Performance Degradation

Before delving into optimization techniques, understanding the root causes of performance issues is essential. Common culprits include:

  • Cluttered Hard Drive: Over time, hard drives accumulate unnecessary files, temporary data, and system junk, hindering performance.
  • Excessive Startup Programs: Numerous programs configured to launch automatically at startup can consume resources, slowing down the system boot process.
  • Outdated Drivers: Outdated drivers can cause compatibility issues and affect system performance, leading to instability and malfunctions.
  • Malware Infections: Malicious software can consume resources, steal data, and compromise system security, impacting performance significantly.
  • Insufficient RAM: Limited RAM can lead to system slowdowns, especially when running resource-intensive applications.
  • Defragmentation Issues: Fragmented hard drives, where data is scattered across the disk, can slow down access speeds, impacting overall performance.
  • Background Processes: Numerous background processes running simultaneously can consume valuable resources, hindering system responsiveness.

Effective Optimization Strategies

Now, let’s explore practical strategies to optimize Windows 10, addressing each of the aforementioned issues:

1. Disk Cleanup and Disk Defragmentation:

  • Disk Cleanup: Regularly use the built-in Disk Cleanup tool to remove temporary files, system junk, and unnecessary data. This frees up valuable disk space, improving performance.
  • Disk Defragmentation: For traditional hard disk drives (HDDs), defragmentation is crucial. It reorganizes fragmented data, improving access speeds and enhancing system responsiveness. However, Solid State Drives (SSDs) do not require defragmentation, as they utilize a different data storage mechanism.

2. Managing Startup Programs:

  • Task Manager: Use the Task Manager (Ctrl+Shift+Esc) to view and manage programs that launch automatically at startup. Disable unnecessary programs to reduce resource consumption and speed up boot times.
  • System Configuration: Access the System Configuration utility (msconfig.exe) to manage startup programs and services. Carefully disable programs you don’t need, ensuring you understand the potential consequences of disabling critical services.

3. Updating Drivers:

  • Device Manager: Use the Device Manager to check for outdated drivers. Right-click on a device, select "Update Driver," and follow the prompts to install the latest versions.
  • Manufacturer Websites: Visit the manufacturer’s website for the latest driver updates specific to your hardware components.
  • Driver Update Software: Utilize specialized driver update software to automatically scan for and install the latest drivers for all your hardware components.

4. Scanning for Malware:

  • Windows Defender: Windows 10 comes with built-in antivirus protection, Windows Defender. Regularly run full system scans to detect and remove any malware infections.
  • Third-Party Antivirus: Consider using a reputable third-party antivirus solution for enhanced protection and additional features.

5. Optimizing RAM Usage:

  • Close Unnecessary Programs: Close programs you are not actively using to free up RAM.
  • Adjust Virtual Memory: If your system has limited RAM, adjust virtual memory settings to use more disk space as a temporary storage area. However, this can slow down performance compared to physical RAM.

6. Managing Background Processes:

  • Task Manager: Use the Task Manager to identify and terminate resource-intensive background processes that are not essential.
  • System Configuration: Disable unnecessary background services through the System Configuration utility (msconfig.exe).

7. Advanced Optimization Techniques:

  • Disable Visual Effects: While aesthetically pleasing, visual effects can consume resources. Disable unnecessary effects in the System Properties window (Performance tab) to improve performance.
  • Adjust Power Settings: Configure power settings to prioritize performance over energy saving. This can increase system responsiveness, especially during demanding tasks.
  • Clean Boot: Performing a clean boot disables unnecessary startup programs and services, isolating performance issues. This can help identify specific programs or services causing problems.
  • Registry Cleanup: Regularly clean the Windows Registry, removing invalid entries and optimizing system performance. However, caution is advised, as incorrect registry modifications can damage the operating system.
  • System Restore: Create a system restore point before making significant changes to your system. This allows you to revert to a previous state in case of issues.

Frequently Asked Questions (FAQs)

Q: Is optimizing Windows 10 necessary for all users?

A: While not mandatory, optimization is highly recommended for all Windows 10 users, especially those experiencing performance issues or seeking to maximize system efficiency.

Q: Can I optimize Windows 10 without technical expertise?

A: Yes, many basic optimization techniques are user-friendly and require no specialized knowledge. However, advanced techniques may require a deeper understanding of Windows 10 and its settings.

Q: What are the risks associated with optimization?

A: Incorrectly configuring system settings or using unreliable optimization tools can lead to system instability, data loss, or even damage the operating system. Therefore, proceed with caution and always back up your data before making significant changes.

Q: How often should I optimize Windows 10?

A: Regularly perform basic maintenance tasks like Disk Cleanup and defragmentation (for HDDs). Update drivers periodically and scan for malware regularly. Advanced optimization techniques can be performed as needed, depending on system performance and user preferences.

Tips for Optimizing Windows 10

  • Regularly clean your hard drive: Use Disk Cleanup and other tools to remove unnecessary files and data.
  • Manage startup programs: Disable unnecessary programs that launch automatically at startup.
  • Keep your drivers updated: Regularly check for and install the latest driver updates for your hardware components.
  • Run a full system scan for malware: Use Windows Defender or a third-party antivirus solution to detect and remove malware infections.
  • Close unnecessary programs: Exit programs you are not actively using to free up RAM.
  • Disable visual effects: Reduce resource consumption by disabling unnecessary visual effects in the System Properties window.
  • Adjust power settings: Prioritize performance over energy saving to enhance system responsiveness.
  • Avoid installing unnecessary software: Only install programs you truly need and avoid installing potentially harmful software.
  • Use a reputable optimization tool: If you choose to use third-party optimization software, ensure it is from a trusted source.
  • Back up your data: Create a backup of your important data before making significant changes to your system.

Conclusion

Optimizing Windows 10 is a continuous process that requires regular maintenance and attention. By implementing the strategies outlined in this article, users can significantly improve system performance, enhance responsiveness, and extend hardware lifespan. Remember to proceed with caution, understand the potential risks, and back up your data before making significant changes. By prioritizing system health and optimizing performance, users can enjoy a smoother, more efficient, and enjoyable Windows 10 experience.

�� How to Enable Windows 10 ULTIMATE Performance mode Guide - YouTube TIPS TO IMPROVE PC PERFORMANCE IN WINDOWS 10  READYBOOST - YouTube How to Enable Windows 10 Ultimate Performance Mode  Ultimate performance mode  Power Settings
How to Speed Up Your Windows 10 Performance (Best Settings Ever) How To Change Performance Options In Windows 10  Daves Computer Tips Cómo habilitar el modo Ultimate Performance en Windows 10 – Zobme
How to Enable Ultimate Performance Mode in Windows 10 (New) - YouTube How To Enable Ultimate Performance Mode On Windows 10  Images and Photos finder

Closure

Thus, we hope this article has provided valuable insights into Enhancing Windows 10 Performance: A Comprehensive Guide. We hope you find this article informative and beneficial. See you in our next article!

Navigating The Landscape Of Windows 10 Pricing In The Philippines: A Comprehensive Guide

Navigating the Landscape of Windows 10 Pricing in the Philippines: A Comprehensive Guide

Introduction

With great pleasure, we will explore the intriguing topic related to Navigating the Landscape of Windows 10 Pricing in the Philippines: A Comprehensive Guide. Let’s weave interesting information and offer fresh perspectives to the readers.

Windows 10 Pricing and Availability  Digital Trends

The Philippines, a vibrant digital economy, relies heavily on personal computers and mobile devices. For many, Windows 10 remains the preferred operating system, offering a familiar and robust platform for work, entertainment, and communication. Understanding the pricing landscape of Windows 10 in the Philippines is crucial for individuals and businesses alike. This comprehensive guide aims to provide clarity and insight into the various options available, empowering users to make informed decisions.

Windows 10 Licensing Models: A Primer

Windows 10 is offered through a variety of licensing models, each catering to different needs and budgets. These models are:

  • Windows 10 Home: Designed for individual users and home computers, this edition offers a range of features including basic security, multimedia support, and access to the Microsoft Store.
  • Windows 10 Pro: Tailored for professionals and small businesses, this edition builds upon Home with enhanced security features, remote desktop access, and support for domain joining.
  • Windows 10 Enterprise: Primarily intended for large organizations, this edition offers comprehensive security and management features, including advanced encryption, device management, and long-term support.
  • Windows 10 Education: Specifically designed for educational institutions, this edition provides features similar to Enterprise, with additional tools for classroom management and learning.

Pricing Dynamics in the Philippines: A Breakdown

The price of Windows 10 in the Philippines is influenced by several factors, including:

  • Licensing Model: As mentioned previously, the chosen edition (Home, Pro, Enterprise, or Education) significantly impacts the price.
  • Retail Channels: Prices can vary depending on the retailer, with online marketplaces often offering competitive options.
  • Promotional Offers: Microsoft and authorized retailers frequently run promotions and discounts, potentially lowering the cost of Windows 10 licenses.
  • Bundled Packages: Many retailers offer bundled packages that include Windows 10 alongside other software or hardware components, potentially providing a cost-effective solution.

Navigating the Market: Key Considerations

When purchasing a Windows 10 license in the Philippines, several factors should be considered:

  • Intended Use: The intended use of the computer will determine the most appropriate Windows 10 edition. Home users may find Home sufficient, while businesses or professionals may require Pro or Enterprise.
  • Budget: Set a budget before researching prices, allowing for a focused search and comparison of options.
  • Retailer Reputation: Choose reputable retailers with a track record of reliable service and competitive pricing.
  • Product Authenticity: Ensure the license purchased is genuine and comes with valid activation keys. Beware of counterfeit software.

Exploring Options: Unveiling the Price Spectrum

While specific prices fluctuate, a general overview of the price range for Windows 10 in the Philippines can be provided:

  • Windows 10 Home: Prices typically range from ₱3,000 to ₱5,000, depending on retailer and promotions.
  • Windows 10 Pro: Expect prices to be higher, typically ranging from ₱5,000 to ₱8,000.
  • Windows 10 Enterprise: Prices for this edition are generally higher, often exceeding ₱10,000.
  • Windows 10 Education: Pricing for this edition is usually negotiated directly with Microsoft or authorized resellers.

Beyond the Price Tag: Factors Affecting Value

While price is a key consideration, it is essential to evaluate the overall value proposition of Windows 10. This includes:

  • Performance and Stability: Windows 10 is renowned for its performance and stability, ensuring a smooth and reliable computing experience.
  • Security Features: Windows 10 incorporates robust security measures to protect users from malware, phishing attacks, and other online threats.
  • Software Compatibility: Windows 10 offers wide compatibility with a vast library of software applications, catering to diverse needs.
  • Ecosystem Integration: Windows 10 seamlessly integrates with other Microsoft services and products, such as Office 365, OneDrive, and Xbox Live.

Frequently Asked Questions

Q: Can I upgrade from a previous version of Windows to Windows 10 for free?

A: While a free upgrade path was offered in the past, this is no longer available. New licenses need to be purchased for Windows 10.

Q: How can I ensure I am purchasing a legitimate Windows 10 license?

A: Purchase from reputable retailers, verify the license key’s authenticity, and avoid suspiciously low prices.

Q: What are the differences between Windows 10 Home and Pro?

A: Windows 10 Pro offers enhanced security features, remote desktop access, and support for domain joining, making it suitable for businesses and professionals.

Q: Can I use a single Windows 10 license on multiple computers?

A: No, a single Windows 10 license is typically tied to a specific device.

Tips for Optimizing Your Windows 10 Purchase

  • Compare Prices: Research prices from multiple retailers and online marketplaces to find the best deals.
  • Look for Bundles: Consider purchasing Windows 10 as part of a bundled package that includes other software or hardware components.
  • Utilize Promotions: Keep an eye out for promotional offers and discounts from Microsoft and authorized retailers.
  • Check System Requirements: Ensure your computer meets the minimum system requirements for Windows 10 before purchasing.

Conclusion

Understanding the pricing landscape of Windows 10 in the Philippines is essential for making informed decisions. By considering the various licensing models, retail channels, and factors influencing value, users can choose the most appropriate option for their needs and budget. Windows 10, with its robust features and extensive ecosystem, continues to be a popular choice for individuals and businesses alike in the Philippines.

Windows 10 Pricing and Availability  Digital Trends PPT - Navigating the Windows 10 Experience: A Comprehensive Guide to Licenses and Upgr Navigating the OS Landscape: A Practical Approach to Transitioning from Windows 10
Navigating the Windows 10 Upgrade: A Comprehensive Guide - Fashion Magazine Microsoft Windows 10 Review, Features, Availability, System Requirement, Price Details iGyaan - Microsoft Reveals the Much-Anticipated Windows 10 Pricing
PPT - Navigating the Windows 10 Experience: A Comprehensive Guide to Licenses and Upgr Windows 10 Pricing Announced - IGN News - YouTube

Closure

Thus, we hope this article has provided valuable insights into Navigating the Landscape of Windows 10 Pricing in the Philippines: A Comprehensive Guide. We hope you find this article informative and beneficial. See you in our next article!

Unlocking The Power Of Proximity: A Deep Dive Into Near Field Communication Technology

Unlocking the Power of Proximity: A Deep Dive into Near Field Communication Technology

Introduction

With great pleasure, we will explore the intriguing topic related to Unlocking the Power of Proximity: A Deep Dive into Near Field Communication Technology. Let’s weave interesting information and offer fresh perspectives to the readers.

Unlocking the Power of Proximity: A Deep Dive into Near Field Communication Technology

Near Field Communication

Near field communication (NFC) has quietly revolutionized the way we interact with the world around us. This wireless technology, operating at extremely short distances, allows devices to communicate seamlessly, transforming everyday interactions into effortless transactions, data exchanges, and even secure authentication.

Understanding the Basics of NFC

NFC is a subset of radio frequency identification (RFID) technology, operating on the principle of electromagnetic induction. Unlike other wireless technologies that rely on radio waves to transmit data over longer distances, NFC operates in the near field, typically within a range of a few centimeters. This proximity-based communication ensures a secure and efficient transfer of information.

How NFC Works:

  1. Electromagnetic Induction: NFC devices, equipped with antennas, generate electromagnetic fields. When two NFC-enabled devices come within close proximity, their electromagnetic fields interact.
  2. Data Transfer: This interaction enables the transfer of data between devices. The data exchange can be either passive, where one device acts as a reader and the other as a tag, or active, where both devices participate in the communication process.
  3. Secure Communication: NFC leverages encryption protocols to ensure secure data transmission. This feature makes NFC ideal for applications requiring secure authentication, such as mobile payments and access control systems.

The Evolution of NFC Technology:

NFC’s journey began in the early 2000s, gaining momentum with the introduction of smartphones and contactless payment systems. The technology has since evolved significantly, with advancements in speed, range, and security.

Key Features of NFC:

  • Short-Range Communication: NFC operates within a very limited range, typically a few centimeters, ensuring secure communication and minimizing interference.
  • Low Power Consumption: NFC devices consume minimal power, making them suitable for battery-powered devices.
  • Fast Data Transfer: NFC allows for rapid data exchange, making it ideal for applications requiring quick transactions.
  • Secure Communication: NFC utilizes encryption protocols to protect data during transmission, making it secure for sensitive information.

Real-World Applications of NFC:

NFC has permeated various aspects of our lives, revolutionizing how we interact with technology and our surroundings. Here are some prominent applications:

1. Mobile Payments: NFC is the backbone of contactless payments, allowing users to make purchases using their smartphones or other NFC-enabled devices. This technology has transformed the retail landscape, providing a convenient and secure alternative to traditional payment methods.

2. Access Control: NFC is widely used for access control systems, enabling users to unlock doors, gates, and other secured areas using their NFC-enabled devices. This technology enhances security by providing a convenient and reliable authentication method.

3. Data Transfer: NFC facilitates the swift transfer of data between devices, including files, contacts, and other information. This feature simplifies the sharing process, eliminating the need for physical cables or complicated Bluetooth pairing procedures.

4. Transportation Ticketing: NFC is increasingly employed in public transportation systems for contactless ticketing. Passengers can simply tap their NFC-enabled devices to access public transport services, eliminating the need for physical tickets and streamlining the travel experience.

5. Healthcare: NFC finds applications in healthcare, enabling secure identification of patients, tracking medical records, and facilitating communication between medical devices. This technology enhances patient safety and improves the efficiency of healthcare operations.

6. Smart Home Integration: NFC enables seamless communication between smart home devices, allowing users to control appliances, lighting, and other home automation systems using their NFC-enabled devices. This technology provides a convenient and intuitive way to manage a smart home environment.

7. Marketing and Advertising: NFC offers innovative possibilities for marketing and advertising. Businesses can integrate NFC tags into their products or marketing materials, allowing customers to access product information, promotional offers, and interactive experiences using their NFC-enabled devices.

8. Security and Authentication: NFC plays a crucial role in secure authentication and access control. Its short-range communication and encryption capabilities make it ideal for verifying identities, granting access to secure areas, and preventing unauthorized access to sensitive information.

9. Industrial Applications: NFC finds applications in various industrial settings, including asset tracking, inventory management, and process automation. This technology enables efficient data collection, real-time monitoring, and improved operational efficiency.

10. Gaming and Entertainment: NFC is being integrated into gaming consoles and other entertainment devices, enabling players to interact with games and content in innovative ways. This technology opens up new possibilities for immersive and interactive gaming experiences.

Benefits of NFC Technology:

  • Convenience: NFC simplifies everyday interactions, eliminating the need for physical keys, cards, or cables.
  • Security: NFC leverages encryption protocols to ensure secure data transmission, protecting sensitive information from unauthorized access.
  • Efficiency: NFC enables fast and efficient data exchange, streamlining transactions and processes.
  • Versatility: NFC finds applications in various industries and sectors, offering a wide range of possibilities.
  • Cost-Effectiveness: NFC technology is relatively inexpensive, making it accessible for various applications.

Challenges and Considerations:

Despite its numerous benefits, NFC faces some challenges and considerations:

  • Limited Range: NFC’s short-range communication can be a limitation in certain scenarios where longer distances are required.
  • Interoperability: Ensuring interoperability between different NFC devices and platforms can be challenging.
  • Security Concerns: While NFC offers robust security features, potential vulnerabilities remain, requiring ongoing security measures.
  • User Adoption: Widespread user adoption is crucial for the success of NFC applications, requiring education and awareness campaigns.

FAQs about NFC:

Q: Is NFC the same as Bluetooth?

A: No, NFC and Bluetooth are distinct technologies. While both facilitate wireless communication, NFC operates at much shorter distances and relies on electromagnetic induction, while Bluetooth uses radio waves for longer-range communication.

Q: Is NFC secure?

A: Yes, NFC utilizes encryption protocols to ensure secure data transmission. However, it’s crucial to use reputable NFC-enabled devices and applications to minimize security risks.

Q: What are some common NFC-enabled devices?

A: Smartphones, tablets, smartwatches, payment cards, access cards, and some smart home devices are commonly equipped with NFC capabilities.

Q: How can I enable NFC on my device?

A: Enabling NFC on your device typically involves navigating to the settings menu and activating the NFC function. The specific steps may vary depending on your device and operating system.

Q: What are some tips for using NFC safely?

A:

  • Be cautious of public NFC readers: Avoid using your NFC-enabled device near public NFC readers unless you’re sure of their legitimacy.
  • Keep your device secure: Use strong passwords and enable security features on your device to protect your data.
  • Update your device software: Regular software updates often include security patches that enhance the protection of your device.

Conclusion:

NFC technology has become an integral part of our digital world, facilitating seamless communication and simplifying our everyday interactions. Its short-range communication, low power consumption, and robust security features make it ideal for a wide range of applications, from mobile payments and access control to smart home integration and industrial automation. As NFC technology continues to evolve, we can expect even more innovative and transformative applications in the future, shaping the way we interact with technology and our surroundings.

Near Field Communication (NFC) What is NFC? - GeeksforGeeks Near Field Communication NFC, NFC Technology Explained
Near Field Communication (NFC) Technology: UPSC Current Affairs What Is Near Field Communication Applications - CXJRFIDFactory near field communication
The Beginner’s Guide to NFCs (Near Field Communication) Uses of Near Field Communication (NFC) technology, enabling contactless  Download Scientific

Closure

Thus, we hope this article has provided valuable insights into Unlocking the Power of Proximity: A Deep Dive into Near Field Communication Technology. We thank you for taking the time to read this article. See you in our next article!

Navigating The QEMU Guest Agent For Windows 11: A Comprehensive Guide

Navigating the QEMU Guest Agent for Windows 11: A Comprehensive Guide

Introduction

In this auspicious occasion, we are delighted to delve into the intriguing topic related to Navigating the QEMU Guest Agent for Windows 11: A Comprehensive Guide. Let’s weave interesting information and offer fresh perspectives to the readers.

Qemu Windows 11

The QEMU Guest Agent, a vital component for seamless virtual machine management, plays a crucial role in enhancing the functionality and user experience within QEMU-based Windows 11 virtual environments. This guide aims to provide a comprehensive understanding of the QEMU Guest Agent, its significance, and the steps involved in its successful implementation.

Understanding the QEMU Guest Agent

The QEMU Guest Agent is a software program installed within a guest operating system (OS) running in a virtual machine environment powered by QEMU. Its primary purpose is to establish a communication bridge between the virtual machine and the host system, facilitating a wide range of functionalities that enhance management and interaction.

Key Functions of the QEMU Guest Agent

The QEMU Guest Agent performs a multitude of tasks, contributing significantly to the overall efficiency and user experience within a virtualized environment. These functions include:

  • Guest Operating System Management: The Guest Agent provides access to vital guest OS information, enabling tasks like retrieving the guest’s hostname, uptime, and other system details.
  • Virtual Machine Control: The Guest Agent empowers users to control the virtual machine from the host system. This includes functionalities like powering the virtual machine on or off, resetting it, and even sending signals to the guest OS.
  • File Transfer: The Guest Agent facilitates seamless data transfer between the host and the guest environment. This allows users to transfer files, install software, and manage the virtual machine’s contents with ease.
  • Network Management: The Guest Agent enables network configuration adjustments within the guest OS. This includes tasks like setting up network interfaces, configuring IP addresses, and managing network connectivity.
  • Guest System Monitoring: The Guest Agent provides real-time monitoring capabilities, allowing users to track resource usage, system performance, and other critical metrics within the guest environment.

The Importance of the QEMU Guest Agent

The QEMU Guest Agent is not merely a supplementary component; it is an essential tool for enhancing the overall virtual machine experience. Its presence unlocks a plethora of benefits, streamlining management, boosting performance, and simplifying interactions with the virtual environment.

Benefits of Using the QEMU Guest Agent:

  • Simplified Management: The Guest Agent streamlines virtual machine administration by providing a centralized interface for managing guest OS settings, controlling the virtual machine, and transferring files.
  • Enhanced Performance: The Guest Agent optimizes performance by enabling efficient communication between the host and guest, minimizing latency and maximizing resource utilization.
  • Increased Functionality: The Guest Agent unlocks a wide range of functionalities, including guest OS monitoring, network management, and advanced control options, enriching the virtual environment’s capabilities.
  • Improved User Experience: The Guest Agent simplifies interactions with the virtual machine, making it easier to manage, troubleshoot, and interact with the guest OS.

Downloading and Installing the QEMU Guest Agent for Windows 11

The process of obtaining and installing the QEMU Guest Agent for Windows 11 is straightforward and can be accomplished through the following steps:

  1. Identify the Appropriate Version: Ensure compatibility by downloading the QEMU Guest Agent version specifically designed for Windows 11. The QEMU project website or official repositories are reliable sources for obtaining the correct package.
  2. Download the Guest Agent Package: Download the QEMU Guest Agent package to your host system. This package typically comes in the form of an executable file (.exe).
  3. Transfer the Package to the Guest: Transfer the downloaded Guest Agent package to the Windows 11 virtual machine. This can be achieved using various methods, such as shared folders, network drives, or USB drives.
  4. Install the Guest Agent: Run the downloaded Guest Agent executable file within the Windows 11 virtual machine. Follow the on-screen instructions to complete the installation process.
  5. Configure the Guest Agent: After successful installation, configure the Guest Agent settings as required. This may involve specifying communication protocols, setting up authentication mechanisms, and configuring other relevant parameters.

Troubleshooting Common QEMU Guest Agent Issues

While the QEMU Guest Agent installation process is generally straightforward, users may encounter occasional issues. These issues can often be resolved by following these troubleshooting steps:

  • Verify Compatibility: Ensure that the downloaded Guest Agent version is compatible with the QEMU version and the Windows 11 operating system installed in the virtual machine.
  • Check Installation Permissions: Confirm that the user account running the Guest Agent installation has sufficient permissions to modify system files and folders.
  • Examine Network Configuration: Verify that the virtual machine’s network settings are properly configured and that the host and guest systems can communicate with each other.
  • Review Guest Agent Logs: Check the Guest Agent logs for error messages or other indications of problems. These logs can provide valuable insights into the root cause of the issue.
  • Consult QEMU Documentation: Refer to the QEMU documentation for detailed information on troubleshooting common Guest Agent issues and potential solutions.

FAQs Regarding the QEMU Guest Agent for Windows 11

Q: Is the QEMU Guest Agent compatible with all QEMU versions?

A: While the QEMU Guest Agent is generally compatible with most QEMU versions, it’s crucial to ensure compatibility by checking the documentation or release notes for the specific QEMU version and the Guest Agent package.

Q: Can I use the Guest Agent with other virtual machine platforms besides QEMU?

A: The QEMU Guest Agent is designed specifically for QEMU virtual machines. Other virtualization platforms may have their own guest agent solutions.

Q: Does the Guest Agent require any specific software dependencies?

A: The QEMU Guest Agent typically requires basic system utilities and libraries common to Windows 11. However, specific dependencies may vary based on the Guest Agent version and QEMU configuration.

Q: How do I configure the Guest Agent to communicate with the host system?

A: The Guest Agent configuration process typically involves specifying the communication protocol (e.g., TCP/IP, UDP), setting up authentication mechanisms (e.g., password-based, key-based), and defining other relevant parameters. Refer to the QEMU documentation for detailed configuration instructions.

Q: Can I use the Guest Agent to access the guest OS from a remote location?

A: While the Guest Agent provides remote access capabilities, it’s essential to configure appropriate security measures to protect the guest environment from unauthorized access. This may involve using secure communication protocols, implementing strong authentication mechanisms, and limiting access to authorized users.

Tips for Effectively Using the QEMU Guest Agent

  • Regularly Update the Guest Agent: Keep the Guest Agent software up to date to benefit from bug fixes, performance enhancements, and new features.
  • Configure Security Measures: Implement appropriate security measures to protect the Guest Agent and the guest environment from unauthorized access.
  • Monitor Guest Agent Logs: Regularly review the Guest Agent logs for any errors, warnings, or other indications of issues.
  • Utilize Guest Agent Features: Explore the full range of Guest Agent functionalities to enhance virtual machine management, performance, and user experience.
  • Consult QEMU Documentation: Refer to the QEMU documentation for comprehensive information on Guest Agent usage, configuration, and troubleshooting.

Conclusion

The QEMU Guest Agent is an indispensable tool for managing and interacting with Windows 11 virtual machines within the QEMU environment. By establishing a communication bridge between the host and guest, the Guest Agent unlocks a wide range of functionalities, enhancing performance, streamlining management, and simplifying interactions with the virtualized environment. By understanding the Guest Agent’s capabilities, its installation process, and its potential benefits, users can effectively leverage this powerful tool to optimize their QEMU-based Windows 11 virtual machine experience.

Qemu Windows 11 Chapter 11. Enhancing Virtualization with the QEMU Guest Agent and SPICE Agent  Red Hat Product Qemu-guest-agent - Proxmox VE
Qemu-guest-agent - Proxmox VE How do I enable QEMU guest agent? How do You install QEMU Guest Agent on Linux and Windows
Qemu On Windows Perform Consistent Snapshots with qemu guest agent • Feisky

Closure

Thus, we hope this article has provided valuable insights into Navigating the QEMU Guest Agent for Windows 11: A Comprehensive Guide. We appreciate your attention to our article. See you in our next article!