Archives December 2023

Navigating The Upgrade: A Guide To PC Health Check For Windows 11

Navigating the Upgrade: A Guide to PC Health Check for Windows 11

Introduction

With great pleasure, we will explore the intriguing topic related to Navigating the Upgrade: A Guide to PC Health Check for Windows 11. Let’s weave interesting information and offer fresh perspectives to the readers.

windows-11-system-requirements-checker-tool-pc-health-check โ€“ AZ World News

The release of Windows 11 marked a significant shift in the operating system’s landscape, bringing with it a new design, features, and system requirements. To ensure a smooth transition for users, Microsoft introduced the PC Health Check application, designed to assess a device’s compatibility with the new operating system. This tool plays a crucial role in guiding users toward a successful upgrade, mitigating potential issues, and offering insights into necessary steps for a seamless Windows 11 experience.

Understanding PC Health Check’s Purpose

The primary function of PC Health Check is to evaluate a computer’s hardware and software against the minimum specifications required for Windows 11. This assessment is crucial for several reasons:

  • Ensuring Compatibility: The tool identifies whether a device meets the necessary hardware criteria, such as processor, memory, storage, and graphics capabilities.
  • Identifying Potential Issues: It highlights potential compatibility conflicts with existing drivers, firmware, or software that might hinder a smooth upgrade process.
  • Providing Clear Guidance: The application delivers a straightforward assessment, indicating whether a device is compatible or not, along with specific reasons for incompatibility.

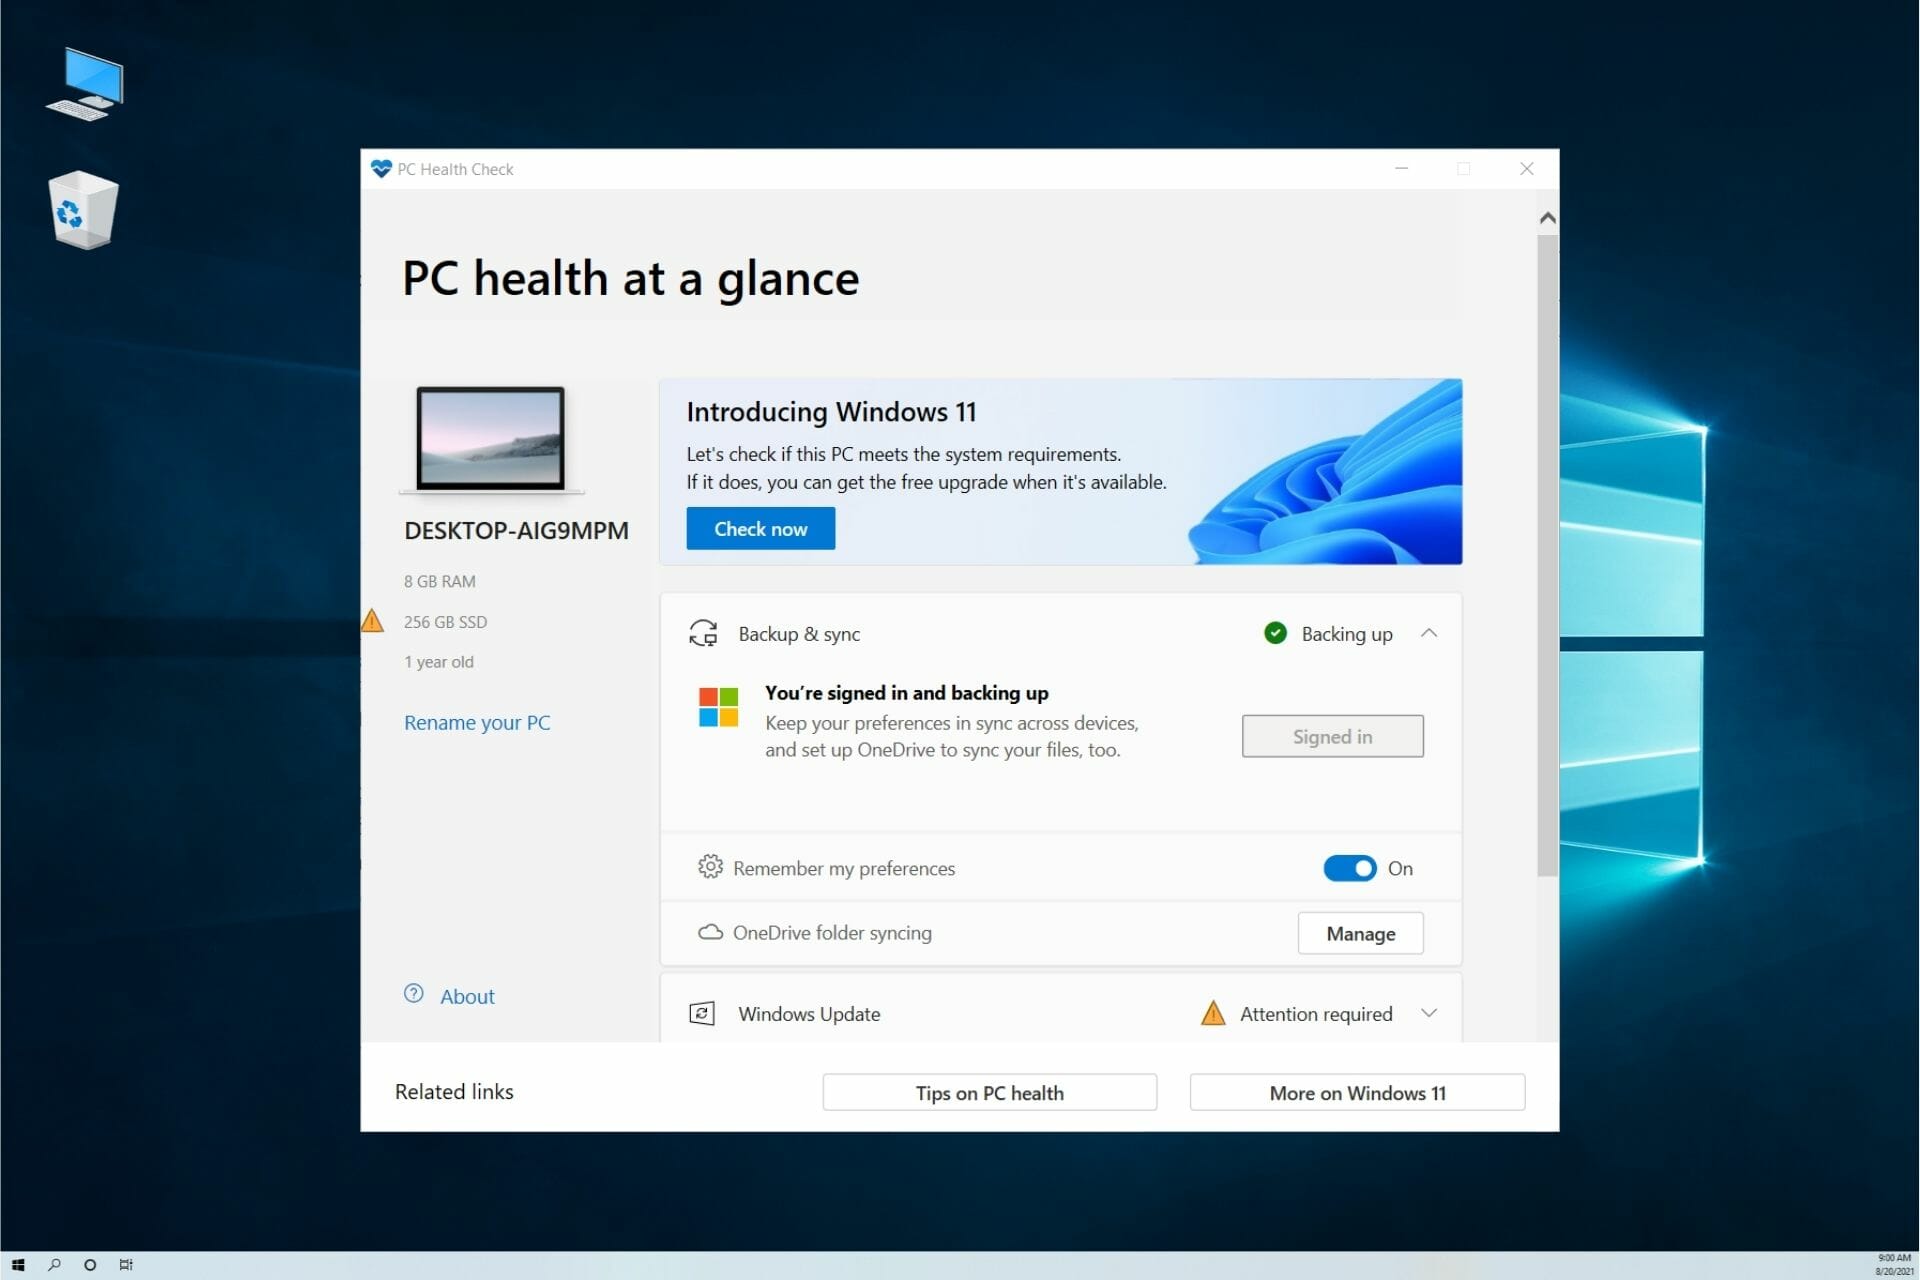
Key Features of PC Health Check

The PC Health Check application offers a user-friendly interface and a concise assessment process. Its primary features include:

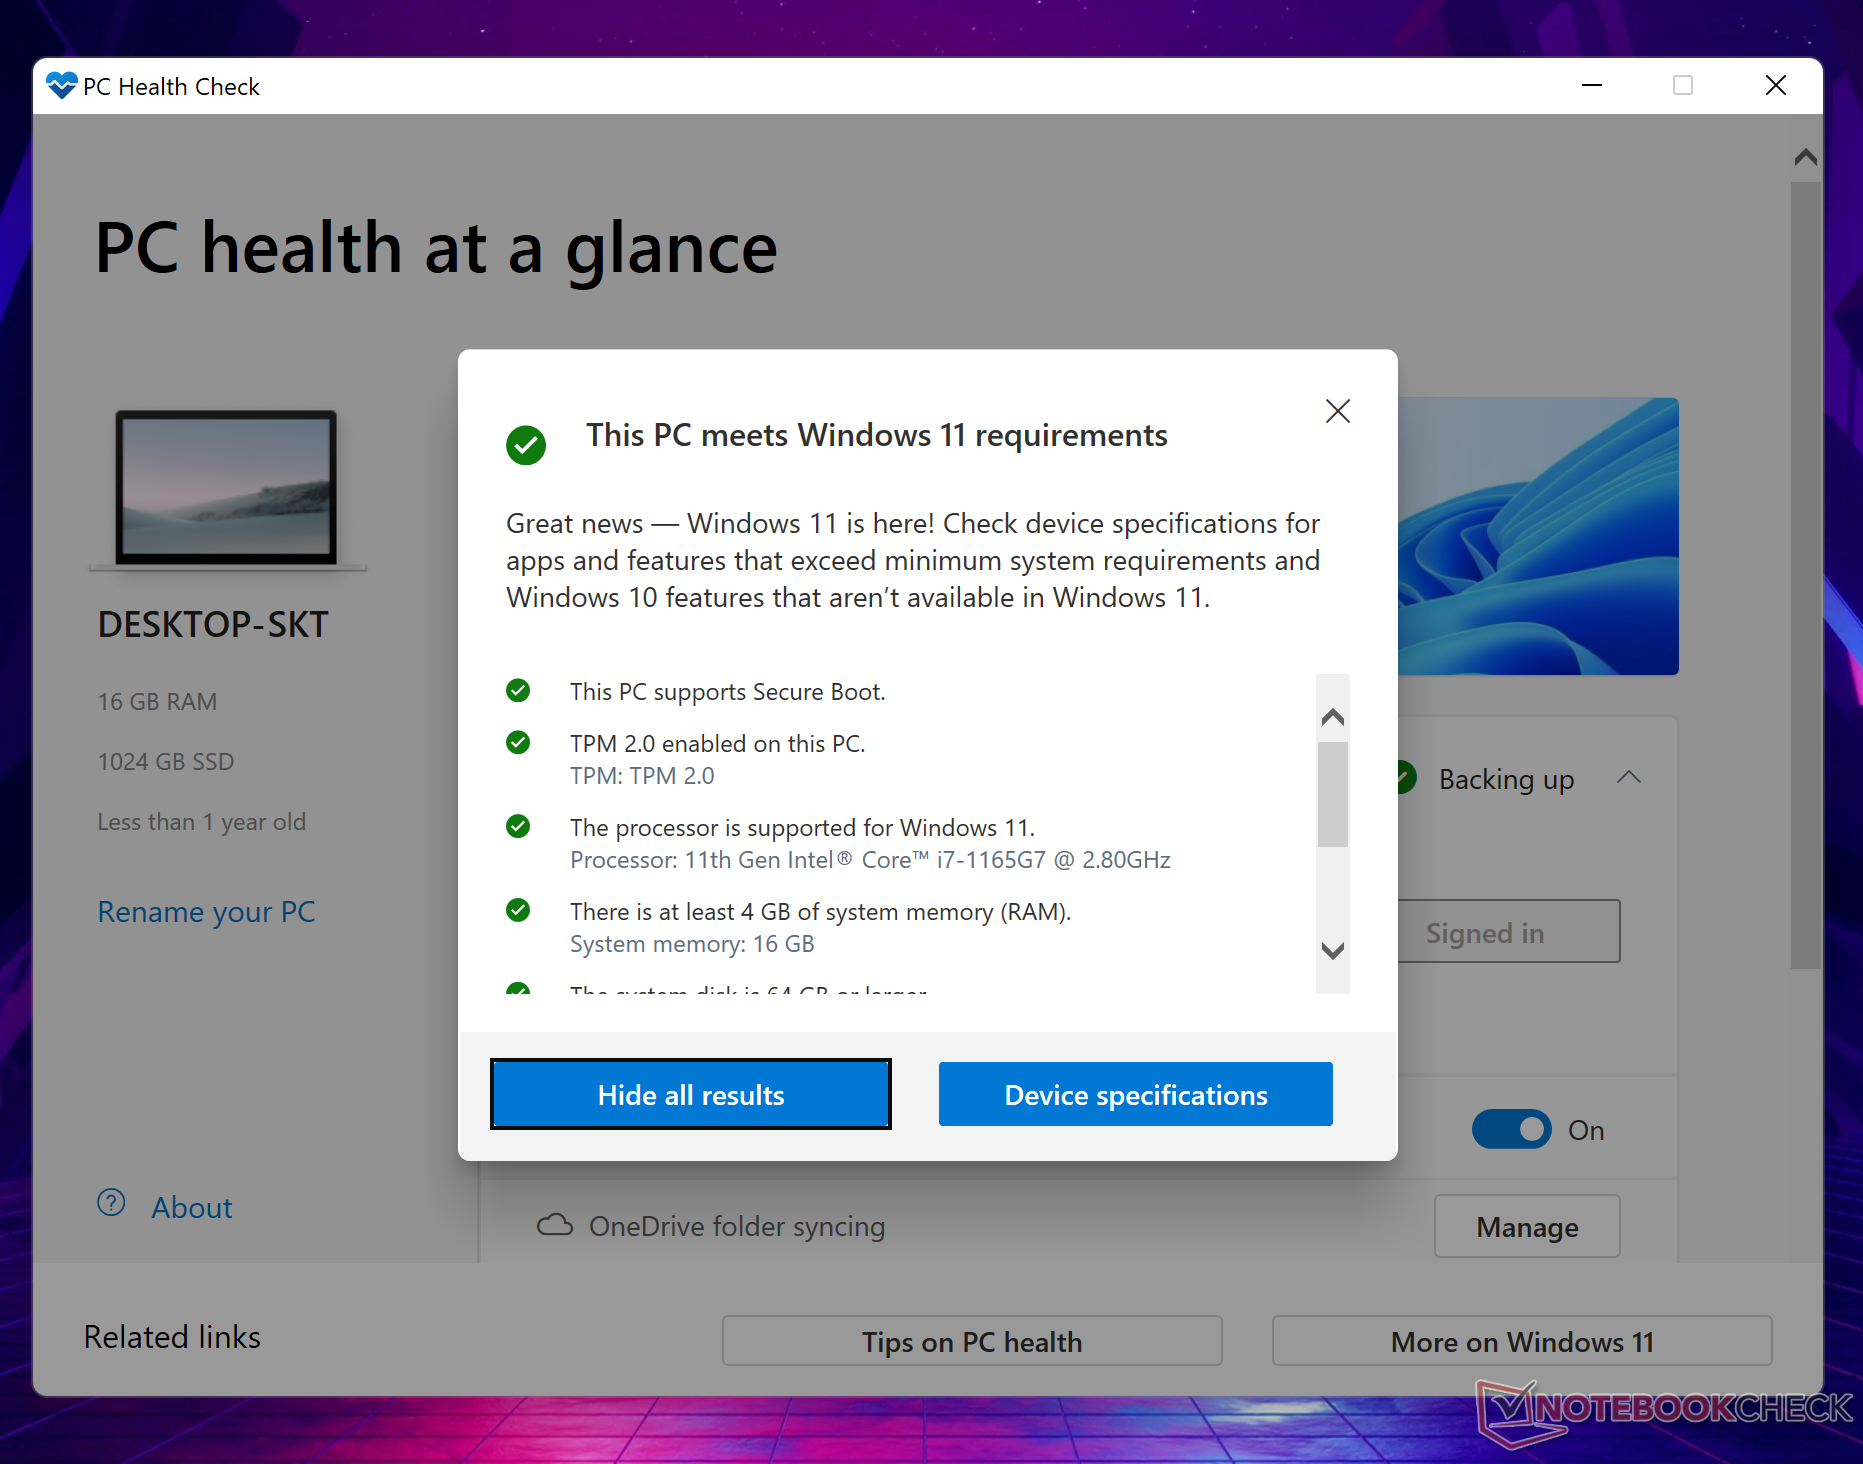
  • System Requirements Check: The application examines the device’s hardware configuration against the minimum system requirements for Windows 11.
  • Compatibility Check: It assesses potential compatibility issues with existing drivers, firmware, and software, alerting users to potential upgrade hurdles.
  • Detailed Report: The application provides a comprehensive report outlining the results of the assessment, including specific reasons for incompatibility.
  • Upgrade Path Recommendations: For compatible devices, the tool suggests the best course of action for upgrading to Windows 11, including recommended steps for preparation.

Benefits of Using PC Health Check

Utilizing the PC Health Check tool offers several benefits for users considering an upgrade to Windows 11:

  • Informed Decision Making: The tool provides users with the necessary information to make an informed decision about upgrading their device.
  • Minimizing Upgrade Issues: By identifying potential compatibility issues beforehand, the tool helps prevent frustrating problems during the upgrade process.
  • Streamlined Upgrade Experience: For compatible devices, the tool guides users through the upgrade process, ensuring a smoother transition.
  • Avoiding Compatibility Headaches: The application helps users avoid investing in an upgrade that might be incompatible with their existing hardware or software.

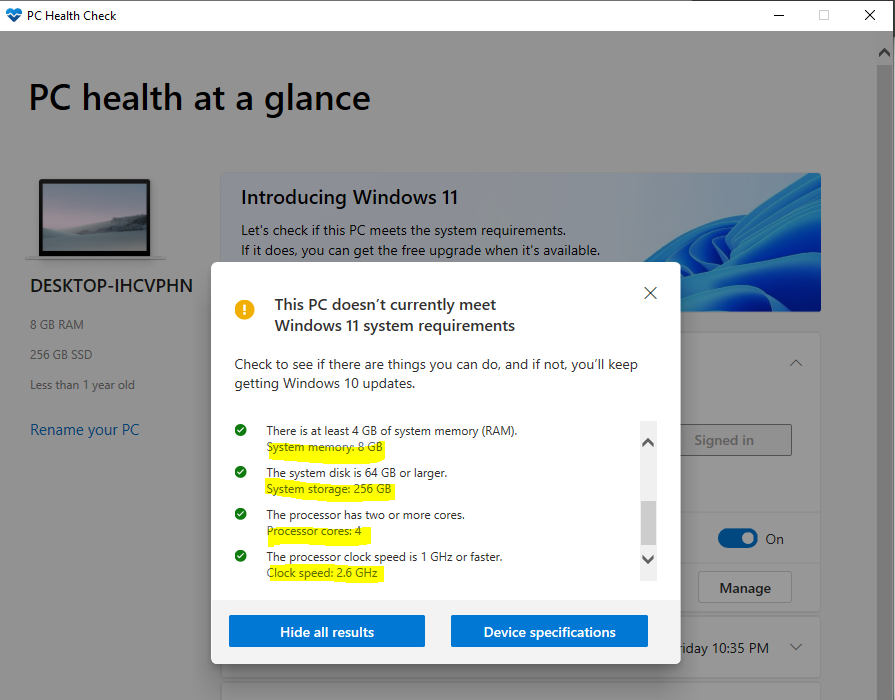
Understanding the PC Health Check Report

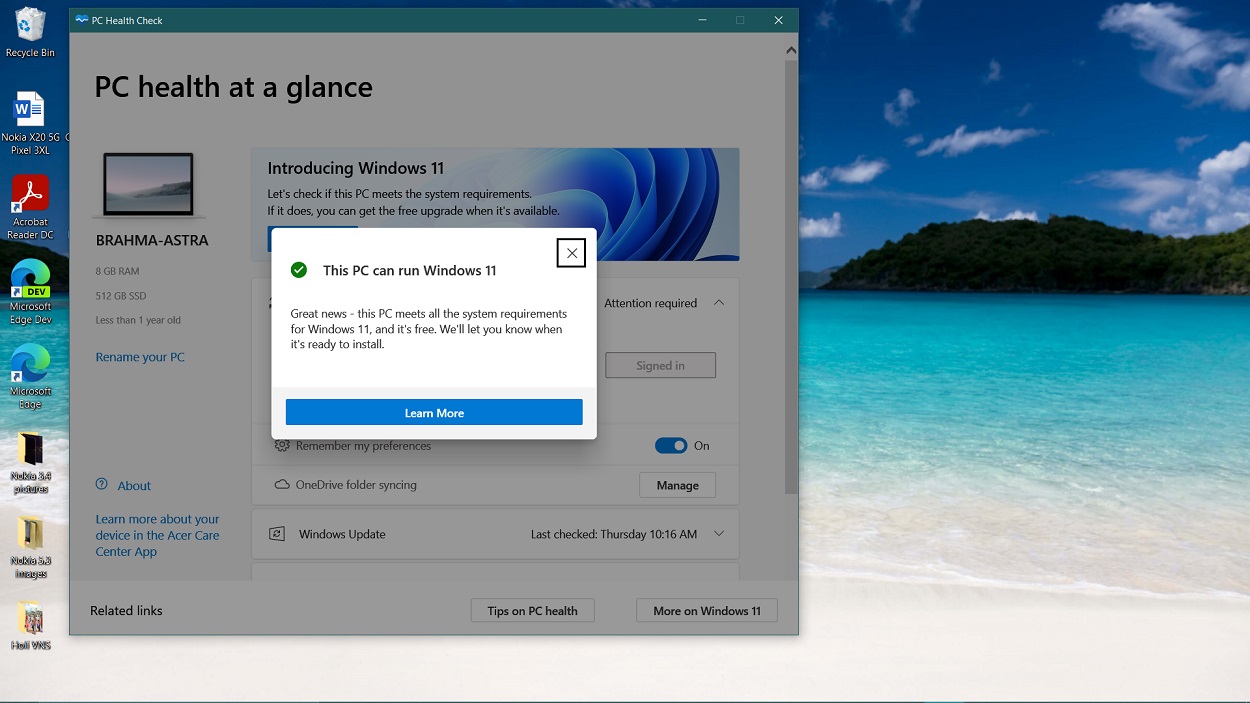
The PC Health Check application generates a report summarizing the assessment results. Here’s a breakdown of the key elements of the report:

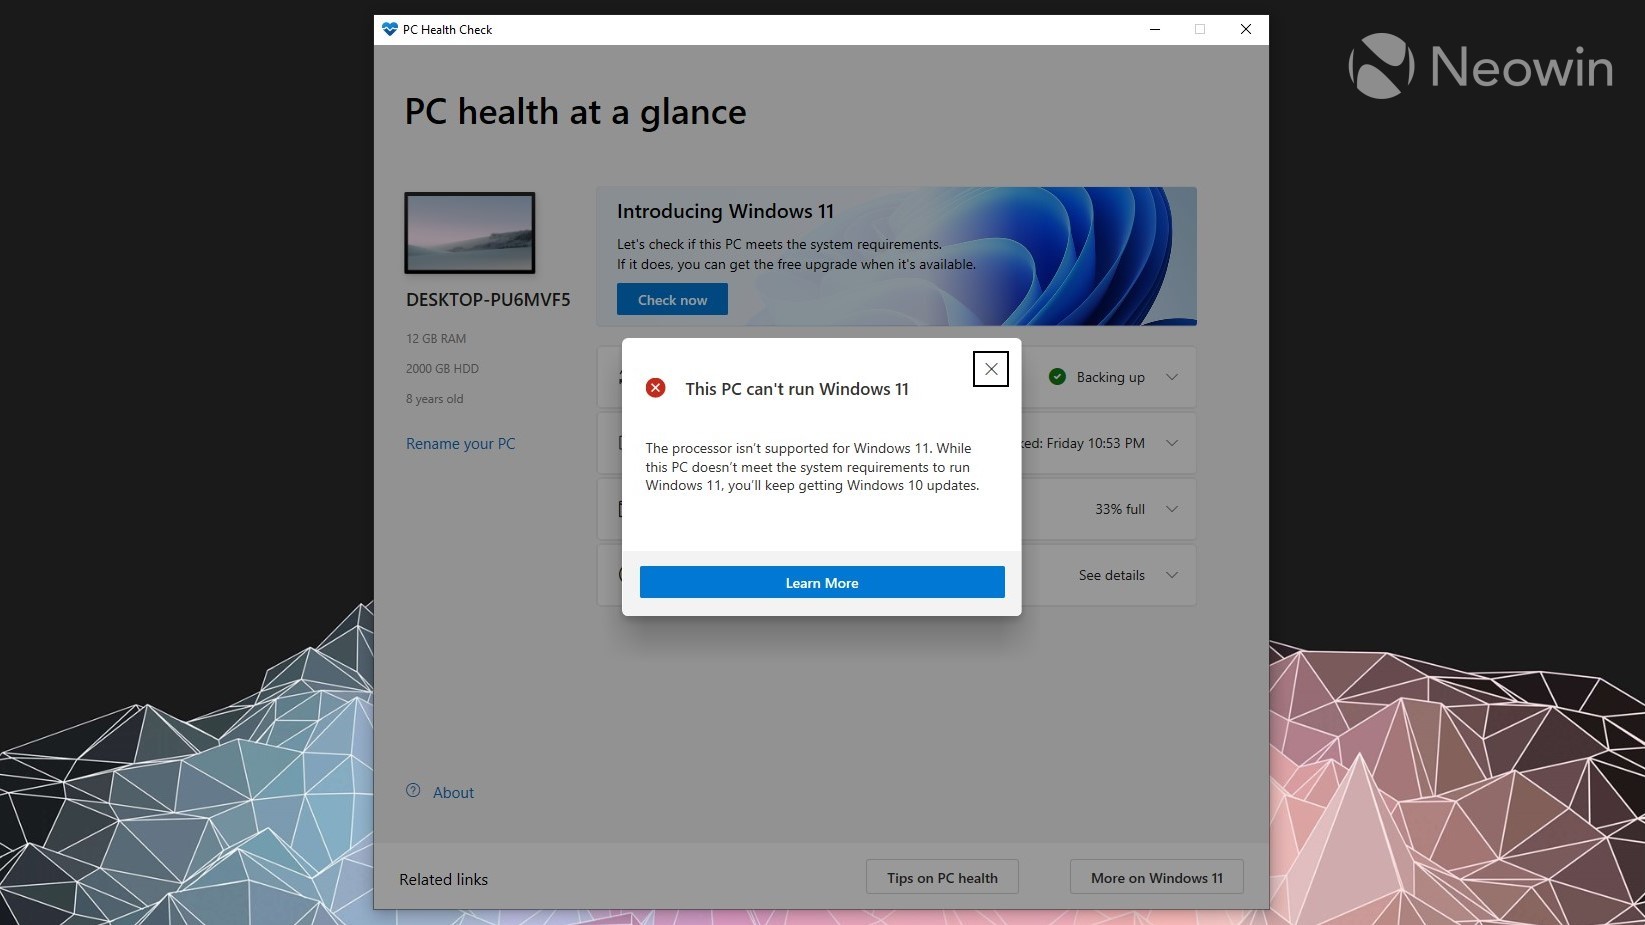
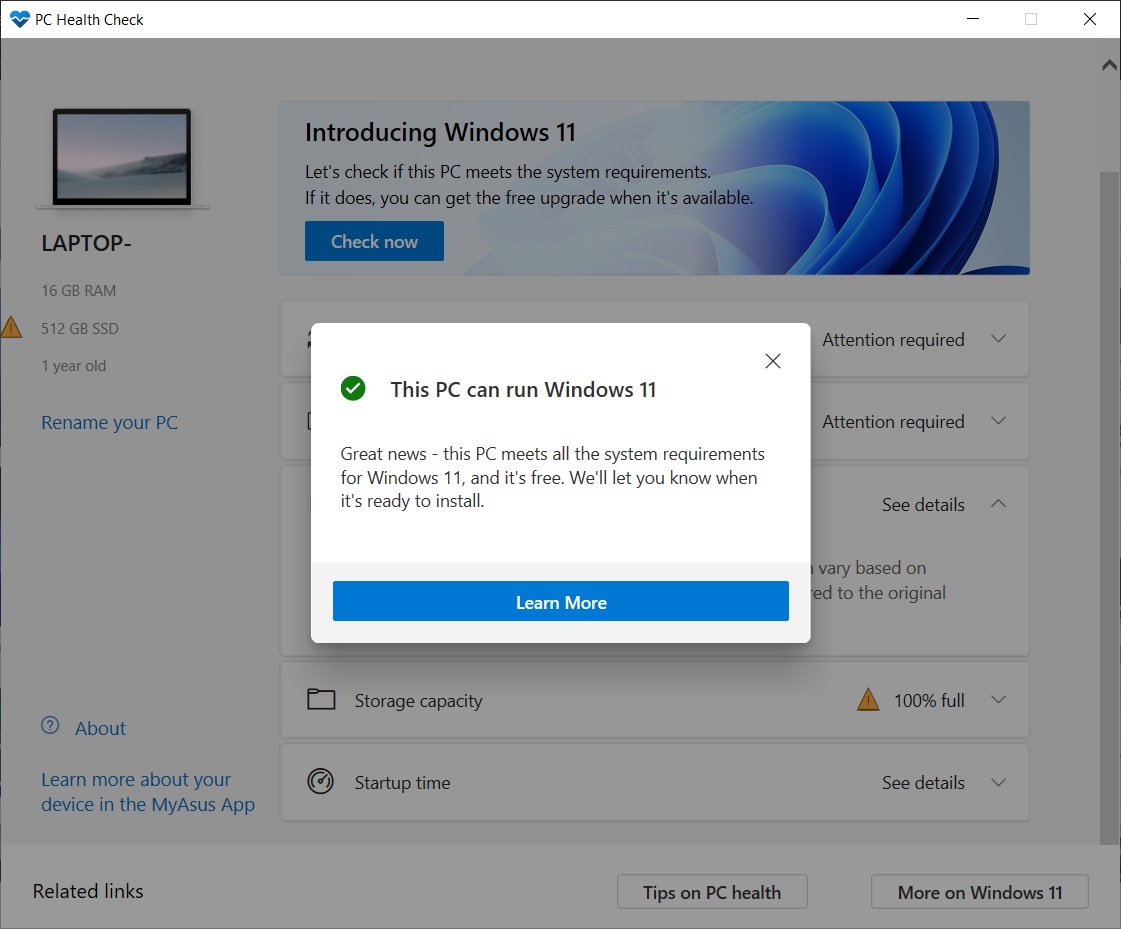
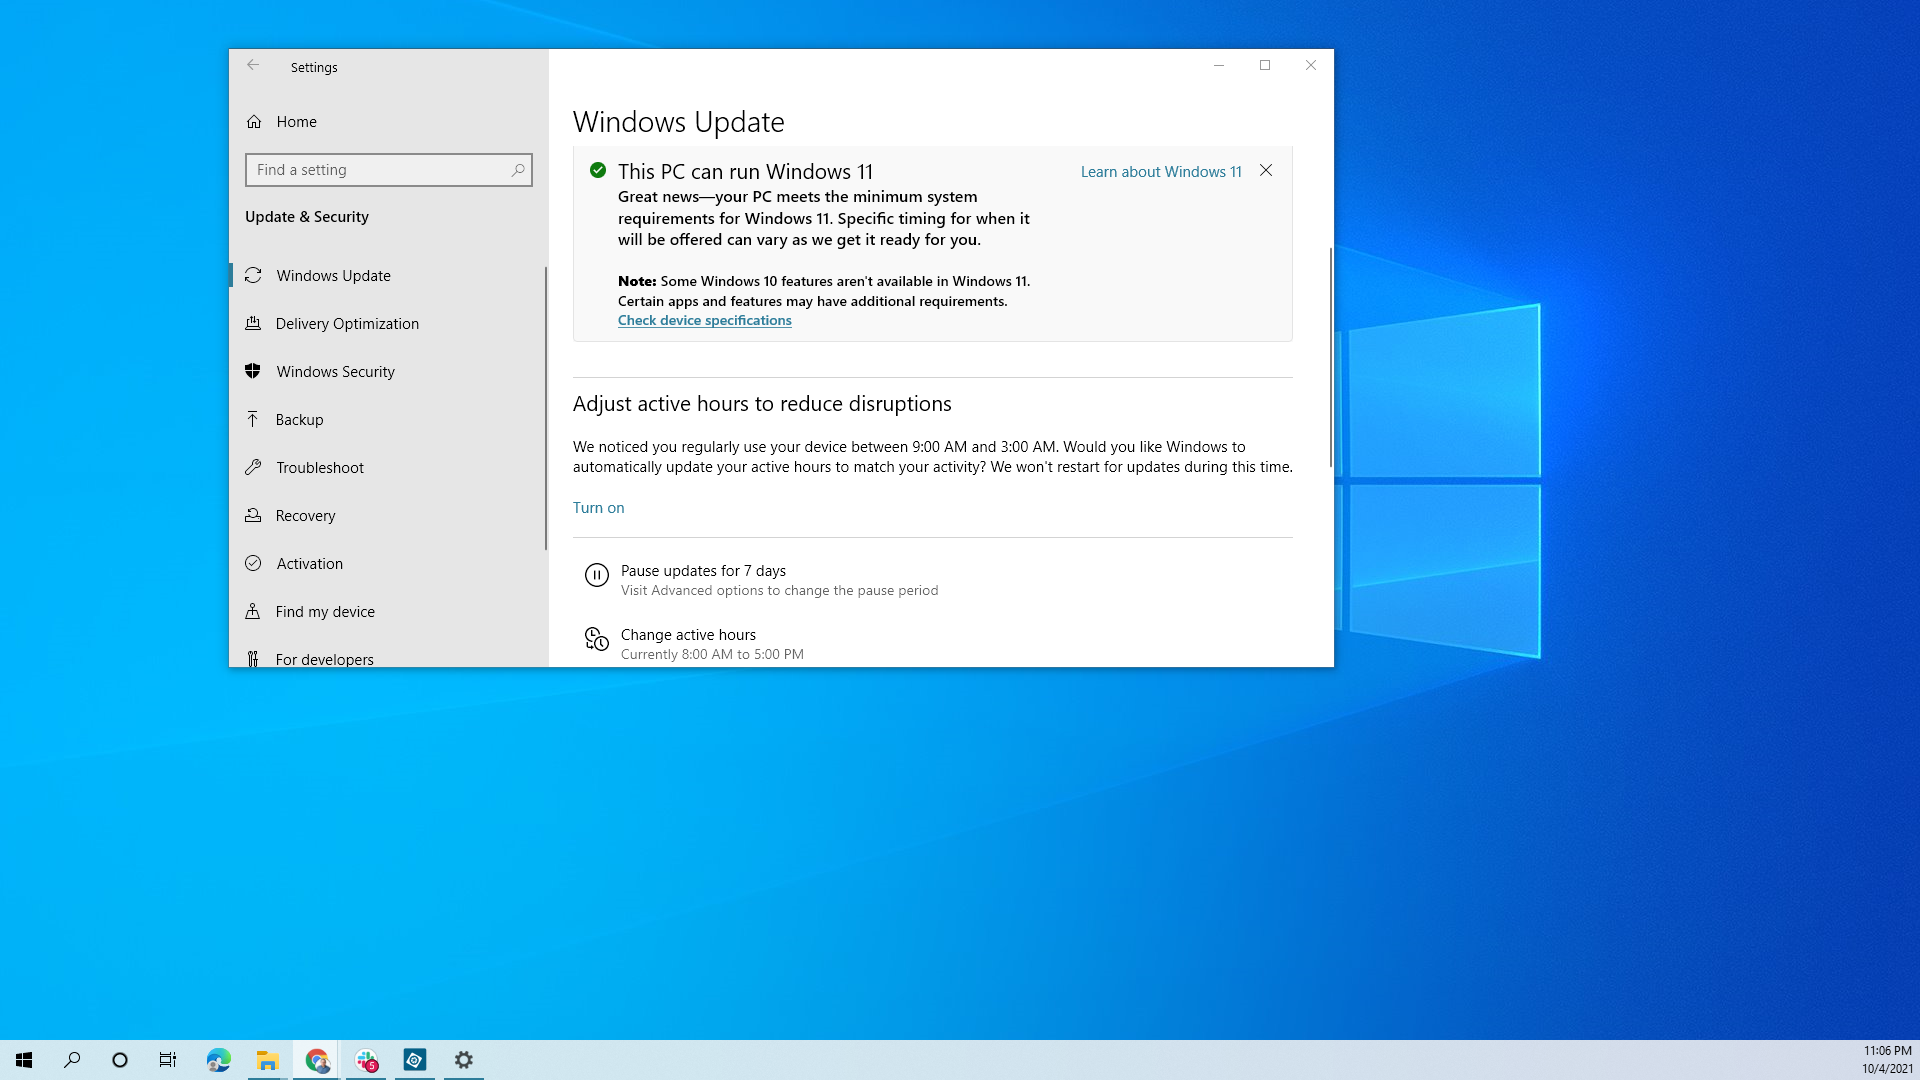
  • Compatibility Status: The report clearly states whether the device is compatible with Windows 11 or not.
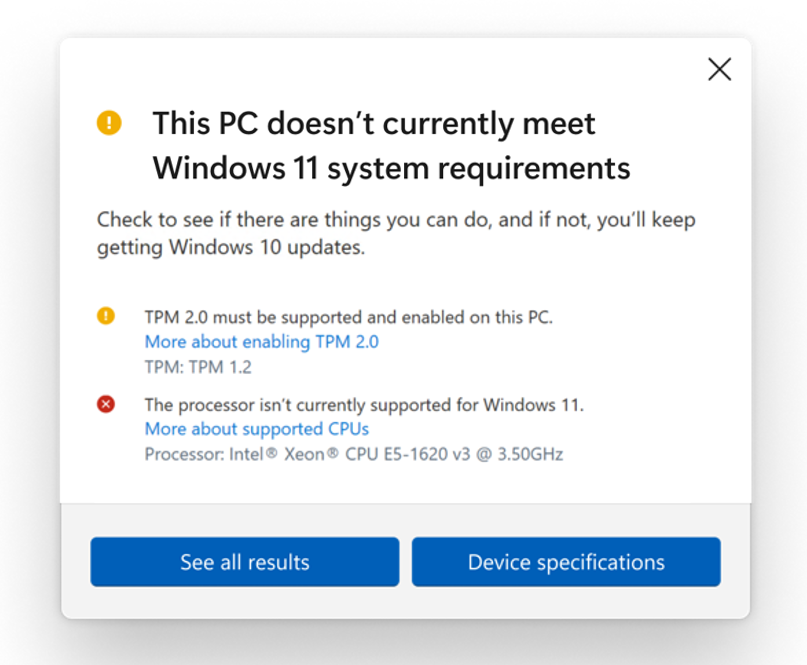
  • Reason for Incompatibility: If the device is deemed incompatible, the report provides specific reasons, such as insufficient hardware specifications or unsupported components.
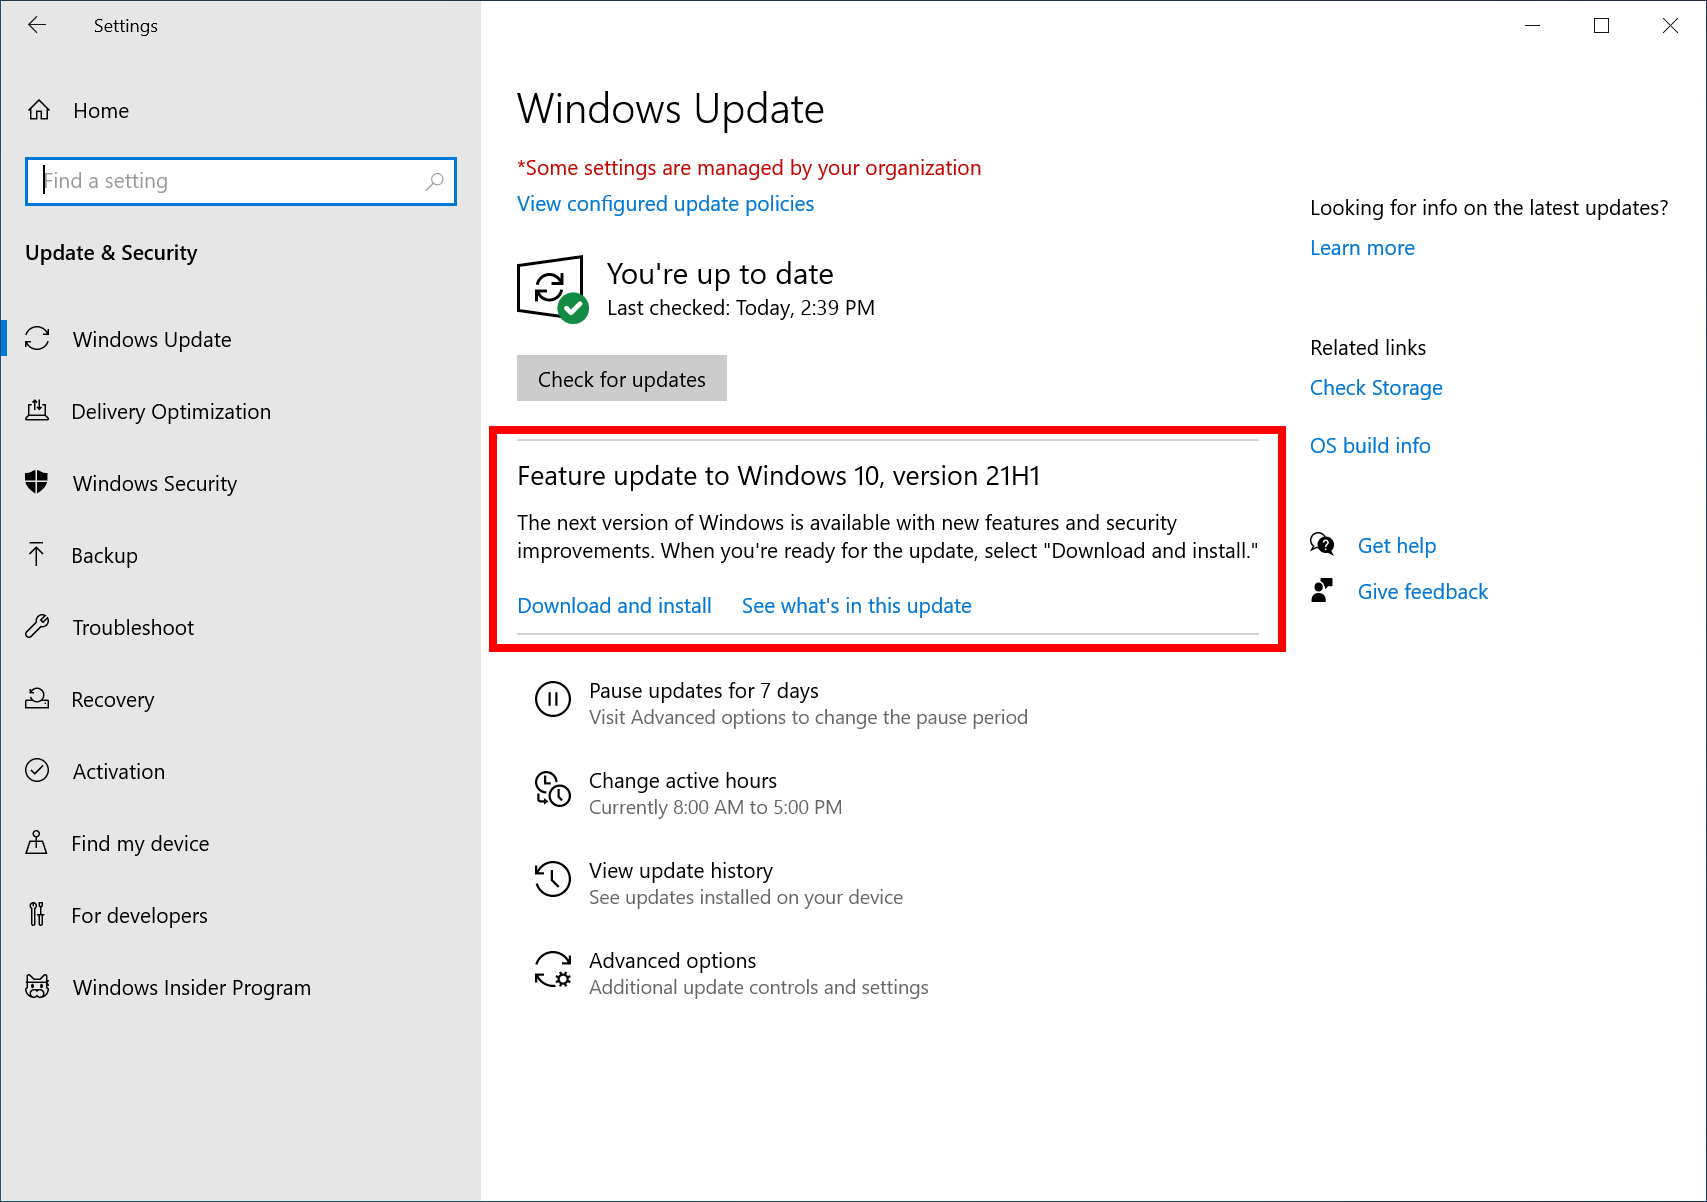
  • Upgrade Path Recommendations: For compatible devices, the report suggests the best course of action for upgrading, including recommended steps for preparation.
  • Additional Information: The report may include additional information about the device’s hardware configuration, software version, and other relevant details.

FAQs about PC Health Check

1. Is PC Health Check a Necessary Tool for Upgrading to Windows 11?

PC Health Check is highly recommended for users considering an upgrade to Windows 11. It provides valuable insights into device compatibility, potential issues, and necessary steps for a smooth upgrade process.

2. What Happens if My Device Fails the PC Health Check?

If your device fails the PC Health Check, it means it does not meet the minimum system requirements for Windows 11. You may need to upgrade your hardware or consider staying on your current version of Windows.

3. Can I Still Upgrade to Windows 11 if My Device Fails the PC Health Check?

While you might be able to manually install Windows 11 on an incompatible device, it is not recommended. The operating system may not function optimally, and you may encounter compatibility issues or performance problems.

4. How Do I Run PC Health Check?

The PC Health Check application can be downloaded from the Microsoft website. Once downloaded, simply run the application and follow the on-screen instructions.

5. Does PC Health Check Affect My Existing Data?

PC Health Check is a diagnostic tool and does not affect your existing data or settings. It only analyzes your device’s hardware and software to determine compatibility.

6. What if My Device is Compatible But Still Has Issues After Upgrading to Windows 11?

If you encounter issues after upgrading to Windows 11, you can contact Microsoft support for assistance. They can help troubleshoot compatibility issues and provide guidance on potential solutions.

Tips for Using PC Health Check Effectively

  • Run the Application Before Upgrading: Always run PC Health Check before attempting to upgrade to Windows 11 to ensure compatibility.
  • Review the Report Carefully: Thoroughly review the report generated by PC Health Check to understand the assessment results and any necessary steps for a successful upgrade.
  • Address Incompatibility Issues: If your device fails the compatibility check, address the identified issues before attempting to upgrade.
  • Keep Your Device Updated: Ensure your device’s operating system, drivers, and firmware are up-to-date before running PC Health Check.
  • Back Up Your Data: Always back up your data before making significant changes to your system, including upgrading to a new operating system.

Conclusion

The PC Health Check application serves as an invaluable tool for users considering an upgrade to Windows 11. By providing a comprehensive assessment of device compatibility and potential issues, the tool helps users make informed decisions, avoid compatibility headaches, and ensure a smooth upgrade experience. Understanding the purpose, features, and benefits of PC Health Check empowers users to navigate the upgrade process confidently and efficiently.

Windows 11 Upgrade Pc Health Check 2024 - Win 11 Home Upgrade 2024 Windows 11 Upgrade Pc Health Check - Get Latest Windows 11 Update Windows 11 Upgrade Pc Health Check - Get Latest Windows 11 Update
How to Run the PC Health Check App for Microsoft Windows 11 Upgrades  Dell US PC Health Check App Windows 11 Upgrade Requirement Updates HTMD Blog Windows 11 pc health check download - raygai
Windows 11 Upgrade Pc Health Check - Get Latest Windows 11 Update Windows 11 Upgrade Health Check 2024 - Win 11 Home Upgrade 2024

Closure

Thus, we hope this article has provided valuable insights into Navigating the Upgrade: A Guide to PC Health Check for Windows 11. We hope you find this article informative and beneficial. See you in our next article!

Maximizing Productivity With Multitasking In Windows 11: A Comprehensive Guide To Utilizing Multiple Windows Simultaneously

Maximizing Productivity with Multitasking in Windows 11: A Comprehensive Guide to Utilizing Multiple Windows Simultaneously

Introduction

In this auspicious occasion, we are delighted to delve into the intriguing topic related to Maximizing Productivity with Multitasking in Windows 11: A Comprehensive Guide to Utilizing Multiple Windows Simultaneously. Let’s weave interesting information and offer fresh perspectives to the readers.

Maximizing Productivity with Multitasking in Windows 11: A Comprehensive Guide to Utilizing Multiple Windows Simultaneously

Guide to Multitask on Windows 11  Multitasking Tools Windows 11 - YouTube

In the contemporary digital landscape, multitasking has become an indispensable skill. The ability to seamlessly juggle multiple applications and tasks simultaneously is crucial for productivity and efficiency. Windows 11, Microsoft’s latest operating system, offers a robust set of features designed to enhance multitasking capabilities, allowing users to effortlessly manage multiple windows side-by-side.

This article delves into the various methods and strategies for effectively utilizing multiple windows simultaneously in Windows 11, exploring the benefits and techniques that empower users to optimize their workflow and maximize productivity.

Understanding the Benefits of Multitasking

The ability to work with multiple windows concurrently offers numerous advantages for users across various domains:

  • Enhanced Efficiency: Multitasking allows users to streamline their workflow by accessing and manipulating different applications simultaneously, reducing the need to constantly switch between programs and minimizing time wasted on context switching.

  • Improved Productivity: By enabling users to work on multiple tasks concurrently, multitasking facilitates faster completion of projects and increased overall output.

  • Seamless Collaboration: The ability to view and manipulate multiple documents or applications side-by-side facilitates collaboration, allowing users to reference and compare information effortlessly.

  • Contextual Awareness: Multitasking allows users to maintain contextual awareness across different tasks, enabling them to seamlessly transition between projects without losing track of their progress.

Methods for Utilizing Multiple Windows in Windows 11

Windows 11 offers a diverse array of tools and techniques for managing multiple windows effectively:

1. Snap Layouts:

Snap Layouts is a powerful feature introduced in Windows 11 that simplifies the process of arranging windows side-by-side. By hovering the mouse over the maximize button of a window, users can access a range of pre-defined layouts, including side-by-side, top-bottom, and quadrants. This feature eliminates the need for manual resizing and positioning, streamlining the process of arranging windows for optimal viewing and interaction.

2. Snap Groups:

Snap Groups builds upon Snap Layouts by allowing users to save and recall specific window arrangements. Once a desired layout has been established using Snap Layouts, users can save it as a Snap Group. Subsequently, simply clicking on the saved Snap Group will instantly restore the previously arranged windows in their designated positions. This feature is particularly useful for repetitive tasks or workflows that involve the same set of applications.

3. Task View:

Task View provides a comprehensive overview of all open windows and applications. By clicking on the Task View button (or using the keyboard shortcut Alt + Tab), users can access a visual representation of their open windows, facilitating easy switching between different applications and tasks. Task View also allows users to create and manage virtual desktops, providing a dedicated workspace for specific projects or activities.

4. Virtual Desktops:

Virtual Desktops are a powerful feature that allows users to create multiple virtual workspaces within Windows 11. Each virtual desktop can be customized with different sets of open windows and applications, providing a dedicated environment for specific projects or tasks. This feature is particularly beneficial for users who manage multiple projects simultaneously or need to separate work and personal activities.

5. Window Management Keyboard Shortcuts:

Windows 11 offers a wide range of keyboard shortcuts specifically designed for managing multiple windows. These shortcuts provide a rapid and efficient means of switching between windows, minimizing, maximizing, and closing applications. Familiarizing oneself with these shortcuts can significantly enhance productivity and streamline workflow.

6. Multiple Monitor Support:

Windows 11 fully supports multiple monitors, allowing users to extend their desktop across multiple screens. This feature offers a vast canvas for multitasking, enabling users to view and manage multiple applications simultaneously across different screens. Users can configure their display settings to optimize the layout and arrangement of windows across multiple monitors, maximizing their workspace and productivity.

Tips for Effective Multitasking

While Windows 11 offers a wealth of tools for managing multiple windows, effective multitasking requires more than just technical proficiency. Here are some tips for maximizing productivity and efficiency when working with multiple windows:

  • Prioritize Tasks: Before embarking on multitasking, prioritize tasks based on urgency and importance. Focus on completing high-priority tasks first, allowing for more efficient allocation of time and resources.

  • Minimize Distractions: Minimize distractions by silencing notifications, closing unnecessary tabs, and creating a dedicated workspace free from interruptions. This allows for focused attention and improved concentration on the tasks at hand.

  • Utilize Time Management Techniques: Employ time management techniques like the Pomodoro method or time-boxing to break down tasks into manageable chunks and allocate specific time slots for each. This promotes focus and prevents burnout.

  • Regular Breaks: Incorporate regular breaks into your workflow to maintain focus and prevent mental fatigue. Short breaks allow for mental rejuvenation and improved productivity upon return.

  • Optimize Window Arrangement: Carefully arrange windows to maximize visibility and ease of access. Group related windows together, leaving ample space for efficient interaction.

  • Utilize Keyboard Shortcuts: Familiarize yourself with keyboard shortcuts for window management, minimizing the need for mouse interaction and streamlining workflow.

Frequently Asked Questions (FAQs)

Q: What is the difference between Snap Layouts and Snap Groups?

A: Snap Layouts allows users to instantly arrange windows into pre-defined layouts, while Snap Groups enables users to save and recall specific window arrangements for later use.

Q: How do I create a virtual desktop?

A: To create a virtual desktop, click on the Task View button (or use the keyboard shortcut Alt + Tab) and then click the "New Desktop" button.

Q: Can I use Snap Layouts with multiple monitors?

A: Yes, Snap Layouts works seamlessly with multiple monitors, allowing users to arrange windows across different screens.

Q: How do I use keyboard shortcuts for window management?

A: Windows 11 offers a wide range of keyboard shortcuts for window management. For example, pressing Win + Left/Right Arrow will move the active window to the left or right monitor, while Win + Up/Down Arrow will maximize or minimize the active window.

Conclusion

Windows 11 empowers users to embrace multitasking with a comprehensive suite of tools and features. By effectively utilizing Snap Layouts, Snap Groups, Task View, Virtual Desktops, and keyboard shortcuts, users can seamlessly manage multiple windows simultaneously, enhancing productivity, streamlining workflow, and maximizing efficiency. Embracing these features and adopting best practices for multitasking can unlock new levels of productivity and elevate users’ digital experience.

Multitasking  How to work with multiple windows in Windows 11? - YouTube How to Use Multi-Windows on Windows 11 How to use Multitasking in Windows 11
How to Multitask in Windows 11 - YouTube How to use Multitasking in Windows 11 How to use Multitasking in Windows 11
Windows 11 Has a Killer Multitasking Feature You Need to Try  Digital Trends Multitasking in Windows 11/10 (Complete Guide)

Closure

Thus, we hope this article has provided valuable insights into Maximizing Productivity with Multitasking in Windows 11: A Comprehensive Guide to Utilizing Multiple Windows Simultaneously. We hope you find this article informative and beneficial. See you in our next article!

Navigating The Modern Landscape: Exploring The New File Explorer In Windows 11

Navigating the Modern Landscape: Exploring the New File Explorer in Windows 11

Introduction

In this auspicious occasion, we are delighted to delve into the intriguing topic related to Navigating the Modern Landscape: Exploring the New File Explorer in Windows 11. Let’s weave interesting information and offer fresh perspectives to the readers.

Windows 11 Modern File Explorer (FILES)  2023 - YouTube

Windows 11’s arrival brought with it a suite of visual and functional enhancements, and among them stands the redesigned File Explorer, a cornerstone of user interaction with the operating system. This revamped tool, while maintaining its familiar foundation, introduces a wave of modernizations that aim to streamline file management, improve navigation, and enhance user experience.

A Refreshed Interface: Embracing Clarity and Efficiency

The first impression of the new File Explorer is one of visual clarity. The interface, while retaining the iconic blue ribbon, adopts a more minimalist approach. The top bar, now free of clutter, features a streamlined layout with essential commands like "New," "Open," and "Save" presented in a clean and concise manner. This uncluttered design promotes intuitive navigation and reduces visual noise, allowing users to focus on their tasks.

Tabbed Browsing: A Familiar Concept, Enhanced Functionality

One of the most significant additions is the implementation of tabbed browsing, a feature borrowed from web browsers. This familiar concept allows users to open multiple file locations within a single File Explorer window, eliminating the need for multiple windows and fostering a more organized workflow. This functionality is particularly beneficial for users who frequently work with multiple folders or projects simultaneously.

Improved Search Functionality: Finding Files Effortlessly

The search function, a crucial element of any file manager, has received a significant overhaul. The new search bar, prominently positioned at the top, employs a more sophisticated algorithm, delivering faster and more accurate results. It seamlessly integrates with Microsoft’s cloud services, allowing users to search through their OneDrive files alongside local storage. This unified search experience eliminates the need to switch between multiple platforms, streamlining the process of finding needed files.

Contextual Ribbon: Tailoring Tools for Specific Tasks

The ribbon, a familiar feature from previous Windows versions, has been redesigned to provide context-specific tools. Instead of displaying all available commands at once, the ribbon adapts its contents based on the selected file or folder, presenting only relevant options. This dynamic approach minimizes clutter and ensures that users have access to the most appropriate tools for the task at hand.

Enhanced File Sharing: Simplifying Collaboration

Sharing files has been made more intuitive and accessible in the new File Explorer. The "Share" button, prominently displayed in the ribbon, offers a range of sharing options, including email, cloud storage, and social media platforms. This simplified process eliminates the need for complex configurations, making collaboration and file sharing a seamless experience.

Integration with OneDrive: Seamless Cloud Access

The integration of OneDrive into the File Explorer is another significant improvement. Users can access their cloud files directly within the File Explorer window, seamlessly navigating between local and cloud storage. This integration eliminates the need for separate applications or websites, providing a unified and streamlined experience for managing files across multiple locations.

Beyond the Interface: Functional Improvements

The new File Explorer is not just about aesthetics; it also boasts functional improvements that enhance user experience. The ability to customize the view with different layouts, including list, details, and icons, allows users to tailor the interface to their specific needs. The inclusion of a "Quick Access" section offers easy access to frequently used folders and files, further streamlining the file management process.

FAQs: Addressing Common Concerns

Q: Is the new File Explorer available on all Windows 11 devices?

A: The new File Explorer is a core component of Windows 11 and is available on all compatible devices.

Q: Can I revert to the older File Explorer?

A: While there is no official way to revert to the older File Explorer in Windows 11, users can explore third-party file managers as alternatives.

Q: Are there any compatibility issues with older software?

A: The new File Explorer is designed to be compatible with existing software, minimizing compatibility issues. However, some older applications may require updates to function optimally.

Q: How can I customize the File Explorer to my preferences?

A: The File Explorer offers various customization options, including changing the view layout, adding folders to "Quick Access," and adjusting ribbon settings.

Tips: Optimizing Your File Management Experience

  • Utilize tabbed browsing to manage multiple folders efficiently.
  • Take advantage of the improved search functionality to find files quickly.
  • Customize the File Explorer view to suit your individual needs.
  • Explore OneDrive integration for seamless cloud file access.
  • Use the "Share" button for simplified file sharing across multiple platforms.

Conclusion: A Modernized Tool for a Modern Operating System

The new File Explorer in Windows 11 is a testament to Microsoft’s commitment to enhancing user experience. By incorporating modern design principles, integrating cloud services, and refining key functionalities, the File Explorer has evolved into a more intuitive, efficient, and visually appealing tool for managing files. While it retains its familiar foundation, the new File Explorer represents a significant step forward in the evolution of Windows file management, providing users with a streamlined and comprehensive experience.

Here's a better look at new Windows 11 File Explorer, Settings app Hereโ€™s What Windows 11โ€™s New File Explorer Looks Like - How-To Geek  Explor Exs Hands on with Windows 11's new leaked File Explorer with modern design
Microsoft reveals brief look at Windows 11's new modern File Explorer UI  Windows Central Where Is File Explorer On Windows 11 Hereโ€™s What Windows 11โ€™s New File Explorer Looks Like
Closer Look: File Explorer in Windows 11 - Neowin How To Enable The New File Explorer Ui In Windows 11 - vrogue.co

Closure

Thus, we hope this article has provided valuable insights into Navigating the Modern Landscape: Exploring the New File Explorer in Windows 11. We thank you for taking the time to read this article. See you in our next article!

The Essence Of Activation: Understanding Windows 10 Product Keys

The Essence of Activation: Understanding Windows 10 Product Keys

Introduction

With enthusiasm, let’s navigate through the intriguing topic related to The Essence of Activation: Understanding Windows 10 Product Keys. Let’s weave interesting information and offer fresh perspectives to the readers.

The Essence of Activation: Understanding Windows 10 Product Keys

Windows 10 Product Key For All Versions [2021]

In the digital landscape, Microsoft Windows 10 reigns as a dominant operating system, powering countless devices and serving as the foundation for countless tasks. While the system itself is readily accessible, its full functionality hinges upon a crucial element: the product key. This unique, alphanumeric code acts as a digital passport, granting access to the complete suite of features and ensuring the legitimacy of the operating system.

Deciphering the Role of the Product Key

The product key serves as a verification mechanism, confirming that the user has obtained a legitimate copy of Windows 10. This process, known as activation, ensures that the software is not being used illegally and allows Microsoft to track the distribution and usage of its products.

Beyond validation, the product key plays a vital role in:

  • Unlocking Features: Activation unlocks the full potential of Windows 10, enabling access to advanced features like updates, security patches, and customization options.
  • Maintaining Security: A valid product key ensures that the operating system is regularly updated with security patches, mitigating vulnerabilities and protecting users from malware and cyber threats.
  • Ensuring Stability: Activation contributes to a stable and reliable operating system experience, as users gain access to the latest updates and bug fixes.
  • Supporting Legitimate Development: Purchasing a legitimate copy of Windows 10 with a valid product key directly supports the development and maintenance of the operating system, fostering innovation and ensuring its long-term sustainability.

Understanding Different Product Key Scenarios

The acquisition and usage of product keys can vary depending on the specific circumstances:

  • Retail Product Keys: These keys are typically purchased from retailers and are designed for single-use installations on a specific device. They offer flexibility as they can be transferred to a different device, provided certain conditions are met.
  • OEM (Original Equipment Manufacturer) Product Keys: These keys are pre-installed on new devices by manufacturers and are permanently bound to that specific hardware. They cannot be transferred to other machines.
  • Volume Licensing Keys: These keys are designed for organizations and businesses and allow for the installation of Windows 10 on multiple devices within a network. They offer various licensing options and management tools.
  • Digital Licenses: With the advent of digital distribution, Windows 10 can be purchased and activated directly through the Microsoft Store. This results in a digital license being linked to the user’s Microsoft account, allowing for activation on multiple devices associated with that account.

The Importance of Legitimate Product Keys

Using a valid product key is essential for several reasons:

  • Legal Compliance: Utilizing an unauthorized copy of Windows 10 is a violation of copyright laws and can result in legal consequences.
  • Security Risks: Unlicensed copies of Windows 10 may be vulnerable to malware and security threats, exposing users to data breaches and system instability.
  • Missed Updates: Without a valid product key, users may miss crucial updates and security patches, leaving their systems vulnerable and hindering functionality.
  • Limited Functionality: Unlicensed copies often lack access to full features and functionality, limiting user experience and productivity.

FAQs about Windows 10 Product Keys

1. How can I find my Windows 10 product key?

  • For pre-installed Windows 10: The product key is typically located on a sticker attached to the device or in the packaging.
  • For retail purchases: The product key is usually included on a card or printed on the product packaging.
  • For digital licenses: The product key is linked to your Microsoft account and can be accessed through the account settings.

2. Can I transfer my Windows 10 product key to a different device?

  • Retail product keys: Yes, you can usually transfer a retail product key to a different device, provided you deactivate it from the original device first.
  • OEM product keys: No, OEM product keys are permanently bound to the original device and cannot be transferred.
  • Digital licenses: Yes, you can activate Windows 10 on multiple devices associated with your Microsoft account.

3. What happens if my Windows 10 product key is invalid?

  • An invalid product key will prevent you from activating Windows 10 and accessing its full functionality. You may need to purchase a legitimate product key or contact Microsoft support for assistance.

4. How can I check if my Windows 10 product key is valid?

  • You can check the validity of your product key by attempting to activate Windows 10. If the activation is successful, the product key is valid.

5. What are the consequences of using an invalid or stolen product key?

  • Using an invalid or stolen product key is illegal and can lead to legal consequences, including fines and penalties.

Tips for Managing Your Windows 10 Product Key

  • Store your product key securely: Keep the product key information in a safe and accessible location, such as a password manager or a physical note.
  • Back up your product key: Make a copy of your product key and store it in a secure location, in case you need to reinstall Windows 10.
  • Use a legitimate product key: Always purchase a valid product key from a reputable source to ensure legal compliance and optimal functionality.
  • Be cautious of online offers: Avoid purchasing product keys from untrusted sources, as they may be invalid or stolen.

Conclusion

The Windows 10 product key acts as a vital component in the overall functionality and security of the operating system. It ensures legitimacy, unlocks features, maintains security, and supports the ongoing development of the platform. Understanding the role of the product key and its various scenarios allows users to make informed decisions and utilize Windows 10 effectively and securely. By using a valid product key and following best practices, users can maximize their experience and enjoy the full potential of Windows 10.

List Of Windows 10 Activation Keys 2023 โ€“ Get Latest Windows 10 Update How to Change the Windows 10 Product Key to Activate Windows - WinBuzzer Windows 10 Product Key Activation Activate Windows 10
Windows 10 Activation Key For 2021 All Versions Product Keys 100% How To Fix Not Working - Vrogue Windows 10 Product Key and Activation (Including Windows 10 Activation Errors) How to Activate Windows 10 with Product Key/Digital License/CMD
4 Ways to Change Product Key to Activate Windows 10 Your Windows 10 Product Key or Activation Key  Mysoftwarekeys.com

Closure

Thus, we hope this article has provided valuable insights into The Essence of Activation: Understanding Windows 10 Product Keys. We appreciate your attention to our article. See you in our next article!

Managing Account Access In Windows 11: A Comprehensive Guide To Enhancing Privacy And Security

Managing Account Access in Windows 11: A Comprehensive Guide to Enhancing Privacy and Security

Introduction

With enthusiasm, let’s navigate through the intriguing topic related to Managing Account Access in Windows 11: A Comprehensive Guide to Enhancing Privacy and Security. Let’s weave interesting information and offer fresh perspectives to the readers.

Managing Account Access in Windows 11: A Comprehensive Guide to Enhancing Privacy and Security

How to manage user account settings on Windows 11  Windows Central

Windows 11, with its streamlined interface and enhanced security features, offers a robust ecosystem for managing user accounts. However, the interconnected nature of modern applications can lead to the creation of numerous accounts that are often unnecessary or potentially compromise privacy. This article provides a detailed guide on how to effectively manage and remove accounts used by various applications in Windows 11, emphasizing the importance of this practice for enhancing privacy, security, and system performance.

Understanding Account Proliferation in Windows 11

As users engage with various applications in Windows 11, they may be prompted to create accounts for accessing specific services or features. These accounts, often associated with third-party applications, may store personal data, preferences, and access credentials. While convenient for personalized experiences, the proliferation of such accounts can lead to several issues:

  • Privacy Concerns: Numerous accounts may store sensitive personal information, potentially exposing users to data breaches or unauthorized access.
  • Security Risks: Multiple accounts can increase the vulnerability to phishing attacks and malware, especially if passwords are reused across different platforms.
  • System Performance: Excessive accounts can strain system resources, leading to slower performance and increased system instability.
  • Account Management Overload: Managing numerous accounts across various applications can become cumbersome, leading to confusion and potential security lapses.

Strategies for Removing Accounts Used by Applications

Windows 11 offers several methods for removing accounts used by applications, each tailored to specific scenarios:

1. Removing Accounts Directly Within Applications

Many applications provide built-in options for managing user accounts within their settings. This method offers the most direct way to remove accounts associated with specific applications:

  • Locate the Settings Menu: Open the application and navigate to its settings menu, typically accessed through a gear icon or a "Settings" option in the main menu.
  • Access Account Management: Within the settings, look for a section related to "Accounts," "Profile," or "Login."
  • Remove Account: Identify the specific account you wish to remove and follow the application’s instructions for deleting it. This typically involves confirming the deletion and potentially entering your account password.

2. Uninstalling Applications and Associated Accounts

If an application is no longer required, uninstalling it can effectively remove any associated accounts:

  • Access the Settings App: Press the Windows key + I to open the Settings app.
  • Navigate to Apps: Click on "Apps" in the left-hand menu.
  • Locate and Uninstall: Find the application you want to remove, click on it, and select "Uninstall."
  • Confirm Uninstall: Confirm the uninstall process to remove the application and any associated data, including accounts.

3. Utilizing Windows 11’s Account Management Features

Windows 11 provides built-in tools for managing user accounts and applications:

  • Settings App: The Settings app allows users to manage accounts linked to Windows, including Microsoft accounts and local accounts.
  • Control Panel: The Control Panel offers a comprehensive interface for managing user accounts and their privileges.
  • Credential Manager: This tool stores and manages passwords for various applications and websites. Removing credentials stored in the Credential Manager can help prevent unauthorized access.

4. Examining Third-Party Tools for Account Removal

While Windows 11 provides robust account management features, third-party tools can offer additional functionality for removing accounts used by applications:

  • Privacy Software: Applications designed for enhancing privacy often include features for removing account data and tracking information.
  • System Optimization Tools: Tools aimed at improving system performance may offer options for removing unused accounts and data.

5. Understanding the Limitations of Account Removal

It is essential to acknowledge that removing accounts used by applications may not always be straightforward:

  • Data Retention: Some applications may retain account data even after the account is removed, requiring manual deletion of specific files.
  • Third-Party Services: Accounts associated with third-party services might require removal through those services’ websites or applications.
  • Application Dependencies: Some applications may rely on specific accounts for functionality, and removing them could lead to errors or malfunctions.

FAQs

Q: Can I remove my Microsoft account from Windows 11 without losing data?

A: Removing your Microsoft account from Windows 11 will not necessarily result in data loss. However, it will affect access to cloud-based services, such as OneDrive and the Microsoft Store.

Q: What happens to my data if I remove an account from an application?

A: The fate of your data depends on the specific application and its data storage policies. Some applications may delete your data, while others might retain it for a specific period.

Q: Is it safe to remove accounts from applications I no longer use?

A: Generally, it is safe to remove accounts from applications you no longer use. However, be cautious about removing accounts from essential applications, as this could disrupt functionality.

Q: Can I remove accounts from applications that are not installed on my computer?

A: Removing accounts from applications that are not installed on your computer may require accessing the application’s website or contacting its support team.

Tips for Effective Account Management

  • Regularly Review Accounts: Make it a habit to review your account list periodically and remove any unnecessary or outdated accounts.
  • Use Strong Passwords: Utilize strong and unique passwords for each account to enhance security.
  • Enable Two-Factor Authentication: Enable two-factor authentication whenever possible to add an extra layer of protection.
  • Be Cautious with Third-Party Applications: Exercise caution when granting access to personal information to third-party applications.
  • Understand Application Privacy Policies: Review the privacy policies of applications before creating accounts to understand how they handle your data.

Conclusion

Managing accounts used by applications in Windows 11 is a crucial aspect of maintaining privacy, security, and optimal system performance. By understanding the potential risks associated with account proliferation and implementing the strategies outlined in this article, users can enhance their digital footprint and ensure a more secure and efficient computing experience. Regular account management practices, coupled with a proactive approach to privacy and security, contribute to a more robust and user-friendly Windows 11 environment.

How to Manage User Account Settings in Windows 11 Manage Your Microsoft Account in Windows 11 โ€“ windows.do Enhancing Security: How to Implement Passkeys on Windows 11 for Password-Free Authentication
Hereโ€™s What Windows 11โ€™s Settings App Looks Like - TECHTELEGRAPH How to Switch User Accounts on Windows 11 How to link local account with Microsoft account on Windows 11 - Pureinfotech
How to create a local account on Windows 11 setup - YouTube What is the Windows Security Accounts Manager (SAM)?

Closure

Thus, we hope this article has provided valuable insights into Managing Account Access in Windows 11: A Comprehensive Guide to Enhancing Privacy and Security. We hope you find this article informative and beneficial. See you in our next article!

Navigating The Network Landscape: Understanding Windows 11’s Network Settings

Navigating the Network Landscape: Understanding Windows 11’s Network Settings

Introduction

With enthusiasm, let’s navigate through the intriguing topic related to Navigating the Network Landscape: Understanding Windows 11’s Network Settings. Let’s weave interesting information and offer fresh perspectives to the readers.

How to Check Network Status and Adapter Properties in Windows 11

Windows 11, like its predecessors, provides a comprehensive suite of tools to manage network connections and sharing. While the interface has undergone a visual refresh, the core functionality remains largely consistent, offering users the ability to configure network settings, manage connections, and control access to shared resources. This article delves into the intricacies of managing network settings in Windows 11, highlighting the importance of understanding and utilizing these tools for optimal network performance and security.

Understanding the Importance of Network Management

The modern digital landscape relies heavily on network connectivity. From accessing online services and sharing files to participating in video conferences and streaming multimedia content, seamless network operation is essential. Windows 11’s network management tools empower users to:

  • Establish and Configure Network Connections: Whether connecting to a Wi-Fi network, a wired Ethernet connection, or a virtual private network (VPN), Windows 11 provides the necessary tools to establish and configure these connections. This includes selecting network profiles, setting security parameters, and configuring network sharing preferences.
  • Manage Network Sharing: Windows 11 allows users to control what resources are shared on their network, including files, folders, printers, and internet connections. This control ensures that only authorized users and devices can access these resources, safeguarding sensitive data and preventing unauthorized access.
  • Optimize Network Performance: Network settings can be adjusted to prioritize specific applications or tasks, ensuring smooth data transfer and optimal performance for critical activities. This includes adjusting bandwidth allocation, setting connection priorities, and configuring network adapters.
  • Enhance Network Security: Windows 11 offers a range of security features designed to protect network connections and data from unauthorized access and cyber threats. These features include firewall settings, network discovery controls, and password protection for shared resources.

Exploring Windows 11’s Network Management Tools

Windows 11’s network management tools are accessed through the Settings app, which offers a streamlined and intuitive interface. The Network & internet section within Settings provides access to a comprehensive set of tools for managing network connections, sharing, and security.

1. Network Connections:

  • Wi-Fi: The Wi-Fi settings allow users to connect to available wireless networks, manage network profiles, and adjust connection preferences. Users can also configure Wi-Fi sharing, enabling other devices to connect to the internet through their Windows 11 device.
  • Ethernet: The Ethernet settings allow users to manage wired network connections, configure network adapters, and set connection priorities. Users can also enable or disable IPv6 support, depending on their network requirements.
  • VPN: The VPN settings allow users to connect to virtual private networks, ensuring secure and private internet access. Users can add VPN connections, configure network settings, and manage VPN profiles.

2. Network Sharing:

  • Private Networks: The private network settings allow users to control sharing preferences for devices connected to the same network. Users can enable or disable file and printer sharing, set password protection for shared resources, and manage network discovery settings.
  • Public Networks: The public network settings offer a more restrictive sharing environment, typically disabling file and printer sharing and limiting network discovery. This setting is ideal for public Wi-Fi networks where security is paramount.

3. Network Security:

  • Firewall & Network Protection: The firewall settings allow users to configure Windows Defender Firewall, a built-in security tool that blocks unauthorized access to the device and network. Users can customize firewall rules, create exceptions, and manage network discovery settings.
  • Network Discovery: The network discovery settings allow users to control whether their device is visible to other devices on the network. Users can enable or disable network discovery, manage file and printer sharing, and set password protection for shared resources.
  • Advanced Sharing Settings: The advanced sharing settings offer a more granular level of control over network sharing preferences. Users can configure network profiles, set sharing permissions for specific folders and devices, and customize network discovery settings.

4. Network Adapter Settings:

  • Network Adapter Properties: Each network adapter, whether Wi-Fi or Ethernet, has its own set of properties that can be configured to optimize performance and security. These properties include network protocols, connection settings, power management options, and advanced settings.

FAQs: Understanding Network and Sharing Settings

Q: How do I connect to a Wi-Fi network in Windows 11?

A: Open the Settings app and navigate to Network & internet > Wi-Fi. Select the desired network from the list of available networks and enter the network password if prompted.

Q: How do I share files and folders on my network?

A: Open the Settings app and navigate to Network & internet > Sharing options. Enable file and printer sharing for the desired network profile. You can then access the shared files and folders from other devices on the network.

Q: How do I set up a VPN connection in Windows 11?

A: Open the Settings app and navigate to Network & internet > VPN. Click Add a VPN connection, provide the necessary information, and connect to the VPN server.

Q: How do I configure the Windows Defender Firewall?

A: Open the Settings app and navigate to Network & internet > Firewall & network protection. You can customize firewall rules, create exceptions, and manage network discovery settings.

Q: How do I troubleshoot network connection issues?

A: Windows 11 offers a built-in network troubleshooter that can help identify and resolve common network problems. Open the Settings app and navigate to Network & internet > Status. Click Network troubleshooter to run the tool.

Tips for Optimizing Network Performance and Security

  • Use Strong Passwords: Secure your network by setting strong passwords for your Wi-Fi network and shared resources. Avoid using easily guessable passwords and consider using a password manager to store and manage your passwords.
  • Enable Network Discovery: Enable network discovery to allow devices on your network to find each other and share resources. However, be cautious about enabling network discovery on public Wi-Fi networks.
  • Disable File and Printer Sharing on Public Networks: Disable file and printer sharing on public Wi-Fi networks to prevent unauthorized access to your files and resources.
  • Update Network Drivers: Keep your network drivers updated to ensure optimal performance and security. Outdated drivers can lead to compatibility issues and security vulnerabilities.
  • Use a VPN for Secure Internet Access: Consider using a VPN when connecting to public Wi-Fi networks or accessing sensitive information online. A VPN encrypts your internet traffic, protecting your data from prying eyes.

Conclusion: Harnessing the Power of Network Management

Understanding and utilizing Windows 11’s network management tools is crucial for achieving optimal network performance, security, and connectivity. By configuring network settings, managing connections, and controlling sharing preferences, users can create a secure and efficient network environment that meets their individual needs. By embracing these tools and adopting best practices, users can maximize the benefits of network connectivity and leverage the power of the digital landscape.

Network & Internet Settings in Windows 11 How to Change Windows 11 Network from Public to Private Network & Internet Settings in Windows 11
Network Sharing Settings In Windows 11 How to Default Reset Windows 11 Network Settings How to Change a Network Name in Windows 11
How to Reset Network Settings in Windows 11 How to Connect to a Network in Windows 11

Closure

Thus, we hope this article has provided valuable insights into Navigating the Network Landscape: Understanding Windows 11’s Network Settings. We appreciate your attention to our article. See you in our next article!

Windows 11: A Comprehensive Evaluation

Windows 11: A Comprehensive Evaluation

Introduction

In this auspicious occasion, we are delighted to delve into the intriguing topic related to Windows 11: A Comprehensive Evaluation. Let’s weave interesting information and offer fresh perspectives to the readers.

Windows 11: A Comprehensive Evaluation

Windows 11 Comprehensive Guide And Cheat Sheet, 54% OFF

Windows 11, the latest iteration of Microsoft’s flagship operating system, has been met with a mixture of excitement and skepticism since its release in October 2021. While some users have embraced its new features and design, others remain hesitant, questioning whether the upgrade is truly worth the effort. This article aims to provide a comprehensive evaluation of Windows 11, exploring its strengths, weaknesses, and potential benefits for users.

A Fresh Look and Feel:

Windows 11 boasts a redesigned interface, with a modernized aesthetic that prioritizes simplicity and clarity. The Start menu has been revamped, adopting a centered layout and featuring a more streamlined design. The taskbar has also undergone a makeover, offering a more minimalist look and improved functionality. These changes are designed to enhance user experience, creating a more intuitive and visually appealing environment.

Enhanced Performance and Stability:

Windows 11 benefits from significant performance improvements, thanks to optimizations for modern hardware and software. It incorporates features like DirectStorage, which allows for faster game loading times, and Windows Subsystem for Android, enabling users to run Android apps directly on their Windows PCs. Additionally, the operating system has been refined for increased stability and security, addressing vulnerabilities found in previous versions.

Focus on Productivity and Collaboration:

Windows 11 emphasizes productivity and collaboration, offering a suite of tools and features designed to enhance user workflow. Microsoft Teams integration allows for seamless communication and collaboration, while features like Snap Layouts and virtual desktops provide greater flexibility and organization. The operating system also incorporates improvements to accessibility, making it easier for users with disabilities to navigate and interact with their devices.

The Case for Upgrading:

For users with compatible hardware, Windows 11 offers several compelling reasons to upgrade. The performance enhancements, new features, and refined user interface can significantly improve daily computing experiences. The integration of Android apps opens up a new world of possibilities, expanding the functionality of Windows PCs. Moreover, the improved security features offer enhanced protection against malicious threats.

Considerations and Challenges:

While Windows 11 presents significant advantages, there are also some considerations and potential challenges to keep in mind. The minimum system requirements for Windows 11 are more stringent than those for Windows 10, meaning some older devices may not be compatible. Additionally, the transition to a new operating system can be disruptive, requiring users to familiarize themselves with new features and workflows.

Frequently Asked Questions:

Q: Is Windows 11 compatible with my computer?

A: Windows 11 has specific system requirements, including a compatible processor, sufficient RAM, and a TPM 2.0 module. You can check your device’s compatibility using the PC Health Check app available on Microsoft’s website.

Q: What are the main differences between Windows 10 and Windows 11?

A: Windows 11 features a redesigned interface, performance enhancements, new features like Windows Subsystem for Android, and improved security. However, it also requires a compatible system and may necessitate a learning curve for users accustomed to Windows 10.

Q: Is Windows 11 free to upgrade?

A: If your device meets the system requirements, Windows 11 is a free upgrade for existing Windows 10 users.

Q: Should I upgrade to Windows 11 immediately?

A: Whether to upgrade to Windows 11 depends on individual needs and preferences. Users with compatible hardware and a desire for new features and performance improvements may find it beneficial. However, users who are comfortable with Windows 10 and do not require the new features may choose to wait or remain on Windows 10.

Tips for Upgrading to Windows 11:

  • Back up your data: Before upgrading, it is crucial to back up your important files and data to prevent loss.
  • Check system requirements: Ensure your device meets the minimum system requirements for Windows 11.
  • Review the new features: Familiarize yourself with the new features and interface of Windows 11 to ensure a smooth transition.
  • Consider a clean install: For a fresh start, you can choose to perform a clean install of Windows 11, but this will erase all data from your device.
  • Seek assistance if needed: If you encounter any issues during the upgrade process, you can consult Microsoft’s support resources or seek assistance from a qualified IT professional.

Conclusion:

Windows 11 represents a significant evolution for the Windows operating system, offering a refined user experience, enhanced performance, and new features that cater to modern computing needs. While the upgrade may not be suitable for all users, particularly those with older devices or a strong preference for Windows 10, it presents a compelling opportunity for those seeking a more modern, efficient, and secure computing environment. Ultimately, the decision to upgrade to Windows 11 rests on individual needs and preferences, carefully weighing the potential benefits against the considerations and challenges involved.

Windows 11 22H2 Enterprise Evaluation is available as ISO for testing Windows 11 enterprise Evaluation (90 days) - YouTube What is Windows 11 Smart App Control?  Petri IT Knowledgebase
Technipages - Tutorials and fixes for smartphone, gadget, and computer problems Windows 11 Comprehensive Guide And Cheat Sheet, 54% OFF I just upgraded to windows 11, what happened when the evaluation copy expires? (my windows 10
Microsoft updates free Windows 11 evaluation virtual machines, now come with version 22H2 - The Windows 11: A Comprehensive Guide about Features and Updates Perunity - Latest Business Story

Closure

Thus, we hope this article has provided valuable insights into Windows 11: A Comprehensive Evaluation. We appreciate your attention to our article. See you in our next article!

Navigating The Windows 11 Update: A Comprehensive Guide

Navigating the Windows 11 Update: A Comprehensive Guide

Introduction

In this auspicious occasion, we are delighted to delve into the intriguing topic related to Navigating the Windows 11 Update: A Comprehensive Guide. Let’s weave interesting information and offer fresh perspectives to the readers.

Windows 11: A Comprehensive Guide about Features and Updates Perunity - Latest Business Story

Windows 11, Microsoft’s latest operating system, promises a sleek interface, enhanced security features, and improved performance. However, the update process can be a source of frustration for some users. This article aims to provide a comprehensive guide to navigating the Windows 11 update, addressing common challenges and offering practical solutions.

Understanding the Windows 11 Update

The Windows 11 update is a significant upgrade, bringing numerous changes and improvements. These include:

  • Modernized User Interface: A redesigned Start menu, centered taskbar, and rounded corners provide a visually appealing and intuitive user experience.
  • Enhanced Security: Windows 11 incorporates advanced security features like hardware-based security and improved protection against malware.
  • Performance Improvements: The update optimizes system performance, leading to faster boot times, smoother multitasking, and enhanced gaming experiences.
  • New Features: Windows 11 introduces innovative features like Snap Layouts for efficient window management, Widgets for quick access to information, and improved touch input capabilities.

Why Upgrading to Windows 11 Matters

While the decision to upgrade is ultimately a personal one, there are compelling reasons to consider Windows 11:

  • Security: The latest operating system provides the most up-to-date security measures, protecting your device from emerging threats.
  • Performance: Windows 11 is designed to optimize performance, resulting in a smoother and faster user experience.
  • Compatibility: With time, more applications and devices will be optimized for Windows 11, ensuring seamless integration and compatibility.
  • Innovation: Windows 11 introduces innovative features that enhance productivity, creativity, and entertainment.

Addressing Common Challenges

Despite its benefits, the Windows 11 update can present various challenges. Common issues include:

  • Compatibility Issues: Older hardware and software may not be compatible with Windows 11, leading to errors or malfunctioning applications.
  • Hardware Requirements: Windows 11 has specific hardware requirements, and devices that do not meet these criteria may not be eligible for the update.
  • Data Transfer: Moving data from an older operating system to Windows 11 can be complex and time-consuming.
  • Troubleshooting: Encountering unexpected errors or issues during the update process can be frustrating and require troubleshooting.

Troubleshooting Tips and Solutions

To address these challenges, consider these tips and solutions:

  • Check System Requirements: Before initiating the update, ensure your device meets the minimum hardware requirements for Windows 11. These requirements can be found on the Microsoft website.
  • Software Compatibility: Check for compatibility issues with your existing software. Microsoft provides a compatibility checker tool to assess whether your applications will work with Windows 11.
  • Backup Data: Create a backup of your essential data before starting the update. This ensures data recovery in case of any unforeseen issues during the process.
  • Clean Installation: If you encounter significant issues or prefer a fresh start, consider performing a clean installation of Windows 11. This involves formatting your hard drive and installing the operating system from scratch.
  • Troubleshooting Resources: Utilize online resources like Microsoft support forums, community forums, and online guides for troubleshooting specific issues.

Frequently Asked Questions (FAQs)

Q: Is Windows 11 free to upgrade?

A: Microsoft offers a free upgrade to Windows 11 for eligible devices running Windows 10. However, this offer may have an expiration date.

Q: What happens to my data during the update?

A: The update process generally preserves your data and settings. However, it is always recommended to create a backup before proceeding.

Q: Can I revert back to Windows 10 after upgrading?

A: Yes, you can revert to Windows 10 within a certain timeframe after upgrading. This option is usually available for up to 10 days after the update.

Q: What are the minimum hardware requirements for Windows 11?

A: The minimum hardware requirements include:

  • Processor: 1 gigahertz (GHz) or faster with 2 or more cores
  • RAM: 4 gigabytes (GB)
  • Storage: 64 GB or larger storage device
  • System Firmware: UEFI, Secure Boot capable
  • Graphics Card: Compatible with DirectX 12 or later
  • Display: High Definition (720p) display, 9 inches or greater diagonally

Q: How do I check if my device is eligible for the Windows 11 update?

A: You can use the PC Health Check app provided by Microsoft to assess your device’s compatibility with Windows 11.

Conclusion

The Windows 11 update offers a modern and enhanced computing experience. While challenges may arise during the update process, understanding the potential issues and implementing appropriate solutions can minimize disruptions. By carefully reviewing system requirements, ensuring software compatibility, backing up data, and utilizing troubleshooting resources, users can navigate the Windows 11 update effectively and enjoy the benefits it offers. Remember, the decision to upgrade is a personal one, and users should weigh the advantages and potential drawbacks before proceeding.

How to Update Windows 11 from Windows Update - YouTube How to Install Windows 11 Update or Upgrade  FREE Step by Step - YouTube Buy WINDOWS 11 HOME User Manual: A Comprehensive Illustrated Guide to Navigating the New
How to Upgrade to Windows 11 Right Now  Tom's Hardware Your Ultimate Guide on How to update Windows 11 from Windows 10/7/8.1. How to Manual Update Windows 11 - YouTube
How to update windows 11 from 21H2 to 22H2 manually?  2022 - YouTube How to check for Windows 11 updates  PCWorld

Closure

Thus, we hope this article has provided valuable insights into Navigating the Windows 11 Update: A Comprehensive Guide. We appreciate your attention to our article. See you in our next article!

Navigating The Windows 10 Update Landscape: A Comprehensive Guide

Navigating the Windows 10 Update Landscape: A Comprehensive Guide

Introduction

In this auspicious occasion, we are delighted to delve into the intriguing topic related to Navigating the Windows 10 Update Landscape: A Comprehensive Guide. Let’s weave interesting information and offer fresh perspectives to the readers.

Navigating the Windows 10 Upgrade: A Comprehensive Guide - Fashion Magazine

Windows 10, Microsoft’s flagship operating system, has been a cornerstone of modern computing since its release in 2015. One of its defining characteristics is the continuous stream of updates, designed to enhance security, performance, and user experience. These updates, released in various forms, play a crucial role in ensuring the smooth and secure operation of Windows 10.

Understanding the Types of Windows 10 Updates:

Windows 10 updates fall into two primary categories:

  • Feature Updates: These are significant releases that introduce substantial new features, functionalities, and interface changes. They are typically released twice a year, often referred to as "major updates."
  • Quality Updates: These are smaller, more frequent updates that focus on bug fixes, security patches, and performance improvements. They are released monthly, often referred to as "cumulative updates."

The Importance of Windows 10 Updates:

Regularly installing Windows 10 updates is essential for several reasons:

  • Enhanced Security: Updates often include critical security patches that address vulnerabilities exploited by malware and hackers.
  • Improved Performance: Updates can optimize system performance, address known bugs, and improve compatibility with newer hardware and software.
  • New Features and Functionality: Feature updates introduce new capabilities, such as improved accessibility features, enhanced gaming experiences, or enhanced productivity tools.
  • Stability and Reliability: Updates help maintain system stability and reliability by addressing potential issues and improving overall system responsiveness.
  • Compatibility: Updates ensure compatibility with the latest software and hardware, ensuring seamless integration and optimal performance.

Navigating the Update Process:

Understanding the process of installing Windows 10 updates is crucial. Here’s a breakdown:

  1. Automatic Updates: Windows 10 is designed to automatically download and install updates in the background. This ensures that your system is always up-to-date with the latest security patches and bug fixes.
  2. Manual Updates: Users can manually check for updates and install them through the Windows Update settings. This allows for greater control over the update process, but it is crucial to keep the system up-to-date.
  3. Update Delays: Windows 10 offers the option to delay feature updates for a specific timeframe. This can be beneficial for businesses or individuals who require more time to test and evaluate new features before deployment.
  4. Update Notifications: Users receive notifications when updates are available, allowing them to plan and schedule the installation process.

Addressing Common Concerns:

While updates are essential, they can sometimes cause issues or raise concerns. Here’s a look at some common questions and their answers:

FAQs:

Q: Will updates affect my data or programs?

A: Generally, updates do not affect user data or installed programs. However, it is always recommended to back up critical data before installing significant updates.

Q: How much time does an update take?

A: The time required for an update varies depending on the size of the update and the system’s hardware specifications. Smaller updates may take a few minutes, while larger updates could take several hours.

Q: What if an update causes problems?

A: While updates are rigorously tested, issues can arise. In such cases, Windows 10 provides options to uninstall updates or revert to a previous version of the operating system.

Q: Can I customize the update process?

A: Yes, Windows 10 offers a range of customization options for updates, including the ability to schedule updates, choose specific update types, and control the bandwidth usage during updates.

Tips for a Smooth Update Experience:

Here are some helpful tips to ensure a smooth and efficient update experience:

  • Regularly Back Up Your Data: Back up important data before installing major updates to avoid potential data loss.
  • Check for Disk Space: Ensure sufficient disk space is available for the update to download and install successfully.
  • Plan Your Update Time: Schedule updates when you are not actively using your computer to avoid disruptions.
  • Stay Informed: Keep track of update announcements and release notes to understand the new features and potential changes.
  • Report Issues: If you encounter any problems during or after an update, report them to Microsoft to help improve future updates.

Conclusion:

Windows 10 updates are an integral part of the operating system’s lifecycle, ensuring security, performance, and compatibility. By understanding the various types of updates, their importance, and the update process, users can effectively manage their update experience and enjoy a smooth, secure, and feature-rich Windows 10 environment. Regular updates are essential for a secure and reliable computing experience, and by following the tips and guidelines outlined above, users can navigate the Windows 10 update landscape with confidence.

The complete guide to Windows 10 updates - Digital Citizen How to manage Windows 10 updates to prevent them from ruining your life - Good Gear Guide Australia How to handle Windows 10 and 11 updates  Computerworld
Windows 10 21h2 Download And Installation Guide How to view available microsoft updates for windows 10 - kartvse How to Change Windows Update Settings
The Windows 10 Update Checklist: 5 Things to Do After Major Updates How to Update Your Windows 10 Computer : HelloTech How

Closure

Thus, we hope this article has provided valuable insights into Navigating the Windows 10 Update Landscape: A Comprehensive Guide. We hope you find this article informative and beneficial. See you in our next article!

The Quarantine Zone: Understanding And Managing Suspicious Files On Your PC

The Quarantine Zone: Understanding and Managing Suspicious Files on Your PC

Introduction

With great pleasure, we will explore the intriguing topic related to The Quarantine Zone: Understanding and Managing Suspicious Files on Your PC. Let’s weave interesting information and offer fresh perspectives to the readers.

The Quarantine Zone: Understanding and Managing Suspicious Files on Your PC

Manage Quarantined Items, Remove & Isolate suspicious files  Internet Security Help

In the digital landscape, where threats constantly evolve and adapt, safeguarding your computer from malicious software is paramount. Antivirus programs play a crucial role in this defense, often employing a "quarantine" mechanism to isolate and neutralize potentially harmful files. This article delves into the concept of quarantine, explaining its purpose, operation, and significance in maintaining a secure computing environment.

Understanding the Quarantine Zone:

The quarantine area within an antivirus program acts as a secure containment zone for files deemed suspicious or potentially harmful. These files are isolated from the rest of your system, preventing them from executing or spreading malicious code. This isolation is crucial as it allows the antivirus software to analyze the file thoroughly and take appropriate action.

The Quarantine Process:

When an antivirus program detects a suspicious file, it initiates the quarantine process. This typically involves:

  1. Detection: The antivirus software scans files and analyzes their behavior, looking for patterns indicative of malicious activity.
  2. Isolation: The suspicious file is moved from its original location to the designated quarantine folder.
  3. Analysis: The quarantined file is subjected to further analysis, including signature matching, behavioral analysis, and sandboxing techniques.
  4. Action: Based on the analysis, the antivirus program decides the appropriate course of action. This could involve:
    • Removal: The file is permanently deleted.
    • Cleaning: The file is sanitized by removing malicious code.
    • Restoration: The file is deemed safe and restored to its original location.
    • Retention: The file is kept in quarantine for further investigation or for future reference.

Benefits of Quarantine:

The quarantine feature offers several benefits, contributing to a more secure and stable computing environment:

  • Protection from Infection: By isolating suspicious files, quarantine prevents them from spreading malware or compromising other files on your system.
  • Time for Analysis: Quarantine provides the antivirus software with a safe space to analyze potentially harmful files without disrupting your workflow.
  • Remediation Options: Quarantine allows for a range of actions, from removal to cleaning, enabling the most appropriate response to the threat.
  • Historical Data: Quarantine can store potentially harmful files for future reference, aiding in the identification and analysis of evolving threats.

Navigating the Quarantine Zone:

While the quarantine zone is a vital security feature, understanding its workings and functionalities is essential.

  • Access and Management: Most antivirus programs provide a user interface for accessing and managing the quarantine zone. This allows users to review quarantined files, decide on their fate, and manage the quarantine settings.
  • False Positives: Occasionally, antivirus programs may misidentify legitimate files as threats, leading to false positives. In such cases, users can typically restore the quarantined file from the quarantine zone.
  • Manual Quarantine: Some antivirus programs allow manual quarantine of specific files, providing an extra layer of security for files that might be suspicious but not flagged by the antivirus software.

Frequently Asked Questions:

Q: How do I access the quarantine zone in my antivirus program?

A: The location and access method for the quarantine zone vary depending on the specific antivirus software used. Refer to the program’s documentation or help files for instructions.

Q: What happens to quarantined files after a certain period?

A: Most antivirus programs automatically delete quarantined files after a predetermined time, typically a few weeks. This ensures that the quarantine folder doesn’t become overloaded with old files. However, users can typically configure this behavior to suit their needs.

Q: Can I manually restore a quarantined file?

A: Yes, most antivirus programs allow users to restore quarantined files manually. However, it’s crucial to exercise caution when restoring quarantined files, as they might pose a risk to your system.

Q: What should I do if I see a lot of files in my quarantine zone?

A: A large number of quarantined files can indicate a potential security issue. Consider reviewing the files, understanding their origin, and taking appropriate action based on your risk assessment.

Tips for Managing the Quarantine Zone:

  • Regularly review the quarantine zone: Periodically check the quarantined files, understanding their origin and nature. This helps identify potential security issues and ensure proper management of the quarantine zone.
  • Update your antivirus software: Regularly updating your antivirus program ensures that it has the latest threat signatures and security patches.
  • Be cautious with restoring quarantined files: Only restore files from the quarantine zone if you are absolutely sure they are safe.
  • Consider using a second opinion antivirus: If you have doubts about a quarantined file, consider using a different antivirus program to scan it for a second opinion.

Conclusion:

The quarantine zone serves as a crucial component of your computer’s security arsenal. By isolating potentially harmful files, it prevents them from executing or spreading malicious code, safeguarding your system from infection. Understanding the workings of the quarantine zone, managing its contents, and implementing best practices for its use are essential for maintaining a secure and stable computing environment. Employing caution, staying informed, and utilizing the tools provided by your antivirus program can significantly reduce the risk of malware infections and protect your valuable data.

View and Manage Quarantined Items on Windows Devices, Move & Isolate Suspicious Files How to configure quarantine files removal on Windows Defender Antivirus  Windows Central Manage Quarantined Items, Remove & Isolate suspicious files  Internet Security Help
View And Manage Quarantined Items, Remove & Isolate Suspicious Files  Cloud Antivirus View And Manage Quarantined Items, Remove & Isolate Suspicious Files  Cloud Antivirus View And Manage Quarantined Items, Move & Isolate Suspicious Files, Quarantine Items
Remove & Isolate Suspicious Files, Quarantine Files  Client - Security Help how to fix there are new suspicious file entries in your quarantine folder - YouTube

Closure

Thus, we hope this article has provided valuable insights into The Quarantine Zone: Understanding and Managing Suspicious Files on Your PC. We thank you for taking the time to read this article. See you in our next article!