Archives December 2023

MySQL Installation Guide For Windows 11: A Comprehensive Walkthrough

MySQL Installation Guide for Windows 11: A Comprehensive Walkthrough

Introduction

With enthusiasm, let’s navigate through the intriguing topic related to MySQL Installation Guide for Windows 11: A Comprehensive Walkthrough. Let’s weave interesting information and offer fresh perspectives to the readers.

MySQL Installation Guide for Windows 11: A Comprehensive Walkthrough

How to install MySQL on Windows 11  #site_titleHow to install MySQL on Windows 11

MySQL, a robust and widely adopted open-source relational database management system (RDBMS), empowers developers to store, manage, and access data efficiently. Its versatility and compatibility with various programming languages make it a popular choice for applications ranging from small-scale personal projects to large-scale enterprise systems. This comprehensive guide provides a step-by-step walkthrough of installing MySQL on Windows 11, equipping users with the necessary knowledge to embark on their database management journey.

Why Choose MySQL?

MySQL’s popularity stems from a combination of compelling features and benefits:

  • Open Source: MySQL is free to download and use, fostering a vibrant community of developers who contribute to its ongoing development and support.
  • Robust and Reliable: Its mature architecture and extensive testing ensure stability and reliability, making it suitable for handling critical data.
  • Cross-Platform Compatibility: MySQL operates seamlessly across various platforms, including Windows, Linux, macOS, and Unix, enabling developers to deploy applications across different environments.
  • Scalability and Performance: MySQL can handle large datasets and complex queries efficiently, adapting to growing data demands.
  • Comprehensive Features: It offers a rich set of features, including ACID properties, transaction management, data integrity constraints, and various query optimization techniques.
  • Active Community Support: A large and active community provides extensive documentation, tutorials, and forums for assistance and knowledge sharing.

Prerequisites

Before diving into the installation process, ensure the following prerequisites are met:

  • Windows 11 Operating System: The installation guide assumes you are using Windows 11.
  • Administrative Privileges: You must have administrative privileges on your computer to install MySQL.
  • Internet Connection: A stable internet connection is required for downloading the installer.

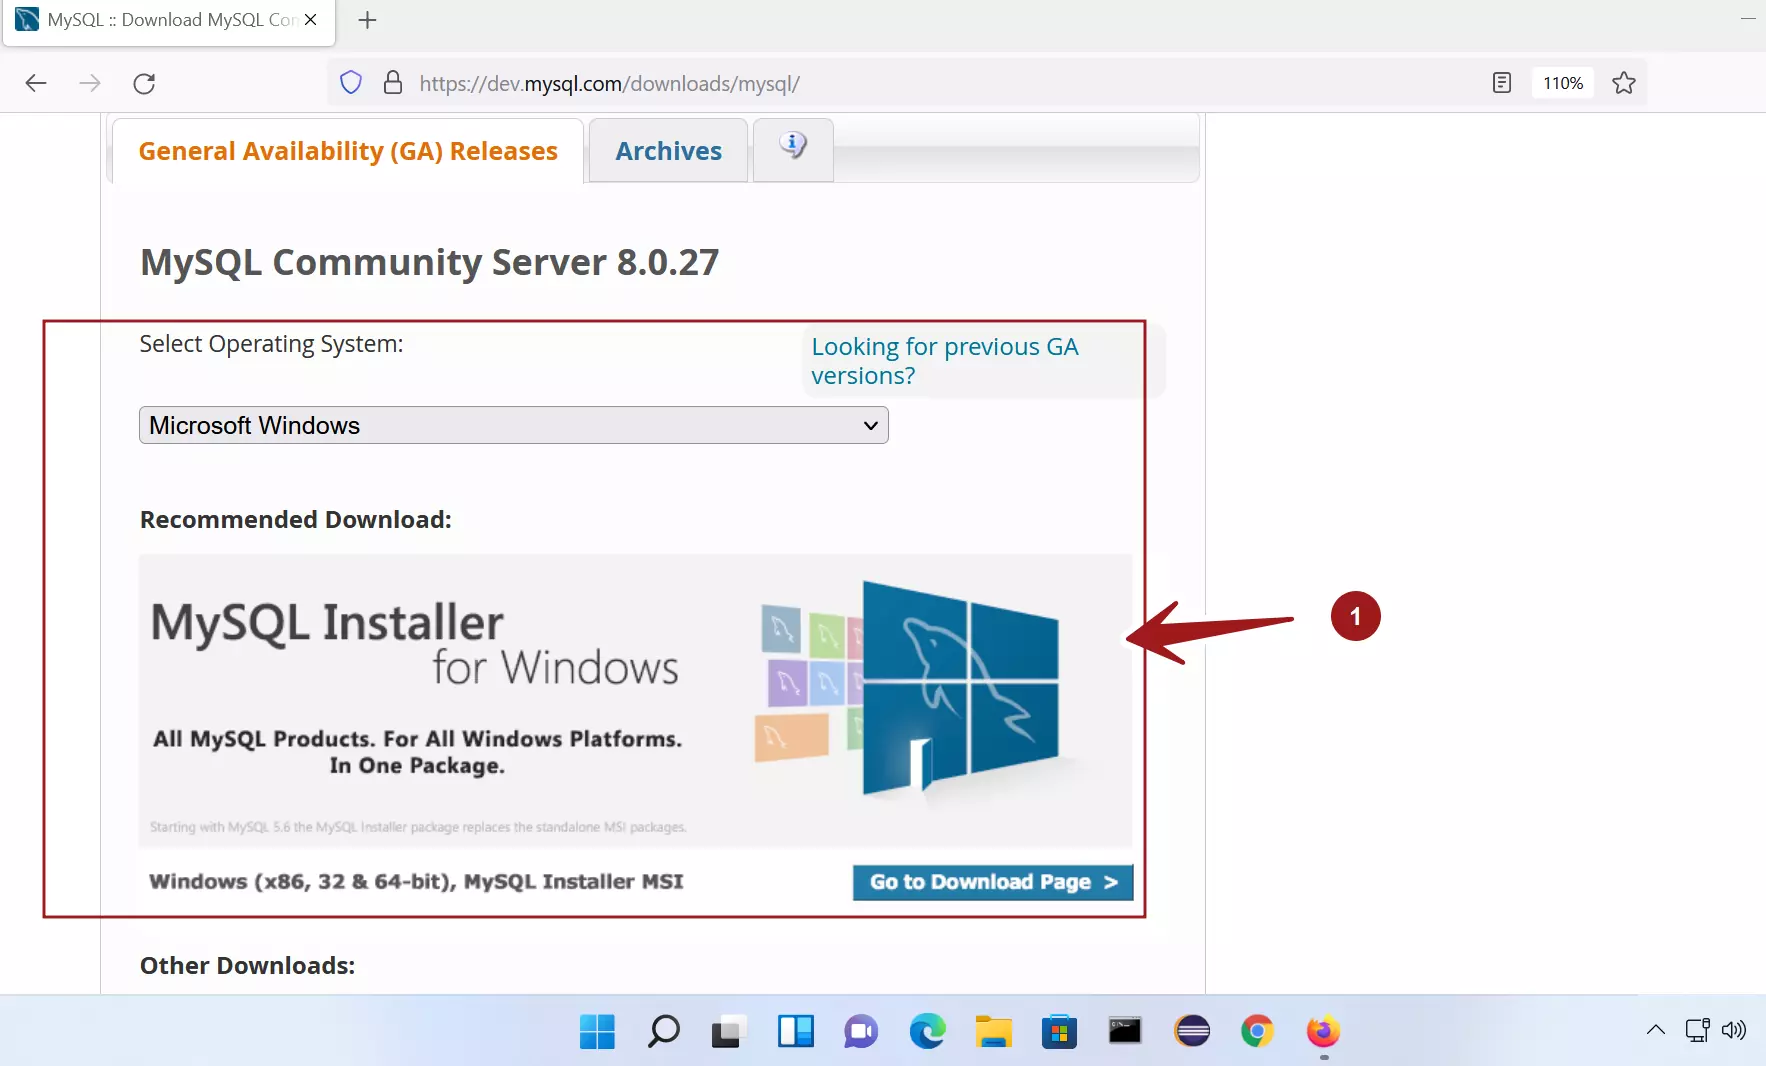
Downloading MySQL Installer

  1. Access the MySQL Website: Navigate to the official MySQL website at https://www.mysql.com/.
  2. Download the Installer: Locate the "Downloads" section and select the "MySQL Community Server" option.
  3. Choose the Correct Installer: Select the appropriate installer package for your Windows 11 system architecture (32-bit or 64-bit). The installer typically comes in a compressed archive format (e.g., .zip or .tar.gz).
  4. Save the Installer: Download the installer to a convenient location on your computer.

Installing MySQL on Windows 11

  1. Extract the Installer: Extract the contents of the downloaded archive file using a file archiver like 7-Zip or WinRAR.
  2. Run the Installer: Locate the extracted installer executable file (typically named mysql-installer-community-[version].exe) and double-click it to launch the installation wizard.
  3. Welcome Screen: The welcome screen provides an overview of the installation process. Click "Next" to proceed.
  4. License Agreement: Carefully read the MySQL Community Server license agreement and accept it by clicking "Next."
  5. Installation Type: Choose the desired installation type:
    • Typical: Installs the most common components for a standard MySQL installation.
    • Custom: Allows you to select specific components for a customized installation.
  6. Configuration Options: Configure the following settings:
    • Installation Directory: Select the location where you want to install MySQL. The default directory is usually suitable.
    • Port Number: Specify the port number that MySQL will use for communication. The default port is 3306.
    • Data Directory: Choose the directory where MySQL will store its data files. The default location is usually sufficient.
    • MySQL Server Instance Name: Provide a name for the MySQL instance. The default name is usually "MySQL Server."
  7. Password for Root User: Set a strong password for the root user, which has administrative privileges within the MySQL database.
  8. Installation Progress: The installation process will begin, displaying a progress bar.
  9. Completion: Upon successful installation, a confirmation message will appear. Click "Finish" to complete the installation process.

Configuring MySQL

After installation, you need to configure MySQL for optimal performance and security:

  1. Access the MySQL Command Line: Open a command prompt or PowerShell window with administrative privileges.
  2. Connect to MySQL: Execute the following command to connect to the MySQL server using the root user credentials you set during installation:
    mysql -u root -p
  3. Enter Password: You will be prompted to enter the password for the root user.
  4. Change Root Password: It is highly recommended to change the default root password for security reasons. Execute the following command to update the root password:
    SET PASSWORD FOR 'root'@'localhost' = PASSWORD('your_new_password');
  5. Set Character Set and Collation: Configure the default character set and collation for your database. This ensures proper data encoding and sorting:
    SET GLOBAL character_set_server = 'utf8mb4';
    SET GLOBAL collation_server = 'utf8mb4_unicode_ci';
  6. Set Time Zone: Set the time zone for your database to match your location:
    SET GLOBAL time_zone = '+00:00';
  7. Enable Remote Access (Optional): If you need to connect to MySQL from other machines, you need to configure remote access. This involves modifying the bind-address setting in the my.cnf configuration file to allow connections from specific IP addresses or networks.
  8. Exit MySQL: Execute the following command to exit the MySQL shell:
    exit

Verifying Installation

To verify that MySQL is installed correctly, perform the following steps:

  1. Open a Command Prompt or PowerShell Window: Launch a command prompt or PowerShell window.
  2. Execute the mysql Command: Type mysql -u root -p and press Enter.
  3. Enter Password: Enter the password you set for the root user.
  4. Check Connection: If the connection is successful, you will be presented with the MySQL prompt.
  5. Execute a Simple Query: To confirm that the database is functioning correctly, execute a simple query:
    SELECT VERSION();

    This query will display the current MySQL version.

Using MySQL Workbench

MySQL Workbench is a powerful graphical user interface (GUI) tool that simplifies database management tasks. It provides a user-friendly environment for creating, managing, and querying databases.

  1. Download MySQL Workbench: Download the latest version of MySQL Workbench from the official MySQL website.
  2. Install MySQL Workbench: Run the downloaded installer and follow the on-screen instructions to install MySQL Workbench.
  3. Launch MySQL Workbench: Open MySQL Workbench by searching for it in the Windows Start menu.
  4. Connect to MySQL Server: In the "MySQL Workbench" window, click "Connect to Database."
  5. Enter Connection Details: Provide the following connection details:
    • Hostname: Usually localhost for local connections.
    • Username: root (or any other user with database access privileges).
    • Password: The password you set for the root user (or the user you are connecting with).
  6. Connect: Click "OK" to establish the connection to your MySQL server.

FAQs

Q: What are the system requirements for installing MySQL on Windows 11?

A: The minimum system requirements for MySQL on Windows 11 are:

  • Operating System: Windows 11
  • Processor: Intel or AMD processor with at least 1 GHz
  • Memory: At least 1 GB of RAM
  • Hard Disk Space: At least 1 GB of free disk space
  • Internet Connection: For downloading the installer and updates

Q: How do I access the MySQL configuration file (my.cnf)?

A: The my.cnf configuration file is usually located in the following directory:

  • For 32-bit systems: C:ProgramDataMySQLMySQL Server [version]my.ini
  • For 64-bit systems: C:ProgramDataMySQLMySQL Server [version]my.ini

Q: How do I create a new database in MySQL?

A: You can create a new database using the following SQL command:

CREATE DATABASE database_name;

Replace database_name with the desired name for your database.

Q: How do I create a new user in MySQL?

A: You can create a new user using the following SQL command:

CREATE USER 'username'@'hostname' IDENTIFIED BY 'password';

Replace username with the desired username, hostname with the hostname or IP address of the machine from which the user will connect, and password with the desired password for the user.

Q: How do I grant privileges to a user?

A: You can grant privileges to a user using the following SQL command:

GRANT privileges ON database_name.* TO 'username'@'hostname';

Replace privileges with the specific privileges you want to grant (e.g., SELECT, INSERT, UPDATE, DELETE), database_name with the name of the database, username with the username, and hostname with the hostname or IP address of the machine from which the user will connect.

Q: How do I stop and start the MySQL server?

A: You can stop and start the MySQL server using the following commands:

  • Stop MySQL: net stop mysql
  • Start MySQL: net start mysql

Q: How do I uninstall MySQL?

A: To uninstall MySQL, follow these steps:

  1. Open the Control Panel: Open the Control Panel by searching for it in the Windows Start menu.
  2. Go to Programs and Features: Click on "Programs and Features" or "Uninstall a program."
  3. Select MySQL: Locate and select "MySQL Server [version]" from the list of installed programs.
  4. Uninstall: Click "Uninstall" to start the uninstallation process.
  5. Follow Instructions: Follow the on-screen instructions to complete the uninstallation process.

Tips

  • Use a Strong Password: Choose a strong password for the root user and other database users. Avoid using common or easily guessable passwords.
  • Keep MySQL Updated: Regularly update MySQL to benefit from bug fixes, security patches, and new features.
  • Monitor MySQL Performance: Monitor MySQL performance metrics (e.g., CPU usage, memory consumption, query execution time) to identify potential bottlenecks and optimize performance.
  • Backup Your Data: Regularly back up your MySQL database to prevent data loss in case of hardware failure or accidental deletion.
  • Use a Database Management Tool: Employ a database management tool like MySQL Workbench for easier database administration, query development, and data visualization.
  • Learn SQL: Familiarize yourself with SQL (Structured Query Language), the standard language for interacting with relational databases.

Conclusion

Installing and configuring MySQL on Windows 11 is a straightforward process that empowers users to manage and access data efficiently. By following the steps outlined in this guide, users can successfully set up a robust and reliable database environment for their projects or applications. Remember to configure MySQL securely, monitor its performance, and regularly back up your data to ensure data integrity and minimize downtime. With its open-source nature, vast community support, and comprehensive feature set, MySQL remains a powerful and versatile choice for database management in various domains.

Install MySQL on Windows 11 - YouTube How To Download And Install MySQL In Windows 11 - YouTube How to Install MySQL on Windows 11 - YouTube
Step by step Instructions to Install MySQL on Windows 11  Page 2 of 5  Hello Sunil How To Install MySQL Server Application on Windows 10/11  Easy Installation Guide  by Krithi Download & Install MySQL on Windows 11  TestingDocs.com
Install MySql Workbench 8.0 In Windows 11 or 10  Step by step guide on installation by Bitter How to Download & Install MySQL On Windows 11

Closure

Thus, we hope this article has provided valuable insights into MySQL Installation Guide for Windows 11: A Comprehensive Walkthrough. We thank you for taking the time to read this article. See you in our next article!

Net Framework 2 0 For Windows 11

net framework 2 0 for windows 11

Introduction

In this auspicious occasion, we are delighted to delve into the intriguing topic related to net framework 2 0 for windows 11. Let’s weave interesting information and offer fresh perspectives to the readers.

Enable Net Framework 2 0 And Net Framework 3 5 In Windows 11  thewindowsclub

The .NET Framework 2.0, released in 2005, represents a significant milestone in software development, laying the foundation for modern applications. While newer versions of .NET have emerged, .NET Framework 2.0 continues to play a vital role for certain applications, particularly legacy software designed for older operating systems. This article explores the relevance of .NET Framework 2.0 in the context of Windows 11, delving into its functionalities, compatibility, and potential challenges.

The .NET Framework 2.0: A Foundation for Software Development

The .NET Framework 2.0 provides a comprehensive platform for building and running applications on Windows operating systems. Its core components include:

  • Common Language Runtime (CLR): The CLR acts as a virtual machine, managing the execution of .NET applications, ensuring type safety, and providing memory management.
  • Base Class Library (BCL): The BCL offers a vast collection of pre-written classes and functions, providing developers with ready-to-use components for various tasks, including file handling, networking, and data manipulation.
  • Windows Forms: This framework allows the creation of graphical user interfaces (GUIs) for desktop applications, enabling intuitive interactions for users.
  • ASP.NET: This component facilitates the development of dynamic websites and web applications, powering features like user authentication, data access, and web services.

Compatibility Challenges with Windows 11

While .NET Framework 2.0 applications can run on Windows 11, compatibility issues may arise due to the significant changes in operating system architecture and security features. Windows 11 prioritizes security and performance, sometimes leading to conflicts with older software frameworks like .NET Framework 2.0.

Addressing Compatibility Issues: Mitigation Strategies

Several approaches can be employed to address compatibility issues and ensure the smooth functioning of .NET Framework 2.0 applications on Windows 11:

  • Compatibility Mode: Windows 11 offers compatibility mode for older applications, enabling them to run in an environment mimicking an older operating system. This can help resolve issues related to application behavior and system settings.
  • Software Updates: Regularly updating the .NET Framework 2.0 itself can address known compatibility issues and security vulnerabilities.
  • Application Updates: If possible, updating the legacy application itself might introduce compatibility improvements for Windows 11.
  • Virtualization: Running the application within a virtualized environment, such as a virtual machine, can provide a controlled and isolated environment, minimizing potential conflicts with Windows 11.
  • Alternative Frameworks: If the application’s functionality can be replicated using a newer .NET framework or other technologies, migrating the application to a more compatible platform might be the most efficient solution.

The Importance of .NET Framework 2.0 in the Modern Landscape

Despite the emergence of newer frameworks, .NET Framework 2.0 remains relevant for several reasons:

  • Legacy Applications: Many critical business applications, developed using .NET Framework 2.0, continue to operate successfully. Upgrading these applications to newer frameworks can be costly and time-consuming.
  • Specialized Software: Certain industries rely on specialized software developed using .NET Framework 2.0, which may not have readily available alternatives.
  • Cost-Effectiveness: Maintaining existing applications developed using .NET Framework 2.0 can be more cost-effective than migrating to newer platforms, especially for smaller businesses.

FAQs: .NET Framework 2.0 on Windows 11

Q: Is .NET Framework 2.0 still supported by Microsoft?

A: Microsoft does not actively support .NET Framework 2.0 with security updates and bug fixes. However, some security updates may be released for critical vulnerabilities.

Q: Can I install .NET Framework 2.0 on Windows 11?

A: Yes, you can install .NET Framework 2.0 on Windows 11. However, it is crucial to ensure compatibility and address potential issues as discussed above.

Q: What are the potential risks of using .NET Framework 2.0 on Windows 11?

A: Using .NET Framework 2.0 on Windows 11 can expose your system to security vulnerabilities due to the lack of active support and potential compatibility issues.

Q: Is there a way to migrate applications from .NET Framework 2.0 to newer frameworks?

A: Migrating applications from .NET Framework 2.0 to newer frameworks is possible, but it requires careful planning, development effort, and potential code refactoring.

Tips for Managing .NET Framework 2.0 Applications on Windows 11

  • Regularly Check for Updates: While Microsoft may not actively support .NET Framework 2.0, security updates may be released for critical vulnerabilities. Regularly checking for updates is crucial.
  • Isolate Legacy Applications: Consider running legacy applications in virtualized environments or on separate machines to minimize potential conflicts with Windows 11.
  • Plan for Migration: If feasible, develop a plan for migrating legacy applications to newer frameworks, gradually phasing out .NET Framework 2.0 over time.
  • Consult with Experts: If facing significant compatibility issues, consider consulting with software development experts for guidance and assistance.

Conclusion

While newer frameworks have emerged, .NET Framework 2.0 remains relevant for certain legacy applications, particularly in specialized industries. Understanding the compatibility challenges and mitigation strategies is crucial for ensuring the smooth functioning of .NET Framework 2.0 applications on Windows 11. As technology evolves, carefully evaluating the trade-offs between maintaining legacy applications and migrating to newer platforms is essential for businesses seeking to balance cost-effectiveness with security and performance.

How To Enable Net Framework 2 0 And 3 5 In Windows 11  Images and Photos finder How To Enable Net Framework 2 0 And 3 5 In Windows 11  grovetech How to Enable .NET Framework 2.0 and 3.5 in Windows 11
How To Enable Net Framework 2 0 And 3 5 In Windows 11  grovetech Как установить и включить отсутствующие .NET Framework 2.0, 3.5, 4.5 на Windows 11  Antiskam Descargar Net Framework 2 0 Para Windows 11 - Image to u
How to Enable NET Framework 2 0 and 3 5 in Windows 11 / 10 - YouTube How To Enable Net Framework 2 0 And 3 5 In Windows 11  grovetech

Closure

Thus, we hope this article has provided valuable insights into net framework 2 0 for windows 11. We hope you find this article informative and beneficial. See you in our next article!

Rejuvenating Your Windows 10 System: A Guide To Data-Preserving Reinstallation

Rejuvenating Your Windows 10 System: A Guide to Data-Preserving Reinstallation

Introduction

In this auspicious occasion, we are delighted to delve into the intriguing topic related to Rejuvenating Your Windows 10 System: A Guide to Data-Preserving Reinstallation. Let’s weave interesting information and offer fresh perspectives to the readers.

Rejuvenating Your Windows 10 System: A Guide to Data-Preserving Reinstallation

[Simple Guide] How to Reinstall Windows 10 without Losing Data or Programs/Apps - Sysprobs

The Windows 10 operating system, while robust and feature-rich, can experience performance degradation over time. This can manifest as slow startup times, sluggish application performance, or frequent system crashes. These issues can stem from various factors, including accumulated temporary files, corrupted system files, or even malware infections. A clean installation of Windows 10 can effectively address these problems, revitalizing your system and restoring optimal performance.

However, the prospect of reinstalling Windows often evokes apprehension, particularly concerning the potential loss of valuable data. The traditional approach to reinstalling Windows 10 necessitates a complete wipe of the hard drive, leading to the erasure of all existing data. This can be a daunting process, requiring extensive backups and subsequent data restoration, potentially consuming significant time and effort.

Fortunately, a data-preserving approach to reinstalling Windows 10 exists, allowing users to enjoy the benefits of a clean system without sacrificing their precious files. This method leverages the power of "in-place upgrade" and advanced backup techniques, ensuring a seamless and efficient rejuvenation of your Windows 10 environment.

Understanding the Importance of a Clean Installation

A clean installation of Windows 10 offers several advantages over simply troubleshooting or updating the existing system:

  • Elimination of System Bloatware: Pre-installed applications, often referred to as "bloatware," can consume valuable disk space and system resources, hindering overall performance. A clean installation allows for a fresh start, devoid of these unwanted programs.

  • Removal of Corrupted Files: Over time, system files can become corrupted, leading to instability and performance issues. A clean installation replaces these corrupted files with fresh, pristine versions, ensuring a stable and reliable operating system.

  • Resolution of Software Conflicts: Conflicting software installations can cause various problems, including crashes, errors, and performance degradation. A clean installation removes these conflicting programs, eliminating potential compatibility issues.

  • Enhanced Security: Malware and viruses can often embed themselves deeply within the system, evading traditional removal methods. A clean installation effectively removes these threats, providing a clean slate for enhanced security.

  • Optimized Performance: A clean installation eliminates unnecessary files and processes, streamlining the operating system and optimizing its performance. This translates to faster boot times, improved application responsiveness, and a smoother overall user experience.

The Power of In-Place Upgrade

The "in-place upgrade" method offers a unique solution for rejuvenating your Windows 10 system without sacrificing your data. This process involves installing a fresh copy of Windows 10 over your existing installation, effectively replacing the existing system files while preserving user data, applications, and settings.

Here’s a step-by-step guide to perform an in-place upgrade:

  1. Back Up Your Data: While the in-place upgrade method aims to preserve user data, it is always prudent to create a backup of your important files and applications. This safeguards against unforeseen issues and provides a safety net in case of any data loss.

  2. Download the Windows 10 Installation Media: Obtain the latest Windows 10 ISO file from Microsoft’s official website. You can either download it directly or create a bootable USB drive using a tool like Rufus or the Media Creation Tool.

  3. Run the Setup Program: Launch the setup program from the downloaded media. Follow the onscreen instructions, ensuring you choose the "Upgrade" option.

  4. Accept License Agreement and Choose Installation Options: Read and accept the license agreement, and choose the "Keep personal files and apps" option to preserve your data during the upgrade process.

  5. Wait for the Installation to Complete: The installation process can take a considerable amount of time, depending on your system’s configuration and the size of your data. Be patient and allow the process to complete without interruption.

  6. Restart Your Computer: Once the installation is complete, your computer will restart. You will then be greeted with a fresh and rejuvenated Windows 10 system, complete with your existing data and applications.

Advanced Data Preservation Techniques

While the in-place upgrade method is generally effective, it might not preserve all your data, particularly if you have modified system files or installed custom drivers. For a more comprehensive data preservation strategy, consider these advanced techniques:

  • System Image Backup: Create a complete system image backup using tools like Windows Backup & Restore or third-party software. This backup captures a snapshot of your entire hard drive, including the operating system, applications, and user data. In case of data loss, you can restore your system to its previous state from this image.

  • File History: Enable File History to automatically back up your personal files to an external drive or network location. This feature continuously backs up your documents, pictures, music, and videos, ensuring data recovery in case of system failure or accidental deletion.

  • Third-Party Backup Solutions: Numerous third-party backup software solutions offer advanced features and options for data protection. These solutions often provide more granular control over backup schedules, file selection, and data encryption, enhancing your overall data security.

FAQs: Reinstalling Windows 10 without Losing Data

1. Is it safe to perform an in-place upgrade?

In-place upgrade is generally a safe process, but it is still recommended to back up your data as a precaution. Microsoft recommends performing a system image backup before undertaking an in-place upgrade.

2. Will all my programs be preserved during the upgrade?

The in-place upgrade process aims to preserve all your installed programs. However, some programs might require reinstallation or configuration after the upgrade.

3. Will my personal settings be preserved?

Yes, your personal settings, such as desktop backgrounds, theme preferences, and browser settings, will be preserved during the in-place upgrade.

4. What if I encounter problems during the upgrade?

If you encounter any issues during the upgrade process, it is recommended to consult Microsoft’s support documentation or contact their technical support for assistance.

5. Can I use an older version of Windows 10 for the in-place upgrade?

It is recommended to use the latest version of Windows 10 for the in-place upgrade. Older versions might not be compatible with the latest features and updates.

Tips for a Smooth Reinstallation

  • Ensure Adequate Disk Space: The in-place upgrade process requires sufficient disk space to accommodate the new installation files. Ensure you have at least 20GB of free space on your primary drive.

  • Disable Antivirus Software: Antivirus software can sometimes interfere with the upgrade process. It is recommended to temporarily disable your antivirus before starting the installation.

  • Disconnect External Devices: Disconnect any external devices, such as USB drives, printers, and scanners, to avoid potential conflicts during the upgrade process.

  • Check for Updates: Ensure your existing Windows 10 installation is up-to-date by installing all available updates before proceeding with the upgrade.

  • Restart Your Computer: After completing the upgrade, restart your computer to allow the changes to take effect.

Conclusion

Reinstalling Windows 10 without losing data is a viable and effective solution for rejuvenating your system and restoring optimal performance. The in-place upgrade method, combined with advanced backup techniques, ensures a seamless and efficient process, allowing you to enjoy the benefits of a clean installation without sacrificing your precious files. By understanding the importance of a clean installation and leveraging the available data preservation options, you can confidently revitalize your Windows 10 system, ensuring a smooth and efficient computing experience.

How to Create and Use Windows 10 Recovery Image Backup How to recover data(files) after reinstalling Windows? Data Recovery Using Fedora – The Unofficial Windows 10 Reinstallation Guide
How to Do System Restore, System Reinstallation? [Simple Guide] How to Reinstall Windows 10 without Losing Data or Programs/Apps - Sysprobs How To Reinstall Windows 10 Step By Step
Windows 10 Version 1507: Clean Reinstallation via Bootable USB from .iso – The Unofficial How to Reinstall Windows 10 - Latest Gadgets

Closure

Thus, we hope this article has provided valuable insights into Rejuvenating Your Windows 10 System: A Guide to Data-Preserving Reinstallation. We hope you find this article informative and beneficial. See you in our next article!

Qt And Windows 11: A Powerful Partnership For Cross-Platform Development

Qt and Windows 11: A Powerful Partnership for Cross-Platform Development

Introduction

With enthusiasm, let’s navigate through the intriguing topic related to Qt and Windows 11: A Powerful Partnership for Cross-Platform Development. Let’s weave interesting information and offer fresh perspectives to the readers.

Qt and Windows 11: A Powerful Partnership for Cross-Platform Development

Qt Releases New Version of Its Cross Platform Development Environment

The world of software development is constantly evolving, driven by the need to reach diverse audiences across multiple platforms. This demand has led to the emergence of cross-platform frameworks, tools that enable developers to create applications that seamlessly function on various operating systems, including Windows, macOS, Linux, and mobile platforms. Qt, a renowned cross-platform framework, has played a significant role in this evolution, offering a robust and comprehensive solution for developers seeking to build visually appealing and performant applications.

Windows 11, the latest iteration of Microsoft’s flagship operating system, has introduced a fresh design language, enhanced features, and a focus on user experience. This combination of innovation and familiarity makes Windows 11 an attractive platform for developers seeking to reach a wide user base.

This article explores the synergy between Qt and Windows 11, examining how these two technologies complement each other to empower developers in creating compelling and feature-rich applications. We delve into the capabilities, benefits, and potential challenges associated with utilizing Qt for Windows 11 development, providing insights into the advantages this combination offers.

Understanding Qt: A Foundation for Cross-Platform Development

Qt, developed by The Qt Company, is a mature and widely adopted cross-platform framework that provides a comprehensive set of tools and libraries for building user interfaces, applications, and embedded systems. Its key strengths lie in its ability to:

  • Create native-looking applications: Qt leverages the native UI elements of each platform, ensuring that applications appear and behave seamlessly on Windows 11, macOS, Linux, and other supported operating systems. This eliminates the need for developers to write separate code for each platform, saving time and effort.
  • Offer a rich set of UI components: Qt provides a comprehensive library of pre-built UI components, including buttons, text fields, lists, menus, and more. These components are designed to be easily customizable, allowing developers to create visually appealing and intuitive user interfaces.
  • Enable rapid development: Qt’s declarative UI approach and extensive libraries simplify the development process, allowing developers to build applications faster and with less code. This translates to reduced development costs and faster time to market.
  • Support diverse application types: Qt is suitable for developing a wide range of applications, from desktop software and mobile apps to embedded systems and industrial automation tools. Its versatility makes it a valuable asset for developers working on various projects.
  • Provide a thriving community: Qt boasts a large and active community of developers, contributing to its continuous evolution and providing support through forums, documentation, and open-source contributions. This vibrant ecosystem ensures that developers have access to resources and assistance when needed.

Windows 11: A Modern Platform for Software Development

Windows 11, the latest iteration of Microsoft’s operating system, represents a significant leap forward in terms of user experience, design, and features. It offers developers a modern platform with:

  • A refreshed user interface: Windows 11 introduces a streamlined and modern design language, focusing on simplicity and clarity. This new aesthetic enhances user engagement and provides a consistent experience across various devices.
  • Enhanced performance: Windows 11 leverages advancements in hardware and software to deliver improved performance and responsiveness. This translates to smoother application execution and a more enjoyable user experience.
  • New features and functionalities: Windows 11 introduces new features, including a redesigned Start Menu, improved multitasking capabilities, and enhanced security features. These advancements provide developers with more tools to create engaging and feature-rich applications.
  • Increased focus on accessibility: Windows 11 prioritizes accessibility, ensuring that applications are usable by individuals with disabilities. This commitment to inclusivity aligns with Qt’s principles of creating accessible applications for all users.

The Power of Qt on Windows 11: A Synergistic Partnership

The combination of Qt and Windows 11 presents developers with a powerful and versatile platform for creating high-quality applications. This synergy offers several advantages:

  • Native look and feel: Qt’s ability to leverage native UI elements ensures that applications built with Qt on Windows 11 seamlessly integrate with the operating system’s design language. This creates a visually appealing and consistent user experience.
  • Access to Windows 11 APIs: Qt provides access to Windows 11 APIs, allowing developers to utilize the latest features and functionalities offered by the operating system. This enables the creation of applications that take full advantage of the capabilities of Windows 11.
  • Improved performance and responsiveness: Qt’s optimized code and efficient resource management, combined with the performance enhancements of Windows 11, result in applications that are fast, responsive, and enjoyable to use.
  • Simplified development process: Qt’s cross-platform nature and extensive libraries streamline the development process, allowing developers to focus on building the core functionality of their applications rather than spending time on platform-specific coding.

Challenges and Considerations

While Qt and Windows 11 offer a compelling combination for development, there are certain challenges and considerations to keep in mind:

  • Learning curve: Developers new to Qt may require some time to familiarize themselves with the framework’s concepts and tools. However, Qt’s comprehensive documentation and active community provide ample resources for learning and support.
  • Performance optimization: While Qt is generally efficient, optimizing performance for specific applications and hardware configurations may require additional effort. Developers should consider performance optimization strategies during the development process.
  • Compatibility issues: While Qt strives for compatibility across platforms, minor differences in operating system behavior or API availability may require adjustments to ensure seamless functionality on Windows 11.

FAQs: Addressing Common Questions

Q: Can I use Qt to develop applications for Windows 11?

A: Yes, Qt is fully compatible with Windows 11. You can leverage Qt’s cross-platform capabilities to build applications that seamlessly function on Windows 11.

Q: Does Qt support the latest Windows 11 features?

A: Qt provides access to the Windows 11 APIs, allowing developers to utilize the latest features and functionalities offered by the operating system.

Q: What are the benefits of using Qt for Windows 11 development?

A: Using Qt for Windows 11 development offers benefits such as native look and feel, access to Windows 11 APIs, improved performance, and a simplified development process.

Q: Are there any challenges associated with using Qt on Windows 11?

A: Potential challenges include a learning curve for new developers, the need for performance optimization, and possible compatibility issues.

Tips: Optimizing Qt Development for Windows 11

  • Utilize Qt’s UI components: Leverage Qt’s rich library of pre-built UI components to create visually appealing and intuitive user interfaces that align with Windows 11’s design language.
  • Optimize for performance: Pay attention to performance optimization strategies, such as using Qt’s efficient resource management features and profiling your application to identify bottlenecks.
  • Test thoroughly: Ensure that your applications are thoroughly tested on Windows 11 to identify and address any compatibility issues or performance regressions.
  • Leverage the Qt community: Engage with the Qt community for support, guidance, and best practices for developing applications on Windows 11.

Conclusion: A Powerful Partnership for the Future

Qt and Windows 11 represent a powerful partnership for developers seeking to create high-quality, cross-platform applications. Qt’s cross-platform capabilities, combined with Windows 11’s modern features and design language, provide a comprehensive and versatile platform for building compelling and user-friendly applications. While challenges exist, the benefits offered by this combination outweigh the potential hurdles, making Qt a valuable tool for developers working on Windows 11 projects. As both Qt and Windows 11 continue to evolve, their synergy will undoubtedly play a significant role in shaping the future of software development, enabling developers to reach wider audiences and create innovative applications that push the boundaries of what’s possible.

Qt: The Cross-Platform Development Toolkit Qt  Cross-platform software development for embedded & desktop 4 Best frameworks for cross-platform desktop app development - Scythe Studio Blog
Cross-platform app development or Why should I choose Qt?  Vakoms Qt  Cross-platform application & UI development framework Cross Platform Development Using QT Creator
Cross-Platform Development with Qt 6 and Modern C++ win11 + qt everywhere 6.4 软件安装_qt everywhere win11-CSDN博客

Closure

Thus, we hope this article has provided valuable insights into Qt and Windows 11: A Powerful Partnership for Cross-Platform Development. We thank you for taking the time to read this article. See you in our next article!

Windows 11: A Comprehensive Exploration Of Microsoft’s Latest Operating System

Windows 11: A Comprehensive Exploration of Microsoft’s Latest Operating System

Introduction

With great pleasure, we will explore the intriguing topic related to Windows 11: A Comprehensive Exploration of Microsoft’s Latest Operating System. Let’s weave interesting information and offer fresh perspectives to the readers.

Windows 11: A Comprehensive Exploration of Microsoft’s Latest Operating System

Windows 11 is now official: this is Microsoft's new operating system - MeTimeTech

Windows 11, the latest iteration of Microsoft’s flagship operating system, represents a significant evolution in the way users interact with their computers and devices. Released in October 2021, it builds upon the foundation of Windows 10, introducing a refined user interface, enhanced security features, and an array of new functionalities designed to improve productivity, creativity, and overall user experience.

A Modernized Interface: A Fresh Look and Feel

Windows 11’s most noticeable change is its redesigned user interface. The Start menu has undergone a complete overhaul, adopting a centered layout and a streamlined design that prioritizes frequently used applications and files. Taskbar icons are now centered, promoting a more balanced and aesthetically pleasing appearance. The overall aesthetic prioritizes clean lines, rounded corners, and a lighter color palette, creating a modern and visually appealing experience.

Enhanced Security: Protecting Users and Data

Security remains a cornerstone of Windows 11. Microsoft has implemented several new features to bolster system security, including:

  • Windows Hello: This biometric authentication system allows users to log in securely using facial recognition or fingerprint scanning.
  • Microsoft Defender: This built-in antivirus software provides comprehensive protection against malware, viruses, and other online threats.
  • Windows Security: This centralized security dashboard offers a unified view of system security settings, allowing users to manage various security features with ease.

Focus on Productivity: Streamlining Workflows and Collaboration

Windows 11 is designed to enhance productivity through features that streamline workflows and facilitate collaboration:

  • Snap Layouts: This feature simplifies window management, allowing users to quickly arrange multiple windows in various configurations for optimal multitasking.
  • Virtual Desktops: Users can create multiple virtual desktops to organize different tasks and workflows, enhancing focus and productivity.
  • Microsoft Teams Integration: Windows 11 integrates seamlessly with Microsoft Teams, providing a unified platform for communication, collaboration, and file sharing.

Gaming Enhancements: Elevating the Gaming Experience

Windows 11 caters to gamers with a range of features designed to enhance their gaming experience:

  • Auto HDR: This feature automatically applies HDR to games that do not natively support it, resulting in richer and more vibrant visuals.
  • DirectStorage: This technology enables faster loading times for games by allowing them to directly access storage drives, bypassing traditional bottlenecks.
  • Xbox Game Pass Integration: Windows 11 integrates with Xbox Game Pass, providing access to a vast library of games for a monthly subscription fee.

Beyond the Desktop: Expanding Windows 11’s Reach

Windows 11 is not limited to traditional desktop computers. It extends its reach to a variety of devices, including:

  • Laptops and Tablets: Windows 11 offers a seamless experience on laptops and tablets, adapting its interface and functionalities to different form factors.
  • 2-in-1 Devices: Windows 11 excels on 2-in-1 devices, providing a fluid transition between laptop and tablet modes, optimizing the user experience for both productivity and entertainment.
  • Surface Devices: Microsoft’s Surface devices, including the Surface Pro and Surface Laptop, are specifically designed to leverage the full potential of Windows 11, delivering a premium user experience.

FAQs: Addressing Common Queries about Windows 11

Q: What are the minimum system requirements for Windows 11?

A: To run Windows 11, your computer must meet the following minimum requirements:

  • Processor: 1 gigahertz (GHz) or faster with two or more cores.
  • RAM: 4 gigabytes (GB) of RAM.
  • Storage: 64 GB or larger storage device.
  • Graphics Card: Compatible with DirectX 12 or later with WDDM 2.x driver.
  • Display: High-definition (720p) display with at least 9 inches diagonally.

Q: How do I upgrade to Windows 11?

A: If your computer meets the minimum requirements, you can upgrade to Windows 11 through the Windows Update settings. You can also download the Windows 11 installation media from Microsoft’s website and perform a clean install.

Q: What are the differences between Windows 10 and Windows 11?

A: Windows 11 introduces significant changes compared to Windows 10, including a redesigned user interface, enhanced security features, improved productivity tools, and new gaming functionalities.

Q: Is Windows 11 free?

A: Windows 11 is available as a free upgrade for eligible Windows 10 devices. However, if you are purchasing a new computer, you will need to pay for a Windows 11 license.

Q: Is Windows 11 stable?

A: Windows 11 has undergone extensive testing and is generally considered stable. However, as with any new operating system, there may be occasional bugs or issues that require updates or fixes.

Tips for Optimizing Your Windows 11 Experience

  • Customize your Start Menu: Personalize your Start menu by pinning frequently used applications, organizing folders, and customizing its appearance.
  • Explore Snap Layouts: Utilize Snap Layouts to arrange windows efficiently, maximizing screen real estate and improving multitasking capabilities.
  • Utilize Virtual Desktops: Create multiple virtual desktops to separate work, leisure, and other tasks, enhancing focus and organization.
  • Enable Windows Hello: Securely log in to your device using facial recognition or fingerprint scanning for enhanced security and convenience.
  • Keep your system updated: Regularly install Windows updates to ensure optimal performance, security, and stability.

Conclusion: Embracing the Future of Computing with Windows 11

Windows 11 represents a significant leap forward in the evolution of Microsoft’s operating system. Its modernized interface, enhanced security features, and focus on productivity, creativity, and gaming provide users with a comprehensive and engaging computing experience. Whether you are a casual user or a power user, Windows 11 offers a compelling platform for work, play, and everything in between. As Microsoft continues to refine and enhance Windows 11, its future promises even greater innovations and opportunities for users to unlock the full potential of their devices.

Windows 11: this is the new Microsoft operating system - Techidence Microsoft has released version 11 of the Windows operating system - pictures What the New Windows 11 Operating System Means for Businesses
Buy Windows 11 User Guide for Beginners: A Comprehensive Guide to Master Windows 11 Operating Windows 11: Everything you need to know about the new operating system • TechBriefly Windows 11: The Ultimate Guide to the Latest Operating System by Microsoft
Microsoft Introduces New Windows 11 Operating System; An Adequate Interface to Compete with Microsoft Windows 11 Operating Systems

Closure

Thus, we hope this article has provided valuable insights into Windows 11: A Comprehensive Exploration of Microsoft’s Latest Operating System. We thank you for taking the time to read this article. See you in our next article!

A Comprehensive Guide To Wireless Sharing On Windows 10: Streamlining File Transfers

A Comprehensive Guide to Wireless Sharing on Windows 10: Streamlining File Transfers

Introduction

With enthusiasm, let’s navigate through the intriguing topic related to A Comprehensive Guide to Wireless Sharing on Windows 10: Streamlining File Transfers. Let’s weave interesting information and offer fresh perspectives to the readers.

A Comprehensive Guide to Wireless Sharing on Windows 10: Streamlining File Transfers

File Sharing over a WiFi Network in Windows 10  Share Printer  Streaming  Share PC to Mobile

Windows 10 introduced a convenient and intuitive feature called "Nearby Sharing," enabling seamless wireless file transfers between devices within close proximity. This functionality simplifies the process of sharing files, images, documents, and even web links, eliminating the need for cumbersome cables or cloud storage services. This article provides a comprehensive overview of Nearby Sharing on Windows 10, exploring its functionalities, benefits, and practical applications.

Understanding Nearby Sharing

Nearby Sharing operates on a peer-to-peer network, leveraging Bluetooth and Wi-Fi Direct to establish a secure connection between devices. This connection allows for fast and efficient data transfers without relying on a central server or internet connectivity. The technology is designed to be user-friendly, requiring minimal setup and offering a straightforward sharing experience.

Enabling and Utilizing Nearby Sharing

Enabling Nearby Sharing on a Windows 10 device is a simple process. Users can access the feature through the "Action Center" or the "Settings" menu. Once activated, nearby devices will appear on the sharing list, allowing users to select the desired recipient for the file transfer.

To share a file, users can right-click on the chosen item and select "Share." A list of available devices will appear, enabling the user to choose the intended recipient. Upon selection, the file transfer will initiate automatically, with progress displayed on the screen.

Benefits of Nearby Sharing

Nearby Sharing offers several advantages over traditional file sharing methods:

  • Simplicity: The user-friendly interface makes the process of sharing files effortless, requiring no technical expertise.
  • Speed: Transfers are typically faster than those using cloud storage services, especially for smaller files.
  • Security: Nearby Sharing uses Bluetooth and Wi-Fi Direct, ensuring secure connections and preventing unauthorized access.
  • Accessibility: The feature is available on all Windows 10 devices, eliminating compatibility issues.
  • Convenience: Users can share files without relying on internet connectivity, making it ideal for situations where internet access is limited.

Applications of Nearby Sharing

Nearby Sharing proves valuable in various scenarios:

  • Sharing files between personal devices: Transferring photos, documents, or music between a laptop and a smartphone becomes effortless.
  • Collaborating on projects: Sharing project files or presentations with colleagues in a meeting becomes convenient and efficient.
  • Sharing content with nearby devices: Sharing web links, videos, or documents with friends or family members becomes seamless.
  • Transferring files to printers: Sending documents directly to a compatible printer becomes convenient and fast.

Troubleshooting Common Issues with Nearby Sharing

While Nearby Sharing offers a seamless experience, users may encounter occasional issues:

  • Device Visibility: If a device is not visible in the sharing list, ensure both devices have Nearby Sharing enabled and are within range.
  • Connection Issues: If a connection fails, verify that both devices have Bluetooth and Wi-Fi Direct enabled and are in close proximity.
  • Sharing Restrictions: Some devices may have restrictions on sharing specific file types or require additional permissions.
  • Security Concerns: Ensure that only trusted devices are connected to avoid unauthorized access.

FAQs Regarding Nearby Sharing

Q: What are the requirements for using Nearby Sharing?

A: Nearby Sharing requires Windows 10 and Bluetooth or Wi-Fi Direct capabilities on both devices.

Q: Is Nearby Sharing secure?

A: Yes, Nearby Sharing utilizes Bluetooth and Wi-Fi Direct, which are secure protocols. However, users should be cautious about sharing files with untrusted devices.

Q: What is the maximum file size that can be shared via Nearby Sharing?

A: The maximum file size depends on the device’s storage capacity and the available bandwidth.

Q: Can I share files with devices running different operating systems?

A: Currently, Nearby Sharing is only compatible with Windows 10 devices.

Q: How do I turn off Nearby Sharing?

A: You can disable Nearby Sharing from the "Action Center" or the "Settings" menu.

Tips for Optimizing Nearby Sharing

  • Ensure both devices have Bluetooth and Wi-Fi Direct enabled.
  • Keep devices within close proximity for optimal connectivity.
  • Check for available updates to ensure compatibility and security.
  • Clear any sharing history to avoid unnecessary clutter.
  • Utilize the "Share" button to initiate file transfers efficiently.

Conclusion

Nearby Sharing on Windows 10 provides a simple and efficient way to transfer files wirelessly between devices. Its user-friendliness, speed, and security make it a valuable tool for personal and professional use. By understanding the features, benefits, and potential issues, users can leverage this technology to streamline their file sharing experience and enhance their productivity.

How to use wifi sharing in windows 10 - ICTfix How to Transfer Files from PC to PC Using WiFi Efficiently How to use wifi sharing in windows 10 - ICTfix
Wifi file share windows How to Enable Network Discovery and Configure Sharing Options in Windows 10 WINDOWS 10  Wireless Display Sharing Tutorial  MIRACAST - YouTube
Guide on How to Set Up File Sharing over a Network on Windows 10 How to use wifi sharing in windows 10 - ICTfix

Closure

Thus, we hope this article has provided valuable insights into A Comprehensive Guide to Wireless Sharing on Windows 10: Streamlining File Transfers. We thank you for taking the time to read this article. See you in our next article!

Understanding The Red Border Phenomenon: A Comprehensive Guide

Understanding the Red Border Phenomenon: A Comprehensive Guide

Introduction

In this auspicious occasion, we are delighted to delve into the intriguing topic related to Understanding the Red Border Phenomenon: A Comprehensive Guide. Let’s weave interesting information and offer fresh perspectives to the readers.

Understanding the Red Border Phenomenon: A Comprehensive Guide

Kings fall red border guide : r/destiny2

The appearance of a red border around a screen is a common phenomenon that can occur across various devices, from smartphones and laptops to televisions and monitors. While seemingly innocuous, this visual anomaly can signal underlying issues with the display hardware or software. This article aims to demystify the red border, providing a comprehensive understanding of its potential causes, implications, and solutions.

Causes of the Red Border

The red border around a screen can be attributed to a variety of factors, each requiring a different approach to resolution. Understanding the root cause is crucial for effective troubleshooting.

1. Hardware Issues:

  • Damaged Display Panel: Physical damage to the display panel, such as a cracked screen or impact-induced distortion, can lead to the appearance of a red border. This type of damage often manifests as a visible line or band of red pixels surrounding the screen’s edge.
  • Faulty Display Cable: A loose, damaged, or incompatible display cable connecting the device to the monitor can result in signal interference, leading to color distortions, including the red border.
  • Defective Motherboard: In rare cases, a malfunctioning motherboard can cause issues with the display driver, leading to color anomalies like the red border.

2. Software Issues:

  • Incorrect Display Settings: Incorrect display settings, such as an overly high resolution or refresh rate, can strain the display and lead to color distortions, including the red border.
  • Outdated or Corrupted Drivers: Outdated or corrupted display drivers can interfere with the communication between the device’s operating system and the display hardware, resulting in visual anomalies.
  • Operating System Errors: Software glitches or errors in the operating system can disrupt the display’s functionality, causing the red border.

3. Environmental Factors:

  • Extreme Temperatures: Operating a device in extreme temperatures, whether excessively hot or cold, can stress the display hardware and lead to color distortions.
  • Electromagnetic Interference: Exposure to strong electromagnetic fields, such as those emitted by nearby electrical appliances, can disrupt the display’s signal and cause visual anomalies.

Implications of the Red Border

While not always a serious problem, the red border can significantly impact the user experience. It can:

  • Reduce Visual Clarity: The red border can obscure the content on the screen, making it difficult to read text or view images.
  • Distract from Content: The presence of the red border can be visually distracting, drawing attention away from the primary content on the screen.
  • Indicate Underlying Hardware Issues: In some cases, the red border can be a sign of a more serious hardware problem, potentially leading to further display malfunctions.

Resolving the Red Border Issue

Addressing the red border requires a methodical approach, starting with simple troubleshooting steps and progressing to more complex solutions.

1. Basic Troubleshooting:

  • Check Display Settings: Ensure the display settings are appropriate for the device and monitor. Adjust the resolution, refresh rate, and color settings to see if the red border disappears.
  • Restart the Device: A simple restart can often resolve software glitches that may be causing the red border.
  • Update Drivers: Ensure the display drivers are up-to-date. Download and install the latest drivers from the device manufacturer’s website.

2. Hardware Checks:

  • Inspect Display Cable: Examine the display cable for any signs of damage, loose connections, or incorrect compatibility. Try replacing the cable with a new one.
  • Check for Physical Damage: Inspect the display panel for any signs of physical damage, such as cracks or distortions.
  • Seek Professional Assistance: If the red border persists despite basic troubleshooting, it’s advisable to seek professional assistance from a qualified technician.

3. Environmental Considerations:

  • Control Temperature: Ensure the device is operating within a comfortable temperature range. Avoid exposing it to extreme heat or cold.
  • Minimize Electromagnetic Interference: Keep the device away from sources of strong electromagnetic fields, such as electrical appliances or power lines.

FAQs about the Red Border Around Screen

1. Is the red border always a serious issue?

Not necessarily. In many cases, the red border is caused by software glitches or incorrect settings, which can be easily rectified. However, it can also indicate underlying hardware problems, so it’s essential to investigate the cause.

2. Can I fix the red border myself?

For software-related issues, basic troubleshooting steps like updating drivers or restarting the device can often resolve the problem. However, if the issue persists or involves hardware damage, it’s best to seek professional assistance.

3. How can I prevent the red border from appearing?

Regularly updating drivers, maintaining appropriate display settings, and avoiding extreme temperatures and electromagnetic interference can help prevent the red border from appearing.

4. Is the red border a common problem?

While not as frequent as other display issues, the red border is a relatively common phenomenon, particularly on older or damaged devices.

5. What should I do if the red border is accompanied by other display problems?

If the red border is accompanied by other display problems, such as flickering, distortion, or blank screen, it’s crucial to seek professional assistance immediately.

Tips for Addressing the Red Border

  • Document the Issue: Note the circumstances surrounding the appearance of the red border, including the device model, operating system, and any recent changes to settings or software.
  • Consult Online Resources: Numerous online forums and troubleshooting guides can provide insights and solutions for the red border issue.
  • Contact Device Manufacturer: If the problem persists, contact the device manufacturer’s customer support for guidance and assistance.

Conclusion

The red border around a screen, while initially appearing as a minor annoyance, can be a symptom of various underlying issues, ranging from software glitches to hardware malfunctions. Understanding the potential causes, implications, and solutions is crucial for effectively addressing the problem. By following the troubleshooting steps outlined in this article and seeking professional assistance when necessary, users can effectively resolve the red border issue and restore their display to optimal functionality.

How To Get Red Border Neomuna Weapons In Destiny 2 The Red Line: Where is the Border? - Partition Studies Figure 1 from Psychology of borders: An integral proposal to understand border phenomena in
How to get a guaranteed red-border Deepsight chest in Destiny 2 Root of Nightmares - Dot Esports Border Theories – The New Inquiry L1 - What are Borders - YouTube
How To Get Red Border Neomuna Weapons In Destiny 2 (Lightfall) - Esports Zip Red Border

Closure

Thus, we hope this article has provided valuable insights into Understanding the Red Border Phenomenon: A Comprehensive Guide. We appreciate your attention to our article. See you in our next article!

Understanding And Utilizing Disk Drive "D" In Windows 10

Understanding and Utilizing Disk Drive "D" in Windows 10

Introduction

In this auspicious occasion, we are delighted to delve into the intriguing topic related to Understanding and Utilizing Disk Drive "D" in Windows 10. Let’s weave interesting information and offer fresh perspectives to the readers.

Understanding and Utilizing Disk Drive "D" in Windows 10

How to Use D Drive Windows 10?

In the realm of computer systems, the concept of "disk drives" is fundamental. These drives, often labeled with letters such as "C" or "D," represent physical storage units that hold data. While the "C" drive typically houses the operating system (Windows 10 in this case), the "D" drive often serves as a secondary storage location. Understanding the purpose and functionality of this "D" drive is crucial for efficient file management and data organization within a Windows 10 environment.

The Role of Disk Drive "D" in Windows 10:

The "D" drive, in most Windows 10 installations, functions as an additional storage space. It can be a separate physical hard drive, a solid-state drive (SSD), or even an external storage device like a USB flash drive or an external hard disk. This secondary storage space offers several benefits:

  • Data Separation: By storing files on the "D" drive, users can keep their operating system and applications on the "C" drive, effectively separating them from personal files, documents, and media. This separation enhances system performance and stability, as it prevents potential data conflicts between the operating system and user data.

  • Increased Storage Capacity: The "D" drive provides additional storage space, allowing users to store large files, media libraries, and other data without filling up the primary "C" drive. This extra storage capacity is particularly beneficial for users who work with large files, such as graphic designers, video editors, and software developers.

  • Backup and Recovery: The "D" drive can serve as a dedicated backup location for critical data stored on the "C" drive. In case of system failure or data corruption, users can restore their files from the backup on the "D" drive, minimizing data loss and ensuring business continuity.

  • Data Security: Users can choose to encrypt the "D" drive, providing an extra layer of security for sensitive data. This encryption ensures that only authorized individuals with the correct password can access the files stored on the "D" drive.

Accessing and Managing Disk Drive "D":

Windows 10 offers several ways to access and manage the "D" drive:

  • File Explorer: The most common method is through File Explorer. Users can navigate to the "D" drive by selecting it from the left-hand pane in File Explorer. This provides a visual representation of the drive’s contents, allowing users to browse, copy, move, delete, and manage files.

  • Disk Management: The Disk Management tool provides a comprehensive overview of all storage devices connected to the computer, including the "D" drive. Users can format, partition, and manage the "D" drive using Disk Management, including resizing partitions, converting between file systems, and changing drive letters.

  • Command Prompt: Experienced users can utilize the Command Prompt to access and manage the "D" drive. Commands like "dir" (list directory contents), "cd" (change directory), and "copy" can be used to manipulate files and folders on the "D" drive.

Understanding Drive Letters:

The letter assigned to a drive, like "D" in this case, is merely a label used by Windows to identify the storage device. The letter can be changed, but it’s generally recommended to leave the default letter assigned by Windows for consistency and ease of navigation.

Benefits of Utilizing Disk Drive "D":

Utilizing a "D" drive offers numerous benefits for Windows 10 users:

  • Improved System Performance: By separating the operating system and applications from user data, the "D" drive can help improve system performance. This is because the operating system and applications can access their files faster, leading to smoother operation and quicker boot times.

  • Enhanced Data Organization: The "D" drive allows for better organization of data, making it easier to locate and manage files. Users can create folders and subfolders to categorize files based on their type, project, or purpose.

  • Increased Data Security: By storing sensitive data on a separate drive, users can enhance data security. This is particularly important for individuals who handle confidential information or financial data.

  • Simplified Backup and Recovery: The "D" drive provides a dedicated location for backups, making it easier to restore data in case of system failure. This simplifies the backup and recovery process, reducing the risk of data loss.

Frequently Asked Questions (FAQs) About Disk Drive "D" in Windows 10:

Q: How do I create a new partition for Disk Drive "D"?

A: To create a new partition for the "D" drive, follow these steps:

  1. Open Disk Management by searching for it in the Windows search bar.
  2. Right-click on the unallocated space on the disk you want to partition and select New Simple Volume.
  3. Follow the on-screen instructions to create the new partition.

Q: Can I change the drive letter assigned to Disk Drive "D"?

A: Yes, you can change the drive letter assigned to the "D" drive. To do so:

  1. Open Disk Management.
  2. Right-click on the "D" drive and select Change Drive Letter and Paths.
  3. Click on Change and select a new drive letter from the dropdown menu.
  4. Click OK to confirm the change.

Q: How do I format Disk Drive "D"?

A: To format the "D" drive, follow these steps:

  1. Open Disk Management.
  2. Right-click on the "D" drive and select Format.
  3. Choose a file system (NTFS is recommended for Windows 10) and set other formatting options as needed.
  4. Click Start to begin formatting the drive.

Q: What is the difference between NTFS and FAT32 file systems?

A: NTFS (New Technology File System) is the recommended file system for Windows 10. It offers better performance, security, and features compared to FAT32. FAT32 is an older file system that is limited in terms of file size and partition size.

Q: How do I back up data from Disk Drive "D"?

A: You can back up data from the "D" drive using various methods:

  • File History: Windows 10 includes a built-in feature called File History that automatically backs up files stored in specific folders.
  • Backup and Restore (Windows 7): This tool allows you to create a complete system image backup, including the operating system, applications, and data on the "D" drive.
  • Third-party backup software: Numerous third-party backup software solutions offer more advanced features and customization options.

Tips for Utilizing Disk Drive "D" in Windows 10:

  • Regularly back up data: It is essential to create regular backups of all important data stored on the "D" drive to protect against data loss.
  • Monitor disk space: Keep an eye on the available space on the "D" drive to avoid running out of storage.
  • Optimize disk performance: Consider defragmenting the "D" drive periodically to improve performance.
  • Use a reliable antivirus program: Protect the "D" drive from malware and viruses by installing and regularly updating a reliable antivirus program.

Conclusion:

Disk drive "D" plays a vital role in Windows 10, offering additional storage space, data separation, and enhanced security. By understanding its purpose and functionality, users can effectively utilize the "D" drive to improve system performance, organize data, and protect against data loss. Whether it’s a separate physical drive, an SSD, or an external storage device, the "D" drive provides valuable flexibility and efficiency for Windows 10 users. By applying the tips and best practices outlined in this article, users can maximize the benefits of the "D" drive and ensure a smooth and secure computing experience.

Windows 10 Disk Management Explained  Sweetwater How to perform Windows 10 disk optimization  TechTarget Windows 10 Disk Management: Your Ultimate Disk Management Guide
How to Find D Drive on Windows 10? How to Fix "Local Disk D Almost Full" in Windows 11/10/8/7 [7 Efficient Methods] - EaseUS 6 Methods: How to Free Up Space on D Drive in Windows 7, 8, 10
Disk info windows 10 - forwardfad How to install a hard drive windows 10 - masabare

Closure

Thus, we hope this article has provided valuable insights into Understanding and Utilizing Disk Drive "D" in Windows 10. We hope you find this article informative and beneficial. See you in our next article!

Reclaiming Lost Data: Navigating File Loss After Windows 10 Updates

Reclaiming Lost Data: Navigating File Loss After Windows 10 Updates

Introduction

With great pleasure, we will explore the intriguing topic related to Reclaiming Lost Data: Navigating File Loss After Windows 10 Updates. Let’s weave interesting information and offer fresh perspectives to the readers.

Reclaiming Lost Data: Navigating File Loss After Windows 10 Updates

5 Ways to Recover Lost Files After Windows 10 Update - EaseUS

Windows 10 updates are designed to enhance system performance, security, and functionality. However, these updates can sometimes lead to unexpected data loss, leaving users grappling with the frustration of missing files. This situation can be particularly distressing when essential documents, cherished photos, or critical work files vanish after a seemingly routine update. Understanding the potential causes and implementing effective recovery strategies is crucial in mitigating the impact of such data loss.

Understanding the Causes of File Loss After Updates

The reasons behind file disappearance after Windows 10 updates can vary, but several common culprits contribute to this problem:

  • File System Corruption: During an update, the file system, which manages the organization and storage of data on your hard drive, can become corrupted. This corruption can lead to file inaccessibility or even complete data loss.
  • File Deletion During Update: Windows 10 updates sometimes perform background tasks that might inadvertently delete files, particularly those located in temporary folders or system directories.
  • Drive Partition Changes: Updates can alter drive partitions, potentially moving or deleting files without explicit user consent.
  • Hardware Issues: Faulty hard drives or other hardware components can contribute to data loss during updates, making files inaccessible or corrupt.
  • User Error: Accidental file deletion or improper handling of update processes can also lead to data loss.

Strategies for Recovering Missing Files

While the prospect of lost files can be disheartening, several methods can help you reclaim your valuable data. The following strategies provide a comprehensive approach to file recovery:

1. Check the Recycle Bin:

The first step in any file recovery process is to check the Recycle Bin. Files deleted during an update might be temporarily stored there, allowing for easy retrieval.

2. Utilize File Recovery Software:

If files are not found in the Recycle Bin, specialized file recovery software can be your next line of defense. These programs scan your hard drive for deleted files, even those that have been overwritten, and attempt to restore them. Popular options include:

  • Recuva: A free and user-friendly software known for its effectiveness in recovering deleted files.
  • EaseUS Data Recovery Wizard: Offers comprehensive features for recovering various data types, including photos, videos, documents, and more.
  • Stellar Data Recovery: Provides advanced options for recovering data from formatted drives or partitions, making it suitable for more complex situations.

3. Explore Previous Versions of Windows:

Windows 10 offers a built-in feature called "Previous Versions" that creates backups of files at regular intervals. If your files were present before the update, you might be able to restore them from a previous version. Access this feature by right-clicking the missing file or folder and selecting "Properties." Navigate to the "Previous Versions" tab to view available backups.

4. Utilize System Restore:

System Restore is another built-in tool that can help revert your system to a previous state, potentially recovering lost files. This option is best used if you believe the update caused system instability or data loss. Access System Restore by searching for "Create a restore point" in the Windows search bar.

5. Seek Professional Data Recovery Services:

If all other methods fail, consider contacting a professional data recovery service. These specialists have advanced tools and expertise to recover data from damaged or inaccessible drives, providing a last resort for retrieving critical information.

Important Considerations:

  • Act Quickly: The sooner you attempt file recovery after an update, the higher the chances of success. Overwriting data on the drive can make recovery more challenging.
  • Avoid Modifying the Drive: Refrain from installing new software or creating new files on the drive where you lost data, as this can potentially overwrite deleted files and hinder recovery efforts.
  • Back Up Regularly: Implementing a regular backup routine is crucial for protecting your data. Back up your important files to external drives, cloud storage services, or other reliable backup solutions.

FAQs

Q: Can I prevent file loss during Windows 10 updates?

A: While complete prevention is not always possible, implementing a few steps can significantly reduce the risk of data loss:

  • Back up your data regularly: Create backups of important files to external drives, cloud storage, or other reliable backup solutions.
  • Perform a system restore point before major updates: This allows you to revert your system to a previous state if an update causes issues.
  • Check for system requirements: Ensure your hardware meets the minimum system requirements for the update to avoid potential compatibility problems.
  • Disable unnecessary background processes: Close unnecessary programs and services before initiating the update to minimize potential conflicts.

Q: Is data recovery software always effective?

A: File recovery software can be highly effective in recovering deleted files, especially if they haven’t been overwritten. However, the success rate depends on factors such as the extent of data loss, the age of the deleted files, and the type of drive used. It’s important to choose reputable software and follow instructions carefully for optimal results.

Q: What if I have a hardware failure after an update?

A: If you suspect hardware failure, it’s crucial to stop using the affected drive to prevent further data loss. Contact a professional data recovery service for expert assistance in retrieving data from the damaged drive.

Tips for Preventing Future File Loss:

  • Use a reliable backup strategy: Back up your data regularly to multiple locations, such as external drives, cloud storage, or network drives.
  • Keep your system updated: Regularly install Windows updates to ensure you have the latest security patches and bug fixes.
  • Create system restore points before major updates: This allows you to revert your system to a previous state if an update causes problems.
  • Avoid installing unnecessary software: Only install software from trusted sources and be cautious about downloading files from unknown websites.
  • Monitor your system for errors: Pay attention to any system errors or warnings, and address them promptly to prevent potential data loss.

Conclusion

Navigating the complexities of file loss after Windows 10 updates requires a proactive approach. Understanding the potential causes, implementing effective recovery strategies, and adopting preventive measures are crucial for minimizing the impact of data loss. While data loss can be a frustrating experience, employing the methods discussed in this article can significantly increase the chances of recovering valuable files. Remember, data is precious, and taking steps to protect it is essential in today’s digital world.

5 Ways to Recover Lost Files After Windows 10 Update - EaseUS [Solution]: How to Recover Files After Windows 10 Update? Windows 10 lost files after updates - alaskaholoser
[Solved] Lost or Missing Desktop Files after Windows 10 Update – EaseUS How To Recover Lost Files After Windows 10 Update in 2021? How To Recover Lost Files After Windows 10 Update in 2021?
Recover Lost Data After Windows 10 Update - YouTube Updated to windows 10 lost files - radiolokasin

Closure

Thus, we hope this article has provided valuable insights into Reclaiming Lost Data: Navigating File Loss After Windows 10 Updates. We thank you for taking the time to read this article. See you in our next article!

Enhancing Xbox Controller Performance On Windows 11: A Comprehensive Guide

Enhancing Xbox Controller Performance on Windows 11: A Comprehensive Guide

Introduction

In this auspicious occasion, we are delighted to delve into the intriguing topic related to Enhancing Xbox Controller Performance on Windows 11: A Comprehensive Guide. Let’s weave interesting information and offer fresh perspectives to the readers.

Enhancing Xbox Controller Performance on Windows 11: A Comprehensive Guide

How to Use Controllers in Windows 11  Gaming Verdict

The Xbox controller has become a ubiquitous input device, cherished for its comfort, responsiveness, and compatibility across various platforms. On Windows 11, this familiarity extends to gaming, emulation, and even productivity applications. However, achieving the optimal performance from an Xbox controller often requires more than simply plugging it in. This article explores the concept of enhancing controller responsiveness on Windows 11, addressing common misconceptions, and providing practical solutions.

Understanding Controller Latency

The key to understanding controller performance lies in recognizing latency, the delay between a user’s input and the game’s response. This delay can be attributed to various factors, including:

  • Bluetooth Connection: While convenient, Bluetooth connections inherently introduce latency due to the wireless communication protocol.
  • Driver Delays: Outdated or incompatible drivers can hinder communication between the controller and the operating system.
  • System Resources: High CPU and GPU utilization can lead to resource allocation conflicts, impacting controller responsiveness.
  • Game Optimization: Poorly optimized games may introduce additional delays in processing controller inputs.

Addressing Latency: The Myth of Overclocking

The term "overclocking" often conjures images of pushing hardware to its limits for increased performance. However, when it comes to Xbox controllers, the concept of overclocking is misleading. Controllers are not designed with adjustable clock speeds or frequencies that can be manipulated for enhanced performance.

Instead, the focus should be on optimizing the existing communication channels and minimizing delays introduced by the system.

Optimizing Controller Performance on Windows 11

Several strategies can be employed to improve Xbox controller responsiveness on Windows 11:

1. Wired Connection:

  • USB Connection: Opting for a wired USB connection eliminates the inherent latency associated with Bluetooth. This offers the most direct and reliable communication path between the controller and the system.
  • USB-C to USB-A Adapters: Ensure compatibility by using high-quality, certified adapters for connecting USB-C controllers to older USB-A ports.

2. Driver Updates:

  • Windows Update: Regularly update Windows to ensure the latest drivers are installed for your controller.
  • Manufacturer Website: Download the latest drivers directly from the controller manufacturer’s website, especially for newer models or specific hardware configurations.

3. System Optimization:

  • Background Processes: Close unnecessary background applications and services to free up system resources for optimal controller responsiveness.
  • Power Settings: Ensure high-performance power settings are enabled to prioritize performance over energy savings.
  • Game Settings: Adjust in-game settings to prioritize responsiveness over graphical fidelity, particularly for fast-paced games.

4. Bluetooth Optimization:

  • Bluetooth Connection Quality: Ensure a strong and stable Bluetooth connection by minimizing interference from other wireless devices.
  • Bluetooth Driver Settings: Explore advanced Bluetooth driver settings for latency reduction, though these options may vary depending on the specific driver and hardware.

5. Dedicated Software:

  • Xbox Accessories App: Utilize the Xbox Accessories app for Windows 11 to fine-tune controller settings, including button mapping, vibration intensity, and battery status.
  • Third-Party Software: Explore specialized software solutions designed to enhance controller performance, offering features like latency reduction and input remapping.

6. Game-Specific Adjustments:

  • Game Settings: Explore in-game options to adjust controller sensitivity, dead zones, and response curves for optimal gameplay.
  • Controller Configurations: Utilize game-specific controller configurations available through third-party software or online resources to optimize input mapping and responsiveness.

Frequently Asked Questions (FAQs)

Q: Can I truly "overclock" my Xbox controller?

A: No, the term "overclocking" is not applicable to Xbox controllers. Controllers do not have adjustable clock speeds or frequencies like CPUs or GPUs.

Q: Is a wired connection always better than Bluetooth?

A: In general, yes. Wired USB connections offer the most direct and reliable communication path, minimizing latency. However, Bluetooth connections can be suitable for casual gaming or when a wired connection is impractical.

Q: How do I know if my controller drivers are outdated?

A: You can check for updates through Windows Update or directly from the controller manufacturer’s website. Outdated drivers can lead to compatibility issues and reduced responsiveness.

Q: Can I improve controller responsiveness through specific Windows 11 settings?

A: Yes, Windows 11 offers various settings that can impact controller performance. Explore power settings, background processes, and Bluetooth driver options for optimization.

Q: What are the best ways to optimize Bluetooth connection quality?

A: Minimize interference from other wireless devices, ensure a strong signal strength, and consider using a dedicated Bluetooth adapter for improved connectivity.

Tips for Optimizing Xbox Controller Performance

  • Prioritize Wired Connection: Opt for a wired USB connection whenever possible for the most reliable and responsive gameplay.
  • Keep Drivers Updated: Regularly check for and install driver updates to ensure optimal compatibility and performance.
  • Minimize Background Processes: Close unnecessary applications and services to free up system resources for controller communication.
  • Adjust Game Settings: Experiment with in-game settings to prioritize controller responsiveness over graphical fidelity.
  • Utilize Dedicated Software: Explore the Xbox Accessories app or third-party software for controller configuration and optimization.
  • Monitor Connection Quality: Pay attention to Bluetooth connection strength and stability for optimal wireless performance.

Conclusion

While the term "overclocking" may not apply to Xbox controllers, achieving optimal responsiveness on Windows 11 requires a comprehensive understanding of latency and its contributing factors. By implementing the strategies outlined in this article, users can significantly enhance controller performance, leading to smoother gameplay and a more enjoyable gaming experience. Remember, the key lies in minimizing delays and optimizing the communication channels between the controller and the operating system. By addressing these factors, you can unlock the full potential of your Xbox controller on Windows 11.

Windows 11: Microsoft introduces gaming-focused controller bar for Windows Insiders Easily FIX your Xbox Controller Driver Errors in Windows 11 - YouTube Update Your Xbox Wireless Controller Now With This Performance Enhancing Firmware  HotHardware
PDP Gaming Rematch Wired Controller for Xbox One, Xbox Series X/S, and Windows PC User Guide Update Your Xbox Wireless Controller Now With This Performance Enhancing Firmware - ANSA SYSTEMS LTD How to Launch Game Controllers Settings in Windows 11
Enhancing Your Gaming: Xbox Wireless Controller - YouTube Enhancing Your Gaming Experience: How to Check Controller Battery Life on Windows  ITIGIC

Closure

Thus, we hope this article has provided valuable insights into Enhancing Xbox Controller Performance on Windows 11: A Comprehensive Guide. We thank you for taking the time to read this article. See you in our next article!