Archives November 2023

Qwindows10

qwindows10

Introduction

With enthusiasm, let’s navigate through the intriguing topic related to qwindows10. Let’s weave interesting information and offer fresh perspectives to the readers.

It appears you are asking about a hypothetical operating system called "qwindows10". There is no known operating system with that name. It’s possible you are referring to a variation of Windows 10, a common operating system for personal computers.

Windows 10 Wallpapers, Pictures, Images

However, since "qwindows10" is not a recognized operating system, I cannot provide an article about it.

If you could clarify your query by providing more context or information about what you are looking for, I might be able to assist you further. For example, you could specify:

  • What features or functionalities are you interested in?
  • What aspects of Windows 10 are you curious about?
  • Are you looking for information about a specific version of Windows 10?

By providing more details, I can help you find the information you need.

Windows 10 22H2: Everything you need to know - Pureinfotech Windows 10 Pro 22h2 Download 2023 – Get Latest Windows 10 Update Download windows 10 iso 64 bit fshare - bapebook
Microsoft unveils a lot of big changes for Windows 10 - The Verge Descargar Windows 10 gratis - Instalación Window 10 logo png, Window 10 icon transparent png 20975526 PNG
Windows 10jpeg Png Windows Windows 10 Ipentec Images Windows 10 Professional For Business - Buy Windows 10 Pro Key

Closure

Thus, we hope this article has provided valuable insights into qwindows10. We appreciate your attention to our article. See you in our next article!

Windows 11’s File Explorer: A New Era Of Organization And Efficiency

Windows 11’s File Explorer: A New Era of Organization and Efficiency

Introduction

In this auspicious occasion, we are delighted to delve into the intriguing topic related to Windows 11’s File Explorer: A New Era of Organization and Efficiency. Let’s weave interesting information and offer fresh perspectives to the readers.

Windows 11’s File Explorer: A New Era of Organization and Efficiency

Here’s What Windows 11’s New File Explorer Looks Like - How-To Geek  Explor Exs

Windows 11 introduces a revolutionary feature that transforms how users navigate and manage files: tabbed File Explorer. This innovation, inspired by modern web browsers, significantly enhances user experience by enabling seamless multi-tasking and a more intuitive approach to file management.

The Advantages of Tabbed File Explorer

Tabbed File Explorer offers a plethora of benefits, fundamentally changing how users interact with their files:

1. Enhanced Multi-tasking: The ability to open multiple file locations in separate tabs within the same File Explorer window eliminates the need to constantly switch between windows. Users can effortlessly navigate between different folders, drives, or network locations without losing track of their work. This streamlined approach significantly improves productivity, especially when working with multiple projects or managing large amounts of data.

2. Improved Organization: Tabbed File Explorer provides a more structured and organized view of files. Each tab acts as a dedicated workspace, allowing users to group related files or folders together. This eliminates the need to open numerous windows, creating a cleaner and more efficient workflow.

3. Simplified Navigation: Navigating between folders and drives is now significantly easier. Users can quickly switch between tabs to access different locations within the same window, eliminating the need to repeatedly click through menus or use the address bar. This intuitive navigation system significantly reduces time spent searching for files and improves overall efficiency.

4. Enhanced Memory Management: Tabbed File Explorer optimizes memory usage by consolidating multiple file locations into a single window. This reduces system strain and improves overall performance, particularly on systems with limited resources.

5. Consistent User Experience: The integration of tabs into File Explorer aligns with the user experience of modern web browsers, making it familiar and intuitive for users accustomed to tabbed interfaces. This consistency reduces the learning curve and allows users to seamlessly transition between applications.

Understanding Tabbed File Explorer in Action

To fully appreciate the impact of tabbed File Explorer, consider the following scenarios:

  • Working on a project: Instead of opening separate windows for project folders, documents, and images, users can now access them all within a single File Explorer window, organized into different tabs. This eliminates the clutter of multiple windows and streamlines the workflow.
  • Managing multiple files from different locations: Tabbed File Explorer allows users to open folders from different drives, network shares, or cloud storage services in separate tabs. This provides a central location for accessing and managing files from various sources, without the need to constantly switch between windows.
  • Comparing files: Users can easily open two folders in separate tabs and compare their contents side-by-side, allowing for faster and more efficient file management.

Beyond the Basics: Exploring the Potential of Tabbed File Explorer

The benefits of tabbed File Explorer extend beyond its core functionality. Here are some advanced features and potential use cases:

  • Customizable Tab Behavior: Users can customize tab behavior to suit their workflow. This includes options for pinning frequently used folders, closing tabs automatically after a certain period of inactivity, and customizing the display of tab titles.
  • Integration with Other Applications: Tabbed File Explorer can be integrated with other applications, enabling users to seamlessly open files from different programs within the same window. This eliminates the need to switch between applications and creates a more cohesive workflow.
  • Enhanced Search Functionality: Tabbed File Explorer can be combined with advanced search features, allowing users to quickly find specific files across multiple folders and drives. This streamlined search process significantly reduces the time spent searching for files.

FAQs on Tabbed File Explorer

Q: How do I enable tabbed File Explorer in Windows 11?

A: Tabbed File Explorer is a built-in feature of Windows 11 and should be automatically enabled. If you are not seeing tabs in your File Explorer, ensure you are running the latest version of Windows 11.

Q: Can I customize the appearance of tabs in File Explorer?

A: While you cannot customize the visual appearance of tabs, you can customize their behavior, such as pinning tabs or automatically closing them after a certain period of inactivity.

Q: Can I open tabs in File Explorer from other applications?

A: While you cannot directly open tabs from other applications, you can drag and drop files or folders from other programs into File Explorer to open them in a new tab.

Q: Are there any limitations to tabbed File Explorer?

A: Tabbed File Explorer is a relatively new feature, and there are some limitations. For example, you cannot currently drag and drop files between tabs or use the tabbed interface to manage files in cloud storage services. However, these limitations are expected to be addressed in future updates.

Tips for Utilizing Tabbed File Explorer

  • Organize your tabs: Use tabs to group related files or folders together, creating a more structured and efficient workflow.
  • Pin frequently used folders: Pin folders you access regularly to your tabs for quick access.
  • Customize tab behavior: Experiment with different tab settings to find what works best for you.
  • Use tabbed File Explorer with other applications: Integrate tabbed File Explorer with other programs to create a seamless workflow.

Conclusion: Embracing the Future of File Management

Tabbed File Explorer is a game-changer for Windows 11 users, offering a more intuitive, efficient, and organized approach to file management. By embracing this innovative feature, users can streamline their workflows, increase productivity, and unlock the full potential of their digital workspace. As the feature evolves, it promises to become an indispensable tool for anyone who relies on their computer for work, creativity, or personal organization.

This is Windows 11's new File Explorer, biggest update since Windows 8 Microsoft reveals brief look at Windows 11's new modern File Explorer UI  Windows Central Here's a better look at new Windows 11 File Explorer, Settings app
Windows 11 File Explorer The first preview of Windows 11 is now available How To Use The New File Explorer In Windows 11 And Cr - vrogue.co
How to enable the new File Explorer UI in Windows 11 if you're an Insider Microsoft released redesigned File Explorer for Windows 11, here is how to enable it - Neowin

Closure

Thus, we hope this article has provided valuable insights into Windows 11’s File Explorer: A New Era of Organization and Efficiency. We appreciate your attention to our article. See you in our next article!

The Allure Of PhotoImpression: A Comprehensive Exploration

The Allure of PhotoImpression: A Comprehensive Exploration

Introduction

In this auspicious occasion, we are delighted to delve into the intriguing topic related to The Allure of PhotoImpression: A Comprehensive Exploration. Let’s weave interesting information and offer fresh perspectives to the readers.

The Allure of PhotoImpression: A Comprehensive Exploration

(a) Schematic for the photoimpression patterning of photoadaptable  Download Scientific Diagram

PhotoImpression, a powerful image editing software, has long been a popular choice for both amateur and professional photographers seeking to enhance their images. While the software is no longer actively developed or supported, its legacy continues to resonate within the digital imaging community. This article delves into the features, benefits, and historical significance of PhotoImpression, providing a comprehensive understanding of its capabilities and impact.

A Glimpse into PhotoImpression’s Capabilities:

PhotoImpression, developed by MGI Software, was renowned for its user-friendly interface and an impressive range of editing tools, catering to a wide spectrum of needs. The software provided a comprehensive suite of features, allowing users to:

  • Basic Image Adjustments: PhotoImpression facilitated fundamental image modifications like brightness, contrast, saturation, and color balance adjustments, enabling users to refine the overall tone and appearance of their images.
  • Special Effects: Users could imbue their images with creative flair using a plethora of special effects, including blur, sharpen, emboss, and vignette effects, adding artistic depth and visual interest.
  • Image Manipulation: PhotoImpression offered tools for image cropping, resizing, and rotating, allowing users to tailor their images to specific requirements.
  • Text and Shapes: The software enabled users to incorporate text and various shapes into their images, facilitating the creation of personalized captions, watermarks, or decorative elements.
  • Layers and Masks: PhotoImpression’s layered editing capabilities allowed users to work with multiple image elements independently, providing flexibility and control over image composition.
  • Filters and Presets: A selection of filters and presets were available, providing quick and easy ways to apply stylistic enhancements to images, streamlining the editing process.

The Advantages of PhotoImpression:

PhotoImpression’s appeal stemmed from its user-friendliness and accessibility, making it a popular choice for individuals seeking to enhance their images without the complexities of professional-grade software.

  • Ease of Use: PhotoImpression’s intuitive interface and straightforward design made it easy for users of all skill levels to navigate and utilize its features.
  • Wide Range of Tools: The comprehensive set of tools provided a versatile platform for image manipulation, catering to diverse editing needs.
  • Affordable Pricing: PhotoImpression’s competitive pricing made it an attractive option for budget-conscious individuals seeking high-quality image editing capabilities.
  • Offline Functionality: Unlike many contemporary image editing programs, PhotoImpression operated offline, eliminating the need for an internet connection, providing greater flexibility and accessibility.

The Significance of PhotoImpression in the Digital Landscape:

While PhotoImpression is no longer actively developed, its impact on the digital landscape remains significant. It played a crucial role in democratizing image editing, making it accessible to a broader audience. Its user-friendly approach paved the way for the proliferation of image editing software, fostering creativity and visual expression among individuals.

FAQs Regarding PhotoImpression:

Q: Is PhotoImpression still available for download?

A: PhotoImpression is no longer available for download as it is no longer actively developed or supported by MGI Software.

Q: Can I still use PhotoImpression on my computer?

A: While PhotoImpression is no longer supported, you may still be able to use it on your computer if you have a previously downloaded version. However, it is important to note that the software may not be compatible with newer operating systems and may lack security updates.

Q: Are there any alternatives to PhotoImpression?

A: Numerous image editing software options are available, ranging from free open-source alternatives to professional-grade packages. Some popular alternatives include GIMP, Adobe Photoshop, Paint.NET, and Affinity Photo.

Q: What happened to PhotoImpression?

A: MGI Software ceased development and support for PhotoImpression, likely due to a combination of factors, including the emergence of newer, more advanced image editing software and the evolving demands of the digital landscape.

Tips for Using PhotoImpression:

  • Start with the basics: Begin by familiarizing yourself with the fundamental editing tools, such as brightness, contrast, and saturation adjustments, before exploring more advanced features.
  • Experiment with effects: Use the special effects and filters to explore different artistic styles and enhance your images creatively.
  • Utilize layers: Leverage the layered editing capabilities to work with multiple image elements independently, providing greater control and flexibility.
  • Save your work regularly: Regularly save your progress to prevent losing your edits in case of unexpected software crashes or interruptions.
  • Explore tutorials and online resources: Numerous online resources, tutorials, and forums are available to assist you in mastering PhotoImpression’s features and techniques.

Conclusion:

While PhotoImpression may have reached the end of its active development cycle, its legacy continues to inspire and influence the digital imaging landscape. Its user-friendly approach and powerful features made image editing accessible to a wider audience, fostering creativity and visual expression. While newer, more advanced software options have emerged, PhotoImpression remains a testament to the evolution of digital imaging tools and the enduring power of accessibility in creative expression.

The Timeless Allure of Black and White Photography: A Comprehensive Exploration – Exploring the PhotoImpressionとは何ですか?(ArcSoftより) ArcSoft PhotoImpression Software Informer: Screenshots
PhotoImpression 3.0 - Macintosh Repository wandering in the light: The Gaia Birds Revisited :: My PhotoImpressions Method wandering in the light: Creating a PhotoImpression for the final patch
The Allure of Art: A Comprehensive Exploration ArcSoft PhotoImpression 6 User Manual  Manualzz

Closure

Thus, we hope this article has provided valuable insights into The Allure of PhotoImpression: A Comprehensive Exploration. We thank you for taking the time to read this article. See you in our next article!

Navigating The Path To Windows 11: A Comprehensive Guide To Installation Methods

Navigating the Path to Windows 11: A Comprehensive Guide to Installation Methods

Introduction

With great pleasure, we will explore the intriguing topic related to Navigating the Path to Windows 11: A Comprehensive Guide to Installation Methods. Let’s weave interesting information and offer fresh perspectives to the readers.

Windows 11 User Guide A Step By Step Guide To Install And Use The New Images

The release of Windows 11 has ushered in a new era of user experience, boasting an array of enhancements and features. However, the transition from previous operating systems necessitates a meticulous approach to installation. This article delves into the various methods available for installing Windows 11, providing a comprehensive understanding of each option and its associated considerations.

1. Upgrading from a Compatible Windows 10 Version:

This method is the most straightforward option for users already running a compatible version of Windows 10. The process involves leveraging the built-in Windows Update functionality to download and install the necessary files.

Benefits:

  • Convenience: The process is automated, requiring minimal user interaction.
  • Preservation of Data: Existing user data and applications are generally retained.

Considerations:

  • System Requirements: The system must meet the minimum hardware requirements for Windows 11.
  • Compatibility: Not all Windows 10 versions are eligible for the upgrade.

2. Clean Installation via USB Drive:

This method involves creating a bootable USB drive containing the Windows 11 installation files and then booting from it to perform a fresh installation. This approach is ideal for users seeking a clean slate or experiencing system issues.

Benefits:

  • Fresh Start: Removes any existing software or data, providing a clean environment.
  • Troubleshooting: Useful for resolving system errors or conflicts.

Considerations:

  • Data Loss: All existing data will be erased during the installation process.
  • Preparation: Requires creating a bootable USB drive and backing up important data.

3. Installing from an ISO File:

This method involves downloading the Windows 11 ISO file and then using a tool like Rufus or Universal USB Installer to create a bootable USB drive. The installation process is similar to the clean installation from a USB drive.

Benefits:

  • Flexibility: Allows users to choose the specific edition of Windows 11 to install.
  • Customization: Offers the option to customize the installation process.

Considerations:

  • Technical Expertise: Requires a basic understanding of ISO files and bootable USB drives.
  • Compatibility: Ensure the ISO file is compatible with the system architecture.

4. Using a Virtual Machine:

This method involves creating a virtual environment within an existing operating system to run Windows 11. This approach is ideal for testing purposes or users who want to experiment with the new operating system without affecting their primary system.

Benefits:

  • Isolation: Creates a separate environment for Windows 11, preventing conflicts with the host system.
  • Testing: Allows users to try Windows 11 without committing to a full installation.

Considerations:

  • Performance: Virtual machines may experience performance limitations compared to a native installation.
  • Resource Requirements: Requires sufficient system resources to run both the host operating system and the virtual machine.

5. Utilizing a Third-Party Tool:

Several third-party tools, such as the Media Creation Tool, are available to assist with the Windows 11 installation process. These tools simplify the process and provide additional features, such as the ability to create bootable USB drives.

Benefits:

  • Ease of Use: Simplifies the installation process with a user-friendly interface.
  • Additional Features: May offer features like system diagnostics and partitioning tools.

Considerations:

  • Reliability: Ensure the tool is from a trusted source and has a good reputation.
  • Compatibility: Verify compatibility with the specific Windows 11 edition and system architecture.

FAQs on Windows 11 Installation:

1. What are the minimum system requirements for Windows 11?

Windows 11 requires a processor with at least two cores running at 1 GHz or faster, 4 GB of RAM, 64 GB of storage space, and a compatible graphics card. Additionally, the system must have a UEFI firmware with Secure Boot enabled.

2. Is it possible to upgrade from Windows 7 or 8.1 to Windows 11?

Directly upgrading from Windows 7 or 8.1 to Windows 11 is not possible. Users need to first upgrade to Windows 10 and then perform the upgrade to Windows 11.

3. What happens to my data during a clean installation?

A clean installation will erase all data from the target drive. It is crucial to back up important data before proceeding with a clean installation.

4. Can I perform a clean installation without a bootable USB drive?

While it is possible to install Windows 11 without a bootable USB drive, it is highly recommended to use one for a clean installation. This approach ensures a stable and reliable installation process.

5. What are the benefits of performing a clean installation?

A clean installation removes any existing software or data, providing a fresh environment and potentially resolving system issues. It also allows for a more efficient and streamlined installation process.

Tips for Successful Windows 11 Installation:

  • Check System Requirements: Ensure the system meets the minimum requirements for Windows 11 before proceeding with the installation.
  • Back Up Data: Create a complete backup of all important data before attempting any installation method.
  • Use a Reliable Tool: Opt for trusted tools and sources when creating bootable USB drives or downloading ISO files.
  • Follow the Instructions Carefully: Adhere to the instructions provided during the installation process to avoid any errors or issues.
  • Test the Installation: After the installation is complete, test the system functionality to ensure everything is working correctly.

Conclusion:

Installing Windows 11 requires careful planning and consideration of the available options. Whether upgrading from Windows 10, performing a clean installation, or utilizing a virtual machine, each method offers distinct advantages and disadvantages. Understanding the nuances of each approach and following the provided guidelines will contribute to a smooth and successful installation process. Remember to prioritize data backup and system compatibility to ensure a seamless transition to the latest version of Windows.

Windows 11 Windows 11 Installation How To Install Windows 11 Images Windows 11 Complete Installation Step By Step Youtube - Vrogue PPT - A Comprehensive Installation Guide to Windows 11 ARM With ISO PowerPoint Presentation - ID
How to Download and Install Windows 11 Official [Complete Guide] 2022 - YouTube How to install Windows 11: Step by Step Complete Guide  Electronics Monk GET (?PDF?) DOWNLOAD Windows 11: 2022 Complete User Guide. Everything You Need to Know Before
Buy Windows 11: A Complete Tutorial Guide for Beginners with Tips & Tricks to Mastering Windows How to install Windows 11: Step by Step Complete Guide - Electronics Monk

Closure

Thus, we hope this article has provided valuable insights into Navigating the Path to Windows 11: A Comprehensive Guide to Installation Methods. We appreciate your attention to our article. See you in our next article!

Restoring To Factory Defaults: A Comprehensive Guide To Device Reset

Restoring to Factory Defaults: A Comprehensive Guide to Device Reset

Introduction

With great pleasure, we will explore the intriguing topic related to Restoring to Factory Defaults: A Comprehensive Guide to Device Reset. Let’s weave interesting information and offer fresh perspectives to the readers.

Restoring to Factory Defaults: A Comprehensive Guide to Device Reset

How System Restore & Factory Reset Work in Windows 10 Free Guide

In the realm of technology, devices, from smartphones to computers, accumulate data and configurations over time. This accumulation, while reflecting personal usage, can also lead to performance issues, security vulnerabilities, or simply a desire for a fresh start. This is where the concept of a "factory reset" comes into play.

A factory reset, often referred to as a "hard reset" or "master reset," is a process that restores a device to its original state, as it was when it left the factory. This involves erasing all user data, settings, and applications, returning the device to its default configuration.

Understanding the Process

A factory reset is essentially a complete wipe of the device’s storage, including:

  • User Data: This encompasses all files, documents, photos, videos, music, and other content stored on the device.
  • Applications: All installed applications, including those pre-installed by the manufacturer, are removed.
  • Settings: Customized settings, such as Wi-Fi passwords, language preferences, and display configurations, are reset to their default values.

Reasons for Performing a Factory Reset

The need for a factory reset arises from various scenarios:

  • Performance Issues: A device might slow down due to accumulated data, corrupted files, or software bugs. A factory reset can often revitalize performance by removing these factors.
  • Security Concerns: If a device has been compromised, a factory reset can effectively remove any malicious software or unauthorized access.
  • Selling or Donating: Before selling or donating a device, a factory reset ensures the removal of all personal information, protecting privacy.
  • Troubleshooting: When encountering persistent issues that cannot be resolved through other means, a factory reset can serve as a troubleshooting step.
  • Software Upgrade: Some software updates might require a factory reset to ensure a clean installation and optimal performance.

Types of Factory Resets

Factory resets can be categorized into two primary types:

  • Full Reset: This involves erasing all data and settings, effectively returning the device to its original state.
  • Partial Reset: This option allows for the removal of specific data or settings while retaining others. This is often used to clear cache or temporary files without affecting personal data.

Steps for Performing a Factory Reset

The specific steps for performing a factory reset vary depending on the device and operating system. However, the general process typically involves the following:

  1. Backup Data: Before proceeding, it is crucial to back up all important data. This can be done through cloud storage services, external hard drives, or other backup methods.
  2. Access Settings: Locate the settings menu on the device, often represented by a gear or cog icon.
  3. Find Reset Option: Navigate to the "Reset" or "Factory Reset" option within the settings menu.
  4. Confirm Reset: The device will usually prompt for confirmation before proceeding with the reset.
  5. Wait for Completion: The reset process can take some time, depending on the device’s storage capacity and data volume.

Frequently Asked Questions

Q: Will a factory reset delete everything on my device?

A: Yes, a factory reset will erase all data, settings, and applications from the device. It is essential to back up all important data before performing a factory reset.

Q: Can I recover data after a factory reset?

A: Once a factory reset is complete, the data is typically unrecoverable. However, specialized data recovery software might be able to retrieve some data in certain cases.

Q: Will a factory reset fix all problems with my device?

A: While a factory reset can resolve many issues, it is not a guaranteed solution for all problems. Some issues might be hardware-related and require professional repair.

Q: What happens to my apps after a factory reset?

A: All applications, including pre-installed ones, will be removed. You will need to reinstall them after the reset is complete.

Q: Can I perform a factory reset remotely?

A: Some devices allow for remote factory reset through cloud services or device management platforms. However, this functionality is not available for all devices.

Tips for Performing a Factory Reset

  • Backup Data Thoroughly: Ensure all important data is backed up before proceeding with the reset.
  • Remove External Storage: Remove any external storage devices, such as SD cards, before performing the reset.
  • Read Instructions Carefully: Consult the device’s user manual or manufacturer’s website for detailed instructions.
  • Consider Professional Help: If unsure about the process or experiencing difficulties, seek assistance from a qualified technician.

Conclusion

A factory reset is a powerful tool for restoring a device to its original state. While it can effectively resolve various issues and provide a fresh start, it is crucial to understand the implications and take necessary precautions, such as backing up data, before performing the reset. By carefully considering the reasons for a factory reset and following the appropriate steps, users can leverage this process to optimize their device’s performance and security.

How to Restore The Factory Default Settings on Android Device How to Factory Reset Windows 10? Lessons I Learned From Info About How To Restore Factory Settings On A Laptop - Sumresort14
How to Restore Windows 10 to Factory Settings? How to Restore Windows to Factory Settings Easy Steps to Reset Windows 10 to Factory Settings
Restoring device factory defaults using the ELKO Smart app - ELKO Smart Technical Guides Resetting windows 10 to factory settings - industriesose

Closure

Thus, we hope this article has provided valuable insights into Restoring to Factory Defaults: A Comprehensive Guide to Device Reset. We hope you find this article informative and beneficial. See you in our next article!

Understanding And Managing Windows 11 Copilot’s Registry Presence

Understanding and Managing Windows 11 Copilot’s Registry Presence

Introduction

In this auspicious occasion, we are delighted to delve into the intriguing topic related to Understanding and Managing Windows 11 Copilot’s Registry Presence. Let’s weave interesting information and offer fresh perspectives to the readers.

Understanding and Managing Windows 11 Copilot’s Registry Presence

How To Enable Copilot In Windows 11 Registry - Image to u

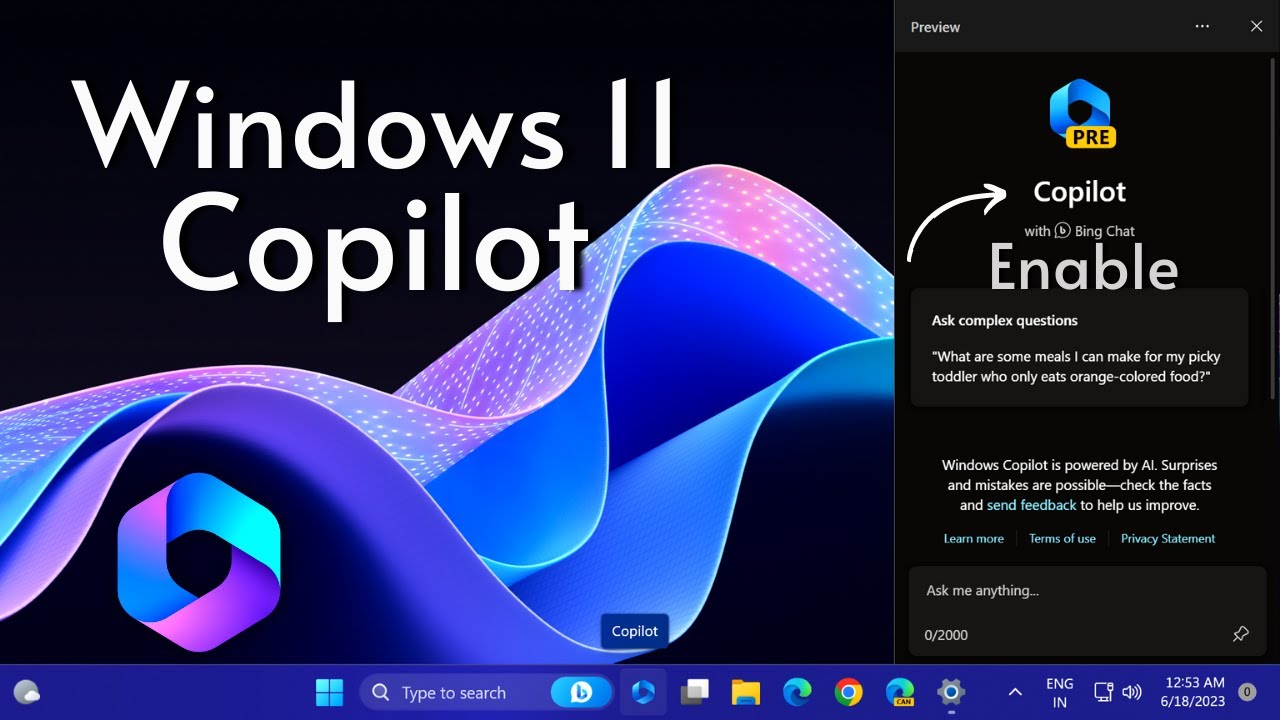
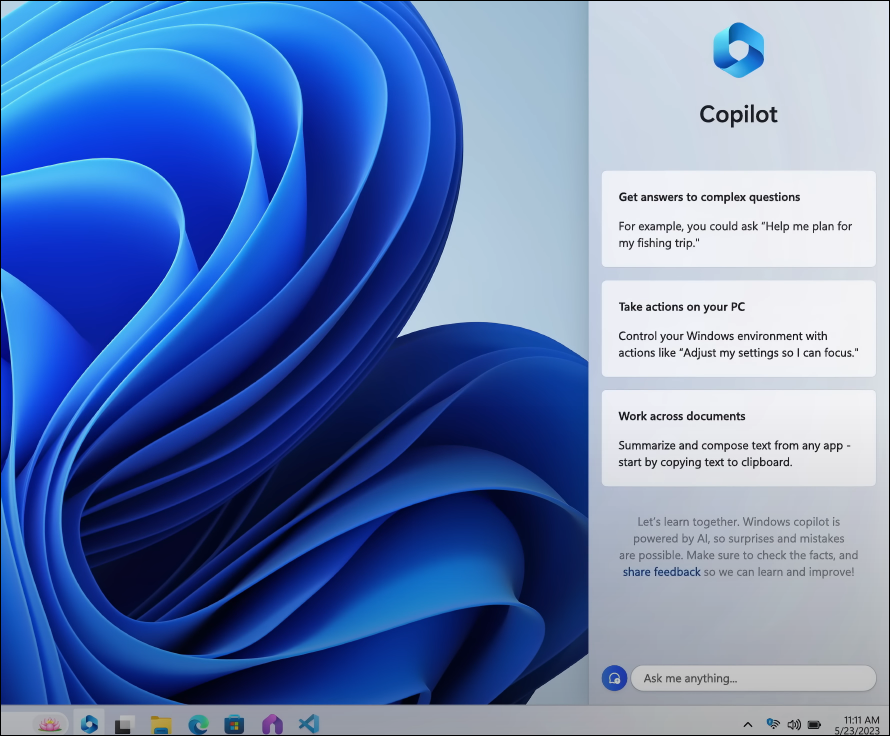
Windows 11’s Copilot, an AI-powered assistant, integrates seamlessly into the operating system, offering a range of helpful features. While Copilot’s presence enhances user experience for many, some users might prefer to remove it or manage its registry entries for various reasons, including privacy concerns, resource optimization, or specific software compatibility issues. This article delves into the intricacies of Copilot’s registry presence and offers a comprehensive guide on understanding and managing it.

Copilot’s Registry Footprint:

Copilot, like any modern software, leaves its footprint in the Windows registry, a hierarchical database that stores system settings and configuration information. This registry presence encompasses various keys and values, enabling Copilot to function effectively and interact with other system components.

The Importance of Understanding Copilot’s Registry Entries:

Understanding the purpose and structure of Copilot’s registry entries is crucial for informed decision-making. For instance, modifying or deleting specific entries might inadvertently affect other system functionalities or compromise Copilot’s performance. Conversely, a thorough understanding of these entries allows users to customize Copilot’s behavior or disable certain features without compromising the entire system.

Methods for Managing Copilot’s Registry Presence:

There are several methods for managing Copilot’s registry entries, ranging from simple tweaks to more complex modifications.

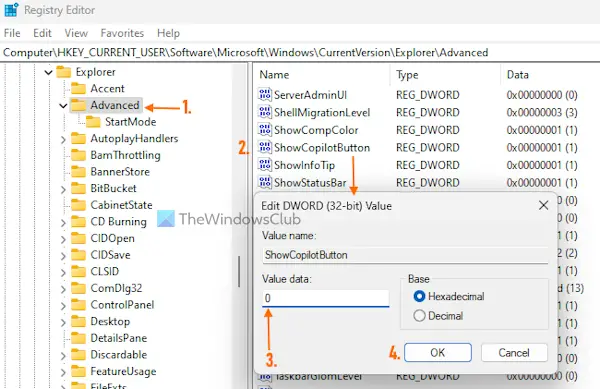
1. Using the Registry Editor:

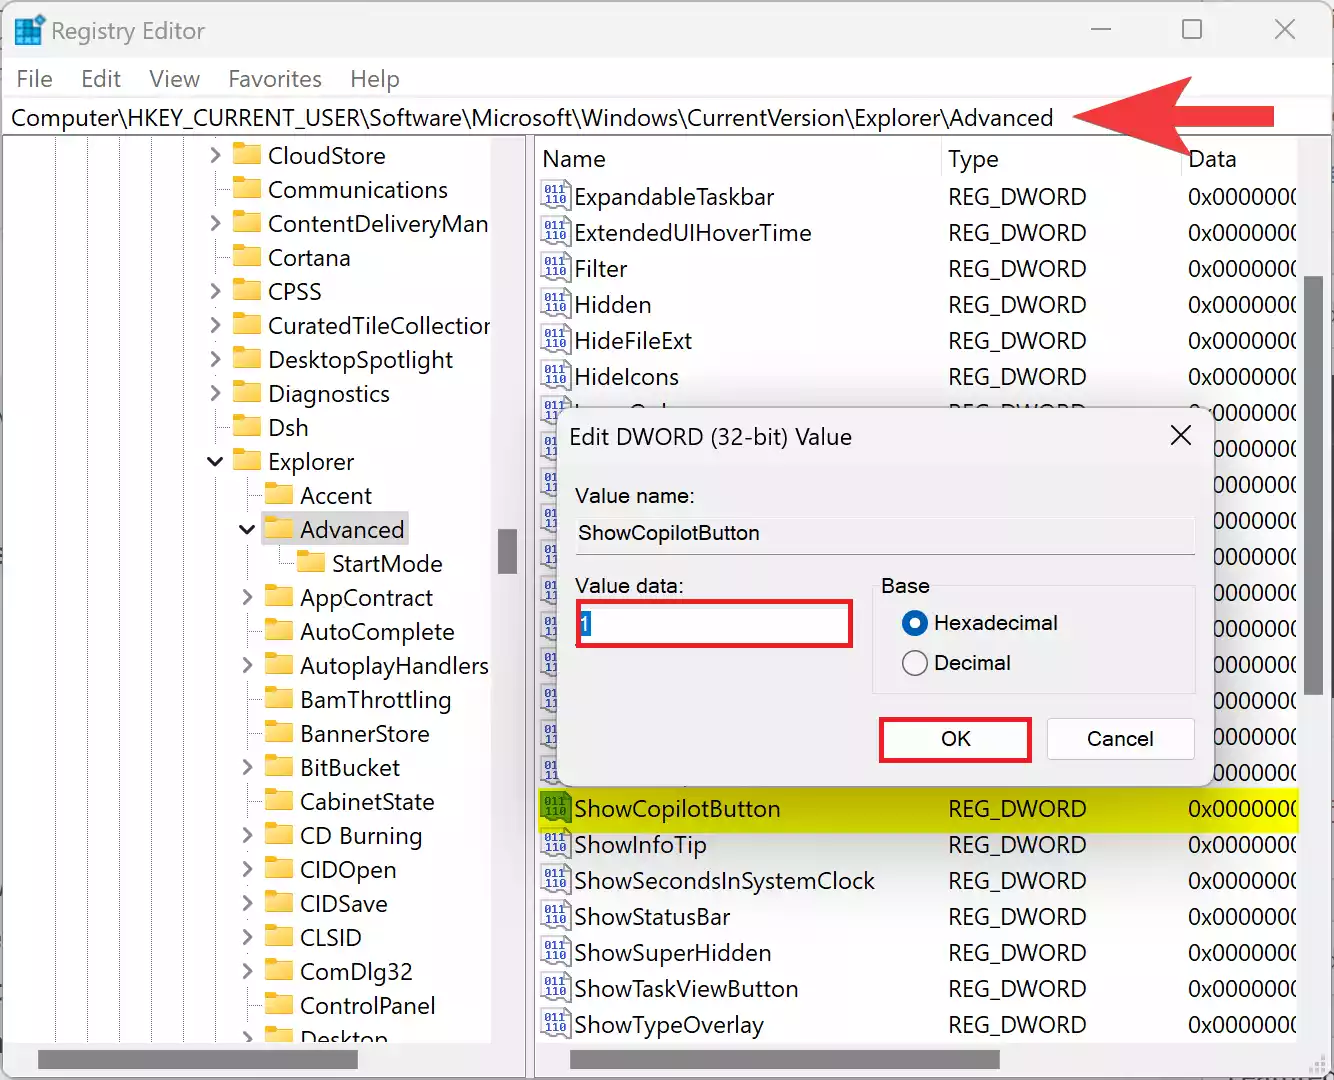
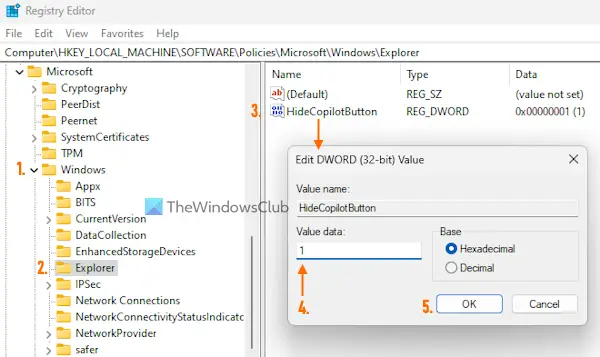
The Windows Registry Editor is a powerful tool that allows users to view, edit, and modify registry entries. However, it is essential to exercise caution when using the Registry Editor, as incorrect modifications can lead to system instability.

  • Identifying Copilot’s Registry Keys: Navigate to the Registry Editor (regedit.exe) and search for keys related to Copilot. Common locations include:
    • HKEY_LOCAL_MACHINESOFTWAREMicrosoftWindowsCurrentVersionCopilot
    • HKEY_CURRENT_USERSOFTWAREMicrosoftWindowsCurrentVersionCopilot
  • Modifying or Deleting Entries: Once identified, users can modify or delete specific entries to customize Copilot’s behavior or disable certain features.

2. Utilizing Third-Party Registry Cleaners:

Third-party registry cleaners offer a user-friendly interface for managing registry entries. These tools scan the registry for outdated or unnecessary entries, including those related to Copilot, and provide options for removal or modification. However, it is crucial to choose reputable and trusted cleaners to avoid potential system damage.

3. Using System Configuration (msconfig):

The System Configuration utility (msconfig.exe) allows users to manage startup items and services, including those related to Copilot. This method provides a more controlled approach to disabling Copilot’s functionalities without directly manipulating registry entries.

4. Employing Group Policy Editor (gpedit.msc):

The Group Policy Editor, available on professional versions of Windows, offers a powerful mechanism for managing system-wide settings, including those related to Copilot. By adjusting specific policies, users can disable or restrict Copilot’s functionalities without modifying registry entries directly.

Important Considerations:

  • Backup Before Modification: Before making any changes to the registry, it is essential to create a system restore point or back up the entire registry. This precaution safeguards against accidental data loss or system instability.
  • Understanding the Impact: Modifying registry entries can have unintended consequences. It is crucial to understand the purpose and impact of each entry before making changes.
  • Consult with Experts: If unsure about the implications of registry modifications, seeking guidance from experienced IT professionals is recommended.

Frequently Asked Questions:

Q1: Is removing Copilot from the registry safe?

A: Removing Copilot from the registry can be safe if done correctly. However, improper modifications can lead to system instability or data loss. It is essential to exercise caution and understand the purpose of each registry entry before making changes.

Q2: Will removing Copilot from the registry affect other system functionalities?

A: Removing Copilot’s registry entries might affect specific functionalities related to the AI assistant, such as voice commands or context-aware suggestions. However, it should not impact core system functionalities.

Q3: Can I restore Copilot after removing it from the registry?

A: Yes, reinstalling Copilot or restoring a system backup will usually restore its registry entries.

Q4: Are there any alternative methods for managing Copilot’s functionalities?

A: Besides registry modifications, users can disable specific Copilot features through the Windows settings or utilize alternative AI assistants available for Windows.

Tips for Managing Copilot’s Registry Presence:

  • Start with a Backup: Always create a system restore point or back up the registry before making any changes.
  • Research Before Modification: Understand the purpose and impact of each registry entry before modifying or deleting it.
  • Use Reputable Tools: If using third-party registry cleaners, choose trusted and reputable tools.
  • Consult Professionals: If unsure about registry modifications, seek guidance from experienced IT professionals.

Conclusion:

Managing Copilot’s registry presence offers users a degree of control over its functionalities and integration within Windows 11. By understanding the purpose and structure of Copilot’s registry entries, users can make informed decisions about customizing its behavior or disabling specific features. However, it is crucial to exercise caution and prioritize system stability when modifying registry entries. Utilizing appropriate methods and seeking professional assistance when needed ensures a smooth and safe experience while managing Copilot’s registry presence.

How to enable new Copilot AI on Windows 11 - Pureinfotech Turn off Copilot in Windows 11 using Settings and Registry Remove Copilot From Windows 11 Registry - Image to u
How To Enable Copilot Windows 11 23h2 - Image to u How to remove Copilot from Taskbar in Windows 11 You Can Now Try Out Windows Copilot in Windows 11; Here's a First Look!  Beebom
Что такое Windows Copilot в Windows 11 и как он работает Windows 11 Copilot: Getting started interacting with the chatbot (preview)

Closure

Thus, we hope this article has provided valuable insights into Understanding and Managing Windows 11 Copilot’s Registry Presence. We thank you for taking the time to read this article. See you in our next article!

A Window To The World: Exploring The Significance Of Official Windows 10 Wallpapers

A Window to the World: Exploring the Significance of Official Windows 10 Wallpapers

Introduction

With enthusiasm, let’s navigate through the intriguing topic related to A Window to the World: Exploring the Significance of Official Windows 10 Wallpapers. Let’s weave interesting information and offer fresh perspectives to the readers.

A Window to the World: Exploring the Significance of Official Windows 10 Wallpapers

Windows 10 official wallpaper 9 - Windows 10 Wallpaper (39400452) - Fanpop

The Windows 10 operating system, with its user-friendly interface and robust functionalities, has become an integral part of the digital landscape. Beyond its core features, however, lies a subtle yet powerful element that contributes to the overall user experience – the official wallpapers. These seemingly simple images play a significant role in shaping the visual identity of Windows 10, influencing user perception and creating a distinct aesthetic.

The Evolution of Windows Wallpapers: From Simple to Sophisticated

The history of Windows wallpapers is a reflection of evolving design philosophies and technological advancements. Early versions of Windows featured rudimentary patterns and basic graphics. As technology matured, wallpapers evolved to incorporate more complex imagery, mirroring the increasing sophistication of the operating system itself.

The transition to Windows 10 marked a paradigm shift in the approach to wallpaper design. Gone were the days of generic, static images. Instead, Microsoft introduced a curated collection of high-resolution, visually captivating wallpapers that captured the essence of the Windows 10 experience. These wallpapers are not merely decorative elements; they are carefully chosen to evoke specific emotions, enhance user engagement, and reflect the core values of the operating system.

The Importance of Official Windows 10 Wallpapers

Official Windows 10 wallpapers serve multiple purposes, extending beyond mere aesthetics. They are integral to the user experience in the following ways:

  • Setting the Tone: Wallpapers act as the first visual impression of the operating system. They set the tone for the overall user experience, influencing the perceived mood and ambiance of the desktop environment. A vibrant, dynamic wallpaper can energize the user, while a serene, minimalist design can promote focus and productivity.

  • Reflecting Brand Identity: Official Windows 10 wallpapers are carefully crafted to reflect the brand identity of Microsoft. They often feature elements that are synonymous with the company’s values, such as innovation, creativity, and user-centricity. This consistency in visual language reinforces brand recognition and strengthens the connection between users and the operating system.

  • Providing a Sense of Place: Many official Windows 10 wallpapers feature breathtaking landscapes, captivating cityscapes, or abstract designs. These images transport users to different locations and evoke a sense of place, fostering a connection to the wider world beyond the screen.

  • Enhancing User Engagement: Visually appealing wallpapers can enhance user engagement with the operating system. They provide a sense of personalization and allow users to customize their desktop environment to reflect their individual preferences. This level of engagement can lead to a more positive user experience and foster a sense of ownership over the operating system.

  • Promoting Exploration and Discovery: Official Windows 10 wallpapers often showcase a diverse range of themes and styles. This encourages users to explore different visual aesthetics and discover new perspectives. This process of exploration can spark creativity and inspire users to personalize their desktops further.

Frequently Asked Questions (FAQs)

Q: Where can I find official Windows 10 wallpapers?

A: Official Windows 10 wallpapers are typically included with the operating system itself. They can also be downloaded from the Microsoft website or the Windows Store.

Q: Can I use my own images as wallpapers?

A: Absolutely. Windows 10 allows users to personalize their desktops with their own images. This provides greater flexibility and allows users to express their individual preferences.

Q: Are there any specific guidelines for choosing a wallpaper?

A: While there are no strict guidelines, it is generally recommended to choose wallpapers that are visually appealing, high-resolution, and appropriate for the intended use.

Q: How often are official Windows 10 wallpapers updated?

A: Microsoft regularly updates its collection of official Windows 10 wallpapers. New wallpapers are typically released alongside major operating system updates or seasonal events.

Tips for Choosing and Using Official Windows 10 Wallpapers

  • Consider your work environment: If you use your computer primarily for work, choose a wallpaper that promotes focus and productivity. Minimalist designs or calming landscapes can be effective choices.

  • Experiment with different styles: Explore the diverse collection of official Windows 10 wallpapers and experiment with different themes and aesthetics. This allows you to discover what works best for you and your personal preferences.

  • Use high-resolution images: Ensure that the wallpapers you choose are high-resolution to avoid pixelation or blurry images on your screen.

  • Adjust the wallpaper settings: Windows 10 provides a range of customization options for wallpapers, such as adjusting the brightness, contrast, and tiling settings. Experiment with these options to find the optimal look for your desktop.

Conclusion

Official Windows 10 wallpapers are more than just decorative elements. They are carefully curated images that play a significant role in shaping the user experience, reflecting brand identity, and promoting engagement with the operating system. By understanding the importance of these wallpapers, users can leverage them to personalize their desktops, create a visually appealing environment, and enhance their overall interaction with Windows 10. As technology continues to evolve, the role of official Windows 10 wallpapers will likely become even more prominent, reflecting the growing importance of visual aesthetics in the digital world.

Microsoft Reveals the Official Windows 10 Wallpaper Official Windows 10 Wallpaper - WallpaperSafari Microsoft Reveals the Official Windows 10 Wallpaper
Microsoft Windows 10 Wallpaper Official - WallpaperSafari Windows 10 Wallpaper  PixelsTalk.Net Official Windows 10 Wallpaper - WallpaperSafari
Windows 10 official achtergrond 5 - Windows 10 achtergrond (39400448) - Fanpop Microsoft Reveals the Official Windows 10 Wallpaper

Closure

Thus, we hope this article has provided valuable insights into A Window to the World: Exploring the Significance of Official Windows 10 Wallpapers. We appreciate your attention to our article. See you in our next article!

Navigating Your Digital Landscape: Exploring The Benefits Of Removing Quick Access In Windows 11

Navigating Your Digital Landscape: Exploring the Benefits of Removing Quick Access in Windows 11

Introduction

With enthusiasm, let’s navigate through the intriguing topic related to Navigating Your Digital Landscape: Exploring the Benefits of Removing Quick Access in Windows 11. Let’s weave interesting information and offer fresh perspectives to the readers.

How to Remove Quick Access in Windows 11

Windows 11, with its streamlined interface and focus on user experience, offers a plethora of features designed to enhance productivity and simplify everyday tasks. One such feature, Quick Access, aims to expedite file access by displaying frequently used files and folders in the File Explorer window. While intended to streamline navigation, Quick Access can become a source of clutter and security concerns for certain users. This article delves into the reasons why removing Quick Access from Windows 11 can be a beneficial decision for specific user profiles, providing a comprehensive understanding of its implications and offering practical guidance for achieving this customization.

Understanding the Function and Potential Drawbacks of Quick Access

Quick Access, a feature introduced in Windows 8, serves as a personalized gateway to recently accessed files and folders, offering quick access to frequently used items. While convenient for many users, Quick Access can present challenges for others, particularly those prioritizing privacy or data security.

Privacy Concerns: Quick Access, by its nature, reveals a user’s browsing history and file access patterns. This information, while seemingly innocuous, can be sensitive in certain contexts. For example, individuals handling confidential documents or working in environments where privacy is paramount may find the exposure of their file access patterns undesirable.

Security Risks: The automatic inclusion of files and folders in Quick Access can inadvertently expose sensitive data. Malicious software, if present on the system, can exploit Quick Access to gain access to valuable information. Additionally, if the device is shared among multiple users, Quick Access can reveal the browsing and file access history of all users, potentially compromising privacy and security.

Cluttered Interface: For individuals who prefer a clean and organized digital workspace, Quick Access can contribute to visual clutter. The automatic inclusion of files and folders, even those not frequently accessed, can create a chaotic interface, hindering efficient navigation.

The Case for Removing Quick Access

While Quick Access offers convenience for many, its potential drawbacks necessitate a careful evaluation of its suitability for individual needs. For users prioritizing privacy, security, or a streamlined interface, removing Quick Access can be a prudent decision.

Removing Quick Access: A Step-by-Step Guide

Removing Quick Access in Windows 11 is a straightforward process, requiring a few simple steps:

  1. Open File Explorer: Navigate to the File Explorer window, either by clicking the File Explorer icon on the taskbar or by pressing the Windows key + E.

  2. Access Settings: Click on the "View" tab located at the top of the File Explorer window.

  3. Disable Quick Access: Uncheck the box labeled "Show Quick Access" in the "Options" section of the "View" tab.

  4. Confirm Changes: Click on the "Apply" button to save the changes and exit the File Explorer window.

Beyond Removal: Further Customization Options

Removing Quick Access is the initial step towards a more personalized File Explorer experience. Additional customization options are available to further refine the interface and enhance productivity:

  • Customize the "This PC" View: The "This PC" view, accessible from the left-hand pane of File Explorer, provides a structured view of your computer’s drives and folders. You can customize the displayed items, such as network locations or specific folders, by right-clicking on the "This PC" view and selecting "Properties."

  • Manage Hidden Items: By default, hidden files and folders are not displayed in File Explorer. You can choose to view hidden items by accessing the "View" tab, clicking on the "Show/Hide" group, and selecting "Hidden items."

  • Customize File Explorer Ribbon: The ribbon at the top of File Explorer provides quick access to common commands and features. You can customize the ribbon by right-clicking on any empty space and selecting "Customize the Ribbon."

FAQs: Addressing Common Questions

1. Can I remove Quick Access without losing access to my frequently used files and folders?

Yes, removing Quick Access will not delete or remove any files or folders from your system. It simply removes the dedicated Quick Access view from the File Explorer window. You can still access your frequently used files and folders through the "This PC" view or by using the search function.

2. Will removing Quick Access affect the performance of my computer?

Removing Quick Access is unlikely to have a noticeable impact on your computer’s performance. It primarily affects the File Explorer interface and does not impact system resources.

3. Can I restore Quick Access if I decide I need it later?

Yes, you can re-enable Quick Access by following the same steps outlined above but selecting the "Show Quick Access" option in the "View" tab of File Explorer.

4. What are the best alternatives to Quick Access?

Several alternatives to Quick Access can provide similar functionality with greater control and customization. These include:

  • File Explorer Search: Utilize the built-in search function in File Explorer to quickly find specific files or folders based on keywords or file types.

  • Pinned Files and Folders: Pin frequently used files or folders to the taskbar or Start menu for quick access.

  • Third-party File Managers: Explore third-party file management software offering features like file indexing, categorization, and advanced search capabilities.

Tips for Maximizing File Explorer Efficiency

Beyond removing Quick Access, several additional tips can enhance your File Explorer experience and boost productivity:

  • Use Keyboard Shortcuts: Leverage keyboard shortcuts like Ctrl + N (New Folder), Ctrl + C (Copy), Ctrl + V (Paste), and Ctrl + Z (Undo) to navigate and manage files efficiently.

  • Customize File Explorer View: Experiment with different view options, such as "Details" or "Large Icons," to find the most visually appealing and informative view for your needs.

  • Utilize File Explorer’s Search Function: Take advantage of the powerful search capabilities in File Explorer to quickly find specific files or folders based on file name, content, date modified, or file type.

  • Organize Your Files: Create a logical folder structure for your files and folders to ensure easy navigation and retrieval.

  • Utilize File Explorer’s History: Access the "Recent" or "Frequent" sections in File Explorer to quickly revisit previously accessed files and folders.

Conclusion

Removing Quick Access in Windows 11 can be a beneficial decision for users prioritizing privacy, security, or a streamlined interface. By understanding the potential drawbacks of Quick Access and exploring the available customization options, individuals can tailor their File Explorer experience to suit their specific needs and preferences. While Quick Access offers convenience, the ability to customize and refine the File Explorer environment empowers users to create a digital workspace that reflects their individual workflow and priorities.

How To Enable Or Disable Quick Access In Windows 11  techcult How to Enable or Disable Quick Access in Windows 11 – TechCult How To Enable Or Disable Quick Access Feature In Windows 11
How to Use Quick Access in Windows 11 - Guiding Tech How to Use Quick Access in Windows 11 - Guiding Tech How To Clear Quick Access In Windows 11 - vrogue.co
How To Remove Quick Access From File Explorer In Windows 11 - YouTube How to Remove Quick Access in Windows 11

Closure

Thus, we hope this article has provided valuable insights into Navigating Your Digital Landscape: Exploring the Benefits of Removing Quick Access in Windows 11. We thank you for taking the time to read this article. See you in our next article!

Navigating The NVIDIA GeForce GTX 1660 Ti Driver Landscape In Windows 11: A Comprehensive Guide

Navigating the NVIDIA GeForce GTX 1660 Ti Driver Landscape in Windows 11: A Comprehensive Guide

Introduction

In this auspicious occasion, we are delighted to delve into the intriguing topic related to Navigating the NVIDIA GeForce GTX 1660 Ti Driver Landscape in Windows 11: A Comprehensive Guide. Let’s weave interesting information and offer fresh perspectives to the readers.

How To Download nvidia geforce gtx 1660 ti graphics card Drivers - YouTube

The NVIDIA GeForce GTX 1660 Ti, a popular graphics card known for its performance and affordability, thrives in the Windows 11 environment when paired with the right drivers. These drivers, essential software components, act as the bridge between the graphics card and the operating system, ensuring smooth operation and optimal performance. This article delves into the intricacies of NVIDIA GeForce GTX 1660 Ti drivers in Windows 11, exploring their importance, installation process, troubleshooting tips, and common FAQs.

Understanding the Importance of Drivers

Drivers are the unsung heroes of the digital world, acting as translators between hardware components and the operating system. In the case of the NVIDIA GeForce GTX 1660 Ti, drivers enable the card to communicate with Windows 11, allowing it to perform tasks like rendering graphics, displaying images, and accelerating video playback. Without the correct drivers, the graphics card might not function properly, leading to issues such as screen flickering, distorted images, or even complete system instability.

The NVIDIA GeForce Experience: Your Driver Management Hub

NVIDIA GeForce Experience is a powerful tool that simplifies the driver management process. This software, available for free from NVIDIA’s website, automatically detects your graphics card and provides you with the latest drivers. It also offers features like game optimization, recording gameplay, and sharing screenshots, enhancing your overall gaming experience.

Installing the Correct Drivers: A Step-by-Step Guide

  1. Identify your graphics card: Open the NVIDIA Control Panel (right-click on the desktop and select "NVIDIA Control Panel") and navigate to "System Information" to confirm your graphics card model.
  2. Download the latest drivers: Visit the NVIDIA website and navigate to the "Drivers" section. Select your graphics card model and operating system (Windows 11).
  3. Run the installation file: Once downloaded, run the executable file and follow the on-screen instructions.
  4. Restart your computer: After installation, restart your computer for the changes to take effect.

Troubleshooting Common Driver Issues

While the driver installation process is generally straightforward, encountering issues is not uncommon. Here’s a breakdown of common problems and their solutions:

  • Driver incompatibility: If you’re experiencing problems after installing new drivers, consider reverting to the previous version. You can find older drivers on the NVIDIA website or through the GeForce Experience.
  • Corrupted drivers: Corrupted drivers can lead to various issues. Try reinstalling the drivers after completely removing the old ones. Use the NVIDIA Display Driver Uninstaller (DDU) for a thorough removal.
  • Outdated drivers: Outdated drivers can cause performance issues and compatibility problems. Ensure you’re using the latest drivers by checking for updates through GeForce Experience or the NVIDIA website.
  • Driver conflicts: If you’re experiencing issues with other software or hardware, try updating or reinstalling the conflicting programs.

Frequently Asked Questions (FAQs) about NVIDIA GeForce GTX 1660 Ti Drivers in Windows 11

Q: How often should I update my drivers?

A: It’s recommended to update your drivers regularly, at least every few months, to benefit from performance enhancements, bug fixes, and new features.

Q: Can I use drivers from older Windows versions?

A: Using drivers designed for older Windows versions on Windows 11 is not recommended. This can lead to compatibility issues and potential system instability.

Q: What if I can’t find drivers for my specific model?

A: If you’re unable to find drivers for your specific model on the NVIDIA website, it’s possible that your graphics card is no longer supported. Consider updating your graphics card or contacting NVIDIA support for assistance.

Q: Can I manually install drivers?

A: While you can manually install drivers, it’s generally recommended to use GeForce Experience or the NVIDIA website for automatic installation. Manual installation can be more complex and may require advanced technical knowledge.

Tips for Optimal Driver Performance

  • Keep your operating system updated: Ensure that your Windows 11 installation is up-to-date with the latest security patches and updates.
  • Use the latest drivers: Regularly check for driver updates through GeForce Experience or the NVIDIA website.
  • Monitor your system temperatures: Overheating can cause performance issues and driver instability. Ensure proper cooling for your graphics card and system.
  • Clean your system: Regularly clean your system from dust and debris, as this can affect airflow and cooling.
  • Use the NVIDIA Control Panel: This tool allows you to customize graphics settings for individual games and applications, potentially improving performance.

Conclusion

The NVIDIA GeForce GTX 1660 Ti remains a compelling graphics card in the Windows 11 environment, delivering a balanced blend of performance and affordability. Optimizing its performance relies heavily on the proper installation and management of drivers. By following the guidelines provided in this article, users can ensure a smooth and enjoyable experience with their NVIDIA GeForce GTX 1660 Ti in Windows 11, maximizing its potential and reaping the benefits of its powerful capabilities.

How to install nvidia drivers for gtx1660 ti - saskool Update GTX 1660 Ti Drivers For Better Gaming Experience - Driver Easy Driver Gtx 1660 Ti Download  donyaye-trade.com
Download NVIDIA GeForce GTX 1660 Ti driver Introducing GeForce GTX 1660 Ti: The Perfect 1080p Upgrade  GeForce News  NVIDIA Gtx 1660 Ti Drivers Download / Download drivers for nvidia geforce gtx 1660 ti video cards
New Game Ready Driver Released: Includes Support For GeForce GTX 1660 SUPER; Adds ReShade How to Update GTX 1660 Driver  Quickly & Easily - Driver Easy

Closure

Thus, we hope this article has provided valuable insights into Navigating the NVIDIA GeForce GTX 1660 Ti Driver Landscape in Windows 11: A Comprehensive Guide. We appreciate your attention to our article. See you in our next article!

The Silent Symphony: Troubleshooting No Sound After Windows 11 Installation

The Silent Symphony: Troubleshooting No Sound After Windows 11 Installation

Introduction

With enthusiasm, let’s navigate through the intriguing topic related to The Silent Symphony: Troubleshooting No Sound After Windows 11 Installation. Let’s weave interesting information and offer fresh perspectives to the readers.

The Silent Symphony: Troubleshooting No Sound After Windows 11 Installation

No Sound After Windows 11 Update Or Sound Missing Problem - 7 Fix How To - YouTube

The transition to Windows 11 promises a fresh and enhanced user experience, but the lack of sound after installation can quickly turn the excitement into frustration. A silent operating system, devoid of the auditory cues we have come to rely on, can be both jarring and inconvenient. This article delves into the common causes behind this issue, providing a comprehensive guide to troubleshooting and restoring your audio experience.

Understanding the Silent Symphony: Potential Culprits

The absence of sound after a Windows 11 installation can stem from a variety of factors, each requiring a specific approach to resolution. The most common culprits include:

  • Driver Issues: The absence of, or incompatibility with, the correct audio drivers is a primary suspect. During the installation process, Windows may not automatically install the necessary drivers for your specific sound card or integrated audio chip. This leads to the system failing to recognize the audio hardware, resulting in silence.

  • Audio Services Deactivation: Windows relies on various services to manage audio functionality. These services could have been inadvertently disabled during the installation process, preventing sound output.

  • System Configuration Errors: Incorrect settings within the sound configuration panel, such as the default playback device or output volume, can also contribute to the silence.

  • Hardware Malfunction: While less common, a physical issue with the sound card or its connection to the motherboard could be the root cause. This could involve a faulty sound card, loose connections, or even a damaged audio jack.

The Diagnostic Symphony: Identifying the Root Cause

Before embarking on troubleshooting, it is essential to systematically identify the source of the problem. This can be achieved through a series of checks:

  1. Device Manager Inspection: The Device Manager provides a comprehensive overview of your system’s hardware. Navigate to the "Sound, video and game controllers" section. If the audio device appears with a yellow exclamation mark, it indicates a driver issue.

  2. Windows Audio Services Check: Ensure that the Windows Audio service is running. Access the services window by searching for "services.msc" in the search bar. Locate the "Windows Audio" service and confirm its status. If it is stopped, start it manually.

  3. Sound Configuration Verification: Open the sound settings by searching for "Sound" in the search bar. Verify that the correct output device is selected and that the volume is not muted.

The Symphony of Solutions: Restoring Sound

Armed with an understanding of the potential causes, we can now explore the solutions for each scenario:

1. Addressing Driver Issues:

  • Automatic Driver Installation: Windows Update is often a reliable source for driver updates. Access the Windows Update settings and check for available updates. If a new audio driver is available, install it.

  • Manual Driver Installation: If Windows Update fails to provide the necessary driver, visit the manufacturer’s website for your motherboard or sound card. Download the latest drivers for your specific model and install them manually.

  • Driver Rollback: If a recent driver update caused the sound issue, consider rolling back to the previous version. Right-click the audio device in Device Manager, select "Properties," and navigate to the "Driver" tab. Choose "Roll Back Driver" to revert to the previous version.

2. Reactivating Audio Services:

  • Windows Audio Service: Locate the "Windows Audio" service in the services window. If it is stopped, start it manually. Right-click the service, select "Properties," and ensure the startup type is set to "Automatic."

  • Other Audio Services: Other services, such as "Multimedia Class Scheduler" and "Windows Time Service," may indirectly influence audio functionality. Check their status and ensure they are running.

3. Correcting System Configuration:

  • Default Playback Device: In the sound settings, verify that the correct output device is selected. If multiple devices are listed, choose the one corresponding to your speakers or headphones.

  • Volume Levels: Check the volume levels for both the system and the selected output device. Ensure that neither is muted or set to a very low level.

4. Diagnosing Hardware Issues:

  • Sound Card Connectivity: Ensure that the sound card is properly connected to the motherboard. If using an external sound card, check the connection to the USB port.

  • Audio Jack Integrity: Inspect the audio jack for any damage or debris. Try cleaning the jack with a compressed air can.

  • Hardware Testing: If you suspect a hardware failure, consider using a dedicated hardware testing tool to diagnose the issue.

FAQs: Addressing Common Concerns

Q: Why is there no sound after upgrading to Windows 11?

A: The upgrade process can sometimes disrupt audio settings or driver compatibility. This is why it’s essential to check the sound configuration, update drivers, and ensure audio services are running after the upgrade.

Q: My speakers are working with other devices, but not with Windows 11. What could be the issue?

A: This suggests a software-related issue, likely a driver incompatibility or incorrect system settings. Follow the troubleshooting steps outlined above to address these possibilities.

Q: I have tried all the troubleshooting steps, but still no sound. What should I do?

A: If all other solutions fail, consider contacting Microsoft support or consulting a computer technician for further assistance.

Tips for Preventing Future Silence:

  • Regular Driver Updates: Stay up-to-date with the latest drivers for your audio hardware to ensure compatibility and optimal performance.

  • Backup System Settings: Before making any significant changes to your system, create a system restore point. This allows you to revert to a previous state if any issues arise.

  • Monitor Audio Services: Keep an eye on the status of audio services, especially after major system changes or updates.

Conclusion: The Harmony Restored

The absence of sound after a Windows 11 installation can be a frustrating experience, but by understanding the potential causes and following the troubleshooting steps outlined, you can restore the harmonious symphony of your computer’s audio. Remember to be patient, persistent, and systematic in your approach, and you will soon be enjoying the full spectrum of sound from your Windows 11 system.

No Audio Device Installed Windows 11 6 Ways to Fix Windows 11 Sound Not Working Permanently How To Fix No Sound Output Problems On Windows 11  Fix All Audio Issues
No Sound After Windows 11 Update Or Sound Missing Problem FIXED - YouTube Fix No Audio After Windows 11 Update 3 Minute 2022 (2023) Download How To Fix: Sound 10 Sou - Vrogue Fix No Audio after Windows 11 Update [3 Minute Fix 2024]
How to Fix No Audio After Installing Windows 11 on PC/Laptop  Видео How to Fix No Sound After Windows 11 Update - Sound Not Working - YouTube

Closure

Thus, we hope this article has provided valuable insights into The Silent Symphony: Troubleshooting No Sound After Windows 11 Installation. We thank you for taking the time to read this article. See you in our next article!