Archives November 2023

Windows 10: A Retrospective And Assessment

Windows 10: A Retrospective and Assessment

Introduction

With great pleasure, we will explore the intriguing topic related to Windows 10: A Retrospective and Assessment. Let’s weave interesting information and offer fresh perspectives to the readers.

Windows 10: A Retrospective and Assessment

35 years of Microsoft Windows: A retrospective

Windows 10, released in 2015, marked a significant shift in Microsoft’s operating system strategy. It aimed to unify the user experience across various devices, from traditional desktops to tablets and smartphones. This ambition, coupled with a commitment to regular updates, has led to a complex and multifaceted legacy. This article delves into the evolution of Windows 10, exploring its strengths, weaknesses, and its lasting impact on the computing landscape.

The Rise of Windows 10: A Unified Vision

Windows 10’s initial appeal stemmed from its promise of a single, consistent operating system across diverse platforms. The "Universal Windows Platform" (UWP) was intended to enable developers to create apps that functioned seamlessly on desktops, laptops, tablets, and phones. This vision, while ambitious, faced challenges in execution. While UWP apps gained traction on some devices, the desktop experience remained largely unchanged, leading to a fragmented ecosystem.

The Power of Updates: A Double-Edged Sword

Windows 10 adopted a continuous update model, pushing out new features and security patches regularly. This approach, while ensuring a constantly evolving system, also introduced challenges. Users often faced unexpected changes, performance issues, and even data loss due to buggy updates. The forced update policy, particularly in the early years, also generated frustration among users who preferred greater control over their system’s updates.

A Look at the Positives: The Strengths of Windows 10

Despite its complexities, Windows 10 boasts several significant strengths:

  • Security Enhancements: Windows 10 introduced robust security features, such as Windows Defender Antivirus, a built-in security suite that effectively combats malware threats. The operating system also incorporated features like Windows Hello, enabling biometric authentication for enhanced security.
  • Improved Performance: Windows 10 brought performance enhancements, particularly in areas like boot times and application loading. The operating system’s resource management was optimized, leading to a smoother user experience, especially on newer hardware.
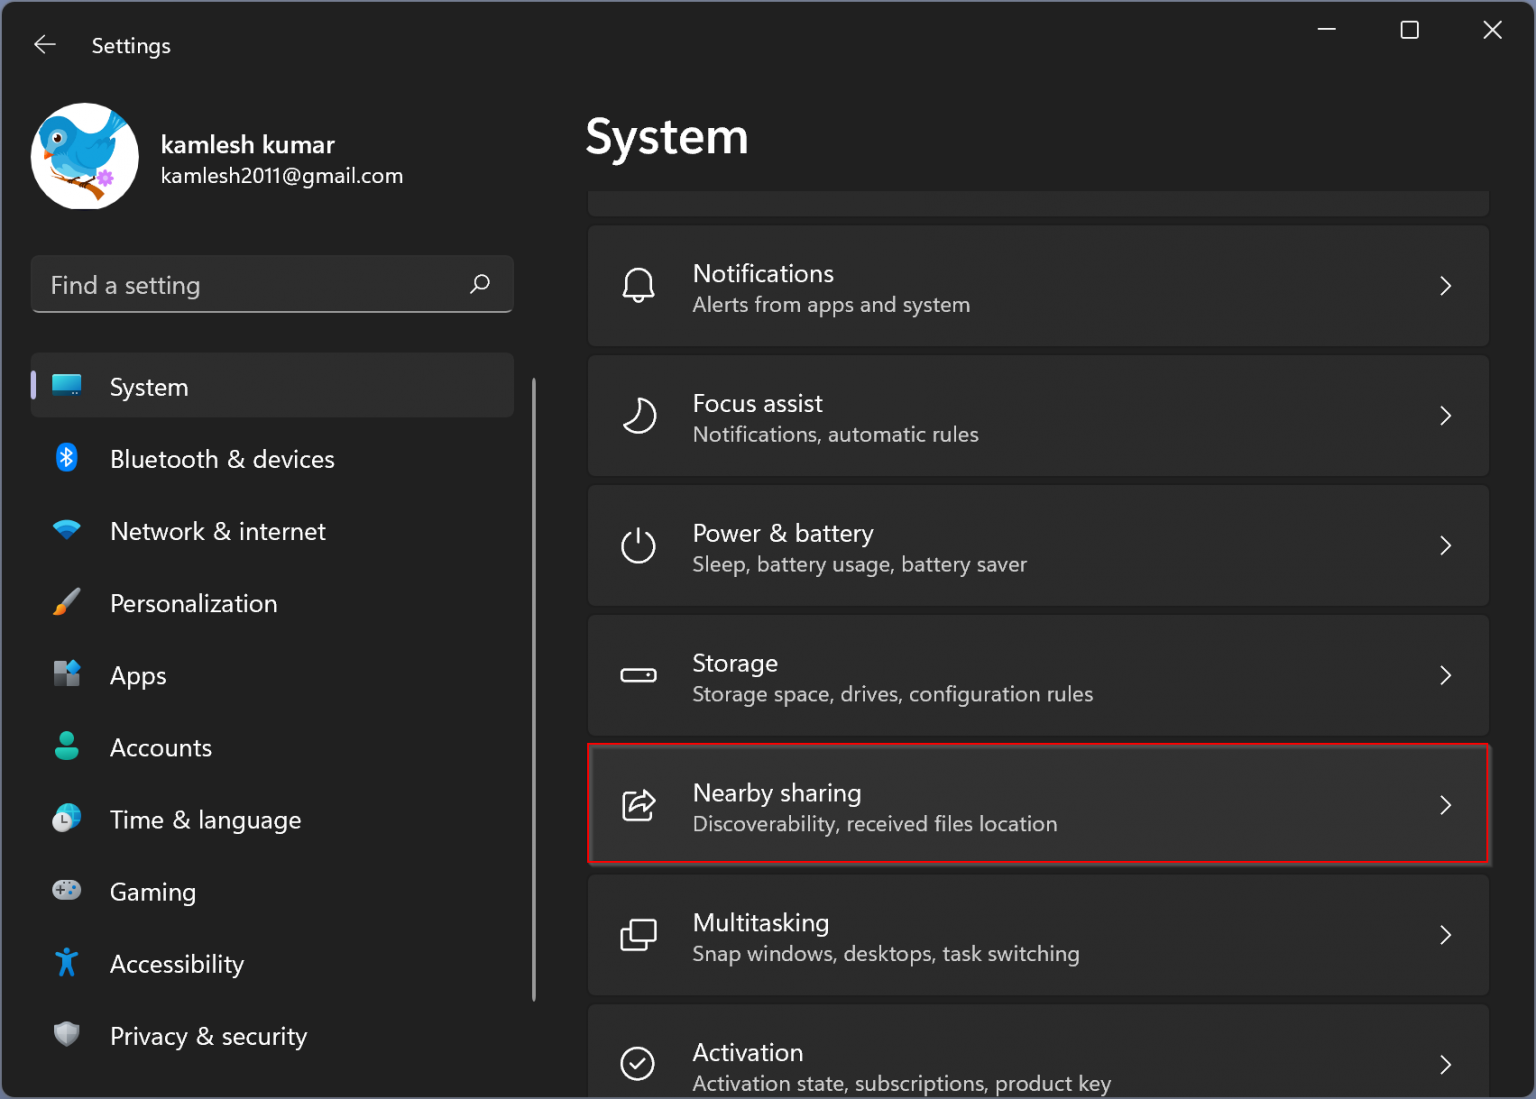
  • User-Friendly Interface: Windows 10 introduced a user-friendly interface with a modernized Start menu, a more intuitive taskbar, and a streamlined settings app. These changes simplified navigation and made the operating system more accessible for both novice and experienced users.
  • Gaming Enhancements: Windows 10 incorporated features like DirectX 12, enhancing gaming performance and graphics quality. The operating system also introduced the Xbox app, enabling seamless integration with Xbox consoles and Xbox Game Pass, a subscription service offering access to a vast library of games.

Addressing the Concerns: The Weaknesses of Windows 10

While Windows 10 boasts several strengths, it also faces criticism for certain shortcomings:

  • Privacy Concerns: Windows 10 faced criticism for its data collection practices, particularly regarding telemetry data sent to Microsoft servers. Users expressed concerns about the extent of data collection and its potential impact on privacy.
  • Resource Consumption: While Windows 10 offers performance enhancements, it is also known for its resource consumption. The operating system can be demanding on older hardware, leading to slower performance and reduced battery life.
  • Forced Updates: The forced update policy, particularly in the early years, was a point of contention for many users. Users felt frustrated by the lack of control over update schedules and the potential for disruptive updates.
  • Compatibility Issues: Windows 10, despite its compatibility efforts, faced challenges in supporting legacy software and hardware. This issue posed a significant hurdle for users who relied on older applications or peripherals.

The Evolution of Windows 10: A Journey of Adaptation

Over the years, Microsoft has addressed many of the concerns raised regarding Windows 10. The operating system has undergone significant changes, focusing on:

  • Enhanced Privacy Controls: Microsoft has introduced more granular privacy controls, allowing users to manage data collection and sharing more effectively.
  • Improved Update Management: Microsoft has shifted towards a more user-centric approach to updates, offering more control over update schedules and allowing users to delay or pause updates.
  • Focus on Performance: Microsoft has continued to optimize Windows 10 for performance, focusing on resource management and streamlining the operating system for better responsiveness.

Windows 10: A Legacy of Change and Innovation

Windows 10’s legacy is complex and multifaceted. It brought significant improvements in security, performance, and user experience, but it also faced challenges in privacy, resource consumption, and forced updates. Microsoft’s ongoing efforts to address these concerns have resulted in a more user-friendly and stable operating system.

However, the continuous updates and the evolving nature of the operating system have created a sense of uncertainty for many users. As technology continues to advance, the future of Windows 10 remains to be seen.

FAQs on Windows 10

1. Is Windows 10 still supported?

Yes, Windows 10 is still supported by Microsoft. However, the support lifecycle varies depending on the specific edition of Windows 10. For example, Windows 10 Home and Pro editions released in October 2020 are supported until October 14, 2025, while Windows 10 Enterprise and Education editions released in October 2020 are supported until October 14, 2025.

2. What are the system requirements for Windows 10?

The system requirements for Windows 10 vary depending on the edition and intended use. However, general requirements include:

  • Processor: 1 GHz or faster processor
  • RAM: 1 GB for 32-bit or 2 GB for 64-bit
  • Storage: 16 GB for 32-bit or 32 GB for 64-bit
  • Graphics: DirectX 9 or later with WDDM 1.0 driver
  • Display: 800 x 600 resolution

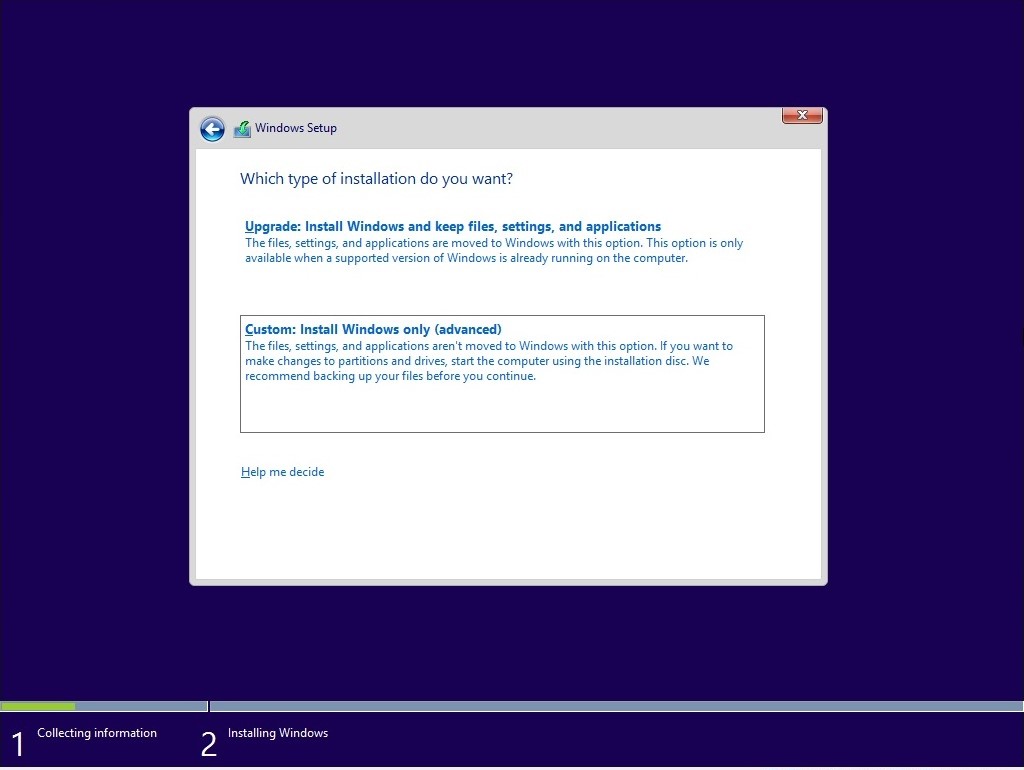
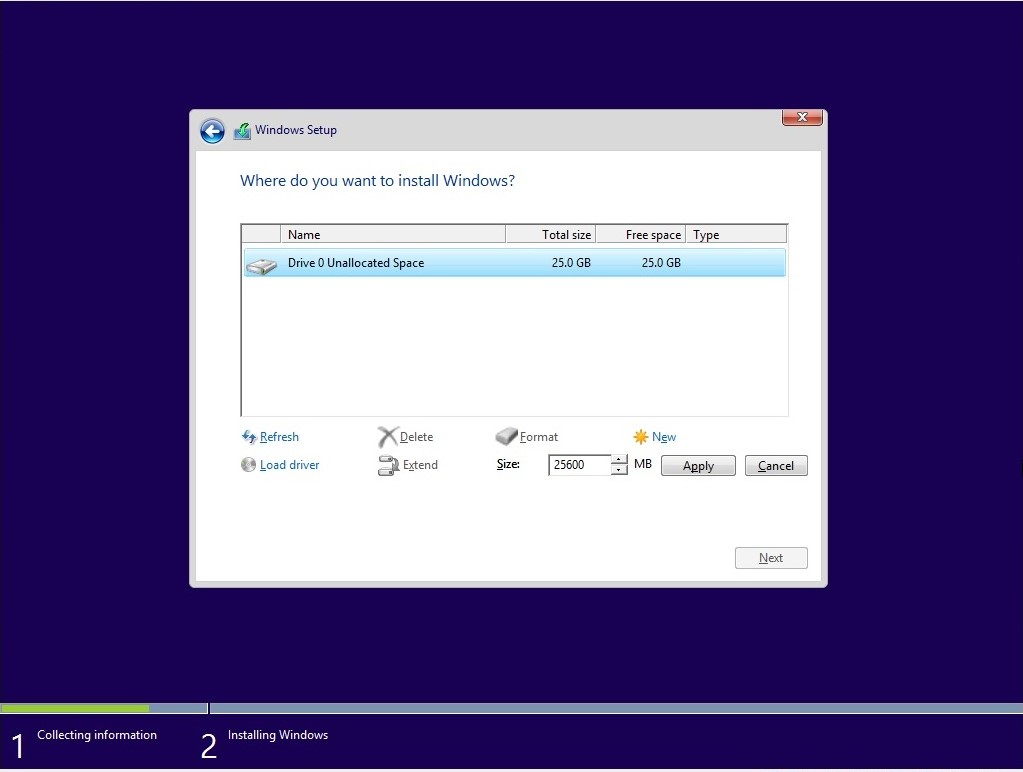
3. How do I upgrade to Windows 10?

To upgrade to Windows 10, you can either purchase a retail copy or use the free upgrade offer provided by Microsoft in the past. If you have a valid Windows 7 or Windows 8.1 license, you may be eligible for a free upgrade.

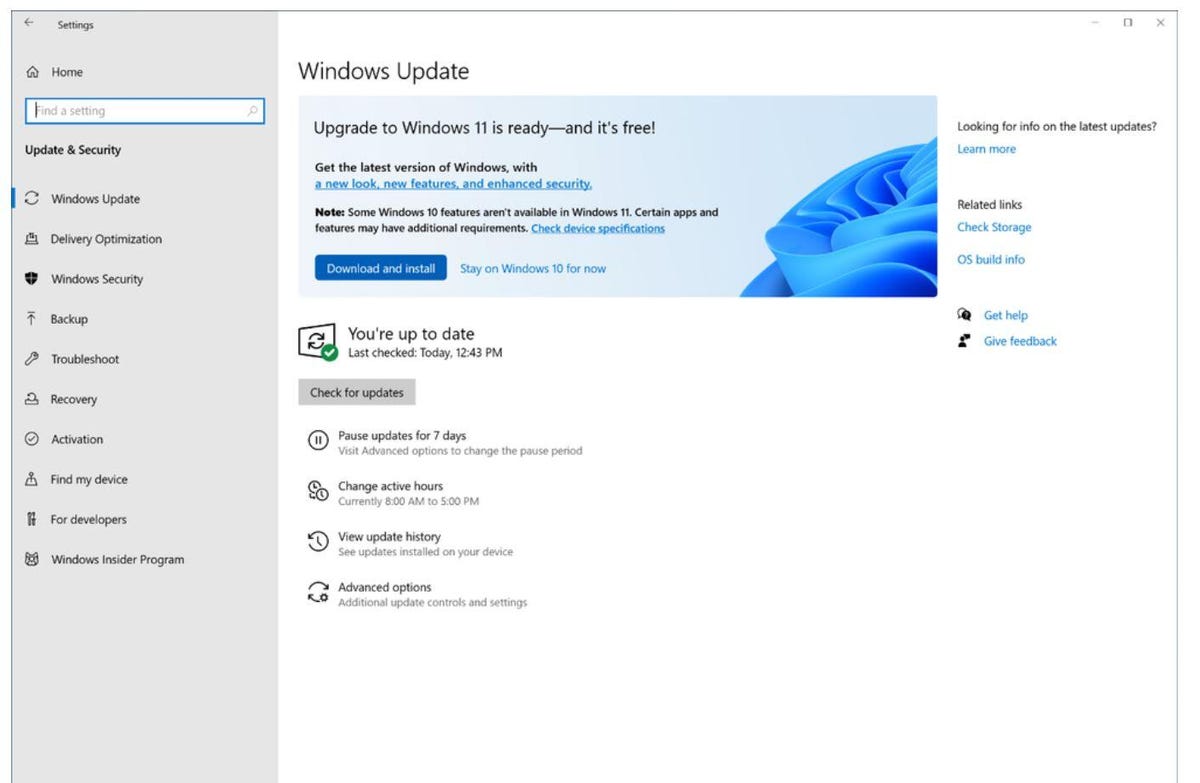
4. How do I update Windows 10?

Windows 10 updates automatically in the background. You can check for updates manually by going to Settings > Update & Security > Windows Update. You can also schedule updates or choose to delay them for a specific period.

5. What are the differences between Windows 10 Home, Pro, Enterprise, and Education editions?

The different editions of Windows 10 offer varying features and functionalities. Windows 10 Home is designed for home users, while Windows 10 Pro offers additional features for businesses and professionals, such as domain join and BitLocker encryption. Windows 10 Enterprise is intended for large organizations and includes advanced security and management features, while Windows 10 Education is specifically designed for educational institutions.

Tips for Windows 10 Users

  • Keep your system updated: Regularly install updates to ensure your system is protected from security vulnerabilities and to enjoy the latest features.
  • Manage your privacy settings: Review and adjust your privacy settings to control data collection and sharing.
  • Use a reliable antivirus: Install and keep a reliable antivirus program updated to protect your system from malware threats.
  • Optimize your system: Regularly clean up your system by deleting unnecessary files and programs to improve performance.
  • Back up your data: Regularly back up your important data to prevent data loss in case of system failure or hardware malfunction.

Conclusion: A Look Ahead

Windows 10 has undoubtedly left a lasting mark on the computing landscape. It has introduced significant changes in user experience, security, and performance. While it faced challenges in privacy, resource consumption, and forced updates, Microsoft has addressed many of these concerns over time.

As technology continues to evolve, the future of Windows 10 remains uncertain. Microsoft’s commitment to continuous updates and its focus on user feedback will be crucial in determining the operating system’s long-term success.

30 ans de Windows : rétrospective en images Microsoft Windows turns 30: A brief retrospective - ExtremeTech Microsoft makes Windows 10 21H2 and Windows 11 previews available for commercial testing  ZDNet
Maximize the Benefits of Scrum Retrospectives with New Azure DevOps Extension - Panu Oksala How To Do A Retrospective + (Step-by-Step Playbook and Example) Microsoft Windows turns 30: A brief retrospective - ExtremeTech
GitHub - microsoft/vsts-extension-retrospectives: An Azure DevOps extension for efficient Windows 11'den Windows 10'a Nasıl Dönüş Yapılır?

Closure

Thus, we hope this article has provided valuable insights into Windows 10: A Retrospective and Assessment. We hope you find this article informative and beneficial. See you in our next article!

A Comprehensive Guide To The New Outlook App For Windows 10

A Comprehensive Guide to the New Outlook App for Windows 10

Introduction

In this auspicious occasion, we are delighted to delve into the intriguing topic related to A Comprehensive Guide to the New Outlook App for Windows 10. Let’s weave interesting information and offer fresh perspectives to the readers.

A Comprehensive Guide to the New Outlook App for Windows 10

Our first look at new Outlook app for Windows 10 with rounded corners

The Microsoft Outlook application has long been a staple for managing email, calendar, contacts, and tasks. In recent years, Microsoft has undertaken a significant overhaul of the Outlook experience, introducing a new, modern, and feature-rich application designed specifically for Windows 10. This new Outlook app offers a streamlined interface, enhanced functionality, and a focus on user productivity, making it a compelling alternative for users seeking a more efficient and intuitive email management solution.

Understanding the New Outlook App’s Core Features

The new Outlook app for Windows 10 distinguishes itself through a range of key features that address the evolving needs of users in a digital world:

  • Unified Inbox: The new Outlook app consolidates all your email accounts into a single, unified inbox. This eliminates the need to switch between multiple applications or tabs, streamlining your email management process and enhancing productivity.

  • Focused Inbox: Recognizing the ever-growing volume of emails, Outlook introduces a "Focused Inbox" feature. This intelligent system automatically prioritizes important emails from known senders, while moving less critical emails to a "Other" tab. This intelligent categorization allows users to focus on high-priority messages first, reducing email overload and improving efficiency.

  • Calendar Integration: The new Outlook app seamlessly integrates with your calendar, providing a unified view of your schedule and tasks. Users can easily create, edit, and manage appointments, meetings, and deadlines, ensuring that they stay organized and on top of their commitments.

  • Contact Management: The app offers robust contact management capabilities, allowing users to store and organize their contacts efficiently. Features like search functionality, group creation, and contact syncing with other devices ensure that users can easily access and manage their contacts across multiple platforms.

  • Task Management: The new Outlook app includes a dedicated task management section, enabling users to create, assign, and track tasks efficiently. This feature allows users to organize their to-do lists, prioritize tasks, and monitor progress, ensuring that they stay on top of their responsibilities.

  • Modern Interface: The new Outlook app boasts a sleek and modern interface designed for optimal user experience. The clean design and intuitive navigation make it easy for users to navigate the app and access the features they need quickly.

  • Integration with Other Microsoft Services: The new Outlook app integrates seamlessly with other Microsoft services like OneDrive, Teams, and Office 365. This integration allows users to access files, collaborate on projects, and manage their work seamlessly within the Outlook environment.

Benefits of Using the New Outlook App

The new Outlook app offers numerous benefits for users seeking an efficient and user-friendly email management solution:

  • Enhanced Productivity: By streamlining email management, prioritizing important messages, and integrating with other productivity tools, the new Outlook app significantly enhances user productivity. Users can manage their emails, schedule appointments, and track tasks more efficiently, ultimately saving time and increasing output.

  • Improved Organization: The app’s unified inbox, focused inbox, and task management features help users organize their digital life more effectively. By centralizing their email, calendar, contacts, and tasks, users can reduce clutter and maintain a more organized workflow.

  • Seamless Collaboration: The integration with other Microsoft services, particularly Teams, enables seamless collaboration with colleagues and clients. Users can share files, participate in online meetings, and manage projects all within the Outlook environment, facilitating communication and teamwork.

  • Enhanced Security: Microsoft prioritizes security and privacy in its products, and the new Outlook app is no exception. The app offers robust security features to protect user data from unauthorized access and malicious attacks.

Addressing Common Concerns and FAQs

The transition to a new application can raise questions and concerns. Here are some frequently asked questions regarding the new Outlook app for Windows 10:

Q: Can I still use the older version of Outlook?

A: While the new Outlook app is the recommended option for Windows 10 users, the older desktop version of Outlook is still available for users who prefer it. However, Microsoft is actively encouraging users to transition to the new app, as it offers a more modern and feature-rich experience.

Q: How do I switch from the old Outlook to the new one?

A: If you have the older desktop version of Outlook installed, you can download and install the new Outlook app from the Microsoft Store. Once installed, you can sign in with your Microsoft account and access your emails, calendar, contacts, and tasks.

Q: Will my data be transferred to the new Outlook app?

A: Yes, your email, calendar, contacts, and tasks will be automatically transferred to the new Outlook app when you sign in with your Microsoft account. You won’t need to manually import your data.

Q: Is the new Outlook app available on other platforms?

A: The new Outlook app is currently available only for Windows 10. However, Microsoft offers other Outlook versions for different platforms, such as Outlook for Mac, Outlook for Android, and Outlook for iOS.

Q: What are the system requirements for the new Outlook app?

A: The new Outlook app requires a Windows 10 operating system and a minimum of 4GB of RAM. It is recommended to have a processor with a clock speed of at least 1 GHz.

Q: How do I get help with the new Outlook app?

A: You can access comprehensive help resources within the app itself, including tutorials, FAQs, and troubleshooting guides. You can also find support articles and forums on the Microsoft website.

Tips for Optimizing Your Outlook Experience

Here are some tips to enhance your experience with the new Outlook app:

  • Customize your inbox: Customize the appearance of your inbox by adjusting the font size, background color, and other settings to match your preferences.
  • Use the search function: The new Outlook app offers a powerful search function that allows you to quickly find specific emails, contacts, or tasks.
  • Take advantage of keyboard shortcuts: Learn and use keyboard shortcuts to navigate the app and perform common tasks more efficiently.
  • Use the calendar reminders: Set reminders for appointments, meetings, and deadlines to ensure that you never miss an important event.
  • Experiment with features: Explore the various features of the new Outlook app to discover how they can benefit your workflow.

Conclusion

The new Outlook app for Windows 10 represents a significant step forward in email management, offering a modern, streamlined, and feature-rich experience designed to enhance user productivity. With its unified inbox, focused inbox, calendar integration, task management capabilities, and seamless integration with other Microsoft services, the new Outlook app provides a comprehensive solution for managing emails, calendars, contacts, and tasks efficiently. By embracing the new Outlook app, users can unlock a more organized, productive, and efficient digital experience.

A New Microsoft Outlook Is Coming to Windows 10 and 11: Here's What You Need to Know The new unified Outlook app for Windows is now available to all Office Insiders New Outlook for Windows - What you need to know — LazyAdmin
New Outlook for Windows - What you need to know — LazyAdmin New Outlook for Windows - What you need to know — LazyAdmin Outlook Mail and Calendar App updated for Windows 10 and Windows 10 Mobile
Best Windows 10 Email Clients and Apps to Use Outlook Mail and Calendar for Windows 10 updated with new features

Closure

Thus, we hope this article has provided valuable insights into A Comprehensive Guide to the New Outlook App for Windows 10. We appreciate your attention to our article. See you in our next article!

Navigating The OneNote Landscape: Understanding The Differences Between OneNote And OneNote For Windows 10

Navigating the OneNote Landscape: Understanding the Differences Between OneNote and OneNote for Windows 10

Introduction

With great pleasure, we will explore the intriguing topic related to Navigating the OneNote Landscape: Understanding the Differences Between OneNote and OneNote for Windows 10. Let’s weave interesting information and offer fresh perspectives to the readers.

Differences between OneNote app & OneNote for Windows 10 - YouTube

The world of digital note-taking is vast, with numerous options vying for user attention. Among them, Microsoft’s OneNote stands out as a powerful and versatile tool. However, a quick glance at the Microsoft Store reveals two distinct versions: "OneNote" and "OneNote for Windows 10." This seemingly subtle distinction can lead to confusion, prompting users to question which version is best suited for their needs.

This article aims to clarify the differences between these two OneNote offerings, providing a comprehensive guide to help users make informed decisions.

OneNote: A Legacy of Features and Functionality

The original OneNote, often referred to as "OneNote 2016" or "OneNote Desktop," represents the traditional version of the application. It boasts a long history of development and has established itself as a reliable and feature-rich tool for note-taking, organization, and collaboration.

Key Features of OneNote:

  • Comprehensive Feature Set: OneNote offers a wide range of functionalities, including text, audio, video, and image capture, handwritten notes, table creation, and drawing tools.
  • Powerful Organization Tools: Users can create notebooks, sections, and pages within notebooks, enabling them to structure their notes effectively.
  • Offline Access: OneNote allows users to work offline, ensuring access to their notes even when internet connectivity is unavailable.
  • Collaboration Features: Sharing notebooks and pages with others is seamless, facilitating collaborative work on projects and ideas.
  • Integration with Other Microsoft Products: OneNote integrates seamlessly with other Microsoft Office applications, such as Word, Excel, and PowerPoint, streamlining workflows.
  • Cross-Platform Compatibility: OneNote is available on Windows, macOS, iOS, and Android, providing a consistent experience across devices.

OneNote for Windows 10: A Modern Approach

OneNote for Windows 10 is a newer version specifically designed for the Windows 10 operating system. While it shares some functionalities with the traditional OneNote, it features a streamlined interface and a focus on touch-based interactions, making it more intuitive for users of touch-enabled devices.

Key Features of OneNote for Windows 10:

  • Modern and Intuitive Interface: The application boasts a clean and modern design, with a simplified ribbon interface and touch-optimized controls.
  • Enhanced Collaboration Features: OneNote for Windows 10 prioritizes collaboration, offering real-time co-authoring capabilities and improved sharing options.
  • Improved Search Functionality: The search functionality has been enhanced, allowing users to find specific information within their notes more easily.
  • Integration with Windows Ink: OneNote for Windows 10 integrates seamlessly with Windows Ink, enabling users to take handwritten notes directly on the screen.
  • Limited Feature Set: While OneNote for Windows 10 offers a robust set of features, it lacks some advanced functionalities present in the traditional OneNote version, such as the ability to create custom templates and specific formatting options.

Choosing the Right OneNote for Your Needs

The choice between OneNote and OneNote for Windows 10 depends largely on individual preferences and usage patterns.

OneNote is ideal for:

  • Users who prioritize a comprehensive feature set: If you require advanced functionalities like custom templates, complex formatting options, and a wider range of customization tools, OneNote remains the more powerful option.
  • Users who value offline access: OneNote’s offline functionality ensures uninterrupted access to notes regardless of internet connectivity.
  • Users who require cross-platform compatibility: If you need to access your notes on multiple devices running different operating systems, OneNote’s cross-platform compatibility makes it a better choice.

OneNote for Windows 10 is ideal for:

  • Users who prefer a modern and intuitive interface: The streamlined interface and touch-optimized controls make OneNote for Windows 10 a more user-friendly option for touch-enabled devices.
  • Users who prioritize collaboration: The enhanced collaboration features, including real-time co-authoring and improved sharing options, make OneNote for Windows 10 a suitable choice for team projects.
  • Users who rely on Windows Ink: If you frequently use Windows Ink for note-taking, OneNote for Windows 10’s seamless integration makes it a natural choice.

FAQs on OneNote and OneNote for Windows 10

Q: Can I use both OneNote and OneNote for Windows 10 simultaneously?

A: Yes, you can install and use both OneNote and OneNote for Windows 10 on the same computer. However, your notes will not be automatically synchronized between the two versions. You will need to manually export and import notes between them.

Q: Which version is better for taking handwritten notes?

A: OneNote for Windows 10 integrates better with Windows Ink, making it the preferred choice for taking handwritten notes directly on the screen.

Q: Which version is more stable and reliable?

A: Both OneNote and OneNote for Windows 10 have their own strengths and weaknesses in terms of stability and reliability. However, the traditional OneNote has a longer history and a more established user base, suggesting a higher level of stability and reliability.

Q: Which version should I choose if I am new to OneNote?

A: If you are new to OneNote, OneNote for Windows 10 offers a more streamlined and intuitive interface, making it easier to learn and use.

Tips for Using OneNote and OneNote for Windows 10

  • Experiment with Both Versions: To determine which version suits your needs best, experiment with both OneNote and OneNote for Windows 10.
  • Utilize the Search Function: Both versions offer powerful search functionalities. Use them to quickly find specific information within your notes.
  • Explore the Collaboration Features: Take advantage of the collaboration features to work on projects with others.
  • Customize Your Notebook: Both versions allow you to customize your notebooks with different themes and backgrounds.

Conclusion

The choice between OneNote and OneNote for Windows 10 ultimately depends on individual preferences and usage patterns. While the traditional OneNote offers a comprehensive feature set and robust offline functionality, OneNote for Windows 10 provides a modern interface, enhanced collaboration features, and seamless integration with Windows Ink. By understanding the key differences and features of each version, users can select the OneNote that best aligns with their specific needs and preferences, ensuring a seamless and efficient note-taking experience.

Différence Entre OneNote Et OneNote Pour Windows 10 - Tech Tribune France Navigate your notes with OneNote on Windows - Microsoft Support Onenote vs Onenote For Windows 10 - What's The Difference? - PresentationSkills.me
Differences between OneNote and OneNote for Windows 10  Work Smarter with Microsoft OneNote OneNote vs Windows 10 OneNote: How to Upgrade OneNote On Windows 10 – The One App For The Future - Sql blog
OneNote vs OneNote for Windows 10, what’s the difference? OneNote  Microsoft Learn

Closure

Thus, we hope this article has provided valuable insights into Navigating the OneNote Landscape: Understanding the Differences Between OneNote and OneNote for Windows 10. We thank you for taking the time to read this article. See you in our next article!

A Deep Dive Into Windows 11 Beta’s "Nearby Share" Feature

A Deep Dive into Windows 11 Beta’s "Nearby Share" Feature

Introduction

With great pleasure, we will explore the intriguing topic related to A Deep Dive into Windows 11 Beta’s "Nearby Share" Feature. Let’s weave interesting information and offer fresh perspectives to the readers.

A Deep Dive into Windows 11 Beta’s "Nearby Share" Feature

How to Use Nearby Sharing on Windows 11

Windows 11, in its beta phase, has introduced a powerful new feature – "Nearby Share" – that promises to revolutionize how users transfer files and content between devices. This article delves into the intricacies of this innovative technology, exploring its functionalities, benefits, and potential applications.

The Essence of "Nearby Share"

At its core, "Nearby Share" is a wireless file transfer technology designed to simplify the process of sharing content between Windows 11 devices. It leverages Bluetooth and Wi-Fi to establish a secure connection between devices, enabling the rapid transfer of files, photos, videos, and even links. This eliminates the need for cumbersome cables or cloud-based services, providing a seamless and efficient way to share data locally.

Key Features and Capabilities

"Nearby Share" in Windows 11 Beta boasts a range of features that enhance its usability and versatility:

  • Device Discovery: The feature automatically detects nearby Windows 11 devices, presenting a list of potential recipients for file sharing. This eliminates the need for manual pairing or complex configurations.
  • Secure Connections: "Nearby Share" prioritizes security, employing end-to-end encryption during file transfers. This ensures that shared data remains protected from unauthorized access.
  • Content Variety: The feature supports a broad spectrum of content, from simple text files to large video files. Users can share documents, images, videos, and even website links with ease.
  • File Size Limitations: While "Nearby Share" handles large files, it does have limits on the maximum file size that can be transferred. These limits vary depending on the specific devices and network conditions.
  • Transfer Speed: The speed of file transfers via "Nearby Share" depends on factors like the distance between devices, the strength of the Wi-Fi signal, and the size of the file being shared. Typically, users can expect reasonably fast transfer speeds, particularly for smaller files.
  • Cross-Platform Compatibility: While "Nearby Share" is primarily designed for Windows 11 devices, it is also compatible with Android devices. This allows for seamless file sharing between Windows and Android ecosystems.

Benefits and Advantages

The introduction of "Nearby Share" in Windows 11 Beta brings numerous benefits to users:

  • Enhanced Convenience: "Nearby Share" significantly simplifies the process of sharing files between devices, eliminating the need for cumbersome cables or cloud-based services.
  • Improved Efficiency: The feature offers a fast and efficient way to transfer files, reducing the time and effort required for sharing data.
  • Increased Security: "Nearby Share" employs strong encryption to protect shared data from unauthorized access, ensuring data privacy and security.
  • Broader Compatibility: The cross-platform compatibility with Android devices expands the potential use cases for "Nearby Share," making it a versatile tool for sharing files across different operating systems.
  • Reduced Reliance on Cloud Services: "Nearby Share" provides a local alternative to cloud-based file sharing services, offering a more private and potentially faster method of transferring data.

Potential Applications

"Nearby Share" has the potential to revolutionize various aspects of file sharing and content transfer, opening up new possibilities across diverse domains:

  • Collaborative Work: Teams can easily share large files, documents, and presentations between colleagues using "Nearby Share," fostering seamless collaboration and productivity.
  • Educational Settings: Students and educators can effortlessly share learning materials, assignments, and projects between devices, promoting efficient knowledge sharing and collaboration.
  • Personal Sharing: Individuals can quickly share photos, videos, and other files with friends and family members nearby, facilitating instant sharing and creating a more connected experience.
  • Business Operations: Businesses can utilize "Nearby Share" for internal file sharing, streamlining workflows and enhancing collaboration between employees.

FAQs about "Nearby Share" in Windows 11 Beta

Q: What are the system requirements for using "Nearby Share"?

A: "Nearby Share" requires a Windows 11 device with Bluetooth and Wi-Fi capabilities.

Q: How do I enable "Nearby Share" on my Windows 11 device?

A: To enable "Nearby Share", open the "Settings" app, navigate to "System" > "Connected Devices" > "Nearby Share," and toggle the feature on.

Q: What types of files can I share using "Nearby Share"?

A: "Nearby Share" supports a wide range of file types, including documents, images, videos, and links.

Q: Is "Nearby Share" secure?

A: Yes, "Nearby Share" uses end-to-end encryption to protect shared data from unauthorized access, ensuring secure file transfers.

Q: Can I share files with Android devices using "Nearby Share"?

A: Yes, "Nearby Share" is compatible with Android devices, allowing for seamless file sharing between Windows and Android ecosystems.

Q: What is the maximum file size that can be shared using "Nearby Share"?

A: The maximum file size limit for "Nearby Share" depends on the specific devices and network conditions.

Q: How fast are file transfers using "Nearby Share"?

A: The transfer speed depends on factors like the distance between devices, the strength of the Wi-Fi signal, and the size of the file being shared.

Q: Can I control who can discover my device for "Nearby Share"?

A: Yes, you can adjust the visibility settings for your device in the "Nearby Share" settings.

Tips for Using "Nearby Share" Effectively

  • Ensure Bluetooth and Wi-Fi are enabled: "Nearby Share" relies on these technologies for connectivity.
  • Keep devices close together: The closer the devices are, the faster the file transfer will be.
  • Check the file size limit: Be aware of the maximum file size that can be shared using "Nearby Share."
  • Adjust visibility settings: Control who can discover your device for "Nearby Share" by adjusting the visibility settings.
  • Utilize the "Nearby Share" history: The feature keeps a history of recently shared files, allowing you to easily access them again.

Conclusion

"Nearby Share" in Windows 11 Beta represents a significant step forward in the realm of file sharing and content transfer. Its ease of use, security features, and cross-platform compatibility make it a powerful tool for both personal and professional use. As this technology matures, it has the potential to transform how we share information and collaborate across various platforms and devices. With its intuitive interface and robust capabilities, "Nearby Share" is poised to become an integral part of the Windows 11 experience, simplifying and enhancing the way we connect and share content with the world around us.

What Is Nearby Sharing And How To Enable It On Windows 11  beebom Exploring The Features Of Windows 11: A Deep Dive How to Enable Nearby Sharing in Windows 11?  Gear up Windows 11 & 10
Google’s Nearby Share is available on Windows 11, here’s how to set it up  iThinkDifferent How to Enable Nearby Sharing in Windows 11?  Gear Up Windows How to Enable and Use Nearby Sharing in Windows 11? 2024��
How to Use Nearby Sharing on Windows 11?  Gear Up Windows What is Windows 11 in S mode?  Deep Dive

Closure

Thus, we hope this article has provided valuable insights into A Deep Dive into Windows 11 Beta’s "Nearby Share" Feature. We appreciate your attention to our article. See you in our next article!

The Power Of Proximity: Understanding Near Field Communication

The Power of Proximity: Understanding Near Field Communication

Introduction

With great pleasure, we will explore the intriguing topic related to The Power of Proximity: Understanding Near Field Communication. Let’s weave interesting information and offer fresh perspectives to the readers.

The Power of Proximity: Understanding Near Field Communication

Near Field Communication (NFC)

Near field communication (NFC) has become an integral part of our daily lives, quietly facilitating a range of interactions from contactless payments to data sharing. This technology, built upon the principles of electromagnetic induction, allows two devices to communicate wirelessly when placed in close proximity, typically within a few centimeters. While seemingly simple, NFC technology encompasses a complex interplay of electromagnetic fields and data transfer protocols, offering a unique set of advantages that have revolutionized various sectors.

Understanding the Fundamentals

NFC operates on the principle of electromagnetic induction, a phenomenon where a changing magnetic field induces an electric current in a nearby conductor. This principle is harnessed to enable communication between two devices, one acting as the transmitter and the other as the receiver. The transmitter generates a time-varying magnetic field that induces a current in the receiver, enabling the transfer of data.

The communication process is initiated when two NFC-enabled devices are brought within close proximity. This proximity triggers an exchange of data packets through a standardized protocol, ensuring compatibility between different devices. NFC utilizes a variety of frequencies, typically operating at 13.56 MHz, which allows for efficient data transfer over short distances.

Exploring the Applications

NFC technology finds diverse applications across various sectors, offering a convenient and secure method for data exchange and device interaction. Some of the most prominent applications include:

  • Contactless Payment: NFC has revolutionized the payment industry by enabling quick and secure transactions through contactless cards and mobile devices. Users can simply tap their NFC-enabled device at a point-of-sale terminal to complete a transaction, eliminating the need for physical cards or cash.

  • Data Sharing: NFC facilitates seamless data sharing between devices, allowing users to transfer files, share contact information, or connect to Wi-Fi networks with a simple tap. This feature simplifies data exchange and eliminates the need for manual pairing or complex configuration processes.

  • Device Pairing: NFC enables effortless pairing between devices, simplifying the process of connecting headphones, speakers, or other peripherals. This eliminates the need for manual pairing procedures and streamlines the user experience.

  • Access Control: NFC technology is widely used in access control systems, allowing users to unlock doors, gates, or other restricted areas using NFC-enabled key cards or mobile devices. This technology provides a secure and convenient alternative to traditional key-based access methods.

  • Mobile Ticketing: NFC is increasingly used for mobile ticketing, allowing users to store and access tickets for events, transportation, or other services on their smartphones. This eliminates the need for physical tickets and simplifies the ticketing process.

  • Near Field Communication (NFC) in the Automotive Industry: NFC technology is gaining traction in the automotive industry, enabling keyless entry, remote vehicle control, and secure communication between vehicles and roadside infrastructure.

Benefits of Near Field Communication

The widespread adoption of NFC technology can be attributed to its numerous benefits, including:

  • Security: NFC operates within a short range, making it difficult for unauthorized individuals to intercept or eavesdrop on data transmissions. This inherent security feature makes NFC a suitable technology for sensitive applications like contactless payments and access control.

  • Convenience: NFC simplifies everyday interactions by eliminating the need for physical cards, cables, or complex pairing procedures. This ease of use has contributed to the widespread adoption of NFC in various sectors.

  • Versatility: NFC technology can be integrated into a wide range of devices, from smartphones and tablets to credit cards and key fobs. This versatility allows for a broad range of applications and enhances the user experience across different platforms.

  • Cost-Effectiveness: NFC technology is relatively inexpensive to implement, making it a cost-effective solution for businesses and consumers alike. This affordability has contributed to its widespread adoption across various industries.

  • Energy Efficiency: NFC operates at low power levels, minimizing energy consumption and extending battery life. This energy efficiency makes NFC a sustainable and environmentally friendly technology.

Addressing Common Concerns

Despite its numerous benefits, NFC technology has also raised some concerns, particularly regarding security and privacy.

  • Security Concerns: While NFC offers inherent security features, potential vulnerabilities exist, particularly in cases of compromised devices or malicious software. Implementing robust security protocols and user authentication mechanisms is crucial to mitigating these risks.

  • Privacy Concerns: NFC technology can be used to track user movements and collect personal data. Ensuring data privacy and user consent is paramount when implementing NFC solutions, particularly in sensitive applications like contactless payments and access control.

FAQs on Near Field Communication

Q: What is the range of NFC communication?

A: NFC communication typically operates within a range of 4 centimeters or less.

Q: Is NFC secure?

A: NFC technology inherently offers security features, but it is essential to implement robust security protocols and authentication mechanisms to mitigate potential vulnerabilities.

Q: What are the common applications of NFC?

A: NFC finds widespread applications in contactless payments, data sharing, device pairing, access control, mobile ticketing, and automotive systems.

Q: What are the benefits of using NFC?

A: NFC offers numerous benefits, including security, convenience, versatility, cost-effectiveness, and energy efficiency.

Q: What are the potential risks associated with NFC?

A: Potential risks associated with NFC include security vulnerabilities and privacy concerns, which can be mitigated through robust security protocols and user consent mechanisms.

Tips for Using NFC

  • Ensure your device is NFC-enabled and properly configured.
  • Keep your NFC-enabled device close to the reader or another NFC-enabled device for successful communication.
  • Be aware of potential security risks and implement appropriate measures to protect your data.
  • Stay informed about NFC technology and its latest developments to maximize its benefits.

Conclusion

Near field communication technology has emerged as a powerful tool for simplifying everyday interactions and enabling seamless data exchange between devices. Its inherent security features, convenience, versatility, and cost-effectiveness have made it an indispensable technology across various sectors. As NFC technology continues to evolve, it is poised to play an even more significant role in shaping our future interactions with technology. By understanding the fundamentals of NFC and its applications, we can leverage its potential to enhance our daily lives and unlock new possibilities for innovation.

Near Field Communication The Beginner’s Guide to NFCs (Near Field Communication) What is Near Field Communication, and Where is it used?  Covve
What is Near Field Communication (NFC)?  - YouTube Near-Field Communications (NFC) for Wireless Power Transfer (WPT): An Overview  IntechOpen Near Field Communication (NFC) in a nutshell - YouTube
What Is Near Field Communication Applications - CXJRFIDFactory Near Field Communication (NFC) Technology: UPSC Current Affairs

Closure

Thus, we hope this article has provided valuable insights into The Power of Proximity: Understanding Near Field Communication. We appreciate your attention to our article. See you in our next article!

PhotoImpression 4: A Comprehensive Guide To The Powerful Photo Editing Software

PhotoImpression 4: A Comprehensive Guide to the Powerful Photo Editing Software

Introduction

With great pleasure, we will explore the intriguing topic related to PhotoImpression 4: A Comprehensive Guide to the Powerful Photo Editing Software. Let’s weave interesting information and offer fresh perspectives to the readers.

PhotoImpression 4: A Comprehensive Guide to the Powerful Photo Editing Software

Arcsoft Photoimpression 4 Software - fasrtalent

PhotoImpression 4, a versatile and user-friendly photo editing software, has earned its place as a trusted tool for both amateur and professional photographers alike. Its intuitive interface and comprehensive feature set empower users to enhance, manipulate, and creatively transform their images, achieving professional-quality results with ease. This article will delve into the key features, benefits, and functionalities of PhotoImpression 4, providing a comprehensive understanding of its capabilities.

A Glimpse into PhotoImpression 4’s Features

PhotoImpression 4 boasts a wide array of tools designed to cater to diverse photo editing needs. These features can be broadly categorized as follows:

1. Image Enhancement and Correction:

  • Brightness, Contrast, and Color Balance: Fine-tune the overall luminosity, contrast, and color balance of your images to achieve a visually appealing aesthetic.
  • Sharpening and Noise Reduction: Enhance image clarity by reducing noise and sharpening edges for a more defined and detailed appearance.
  • Red-Eye Removal: Eliminate the distracting red-eye effect often encountered in flash photography with a single click.
  • Color Correction: Adjust specific color hues and saturation levels to achieve a desired color palette or compensate for lighting imperfections.

2. Image Manipulation and Effects:

  • Cropping and Resizing: Precisely crop and resize images to create desired compositions and fit specific dimensions.
  • Rotation and Flipping: Easily rotate and flip images to adjust their orientation or create unique perspectives.
  • Layers and Masks: Utilize layers and masks to isolate specific areas of an image and apply effects selectively, achieving complex manipulations.
  • Special Effects: Explore a wide range of artistic and creative effects, including blur, vignette, embossing, and more, to add a unique touch to your images.

3. Text and Graphics:

  • Text Editing: Add and customize text elements with various fonts, sizes, colors, and styles to create captions, titles, and more.
  • Shapes and Objects: Incorporate geometric shapes, lines, and other objects to enhance image composition or create visual elements.
  • Drawing Tools: Utilize brushes and other drawing tools to create freehand illustrations or edit images directly.

4. Batch Processing:

  • Automated Editing: Apply a set of editing commands to multiple images simultaneously, saving time and effort when working with large collections.

5. File Management and Organization:

  • Image Browser: Easily navigate and manage your image library within the software, making it convenient to locate and access specific files.

Benefits of Using PhotoImpression 4

PhotoImpression 4 offers numerous advantages to users, making it a valuable tool for various purposes:

  • User-Friendly Interface: The software’s intuitive design and straightforward layout make it easy to learn and use, even for beginners.
  • Comprehensive Feature Set: The extensive array of tools caters to a wide range of editing needs, from basic enhancements to complex manipulations.
  • Professional-Quality Results: PhotoImpression 4 empowers users to achieve high-quality results that rival professional-grade editing software.
  • Time-Saving Features: Batch processing and other automated tools streamline workflow and reduce editing time.
  • Cost-Effective Solution: Compared to other professional photo editing software, PhotoImpression 4 offers a cost-effective alternative without compromising on functionality.

FAQs about PhotoImpression 4

1. Is PhotoImpression 4 compatible with my operating system?

PhotoImpression 4 is designed to be compatible with a wide range of operating systems, including Windows and macOS. It is recommended to check the software’s system requirements before downloading and installing it.

2. What file formats does PhotoImpression 4 support?

PhotoImpression 4 supports a variety of image file formats, including JPEG, PNG, GIF, TIFF, and more. This ensures compatibility with various cameras, devices, and applications.

3. Can I use PhotoImpression 4 to create professional-quality prints?

Yes, PhotoImpression 4 allows you to optimize images for printing by adjusting resolution and color settings to achieve high-quality prints.

4. Does PhotoImpression 4 offer tutorials or support resources?

Yes, PhotoImpression 4 provides comprehensive online tutorials and documentation to guide users through its features and functionalities. Additionally, customer support is available for assistance.

5. Is PhotoImpression 4 a free software?

PhotoImpression 4 is typically available as a paid software. However, trial versions may be available for evaluation purposes.

Tips for Using PhotoImpression 4 Effectively

  • Start with basic enhancements: Before diving into advanced features, focus on fundamental adjustments like brightness, contrast, and color balance to establish a solid foundation.
  • Utilize layers: Layers provide a non-destructive editing environment, allowing you to experiment with effects and adjustments without permanently altering the original image.
  • Explore special effects: PhotoImpression 4 offers a range of creative effects that can add visual interest and artistic flair to your images.
  • Utilize batch processing: Streamline your workflow by applying a set of editing commands to multiple images simultaneously, especially when working with large collections.
  • Practice and experiment: The best way to master PhotoImpression 4 is to experiment with its features and explore different techniques to find your own unique editing style.

Conclusion

PhotoImpression 4 stands as a powerful and user-friendly photo editing software, offering a comprehensive suite of tools to enhance, manipulate, and creatively transform images. Its intuitive interface, extensive features, and professional-quality results make it an invaluable asset for photographers, graphic designers, and anyone seeking to elevate their image editing capabilities. By understanding the software’s functionalities and utilizing its features effectively, users can unlock the full potential of PhotoImpression 4 and create stunning visuals that capture the essence of their creative vision.

Photoimpression 4.1 Quick Start Guide Arcsoft photoimpression 4 free download full version - passlwholesale ArcSoft PhotoImpression 4.0 Download (Free trial)
PhotoImpression 4.1 Quick Start Guide  Manualzz Photoimpression 4 Full Version - herofclass ArcSoft PhotoImpression 4.0 Download (Free trial)
Photoimpression 4 Download Full Versionl [PATCHED] Arcsoft photoimpression 4 software - jzascan

Closure

Thus, we hope this article has provided valuable insights into PhotoImpression 4: A Comprehensive Guide to the Powerful Photo Editing Software. We hope you find this article informative and beneficial. See you in our next article!

Navigating The Realtek Installation Error On Windows 11: A Comprehensive Guide

Navigating the Realtek Installation Error on Windows 11: A Comprehensive Guide

Introduction

In this auspicious occasion, we are delighted to delve into the intriguing topic related to Navigating the Realtek Installation Error on Windows 11: A Comprehensive Guide. Let’s weave interesting information and offer fresh perspectives to the readers.

Fix Realtek Semiconductor Driver Install Error 0x80070103 On Windows 11

The "Realtek installation error" on Windows 11, often accompanied by the cryptic code 0x80070103, can be a frustrating hurdle for users seeking to install or update their Realtek audio drivers. This error, typically associated with Realtek’s audio drivers, hinders the smooth operation of audio devices, potentially impacting sound output, microphone functionality, and even system stability.

This comprehensive guide aims to demystify this error, providing a clear understanding of its causes, potential solutions, and preventative measures.

Understanding the Error: A Deep Dive

The error code 0x80070103, in the context of Realtek driver installation, generally indicates a conflict or issue with the installation process. This could stem from various factors, including:

  • Corrupted or Incompatible Drivers: The downloaded Realtek driver package might be corrupted during download or incompatible with the user’s specific hardware configuration.
  • Conflicting Software: Other software installed on the system, particularly audio-related programs, might clash with the Realtek driver installation.
  • System File Corruption: Damaged or missing system files can hinder the driver installation process, leading to the error.
  • Insufficient Permissions: The user might lack sufficient permissions to install or modify system files, preventing the driver installation.
  • Network Connectivity Issues: During driver download or installation, network connectivity problems can disrupt the process, resulting in the error.

Troubleshooting the Realtek Installation Error: A Step-by-Step Approach

Addressing the error requires a systematic approach, starting with the most common solutions and progressing to more advanced troubleshooting steps:

1. Downloading the Correct Driver:

  • Verify Compatibility: Ensure that the downloaded Realtek driver package is compatible with the user’s specific system configuration, including the operating system, processor, and motherboard model.
  • Official Sources: Download the driver from the Realtek website or the manufacturer’s website for the user’s specific motherboard or laptop model. Avoid downloading drivers from unofficial sources, as they might be corrupted or contain malware.

2. Running the Installation as Administrator:

  • Elevated Privileges: Right-click the installation file and select "Run as administrator." This grants the installation process the necessary permissions to modify system files and complete the installation.

3. Temporarily Disabling Antivirus Software:

  • Potential Interference: Antivirus software might mistakenly identify the Realtek driver installation as a threat and block it. Temporarily disabling the antivirus software during the installation process can help resolve the error.

4. Updating Windows:

  • System Updates: Windows updates often include critical bug fixes and driver updates that can resolve compatibility issues. Ensure that the system is running the latest version of Windows.

5. Cleaning the Registry:

  • Registry Errors: Errors in the Windows registry can hinder driver installation. Using a registry cleaner tool can help identify and fix any registry errors that might be causing the problem.

6. Reinstalling the Audio Driver:

  • Complete Removal: Uninstall the existing Realtek audio driver through the Device Manager. Once uninstalled, reboot the system and attempt to install the latest compatible driver.

7. Checking for Hardware Issues:

  • Device Functionality: If the error persists, consider checking for hardware issues with the audio device. Ensure that the device is properly connected and functioning correctly.

8. Utilizing System Restore:

  • Restoring to a Previous State: If the error occurred after a recent system change, using system restore to revert to a previous working state might resolve the issue.

9. Contacting Support:

  • Expert Assistance: If all other troubleshooting steps fail, contact Realtek support or the manufacturer of the user’s motherboard or laptop for further assistance.

FAQs: Addressing Common Queries

Q1: Why is the Realtek driver installation failing with error code 0x80070103?

A: This error code typically signifies a conflict or issue with the installation process. It could be caused by corrupted or incompatible drivers, conflicting software, system file corruption, insufficient permissions, or network connectivity problems.

Q2: What are the potential risks associated with the Realtek installation error?

A: The error can prevent the proper functioning of audio devices, leading to issues with sound output, microphone functionality, and potentially affecting system stability.

Q3: Can I use my computer without installing the Realtek audio driver?

A: While the computer might function without the Realtek driver, it will likely lack audio functionality. Depending on the system configuration, a generic audio driver might be installed, but it may not offer all the features and functionality of the Realtek driver.

Q4: Is there a specific Realtek driver version that is known to cause this error?

A: While specific driver versions might have known issues, the error is not limited to a single version. The issue is generally tied to the installation process and can occur with various driver versions.

Q5: Can I safely ignore the error and continue using my computer?

A: It is not recommended to ignore the error. While the computer might function without the Realtek driver, the error might indicate underlying system issues that could affect other software or hardware.

Tips for Preventing the Error:

  • Regular System Maintenance: Maintain a clean and updated system by regularly running system scans, cleaning the registry, and installing the latest Windows updates.
  • Avoid Unofficial Sources: Download drivers only from the official Realtek website or the manufacturer’s website for the user’s specific motherboard or laptop model.
  • Backup Important Data: Regularly back up important data to prevent data loss in case of system errors.
  • Monitor for Updates: Keep an eye on Realtek’s website for updates to their drivers. Regularly updating drivers can help resolve compatibility issues and improve system performance.

Conclusion: Ensuring Smooth Audio Functionality

The Realtek installation error, often accompanied by the code 0x80070103, can be a frustrating obstacle for Windows 11 users. By understanding the underlying causes and implementing the troubleshooting steps outlined in this guide, users can effectively address this error and restore their audio functionality. Remember to prioritize downloading drivers from official sources, running installations as administrator, and maintaining a clean and updated system to prevent future occurrences of this error.

Realtek Semiconductor Driver Install ERROR 0x80070103 on windows 11 ( easy fix ) - *new update* Realtek Semiconductor Corp Extension Install error in Windows 11 [SOLVED] - YouTube Fix Realtek Semiconductor Driver Install Error 0x80070103 On Windows 11
Fix Realtek Audio Console Not Working in Windows 11 – TechCult How To Download Install And Update Realtek Audio Driver In Windows 11  helpdeskgeek FIXED: Realtek HD Audio Manager Missing Windows 11 & 10  Working Tutorial  PC Error Fix - YouTube
How to Fix Windows 11 Update Error 0x800705aa? Here Are Some Ways Windows 11 Driver

Closure

Thus, we hope this article has provided valuable insights into Navigating the Realtek Installation Error on Windows 11: A Comprehensive Guide. We hope you find this article informative and beneficial. See you in our next article!

Understanding The "Documents" Folder On Windows 10: A Comprehensive Guide

Understanding the "Documents" Folder on Windows 10: A Comprehensive Guide

Introduction

In this auspicious occasion, we are delighted to delve into the intriguing topic related to Understanding the "Documents" Folder on Windows 10: A Comprehensive Guide. Let’s weave interesting information and offer fresh perspectives to the readers.

Understanding the "Documents" Folder on Windows 10: A Comprehensive Guide

Documents And Settings Win 10

The "Documents" folder, a prominent fixture on the Windows 10 desktop, serves as a central hub for user-generated content. This dedicated location simplifies file organization, providing a readily accessible repository for various document types, including text files, spreadsheets, presentations, images, and more.

The Significance of the "Documents" Folder

The "Documents" folder holds significant importance in the Windows 10 ecosystem for several reasons:

  • Centralized Storage: It acts as a designated space to store and manage user-created files, fostering a streamlined workflow.
  • Easy Access: Its prominent placement on the desktop ensures quick and effortless access to essential files.
  • Organization and Categorization: The folder structure encourages the creation of subfolders, enabling users to categorize and organize their documents efficiently.
  • Default Location for Applications: Many applications, particularly those designed for document creation and editing, automatically save files within the "Documents" folder, simplifying file management.
  • Synchronization: The "Documents" folder can be synchronized with cloud storage services like OneDrive, ensuring file accessibility across multiple devices.

Exploring the "Documents" Folder’s Structure and Functionality

The "Documents" folder, upon opening, presents a familiar file explorer interface. This interface allows users to:

  • Navigate: Utilize the navigation pane to browse through folders and subfolders within the "Documents" folder.
  • Create and Modify: Create new folders, rename existing ones, and delete folders as needed.
  • Organize Files: Drag and drop files into the "Documents" folder or its subfolders for convenient organization.
  • Search: Utilize the search bar to quickly locate specific files within the "Documents" folder.
  • Sort: Sort files by name, date modified, type, or size for enhanced organization.
  • View Options: Adjust file view options, including list, details, and thumbnail views, to optimize file display.

Understanding the Benefits of Using the "Documents" Folder

The "Documents" folder offers numerous benefits for Windows 10 users:

  • Enhanced Productivity: Centralized storage and easy access to files streamline workflow and improve productivity.
  • Improved Organization: The folder structure facilitates effective file organization, reducing clutter and enhancing efficiency.
  • Streamlined File Sharing: Sharing files stored within the "Documents" folder becomes effortless through email, cloud storage services, or external drives.
  • Simplified Backup: Backing up the "Documents" folder ensures the preservation of valuable user data.
  • Enhanced Security: The "Documents" folder can be secured with passwords or access restrictions, protecting sensitive information.

Frequently Asked Questions

Q: Can I rename or move the "Documents" folder?

A: While you can technically rename or move the "Documents" folder, it is strongly discouraged. This action can disrupt application functionality and lead to compatibility issues. It is best to use the folder as intended, maintaining its default location.

Q: Can I store files other than documents in the "Documents" folder?

A: Yes, the "Documents" folder can accommodate various file types, including images, videos, audio files, and other data. However, organizing files into dedicated subfolders based on their type is recommended for improved clarity and accessibility.

Q: How can I ensure the security of files stored within the "Documents" folder?

A: Windows 10 offers various security features to protect files stored in the "Documents" folder. These include:

  • Password Protection: Set passwords for individual files or folders to restrict access.
  • File Encryption: Encrypt sensitive files to prevent unauthorized access.
  • File Sharing Permissions: Configure file sharing permissions to control who can access and modify files within the "Documents" folder.

Tips for Optimizing the "Documents" Folder

  • Create Subfolders: Divide the "Documents" folder into subfolders based on file type, project, or any other logical categorization.
  • Use Descriptive Names: Name folders and files clearly and descriptively to facilitate easy identification.
  • Regularly Clean Up: Delete unnecessary files and folders to maintain a clean and organized "Documents" folder.
  • Utilize Cloud Storage: Sync the "Documents" folder with cloud storage services for accessibility across multiple devices.
  • Backup Regularly: Create regular backups of the "Documents" folder to safeguard important data.

Conclusion

The "Documents" folder on Windows 10 plays a crucial role in managing user-generated content. Its centralized storage, easy accessibility, and organizational features contribute significantly to a productive and efficient workflow. By understanding its functionality and incorporating best practices, users can leverage the "Documents" folder to organize their files effectively, enhance productivity, and protect valuable data.

Documents And Settings Win 10 Documents And Settings Win 10 Documents And Settings Folder
How to Move Documents Folder in Windows 10  LaptrinhX / News Documents And Settings Win 10 Windows 10 Tip: Manage Files and Folders with File Explorer
Windows 10 Tip: Manage Files and Folders with File Explorer Organize Folders and Files in Windows 10  CustomGuide

Closure

Thus, we hope this article has provided valuable insights into Understanding the "Documents" Folder on Windows 10: A Comprehensive Guide. We hope you find this article informative and beneficial. See you in our next article!

Reinstalling Windows 10: A Clean Slate For Your PC

Reinstalling Windows 10: A Clean Slate for Your PC

Introduction

With great pleasure, we will explore the intriguing topic related to Reinstalling Windows 10: A Clean Slate for Your PC. Let’s weave interesting information and offer fresh perspectives to the readers.

Reinstalling Windows 10: A Clean Slate for Your PC

Clean Install/ Reinstall Windows 10 - All Steps Included - Using a USB or DVD Installation Media

The allure of a fresh start is undeniable, particularly when it comes to a computer. Reinstalling Windows 10 can revitalize your PC’s performance, resolve persistent issues, and create a more streamlined user experience. However, the process often involves navigating a landscape of pre-installed applications, commonly known as bloatware, which can consume valuable resources and hinder overall efficiency. This article aims to provide a comprehensive guide to reinstalling Windows 10 while eliminating bloatware, allowing you to reclaim control over your digital environment.

The Importance of a Clean Installation

A clean installation of Windows 10 offers several advantages:

  • Enhanced Performance: By removing unnecessary software, a clean install frees up disk space, RAM, and processing power, resulting in faster boot times, smoother application launches, and improved overall performance.
  • Reduced Security Risks: Bloatware often includes vulnerabilities that can be exploited by malicious actors. A clean installation eliminates these risks, creating a more secure computing environment.
  • Personalized User Experience: A fresh install provides the opportunity to customize the operating system, selecting only the desired applications and settings. This tailored approach fosters a more efficient and enjoyable user experience.
  • Troubleshooting and Repair: Reinstalling Windows 10 can resolve various software conflicts, driver issues, and system errors that may have accumulated over time.

Methods for Reinstalling Windows 10

There are two primary methods for reinstalling Windows 10:

  1. In-place Upgrade: This method retains your personal files and settings while reinstalling the operating system. However, it does not eliminate bloatware.
  2. Clean Installation: This method completely wipes the hard drive, removing all data and software, including bloatware. It requires a backup of important files before proceeding.

The Clean Installation Approach: A Step-by-Step Guide

For a truly clean and efficient installation, the clean installation method is recommended. Here’s a detailed guide:

Step 1: Backup Your Data

Before embarking on a clean installation, it is crucial to back up all essential data. This includes documents, photos, videos, music, and any other important files. You can use external hard drives, cloud storage services, or USB drives for this purpose.

Step 2: Create a Bootable USB Drive

To install Windows 10 from scratch, you need a bootable USB drive containing the installation files. Microsoft provides a tool called the Media Creation Tool for this purpose. Download the tool from the official Microsoft website and follow the on-screen instructions to create a bootable USB drive.

Step 3: Access the BIOS and Boot from USB

Restart your computer and access the BIOS setup menu. This is typically done by pressing a specific key during the boot process, often F2, F12, or Delete. Consult your motherboard’s documentation for the correct key. Within the BIOS menu, navigate to the boot settings and prioritize the USB drive as the boot device. Save the changes and exit the BIOS.

Step 4: Install Windows 10

The computer will now boot from the USB drive and initiate the Windows 10 installation process. Follow the on-screen instructions, including selecting the language, keyboard layout, and time zone. You will then be prompted to choose the installation type. Select "Custom: Install Windows only (advanced)".

Step 5: Partition the Hard Drive

The next step involves partitioning the hard drive. This allows you to allocate specific space for the operating system and other files. If you are performing a clean installation, you can delete all existing partitions and create a new one for Windows 10.

Step 6: Complete the Installation

Once the partitions are set up, the installation process will continue. This may take some time, depending on the speed of your computer and the size of the hard drive. Once the installation is complete, you will be prompted to create a user account and configure basic settings.

Step 7: Install Essential Drivers

After completing the initial setup, it is essential to install the necessary device drivers. These drivers ensure that your hardware, such as the graphics card, sound card, and network adapter, functions correctly. You can download the drivers from the manufacturer’s website or use a driver update utility.

Eliminating Bloatware: The Final Step

With Windows 10 installed, you can now focus on removing any unwanted bloatware. Here are some effective methods:

  • Uninstall Through Settings: Access the "Settings" app, navigate to "Apps," and select "Apps & features." From here, you can identify and uninstall unwanted applications.
  • Use a Third-Party Uninstaller: Specialized uninstaller tools, such as Revo Uninstaller or IObit Uninstaller, offer advanced features like deep scanning and removal of leftover files.
  • Disable Bloatware: For applications you don’t want to uninstall but prefer to disable, you can use the "Disable" option in the "Apps & features" settings or use a third-party tool like Autoruns for a more comprehensive approach.

Tips for a Smooth Reinstallation

  • Create a Bootable USB Drive with the Latest Version of Windows 10: Ensure you are using the most up-to-date version of Windows 10 for optimal compatibility and security.
  • Back Up Your Drivers: Before reinstalling Windows 10, back up your existing device drivers to avoid reinstalling them manually later.
  • Download Essential Applications: Prepare a list of essential applications that you will need after reinstalling Windows 10. Download them beforehand for easy installation.
  • Consider a Minimalist Approach: Opt for a clean installation with minimal applications and settings. This creates a leaner and more responsive operating system.

FAQs: Addressing Common Concerns

Q: Will reinstalling Windows 10 erase my data?

A: Yes, a clean installation of Windows 10 will erase all data on the hard drive. It is crucial to back up your data before proceeding.

Q: Can I reinstall Windows 10 without a USB drive?

A: While it is possible to reinstall Windows 10 using a DVD, a USB drive is the preferred method due to its portability and speed.

Q: What if I encounter errors during the installation process?

A: If you encounter errors, consult Microsoft’s support website or seek assistance from a qualified technician.

Q: How often should I reinstall Windows 10?

A: Reinstalling Windows 10 is generally recommended every 1-2 years or when experiencing significant performance issues.

Conclusion: Reclaiming Your Digital Freedom

Reinstalling Windows 10 without bloatware empowers you to regain control over your computing environment. By eliminating unnecessary software, you can enhance performance, improve security, and create a personalized user experience. This comprehensive guide provides a step-by-step approach to a clean installation, ensuring a smooth and efficient process. Remember to back up your data, create a bootable USB drive, and follow the instructions carefully. With a clean installation, you can enjoy a revitalized PC, free from bloatware and ready for a fresh start.

How To Reinstall Windows 10 Step By Step with Pictures 3 Ways to Reinstall Windows 10 without Losing Data - Chrunos Reinstall Windows 10. Step-by-step tutorial. — How To Fix Guide
How to use Reset this PC to easily reinstall Windows 10 How To Reinstall Windows 10 Step By Step with Pictures How to: Perform a Clean Install or Reinstall of Windows 10 - Microsoft Community
How To Reinstall Windows 10 Clean - triplegoodsite How to: Perform a Clean Install or Reinstall of Windows 10 - Microsoft Community

Closure

Thus, we hope this article has provided valuable insights into Reinstalling Windows 10: A Clean Slate for Your PC. We hope you find this article informative and beneficial. See you in our next article!

Troubleshooting Printer Connectivity In Windows 10: A Comprehensive Guide

Troubleshooting Printer Connectivity in Windows 10: A Comprehensive Guide

Introduction

In this auspicious occasion, we are delighted to delve into the intriguing topic related to Troubleshooting Printer Connectivity in Windows 10: A Comprehensive Guide. Let’s weave interesting information and offer fresh perspectives to the readers.

Troubleshooting Printer Connectivity in Windows 10: A Comprehensive Guide

Top 3 Methods to Fix Windows 10 Printer Problems

In the modern digital landscape, printers have become indispensable tools for both personal and professional tasks. However, encountering connectivity issues with your printer can be frustrating, disrupting workflow and productivity. This comprehensive guide aims to equip users with the knowledge and steps necessary to effectively troubleshoot and resolve common printer connectivity problems in Windows 10.

Understanding Printer Connectivity

Before diving into troubleshooting steps, it’s crucial to understand the underlying principles of printer connectivity in Windows 10. Printers connect to computers via various methods, each with its own set of potential issues:

  • USB Connection: This is the most common method, offering a direct physical link between the printer and computer.
  • Wireless Network: Printers equipped with Wi-Fi capabilities can connect to a local network, allowing multiple devices to share access.
  • Ethernet Connection: This method provides a wired connection, often preferred for its stability and speed, particularly in high-traffic environments.
  • Cloud Printing: This modern approach utilizes cloud services to facilitate printing from various devices, regardless of location.

Common Printer Connectivity Issues in Windows 10

While various factors can contribute to printer connectivity problems, some recurring issues are more prevalent:

  • Driver Issues: Outdated or incompatible printer drivers can prevent proper communication between the printer and computer.
  • Network Connectivity: Problems with the Wi-Fi network, router, or network settings can disrupt communication with a wireless printer.
  • Power Issues: A printer that is not receiving sufficient power may fail to respond to commands or connect to the network.
  • Hardware Malfunctions: Faulty cables, damaged ports, or internal printer components can lead to connectivity problems.
  • Software Conflicts: Occasionally, other software programs or conflicting settings can interfere with printer functionality.

Troubleshooting Steps for Printer Connectivity

Addressing printer connectivity issues in Windows 10 requires a systematic approach. The following steps outline a comprehensive troubleshooting process:

1. Verify Basic Connections:

  • USB: Ensure the USB cable is securely connected to both the printer and the computer. Try a different USB port if available.
  • Wireless: Confirm that the printer is connected to the same Wi-Fi network as the computer.
  • Ethernet: Verify that the Ethernet cable is correctly plugged into both the printer and the network router.

2. Check Printer Power:

  • Ensure the printer is turned on and receiving power.
  • Check the power cord for any damage or loose connections.
  • If using a power strip, verify it’s functioning correctly.

3. Update or Reinstall Printer Drivers:

  • Windows Update: Windows automatically updates drivers, but it’s recommended to manually check for the latest version.
  • Manufacturer Website: Download the most recent driver for your printer model from the manufacturer’s website.
  • Device Manager: Access the Device Manager (right-click "This PC" > "Manage" > "Device Manager") and check for any error messages or yellow exclamation marks next to the printer. Update or reinstall the driver if necessary.

4. Troubleshoot Network Connectivity:

  • Network Troubleshooter: Run the Windows Network Troubleshooter (Settings > Network & Internet > Status > Troubleshoot).
  • Router Restart: Restart your router and modem to refresh the network connection.
  • Wi-Fi Signal Strength: Ensure a strong Wi-Fi signal reaches the printer. Consider repositioning the router or using a Wi-Fi extender if needed.
  • Network Settings: Verify the printer’s network settings, such as IP address and SSID, match those of the computer and router.

5. Restart Services:

  • Print Spooler: Restart the Print Spooler service (Search "services.msc" > locate "Print Spooler" > right-click > "Restart").
  • Other Relevant Services: Check for other services related to printing and networking, such as "Windows Update," "Network Location Awareness," and "DHCP Client." Restart any services that appear to be malfunctioning.

6. Clear Print Queue:

  • Open Print Queue: Open the "Printers & Scanners" settings (Settings > Devices > Printers & Scanners) and locate the printer.
  • Clear Queue: Right-click the printer icon > "See what’s printing" > "Cancel all documents."

7. Run System File Checker:

  • Command Prompt: Open the Command Prompt as administrator (Search "cmd" > right-click > "Run as administrator").
  • Run Command: Type "sfc /scannow" and press Enter. This will scan for and repair corrupt system files.

8. Check for Software Conflicts:

  • Uninstall Recent Software: If the problem arose after installing new software, consider uninstalling it to see if the issue resolves.
  • Disable Antivirus: Temporarily disable your antivirus software to rule out any potential conflicts.

9. Reset Printer to Factory Defaults:

  • Printer Settings: Refer to your printer’s user manual for instructions on resetting the printer to factory defaults. This can resolve network connectivity issues caused by incorrect settings.

10. Contact Manufacturer Support:

  • If all troubleshooting steps have been exhausted, it’s advisable to contact the printer manufacturer’s support team for further assistance. They may be able to provide more specific solutions or diagnose hardware problems.

Frequently Asked Questions (FAQs)

1. How do I know if my printer is online?

The printer status in the "Printers & Scanners" settings will indicate whether it’s online. A green checkmark indicates a connected printer.

2. My printer is connected to the network but not printing. What should I do?

This could indicate a driver issue, a problem with the print queue, or a network connectivity issue. Follow the troubleshooting steps outlined above, focusing on driver updates, clearing the print queue, and verifying network settings.

3. Why does my printer keep going offline?

Frequent disconnections could be due to weak Wi-Fi signal, power issues, or network congestion. Check the Wi-Fi signal strength, ensure the printer is receiving adequate power, and consider restarting your router.

4. How do I troubleshoot a printer that is not recognized by Windows 10?

Firstly, ensure the printer is connected correctly. If it’s a USB connection, try a different port. If it’s a wireless printer, verify network connectivity. If the problem persists, check for driver issues or run the Windows Network Troubleshooter.

5. Can I use a printer on a different network without connecting it?

Yes, cloud printing services allow you to print to a printer on a different network without physically connecting it to your computer. This requires setting up a cloud printing account and configuring the printer for cloud printing.

Tips for Maintaining Printer Connectivity

  • Regular Driver Updates: Keep your printer drivers up to date to ensure optimal performance and compatibility.
  • Strong Wi-Fi Signal: Ensure a strong Wi-Fi signal reaches the printer to prevent disconnections.
  • Power Management: Avoid setting power-saving options for the printer that may cause it to turn off unexpectedly.
  • Network Security: Use strong passwords and keep your router’s firmware up to date to protect your network and printers from unauthorized access.

Conclusion

Effective troubleshooting of printer connectivity issues in Windows 10 requires a systematic approach. By following the steps outlined in this guide, users can identify and resolve most common connectivity problems. Regular maintenance, including driver updates and network security practices, can help prevent future issues and ensure seamless printing functionality.

How to Fix Printer Problems in Windows 10? – WebNots Mastering Printer Connectivity: Windows Troubleshooting Guide - YouTube How to Troubleshoot a Printer Connection in Windows
How to Troubleshoot Common Printer Problems in Windows 10 How To Troubleshoot Common Printer Problems In Windows 10  technotips Fix "Windows Cannot Connect to the Printer" Error
Printer Troubleshooter For Windows 10 Pc Windows - Vrogue How to Troubleshoot Common Printer Problems in Windows 10

Closure

Thus, we hope this article has provided valuable insights into Troubleshooting Printer Connectivity in Windows 10: A Comprehensive Guide. We hope you find this article informative and beneficial. See you in our next article!