Archives November 2023

Sharing Made Simple: A Comprehensive Guide To Windows 10’s Nearby Sharing Feature

Sharing Made Simple: A Comprehensive Guide to Windows 10’s Nearby Sharing Feature

Introduction

With enthusiasm, let’s navigate through the intriguing topic related to Sharing Made Simple: A Comprehensive Guide to Windows 10’s Nearby Sharing Feature. Let’s weave interesting information and offer fresh perspectives to the readers.

Sharing Made Simple: A Comprehensive Guide to Windows 10’s Nearby Sharing Feature

How to Use Nearby Sharing to Share Files in Windows 10

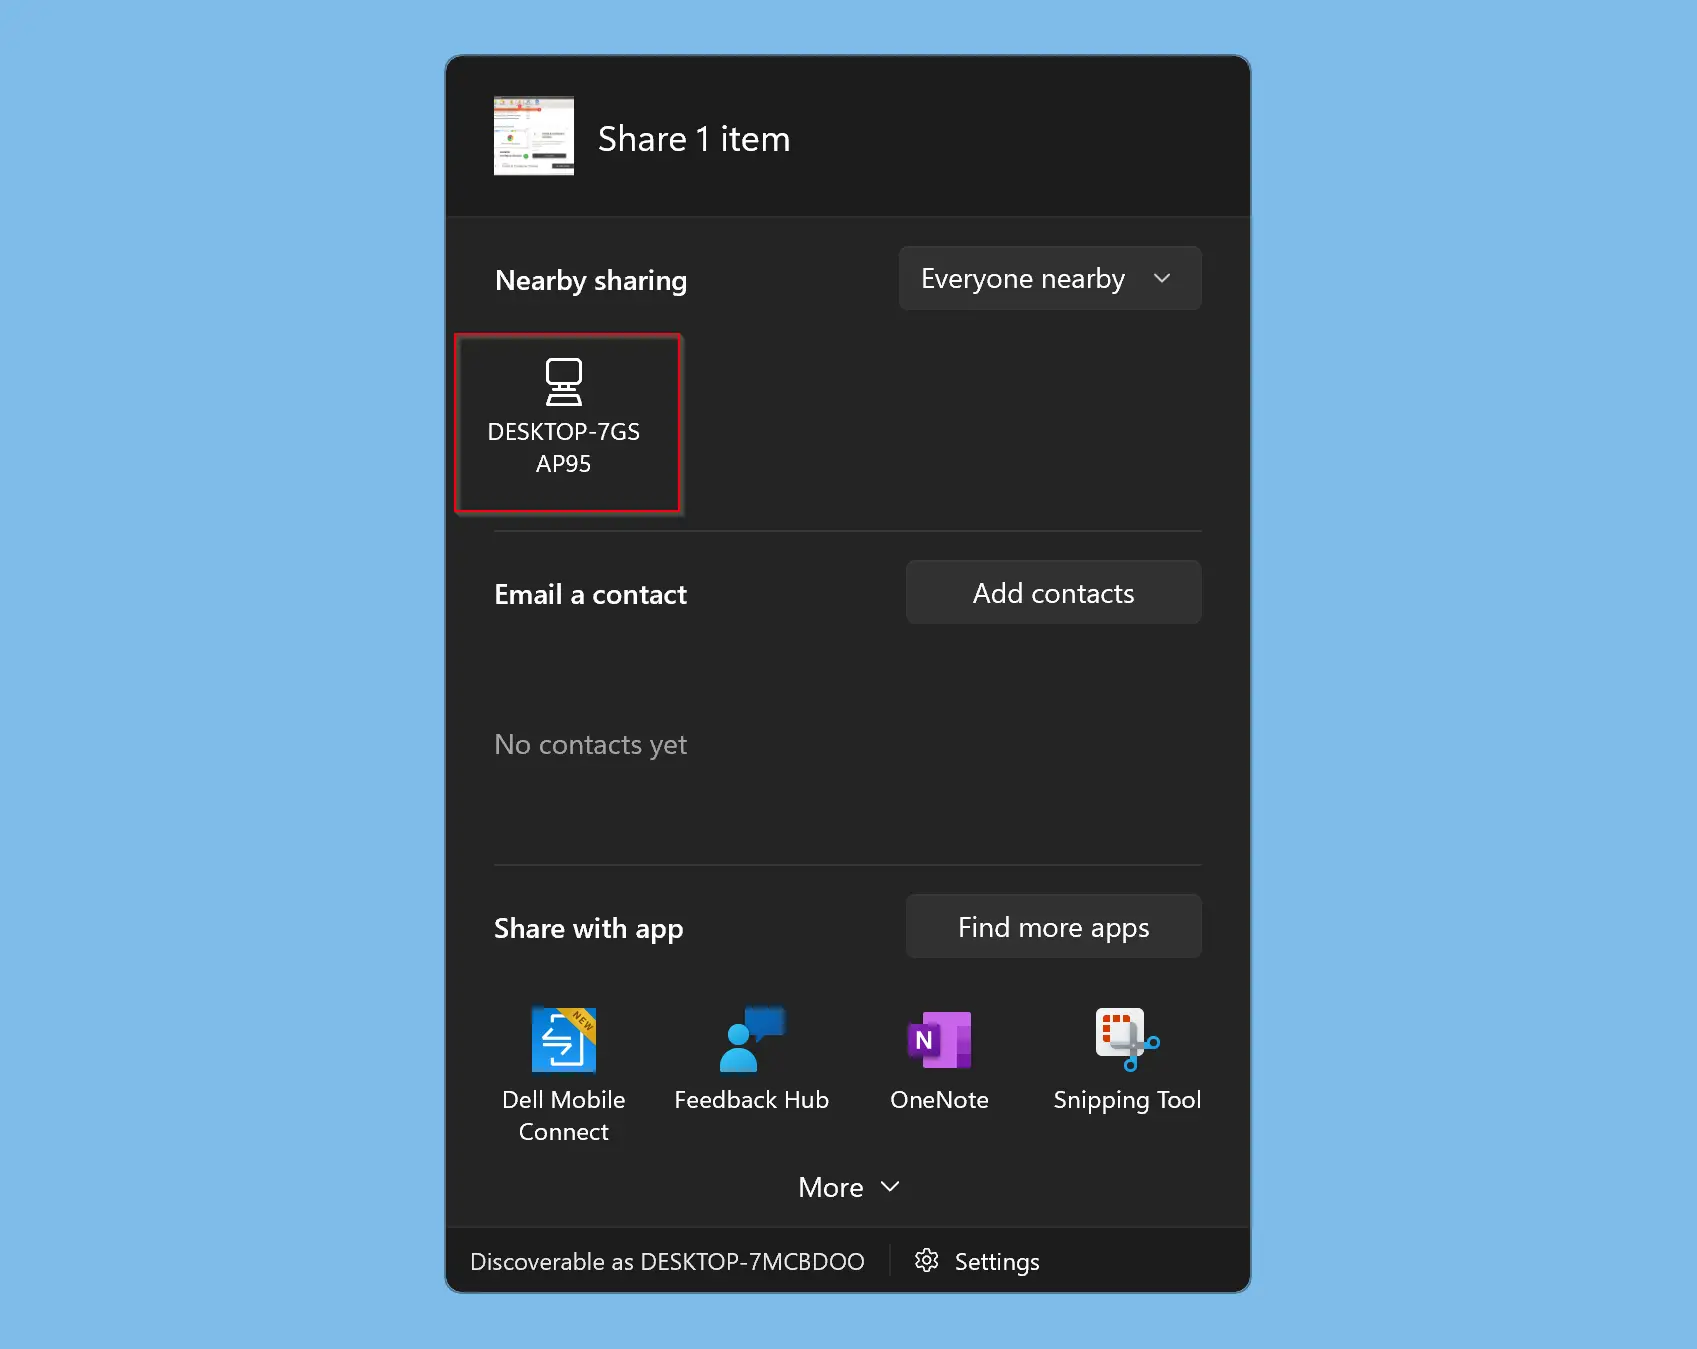
Windows 10 introduced a convenient and intuitive way to share files, links, and other content between nearby devices. This feature, known as Nearby Sharing, eliminates the need for cumbersome email attachments, tedious cloud uploads, or complex Bluetooth pairings. It leverages the power of Bluetooth and Wi-Fi to establish a secure connection between devices, enabling seamless data transfer within a close proximity.

Understanding the Mechanics of Nearby Sharing

At its core, Nearby Sharing operates on the principle of proximity and device discovery. When enabled, your Windows 10 device continuously scans for nearby compatible devices that have Nearby Sharing activated. This discovery process relies on Bluetooth and Wi-Fi, allowing your device to identify potential recipients within a short range.

Once a compatible device is found, a secure connection is established through a combination of Bluetooth and Wi-Fi Direct. This connection ensures that data transfer is encrypted and protected from unauthorized access. The transfer process itself is swift and efficient, making it a practical solution for everyday sharing needs.

Benefits of Utilizing Nearby Sharing

  1. Simplicity and Convenience: Nearby Sharing simplifies the sharing process, eliminating the need for complex configurations or multiple steps. Users can share content with a single click, without the hassle of uploading to the cloud or sending large email attachments.

  2. Secure Data Transfer: The feature prioritizes security by utilizing encryption during data transfer. This ensures that shared content remains protected from unauthorized access, providing peace of mind for users concerned about data privacy.

  3. Enhanced User Experience: Nearby Sharing enhances the user experience by streamlining the sharing process. The intuitive interface and straightforward steps make it accessible to users of all technical backgrounds, fostering a more seamless and enjoyable interaction with their devices.

  4. Broad Compatibility: Nearby Sharing is compatible with a wide range of devices running Windows 10, including PCs, laptops, tablets, and smartphones. This broad compatibility ensures that users can share content with a diverse range of devices within their network.

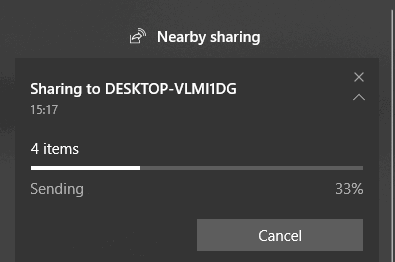
  5. Efficient File Transfer: The feature leverages the power of Bluetooth and Wi-Fi Direct, enabling fast and efficient file transfer. This is particularly beneficial for sharing large files, eliminating the need for lengthy uploads or downloads.

Practical Applications of Nearby Sharing

  1. Sharing Documents and Files: Seamlessly share documents, presentations, images, and other files with colleagues, friends, or family members within close proximity.

  2. Transferring Music and Videos: Easily transfer music, movies, and other multimedia content to nearby devices, simplifying entertainment sharing.

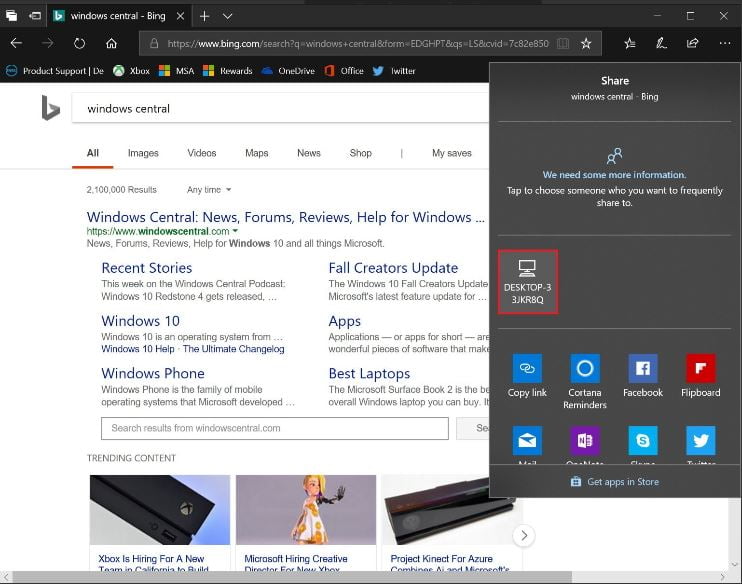
  3. Sharing Web Links: Quickly share interesting articles, web pages, and other online content with nearby devices, fostering collaborative browsing experiences.

  4. Connecting to Printers: Print documents and images directly from your device to a nearby printer without the need for wired connections or complex setup procedures.

Frequently Asked Questions (FAQs)

Q: What devices are compatible with Nearby Sharing?

A: Nearby Sharing is compatible with Windows 10 devices, including PCs, laptops, tablets, and smartphones.

Q: What types of content can I share using Nearby Sharing?

A: You can share files, links, and other content, including documents, images, videos, and music.

Q: Is Nearby Sharing secure?

A: Yes, Nearby Sharing uses encryption to protect data during transfer, ensuring that shared content remains secure.

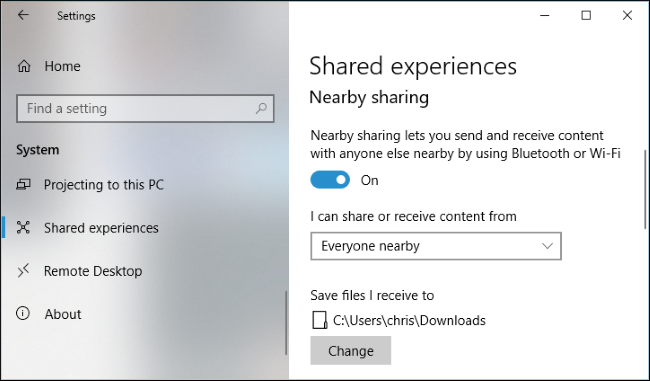
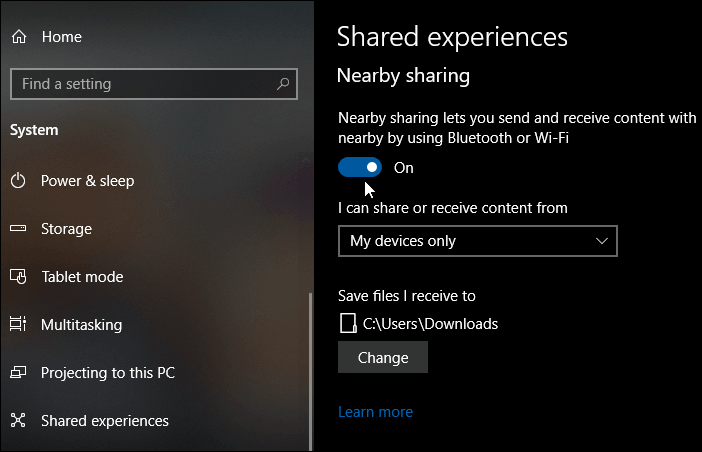
Q: How do I enable Nearby Sharing on my device?

A: To enable Nearby Sharing, go to Settings > System > Shared experiences and toggle the switch for Nearby sharing.

Q: What is the range of Nearby Sharing?

A: The range of Nearby Sharing varies depending on the device and environmental factors. Generally, it operates within a range of approximately 30 feet.

Q: Can I share content with devices running different operating systems?

A: Currently, Nearby Sharing is primarily designed for sharing between Windows 10 devices. However, future updates may introduce compatibility with other operating systems.

Tips for Optimizing Nearby Sharing

  1. Ensure Bluetooth and Wi-Fi are Enabled: Nearby Sharing relies on these connections, so ensure they are activated on both devices.

  2. Keep Devices Within Range: Nearby Sharing operates within a limited range, so keep devices within close proximity for successful sharing.

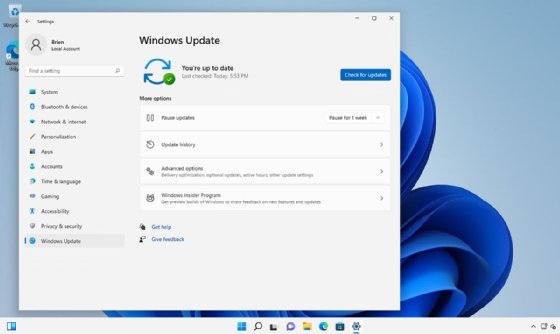
  3. Check for Updates: Regularly update your device to ensure compatibility and optimal performance.

  4. Adjust Sharing Settings: Customize sharing settings to control what content is shared and with whom.

  5. Verify Device Compatibility: Ensure that both devices support Nearby Sharing for successful file transfer.

Conclusion

Nearby Sharing is a valuable feature in Windows 10 that simplifies and streamlines the process of sharing content between nearby devices. Its ease of use, security features, and broad compatibility make it a practical and efficient solution for everyday sharing needs. By leveraging the power of Bluetooth and Wi-Fi, Nearby Sharing eliminates the need for cumbersome methods and provides a seamless and secure experience for users. As technology continues to evolve, we can expect further enhancements and refinements to this feature, making it an even more integral part of the Windows 10 ecosystem.

How to Use Nearby Sharing on Windows 10 How to Share Files Between Computers on Windows 10 - Made Stuff Easy Quick and easy: Share files with Windows 10's Nearby sharing - CNET
How to use Nearby Sharing feature on Windows 10 How to Share Your Files with Nearby Sharing on Windows 10  Windows Geek [Step by Step Guide] How to Use Nearby Share on Windows?
How To Transfer Files Using Nearby Sharing On Windows 10 How To Share Files With Other PC In Windows 10 Without Any Tool

Closure

Thus, we hope this article has provided valuable insights into Sharing Made Simple: A Comprehensive Guide to Windows 10’s Nearby Sharing Feature. We thank you for taking the time to read this article. See you in our next article!

Navigating Windows 11 Startup Issues: A Comprehensive Guide

Navigating Windows 11 Startup Issues: A Comprehensive Guide

Introduction

With enthusiasm, let’s navigate through the intriguing topic related to Navigating Windows 11 Startup Issues: A Comprehensive Guide. Let’s weave interesting information and offer fresh perspectives to the readers.

Startup Settings (What It Is and How to Use It)

Windows 11, despite its modern design and enhanced features, is not immune to startup problems. These issues can range from minor inconveniences to major roadblocks, hindering user productivity and access to essential data. Understanding the common causes and troubleshooting steps is crucial for resolving these challenges effectively.

Common Windows 11 Startup Issues and Their Causes

  1. Slow Boot Times:

    • Outdated Drivers: Outdated device drivers can lead to compatibility issues and slow down the boot process.
    • Excessive Startup Programs: A large number of programs configured to launch automatically at startup can significantly increase boot time.
    • Hard Drive Issues: A fragmented or failing hard drive can cause delays in accessing data, impacting boot performance.
    • Insufficient RAM: Insufficient RAM can cause the system to struggle to load programs and services during startup, resulting in slow boot times.
  2. Blue Screen of Death (BSOD):

    • Hardware Failure: Faulty hardware components, such as RAM, hard drive, or motherboard, can trigger BSOD errors.
    • Driver Issues: Incompatible or corrupted drivers can lead to system instability and BSODs.
    • System File Corruption: Damaged or corrupted system files can cause critical errors, resulting in BSODs.
    • Overheating: Excessive heat can lead to system instability and BSODs.
  3. Automatic Repair Loop:

    • Corrupted System Files: Damaged or corrupted system files can prevent Windows from booting properly, leading to the automatic repair loop.
    • Hard Drive Errors: Errors on the hard drive, including bad sectors or file system corruption, can trigger the automatic repair loop.
    • Incompatible Hardware: Hardware components that are not compatible with Windows 11 can cause system instability and trigger the automatic repair loop.
  4. Error Messages During Boot:

    • Missing or Corrupted Boot Files: Critical boot files, such as BOOTMGR or BCD, may be missing or corrupted, preventing Windows from loading.
    • Incorrect Boot Order: The BIOS or UEFI settings might have an incorrect boot order, preventing Windows from being selected as the primary boot device.
    • Hard Drive Partition Issues: Problems with the hard drive partition, such as a corrupted partition table, can prevent Windows from accessing the boot files.

Troubleshooting Windows 11 Startup Issues

  1. Safe Mode: Starting Windows in safe mode disables most startup programs and drivers, isolating potential issues. This allows for troubleshooting without interfering with other software.

  2. System Restore: Rolling back the system to a previous restore point can revert changes that might have caused startup problems. This is particularly helpful for recent software updates or driver installations.

  3. Startup Repair: The built-in Startup Repair tool attempts to automatically detect and fix issues that prevent Windows from starting correctly.

  4. Check Disk (CHKDSK): Running CHKDSK can scan the hard drive for errors and attempt to repair them. This can be helpful for resolving issues related to file system corruption or bad sectors.

  5. Driver Updates: Updating device drivers to the latest versions can resolve compatibility issues and improve system stability.

  6. Uninstall Recent Software: Recent software installations can sometimes conflict with Windows 11, causing startup problems. Uninstalling the problematic software can resolve these issues.

  7. BIOS/UEFI Settings: Checking BIOS or UEFI settings, including boot order and hardware configuration, can ensure that Windows 11 is properly configured and can boot correctly.

  8. Hardware Troubleshooting: If hardware issues are suspected, testing individual components, such as RAM, hard drive, or motherboard, can help identify the faulty component.

Frequently Asked Questions

Q: What are the most common reasons for slow boot times in Windows 11?

A: Outdated drivers, excessive startup programs, hard drive issues, and insufficient RAM are the most common culprits.

Q: How do I access safe mode in Windows 11?

A: During startup, press and hold the Shift key while selecting "Restart" from the Start menu. Choose "Troubleshoot" > "Advanced options" > "Startup Settings" > "Restart" and then select the desired safe mode option.

Q: What are some signs of a failing hard drive?

A: Slow boot times, frequent crashes, error messages, and clicking noises from the hard drive are common signs of failure.

Q: How do I run CHKDSK in Windows 11?

A: Open Command Prompt as administrator and type "chkdsk /f /r" and press Enter.

Q: How do I update device drivers in Windows 11?

A: Go to "Device Manager" (search in the Start menu), select the device with outdated drivers, right-click, and choose "Update driver."

Tips for Preventing Windows 11 Startup Issues

  • Regularly Update Windows: Install the latest Windows updates to address security vulnerabilities and improve system stability.
  • Maintain a Clean System: Regularly remove unnecessary files, uninstall unused software, and defragment the hard drive to optimize performance.
  • Monitor System Resources: Keep an eye on RAM usage and hard drive space to avoid performance bottlenecks.
  • Backup Regularly: Create regular backups of important data to protect against data loss in case of system failure.
  • Use a Reputable Antivirus: Install and maintain a reputable antivirus program to protect against malware that can cause system instability.

Conclusion

Windows 11 startup issues can be frustrating, but by understanding the common causes and following the troubleshooting steps outlined above, users can effectively resolve these problems. Regular maintenance and proactive measures, such as keeping the system updated and clean, can significantly reduce the likelihood of encountering these issues. By taking a systematic approach and utilizing the available tools and resources, users can ensure a smooth and reliable Windows 11 experience.

How to FIX Automatic Repair Loop & StartUp Problems in Windows 11 (2023 Guide) - YouTube How to Access Advanced Startup Options (WinRE) on Windows 11? - MiniTool How to Fix Windows 11 Start Menu Not Working, Not Searching, Not Opening Issues - YouTube
Enable or Disable Startup Programs in Windows 11 [Guide 2024] How to Manage Startup Programs on Windows 11 – WiseCleaner How to Fix Windows 11 Slow Startup (3 Methods) - YouTube
Troubleshooting the most common issues with Windows 11  TechTarget Startup Repair Windows 11  How to Automatic Repair Loop Problems in Windows 11 - YouTube

Closure

Thus, we hope this article has provided valuable insights into Navigating Windows 11 Startup Issues: A Comprehensive Guide. We thank you for taking the time to read this article. See you in our next article!

Seamless Sharing In Windows 11: Exploring The Power Of Nearby Sharing

Seamless Sharing in Windows 11: Exploring the Power of Nearby Sharing

Introduction

With enthusiasm, let’s navigate through the intriguing topic related to Seamless Sharing in Windows 11: Exploring the Power of Nearby Sharing. Let’s weave interesting information and offer fresh perspectives to the readers.

Seamless Sharing in Windows 11: Exploring the Power of Nearby Sharing

How to Use Nearby Sharing on Windows 11

Windows 11 introduces a robust and intuitive feature called Nearby Sharing, designed to simplify the process of transferring files, links, and other content between compatible devices. This innovative technology leverages Bluetooth and Wi-Fi to establish a secure, direct connection, eliminating the need for cloud services or cumbersome cable connections.

Understanding the Mechanics of Nearby Sharing

At its core, Nearby Sharing in Windows 11 operates on a simple yet powerful principle: proximity and discoverability. When enabled, your device becomes visible to other nearby devices that also have Nearby Sharing activated. This visibility allows for the initiation of a secure connection, facilitated by Bluetooth for initial pairing and Wi-Fi for high-speed data transfer.

The Benefits of Nearby Sharing

The advantages of Nearby Sharing extend beyond mere convenience, offering a compelling solution for a range of scenarios:

  • Effortless File Transfers: Sharing photos, videos, documents, and other files between devices becomes a breeze. The process is as simple as selecting the content and choosing the target device from the Nearby Sharing interface.
  • Instantaneous Link Sharing: Websites, articles, and other online content can be shared instantly with nearby devices. This eliminates the need to manually copy and paste URLs, streamlining information exchange.
  • Enhanced Collaboration: Nearby Sharing facilitates collaborative work by enabling the seamless sharing of documents and projects between colleagues in close proximity.
  • Privacy and Security: The technology prioritizes user privacy and security. Connections are established only between devices that have Nearby Sharing enabled, and data transfers are encrypted, ensuring confidentiality.

Configuration and Usage

Enabling and utilizing Nearby Sharing in Windows 11 is straightforward:

  1. Activation: Navigate to the "Settings" app, select "System," and then choose "Nearby Sharing."
  2. Device Visibility: Choose whether to make your device visible to all nearby devices or only to those with your contacts.
  3. Sharing Content: To share content, select the file, link, or other item and choose "Share" from the context menu. Select the desired recipient device from the list of available options.

Exploring the Capabilities of Nearby Sharing

While Nearby Sharing is primarily designed for file and link transfers, its capabilities extend beyond these fundamental functionalities:

  • Sharing to Printers: Users can directly share documents and images with nearby printers that support Nearby Sharing.
  • Sharing to Smart Devices: Certain smart devices, such as smart speakers and displays, may support Nearby Sharing, enabling the transfer of content for playback or display.
  • Sharing to Other Platforms: While Nearby Sharing is primarily a Windows 11 feature, it can also be used to share content with devices running other operating systems, such as Android and iOS, through the "Nearby Share" app.

Addressing Common Concerns

While Nearby Sharing offers numerous advantages, it is important to address potential concerns:

  • Security: The encryption technology employed by Nearby Sharing ensures secure data transfer. However, it is crucial to be aware of the potential risks associated with sharing sensitive information with untrusted devices.
  • Compatibility: Not all devices support Nearby Sharing. Ensure that both the sending and receiving devices have the feature enabled and are compatible.
  • Range: The effective range of Nearby Sharing is limited by Bluetooth and Wi-Fi capabilities. While the actual range can vary, it is generally recommended to be within a close proximity for optimal performance.

Frequently Asked Questions

Q: What are the minimum system requirements for Nearby Sharing?

A: Nearby Sharing requires a device running Windows 11 with Bluetooth and Wi-Fi capabilities.

Q: Can I use Nearby Sharing to share files with devices running other operating systems?

A: Yes, Nearby Sharing can be used to share files with devices running Android and iOS through the "Nearby Share" app.

Q: Is Nearby Sharing secure?

A: Yes, Nearby Sharing uses encryption to secure data transfers. However, it is always important to be cautious about sharing sensitive information with untrusted devices.

Q: What is the range of Nearby Sharing?

A: The range of Nearby Sharing is limited by Bluetooth and Wi-Fi capabilities. It is generally recommended to be within close proximity for optimal performance.

Q: Can I use Nearby Sharing to share files with printers?

A: Yes, Nearby Sharing can be used to share files with printers that support the feature.

Tips for Optimizing Nearby Sharing

  • Enable Bluetooth and Wi-Fi: Ensure that both Bluetooth and Wi-Fi are enabled on both devices for optimal connectivity.
  • Keep Devices Close: Nearby Sharing works best when devices are within close proximity.
  • Check for Updates: Ensure that both devices have the latest operating system updates installed to benefit from the latest improvements and bug fixes.
  • Review Sharing Settings: Regularly review your sharing settings to ensure that only trusted devices are visible and that the desired level of visibility is maintained.

Conclusion

Nearby Sharing in Windows 11 represents a significant advancement in file sharing technology, offering a seamless, secure, and intuitive experience. Its ability to facilitate effortless transfers between devices, enhance collaboration, and prioritize user privacy makes it a valuable addition to the Windows ecosystem. By embracing this innovative feature, users can streamline their workflows, improve productivity, and enjoy a more connected digital experience.

How to Use Nearby Sharing on Windows 11?  Gear Up Windows How To Use Nearby Sharing On Windows 11  digisrun Nearby share for pc  nearby share windows 11  android to pc file transfer  how to use nearby
How to Use Nearby Sharing on Windows 11?  Gear Up Windows Seamless File Sharing: Google Nearby Share for Windows How to Enable and Use Nearby Sharing in Windows 11? 2024��
Nearby Share is Finally Available on Windows, Allowing for a Seamless File Sharing Experience Change Nearby Sharing Setting in Windows 11 - YouTube

Closure

Thus, we hope this article has provided valuable insights into Seamless Sharing in Windows 11: Exploring the Power of Nearby Sharing. We thank you for taking the time to read this article. See you in our next article!

Nero 9: A Legacy Of Disc Burning And Media Management In The Windows 10 Era

Nero 9: A Legacy of Disc Burning and Media Management in the Windows 10 Era

Introduction

In this auspicious occasion, we are delighted to delve into the intriguing topic related to Nero 9: A Legacy of Disc Burning and Media Management in the Windows 10 Era. Let’s weave interesting information and offer fresh perspectives to the readers.

Nero 9: A Legacy of Disc Burning and Media Management in the Windows 10 Era

TV & Music TechnoGeek: Nero Kwik Media & Nero 9 free burning software

Nero 9, released in 2007, represents a significant chapter in the history of disc burning and media management software. While it predates the widespread adoption of Windows 10, its capabilities remain relevant for those seeking to manage and manipulate optical media, particularly in environments where legacy hardware and software compatibility are essential.

Understanding the Significance of Nero 9 in the Context of Windows 10

The advent of cloud storage and streaming services has significantly reduced the reliance on physical media like CDs and DVDs. However, there are still scenarios where Nero 9’s capabilities prove invaluable:

  • Legacy Data Preservation: Many users still possess valuable data stored on optical discs. Nero 9 provides tools to back up, archive, and access this data.
  • Specialized Applications: Certain industries and applications, such as music production, video editing, and software distribution, continue to rely on physical media for archival and distribution purposes. Nero 9 offers the necessary tools for creating and managing these media formats.
  • Compatibility with Older Hardware: Nero 9 offers compatibility with a wide range of optical drives, including older models that might not be supported by newer software.
  • Offline Access: In situations where internet connectivity is limited or unreliable, Nero 9 enables offline access to data stored on optical media.

Key Features of Nero 9 for Windows 10 Users

While Nero 9 was designed for earlier versions of Windows, its core functionalities remain valuable for Windows 10 users:

  • Disc Burning: Nero 9 excels at burning data, audio, and video to CDs, DVDs, and Blu-ray discs. It supports a variety of formats, including ISO images, and offers advanced options for customizing disc content.
  • Disc Copying: The software enables users to create exact copies of existing discs, ensuring data preservation and duplication.
  • Disc Ripping: Nero 9 allows users to extract audio tracks from CDs and convert them to digital formats like MP3 or WAV, providing a convenient way to create digital music libraries.
  • Media Management: Beyond disc burning, Nero 9 offers tools for managing and organizing multimedia files, including photo slideshow creation and basic video editing.
  • Data Backup: The software includes backup features for safeguarding important data, allowing users to create backups to optical discs, external drives, or network locations.

Running Nero 9 on Windows 10: Considerations and Solutions

While Nero 9 was not designed for Windows 10, it can be run with some adjustments and workarounds:

  • Compatibility Mode: Windows 10 offers compatibility mode, which allows users to run older software designed for previous versions of Windows. This might be the most straightforward approach to running Nero 9.
  • Administrator Privileges: Running Nero 9 might require administrator privileges to access system resources and ensure proper functionality.
  • Driver Updates: Ensure that the optical drive drivers are up-to-date for optimal performance and compatibility with Nero 9.
  • Third-Party Tools: Some users might need to employ third-party tools, such as virtual machine software, to create a virtual environment simulating an older Windows version where Nero 9 can run without issues.

FAQs about Nero 9 and Windows 10

Q: Is Nero 9 compatible with Windows 10?

A: While Nero 9 was not designed for Windows 10, it can be run using compatibility mode and other workarounds. However, some features might not function as intended.

Q: Can I use Nero 9 to burn Blu-ray discs on Windows 10?

A: Nero 9 does support Blu-ray disc burning, but compatibility with specific Blu-ray drives on Windows 10 may vary.

Q: Does Nero 9 offer any security features for data protection?

A: Nero 9 includes password protection for discs, allowing users to restrict access to sensitive data.

Q: Are there any alternative disc burning software solutions for Windows 10?

A: Yes, there are several alternatives available, including free and paid options. Some popular choices include ImgBurn, CDBurnerXP, and Ashampoo Burning Studio.

Tips for Using Nero 9 on Windows 10

  • Check for Updates: Consider checking for any available updates for Nero 9, as these might address compatibility issues with Windows 10.
  • Run as Administrator: Launch Nero 9 with administrator privileges to avoid potential permission errors.
  • Use Compatibility Mode: If encountering issues, enable compatibility mode for Nero 9 by right-clicking the executable file and selecting "Properties."
  • Experiment with Settings: Adjust Nero 9 settings, such as the burning speed and disc format, to optimize performance and compatibility.

Conclusion

Nero 9 remains a valuable tool for users who require optical media management capabilities, particularly in scenarios involving legacy data, specialized applications, and offline access. While its compatibility with Windows 10 might require some adjustments, its core functionalities and versatility continue to make it a relevant choice for users with specific needs.

For those seeking a modern and more seamlessly integrated solution for disc burning and media management on Windows 10, exploring alternative software options might be advisable. However, for users who value the familiarity and features of Nero 9, it remains a viable option, albeit one that requires a bit more effort to integrate into the Windows 10 environment.

Nero 9.4.26.0 – Burn video, audio, data CDs and DVDs – FREE STREAMING What Happened To Nero Burning ROM, The Program With Which We Filled All Those Tubs Of CD's CD KEY Nero 9.0.9.4 Trial .Exe  Megaleecher.Net
Nero 9 Ultra Edition CD/DVD Burning Software for Windows 500109 Nero 9 Free - Download How To Use Nero 9 To Burn The Disc - YouTube
Top 10 Disc vypalovací software pro Windows Download Free Nero 9 Disc Burning Software

Closure

Thus, we hope this article has provided valuable insights into Nero 9: A Legacy of Disc Burning and Media Management in the Windows 10 Era. We appreciate your attention to our article. See you in our next article!

Unlocking The Potential Of R In Windows 10: Troubleshooting And Maximizing Its Power

Unlocking the Potential of R in Windows 10: Troubleshooting and Maximizing Its Power

Introduction

With great pleasure, we will explore the intriguing topic related to Unlocking the Potential of R in Windows 10: Troubleshooting and Maximizing Its Power. Let’s weave interesting information and offer fresh perspectives to the readers.

Unlocking the Potential of R in Windows 10: Troubleshooting and Maximizing Its Power

How to use the Troubleshoot tools to fix problems on the Windows 10 Creators Update  Windows

R, a free and open-source programming language and software environment, has become indispensable for data analysis, statistical computing, and visualization. Its flexibility, comprehensive libraries, and active community have made it a powerful tool for researchers, analysts, and data scientists across various domains. However, encountering issues with R in Windows 10 can be frustrating, hindering the ability to leverage its full potential. This article aims to provide a comprehensive guide to troubleshooting common R-related problems on Windows 10, highlighting the importance of R and its benefits while offering practical solutions.

Understanding the Importance of R in Data Analysis

R’s significance in the field of data analysis stems from its core features:

  • Comprehensive Statistical Functionality: R boasts a vast collection of packages dedicated to statistical analysis, covering everything from basic descriptive statistics to advanced machine learning algorithms. This rich ecosystem enables users to perform complex statistical procedures without writing extensive code.
  • Data Visualization Capabilities: R’s graphical capabilities are unmatched, allowing users to create visually appealing and informative charts, plots, and dashboards. This visual representation of data facilitates understanding and communication of insights.
  • Flexibility and Extensibility: R’s open-source nature allows for customization and extension through user-created packages. This fosters a collaborative environment where users can share and contribute to the growing library of tools.
  • Strong Community Support: A vibrant and active community of R users provides ample resources, tutorials, and forums for support and knowledge sharing. This collective effort ensures continuous learning and problem-solving.

Troubleshooting Common R Issues in Windows 10

While R offers immense value, its implementation in Windows 10 can sometimes present challenges. These issues can range from installation problems to unexpected errors during code execution. Here’s a breakdown of common R problems and their solutions:

1. Installation Issues:

  • Incomplete or Corrupted Installation: A faulty installation process can lead to missing files or corrupted components, preventing R from functioning correctly.
  • Solution: Reinstall R from the official website, ensuring a stable internet connection and sufficient disk space.

2. Environment Variables:

  • Incorrect Path Settings: R relies on environment variables to locate its executables and libraries. Incorrect or missing path settings can cause R to fail to find necessary components.
  • Solution: Verify and update environment variables, specifically the PATH variable, to include the directory containing R’s installation files and the R_HOME variable pointing to the R installation root directory.

3. Package Installation Errors:

  • Network Connectivity Issues: Package installation relies on internet connectivity to download required files. A poor internet connection or firewall restrictions can hinder the process.
  • Solution: Ensure a stable internet connection and check firewall settings to allow access for R package downloads.

4. Code Execution Errors:

  • Missing or Outdated Packages: R code often relies on specific packages. Missing or outdated packages can lead to errors during code execution.
  • Solution: Install or update the required packages using the install.packages() function.

5. Memory Management Issues:

  • Insufficient Memory: R can be memory-intensive, especially when handling large datasets. Insufficient memory can lead to crashes or slow performance.
  • Solution: Optimize code for memory efficiency, consider using 64-bit versions of R, and increase system memory if necessary.

6. Compatibility Issues:

  • Conflicting Software: Certain software applications might interfere with R’s functionality, causing unexpected errors.
  • Solution: Identify and temporarily disable potentially conflicting software.

7. RStudio Issues:

  • RStudio Configuration: RStudio, a popular IDE for R, requires proper configuration to work seamlessly with R.
  • Solution: Verify RStudio settings, particularly the R version and working directory, to ensure compatibility.

FAQs: Addressing Common R in Windows 10 Concerns

Q: Why does R keep crashing on Windows 10?

A: R crashing can be attributed to several factors, including insufficient memory, conflicting software, outdated packages, or corrupted installation files.

Q: How do I update R on Windows 10?

A: To update R, download the latest version from the official website and run the installer. The installer will automatically update your existing installation.

Q: Can I use R on a virtual machine in Windows 10?

A: Yes, you can install R on a virtual machine running a compatible operating system, such as Linux or macOS. This provides a controlled environment for R and its dependencies.

Q: How can I troubleshoot R package installation errors?

A: Check your internet connection, ensure you have administrator privileges, and verify the package name and repository. You can also try using the install.packages() function with the repos argument set to a mirror site.

Tips for Optimizing R in Windows 10

  • Use a Dedicated R Environment: Create a dedicated environment for R to prevent conflicts with other applications. This can be achieved using virtual environments or separate folders for R-related files.
  • Keep R and Packages Updated: Regularly update R and its packages to ensure compatibility and access to the latest features and bug fixes.
  • Utilize RStudio: RStudio provides a user-friendly interface for writing, running, and debugging R code, enhancing productivity and simplifying workflow.
  • Explore R Resources: Leverage online resources, tutorials, and forums to learn best practices, troubleshoot problems, and stay updated on R developments.

Conclusion: Unleashing the Power of R in Windows 10

R’s capabilities in data analysis, statistical computing, and visualization make it an invaluable tool for researchers, analysts, and data scientists. While challenges may arise in its implementation on Windows 10, understanding common issues and their solutions allows users to overcome obstacles and fully harness R’s potential. By addressing installation problems, environment variables, package errors, memory management issues, and compatibility conflicts, users can ensure a smooth and productive R experience on Windows 10. Continuously learning, updating, and seeking support within the R community further empowers users to unlock the full potential of this powerful language and environment.

How to access Windows 10 troubleshooting tools step by step  TechTarget Troubleshooting Windows 10 How to troubleshoot power issues in windows? - All-In-One Digital Adoption Platform
How to Enable Recommended Troubleshooting in Windows 10 How To Open Troubleshooting In Windows 10 Troubleshooting Windows 10
Troubleshooting Windows 10 13 Troubleshooting Tools to Fix Windows 10  MakeUseOf

Closure

Thus, we hope this article has provided valuable insights into Unlocking the Potential of R in Windows 10: Troubleshooting and Maximizing Its Power. We thank you for taking the time to read this article. See you in our next article!

The Power Of Proximity: Exploring The Role Of Near-Field Communication In The IPhone

The Power of Proximity: Exploring the Role of Near-Field Communication in the iPhone

Introduction

With great pleasure, we will explore the intriguing topic related to The Power of Proximity: Exploring the Role of Near-Field Communication in the iPhone. Let’s weave interesting information and offer fresh perspectives to the readers.

The Power of Proximity: Exploring the Role of Near-Field Communication in the iPhone

Near Field Communication on iPhone with iCarte

The iPhone, a ubiquitous symbol of technological advancement, has consistently pushed the boundaries of mobile functionality. One of its key features, often operating in the background, is Near-Field Communication (NFC). This technology, though seemingly invisible to many users, plays a vital role in enhancing user experience and facilitating seamless interactions with the physical world. This article delves into the intricacies of NFC on the iPhone, exploring its capabilities, applications, and the impact it has on everyday life.

Understanding Near-Field Communication

NFC, at its core, is a short-range wireless communication technology that enables devices to exchange data when they are in close proximity, typically within a few centimeters. This "near-field" interaction sets it apart from other wireless technologies like Bluetooth or Wi-Fi, which can operate over greater distances.

The technology operates on the principles of electromagnetic induction, where one device’s magnetic field induces a current in another device, facilitating data transfer. This process requires no pairing or complex setup, making it incredibly user-friendly.

The iPhone’s Embrace of NFC

Apple introduced NFC to the iPhone in 2011 with the release of the iPhone 4S, initially focusing on a specific application: Apple Pay. This mobile payment system revolutionized the way people paid for goods and services, eliminating the need for physical cash or cards. With a simple tap of the iPhone on a compatible terminal, users could quickly and securely make transactions.

However, the iPhone’s NFC capabilities extend far beyond Apple Pay. Over the years, Apple has progressively integrated NFC into various aspects of the device’s functionality, expanding its potential and enriching the user experience.

Applications of NFC on the iPhone

The iPhone’s NFC functionality enables a diverse range of applications, seamlessly integrating the digital and physical worlds. Here are some prominent examples:

  • Mobile Payments: Apple Pay, with its secure and convenient payment system, has become a dominant force in the mobile payment landscape. NFC empowers users to make purchases at a wide range of retailers, transit systems, and online platforms.

  • Data Transfer: NFC facilitates the quick and easy transfer of data between devices, such as sharing contact information, photos, and files. This eliminates the need for cumbersome Bluetooth pairing or complex file-sharing protocols.

  • Access Control: NFC enables access control systems, allowing users to unlock doors, gates, and other secured areas using their iPhones. This eliminates the need for physical keys or keycards, offering greater convenience and security.

  • Digital Tickets and Passes: NFC empowers users to store and access digital tickets and passes for events, transportation, and other services directly on their iPhones. This eliminates the need for physical tickets, reducing clutter and promoting a paperless environment.

  • Gaming and Entertainment: NFC can enhance gaming experiences by enabling interactions with NFC-enabled toys, figurines, or game cards. It can also be used for interactive installations and augmented reality applications, blurring the lines between the digital and physical realms.

  • Healthcare and Wellness: NFC can be utilized for healthcare applications, such as storing medical information, facilitating communication between patients and healthcare providers, and enabling contactless payment for medical services.

The Importance of NFC on the iPhone

The integration of NFC on the iPhone has brought about significant benefits, transforming how users interact with their devices and the world around them. Here are some key advantages:

  • Convenience and Simplicity: NFC eliminates the need for complex pairing or setup processes, offering a seamless and intuitive user experience.

  • Security and Privacy: NFC technology typically operates within a very limited range, reducing the risk of unauthorized access and enhancing data security.

  • Enhanced User Experience: NFC enables a range of applications that improve user convenience, efficiency, and entertainment.

  • Increased Functionality: NFC expands the iPhone’s capabilities, enabling users to interact with the physical world in new and innovative ways.

  • Future-Proofing: NFC is a rapidly evolving technology, and its integration into the iPhone ensures its future-readiness for emerging applications and advancements.

FAQs about NFC on the iPhone

1. What is the range of NFC on the iPhone?
NFC on the iPhone operates within a very short range, typically a few centimeters. This ensures secure data transfer and prevents unauthorized access.

2. Is NFC on the iPhone compatible with all devices?
NFC is a widely adopted technology, but not all devices are equipped with it. It’s essential to check if a device is NFC-enabled before attempting to use it for NFC-based interactions.

3. How can I enable or disable NFC on my iPhone?
NFC on the iPhone is typically enabled by default. To disable it, go to Settings > Wallet & Apple Pay and toggle off the "Apple Pay" switch.

4. Is NFC on the iPhone secure?
Apple Pay, which utilizes NFC, prioritizes security through various measures, including encryption, tokenization, and biometric authentication.

5. Can I use NFC on my iPhone without an internet connection?
NFC does not require an internet connection for basic data transfer between devices. However, some applications, such as mobile payments, may require an internet connection for processing transactions.

Tips for Using NFC on the iPhone

  • Ensure NFC is enabled: Double-check that NFC is enabled on your iPhone in the Settings app.
  • Keep devices close together: For successful NFC interactions, ensure the two devices are within a few centimeters of each other.
  • Align devices correctly: Align the NFC-enabled areas of both devices for optimal data transfer.
  • Use compatible devices: Ensure both devices are NFC-enabled and compatible with the intended application.
  • Keep your iPhone updated: Regularly update your iPhone to benefit from the latest NFC features and security enhancements.

Conclusion

NFC, while often operating behind the scenes, is a fundamental technology that has significantly impacted the iPhone’s functionality and user experience. It has enabled seamless mobile payments, facilitated data transfer, and opened doors to a world of possibilities, enhancing convenience, security, and user engagement. As NFC technology continues to evolve, it will likely play an even greater role in shaping the future of mobile devices and their interactions with the physical world. The iPhone, with its seamless integration of NFC, is poised to remain at the forefront of this technological revolution, empowering users to embrace the power of proximity and unlock a world of possibilities.

What is Near Field Communication, and Where is it used?  Covve Near-Field Communications (NFC) for Wireless Power Transfer (WPT): An Overview  IntechOpen Near Field Communication (NFC)
Near Field Communication: What Is It And How Can I Stay Safe Near Field Communication What Is Near Field Communication Applications - CXJRFIDFactory
Near field communication - “Near Field Communication” Near Field Communication (NFC) is a Near Field Communications  The iPhone FAQ

Closure

Thus, we hope this article has provided valuable insights into The Power of Proximity: Exploring the Role of Near-Field Communication in the iPhone. We thank you for taking the time to read this article. See you in our next article!

Navigating The New Landscape: Exploring The Latest Windows 11 Updates

Navigating the New Landscape: Exploring the Latest Windows 11 Updates

Introduction

In this auspicious occasion, we are delighted to delve into the intriguing topic related to Navigating the New Landscape: Exploring the Latest Windows 11 Updates. Let’s weave interesting information and offer fresh perspectives to the readers.

Windows 11 update: All new features, changes & release date  WinCentral

The Windows operating system has been a cornerstone of personal computing for decades, constantly evolving to meet the demands of a changing digital landscape. In recent years, Microsoft has focused on refining and enhancing Windows 11, introducing a series of updates that bring substantial improvements to user experience, security, and productivity. This exploration delves into the key features of these updates, examining their impact on how users interact with their devices and the benefits they offer.

The Focus on User Experience

One of the most prominent themes running through the latest Windows 11 updates is a concerted effort to enhance user experience. This translates into a more intuitive and visually appealing interface, alongside improvements to core functionalities.

1. Enhanced Search Functionality:

The Windows 11 search bar has undergone a significant transformation, becoming a more comprehensive and powerful tool for finding information. The updated search engine now incorporates results from the web, files, and applications, offering a unified search experience.

FAQs:

  • Q: How does the new search bar differ from previous versions?

    A: The updated search bar in Windows 11 offers a more integrated search experience. It pulls results from various sources like the web, local files, and applications, providing a consolidated search interface.

  • Q: Can I customize the search bar’s behavior?

    A: Yes, users can customize the search bar’s behavior. Options include choosing the search sources, adjusting the search scope, and managing privacy settings.

Tips:

  • Tip: Utilize the search bar’s advanced filtering options to narrow down search results based on file type, date, or location.

  • Tip: Employ the "@" symbol followed by the app name to directly search within specific applications. For instance, "@Word" will search within Microsoft Word documents.

2. Taskbar Customization:

The taskbar, a central element of the Windows interface, has been redesigned to offer greater flexibility and customization. Users can now choose to align the taskbar to the top, left, or right of the screen, adjust the size of icons, and customize the appearance of the system tray.

FAQs:

  • Q: Can I customize the taskbar’s appearance?

    A: Yes, the taskbar can be customized in several ways. Users can change the alignment, icon size, and system tray appearance to suit their preferences.

  • Q: How do I align the taskbar to the top of the screen?

    A: Right-click on the taskbar, select "Taskbar settings," and then change the "Taskbar alignment" setting to "Top."

Tips:

  • Tip: Utilize the "Taskbar settings" menu to explore various customization options, including the ability to disable the taskbar clock or system tray icons.

  • Tip: Use the "Taskbar alignment" setting to align the taskbar to the side of the screen, creating a more compact and efficient layout for users with limited screen space.

3. Focus Modes and Notifications:

Windows 11 introduces new features designed to enhance focus and minimize distractions. Focus Modes allow users to create specific workspaces with personalized settings, filtering out notifications and distractions from irrelevant applications.

FAQs:

  • Q: How do Focus Modes work?

    A: Focus Modes create specific workspaces where users can customize notifications and application access. They can choose to block distracting notifications or limit access to specific apps, fostering a more focused work environment.

  • Q: Can I create multiple Focus Modes for different tasks?

    A: Yes, users can create multiple Focus Modes, each tailored to specific tasks or activities. This allows for a more tailored and efficient workflow.

Tips:

  • Tip: Explore the various Focus Modes available, including "Do Not Disturb," "Work," and "Personal," to find the best fit for different tasks.

  • Tip: Utilize the "Focus Assist" feature to automatically activate Focus Modes based on specific time intervals or calendar events.

4. Enhanced Widgets:

Windows 11 introduces a dedicated "Widgets" pane, offering a streamlined access point for various information and tools. Widgets provide quick access to news updates, weather forecasts, calendar events, and more, all within a single, easily accessible location.

FAQs:

  • Q: What are Widgets in Windows 11?

    A: Widgets are small, interactive applications that provide quick access to information and tools. They can display news, weather, calendar events, and more, offering a convenient way to stay informed and manage tasks.

  • Q: Can I customize the Widgets pane?

    A: Yes, the Widgets pane can be customized. Users can add or remove widgets, rearrange their order, and configure their settings.

Tips:

  • Tip: Explore the various available widgets to find those that align with your interests and needs.

  • Tip: Utilize the "Widget board" to organize and customize the appearance of your widgets.

5. Improved Accessibility Features:

Windows 11 places a strong emphasis on accessibility, introducing new features designed to enhance usability for users with disabilities. These include improved screen reader functionality, improved color contrast settings, and a new "Narrator" mode that provides audio feedback for various system actions.

FAQs:

  • Q: What accessibility features are included in Windows 11?

    A: Windows 11 includes enhanced screen reader functionality, improved color contrast settings, and a new "Narrator" mode that provides audio feedback for system actions, making the operating system more accessible to users with disabilities.

  • Q: How can I customize accessibility settings in Windows 11?

    A: Access the "Accessibility settings" through the "Settings" app to adjust screen reader options, color contrast, and other features to suit individual needs.

Tips:

  • Tip: Explore the "Ease of Access" settings to discover and configure various accessibility features, including keyboard shortcuts, mouse settings, and text-to-speech options.

  • Tip: Utilize the "Narrator" mode to receive audio feedback on system actions, making it easier to navigate the operating system without visual input.

Security and Performance Enhancements

Beyond user experience improvements, Windows 11 updates also focus on bolstering security and enhancing system performance.

1. Enhanced Security Features:

Windows 11 introduces a suite of new security features designed to protect users from evolving threats. These include "Microsoft Defender SmartScreen," which proactively identifies and blocks malicious websites and downloads, and "Windows Security," a centralized security dashboard for managing various security settings.

FAQs:

  • Q: What security features are included in Windows 11?

    A: Windows 11 includes "Microsoft Defender SmartScreen" for proactive threat detection, "Windows Security" for centralized security management, and other features designed to enhance system security.

  • Q: How does "Microsoft Defender SmartScreen" work?

    A: "Microsoft Defender SmartScreen" analyzes websites and downloads for malicious content, blocking access to potentially harmful resources.

Tips:

  • Tip: Regularly update Windows 11 to benefit from the latest security patches and improvements.

  • Tip: Utilize the "Windows Security" dashboard to configure and manage various security settings, including antivirus protection, firewall settings, and device security.

2. Performance Optimization:

Windows 11 updates include various optimizations designed to enhance system performance and resource utilization. These include improvements to the operating system’s core components, such as the file system and memory management, resulting in faster boot times, smoother application performance, and improved overall system responsiveness.

FAQs:

  • Q: What performance improvements are included in Windows 11?

    A: Windows 11 updates include optimizations to core system components, such as the file system and memory management, resulting in faster boot times, smoother application performance, and improved overall system responsiveness.

  • Q: How can I optimize Windows 11 for performance?

    A: Keep your system updated with the latest Windows 11 updates, manage background applications, and utilize the "Performance" settings in the "System" menu to adjust system performance options.

Tips:

  • Tip: Regularly clear temporary files and unnecessary data to free up disk space and improve performance.

  • Tip: Manage background applications and services to reduce resource consumption and improve system responsiveness.

3. Integration with Microsoft Ecosystem:

Windows 11 updates enhance integration with the broader Microsoft ecosystem. This includes tighter integration with services like Microsoft Teams, OneDrive, and Xbox, offering seamless workflows and enhanced productivity across different Microsoft platforms.

FAQs:

  • Q: How does Windows 11 integrate with other Microsoft services?

    A: Windows 11 integrates seamlessly with services like Microsoft Teams, OneDrive, and Xbox, offering a unified experience across different Microsoft platforms.

  • Q: Can I use Microsoft Teams on Windows 11?

    A: Yes, Windows 11 includes a dedicated Microsoft Teams application, offering seamless integration with other Microsoft services and features.

Tips:

  • Tip: Utilize the "Microsoft Teams" application for seamless communication and collaboration within the Microsoft ecosystem.

  • Tip: Leverage the "OneDrive" integration to easily store and access files across different devices.

4. Enhanced Gaming Experience:

Windows 11 updates bring significant improvements to the gaming experience, including enhanced support for DirectX 12 Ultimate, DirectStorage, and Auto HDR, delivering smoother gameplay, faster loading times, and improved visual fidelity.

FAQs:

  • Q: What gaming enhancements are included in Windows 11?

    A: Windows 11 includes enhanced support for DirectX 12 Ultimate, DirectStorage, and Auto HDR, resulting in smoother gameplay, faster loading times, and improved visual fidelity.

  • Q: How does DirectStorage improve gaming performance?

    A: DirectStorage allows games to bypass the traditional bottleneck of data loading, resulting in faster loading times and a smoother gaming experience.

Tips:

  • Tip: Ensure your gaming system meets the minimum requirements for DirectX 12 Ultimate to fully benefit from its performance enhancements.

  • Tip: Enable the "Game Mode" setting in Windows 11 to prioritize game performance and reduce system resource consumption by other applications.

Conclusion

The ongoing updates to Windows 11 represent a continuous effort to refine and enhance the operating system, addressing user needs, bolstering security, and improving performance. From a more intuitive user interface and enhanced search functionality to improved accessibility features and a more robust security framework, these updates demonstrate a commitment to providing a comprehensive and powerful operating system that adapts to the evolving demands of the digital world. As Windows 11 continues to evolve, users can expect further enhancements and new features that further refine the user experience, making it a more efficient, secure, and engaging platform for work, play, and everything in between.

Microsoft Windows 11 Update All You Need To Know About The New - Vrogue Microsoft Releases Windows 11 Cumulative Update KB5014697 List of All Windows 11 Editions: Mixed Reality Enters the Stage
Windows 11 Update All New Features Release Date Wincentral Images Microsoft Windows 11 Update: All you need to know about the new features – India TV Your Ultimate Guide on How to update Windows 11 from Windows 10/7/8.1.
How to Update Windows 11 to Latest Version on Your PC? Microsoft Windows 11 Update Everything You Should Know - Photos

Closure

Thus, we hope this article has provided valuable insights into Navigating the New Landscape: Exploring the Latest Windows 11 Updates. We hope you find this article informative and beneficial. See you in our next article!

The Windows 10 Documents Folder: A Central Hub For Your Digital Life

The Windows 10 Documents Folder: A Central Hub for Your Digital Life

Introduction

In this auspicious occasion, we are delighted to delve into the intriguing topic related to The Windows 10 Documents Folder: A Central Hub for Your Digital Life. Let’s weave interesting information and offer fresh perspectives to the readers.

The Windows 10 Documents Folder: A Central Hub for Your Digital Life

Documents And Settings Win 10

In the intricate landscape of Windows 10, the "Documents" folder stands as a fundamental cornerstone, serving as a central repository for a vast array of user-generated files. Its significance extends beyond mere storage; it acts as a primary organizing principle for digital content, fostering efficient management and access to critical data. This article delves into the intricacies of the Windows 10 Documents folder, exploring its structure, functionalities, and the vital role it plays in the overall user experience.

Understanding the Documents Folder’s Structure

The Documents folder, located within the user’s profile directory, is a hierarchical structure that houses various subfolders. These subfolders can be created by the user or automatically generated by applications, enabling a systematic organization of files based on their type or purpose.

Default Subfolders:

  • Downloads: This folder automatically stores files downloaded from the internet, providing a convenient location for accessing recent downloads.
  • Music: Designed for storing audio files, it can be used to organize music collections.
  • Pictures: A dedicated space for storing images, this folder serves as a central repository for photos, screenshots, and other visual content.
  • Videos: This folder accommodates video files, allowing users to centralize their video library.

User-Created Subfolders:

Beyond these default subfolders, users can create their own subfolders within the Documents folder. This allows for a personalized organization strategy, catering to individual needs and preferences. For instance, a user might create subfolders for specific projects, work-related documents, or personal notes.

Windows 10 provides a user-friendly interface for navigating and managing the Documents folder. It can be accessed through the following methods:

  • File Explorer: The File Explorer, accessible through the taskbar or the Start menu, provides a comprehensive view of the file system, including the Documents folder.
  • Quick Access: The Quick Access section in File Explorer displays frequently accessed folders, including the Documents folder, for quick access.
  • Desktop Shortcut: A shortcut to the Documents folder is typically present on the desktop, offering a direct entry point.

Within the Documents folder, users can perform various actions:

  • Creating New Folders: Users can create new subfolders to further organize their files.
  • Moving and Copying Files: Files can be moved or copied between different folders within the Documents folder or to other locations on the computer.
  • Renaming Files: Files can be renamed to improve clarity and organization.
  • Deleting Files: Unwanted files can be deleted to free up storage space.
  • Searching for Files: The built-in search function allows users to quickly locate specific files within the Documents folder based on keywords or file types.

Benefits of Utilizing the Documents Folder

The Documents folder offers numerous benefits to Windows 10 users:

  • Centralized Storage: It provides a single, dedicated location for storing user-generated files, eliminating the need for scattered files across various folders.
  • Simplified Organization: The hierarchical structure allows for logical organization of files, making it easier to find and access them.
  • Improved Accessibility: The Documents folder is readily accessible through various methods, ensuring quick and convenient access to files.
  • Enhanced File Management: The Documents folder integrates seamlessly with Windows 10’s file management tools, enabling efficient operations such as moving, copying, renaming, and deleting files.
  • Cloud Integration: Windows 10 allows for cloud storage integration with services like OneDrive, enabling automatic backup and synchronization of files stored in the Documents folder.

Frequently Asked Questions (FAQs)

Q: What happens if I delete the Documents folder?

A: Deleting the Documents folder will permanently remove all files stored within it. It is crucial to back up important files before deleting the folder.

Q: Can I change the location of the Documents folder?

A: While it is possible to change the location of the Documents folder, it is not recommended for most users. Changing the location can disrupt the functionality of applications that rely on the default location.

Q: How can I access my Documents folder from other devices?

A: To access your Documents folder from other devices, you can use cloud storage services like OneDrive, which automatically sync your files across different devices.

Q: Can I share files from my Documents folder with others?

A: Yes, you can share files from your Documents folder with others by using file sharing options within Windows 10 or by using cloud storage services.

Q: How can I protect my files in the Documents folder?

A: You can protect your files in the Documents folder by using a password-protected folder, encrypting your files, or using antivirus software to prevent malware infections.

Tips for Effective Documents Folder Management

  • Regularly Organize: Make a habit of organizing your Documents folder regularly by creating new subfolders, moving files to appropriate locations, and deleting unwanted files.
  • Use Descriptive File Names: Use clear and descriptive file names to easily identify the content of each file.
  • Utilize File Tags: Windows 10 allows you to add tags to files, which can help categorize and search for specific files.
  • Backup Regularly: Back up your Documents folder regularly to prevent data loss in case of hardware failure or accidental deletion.
  • Consider Cloud Storage: Use cloud storage services to automatically back up and sync your Documents folder across multiple devices.

Conclusion

The Documents folder in Windows 10 serves as a vital hub for storing and organizing user-generated files. Its hierarchical structure, user-friendly interface, and integration with various file management tools make it an essential component of the Windows 10 experience. By understanding its functionalities and adopting best practices for file management, users can effectively utilize the Documents folder to maintain a well-organized and accessible digital library.

Two Documents Folders Windows 10 - seoerseood How Does a Desktop Window Work in Windows 10? - dummies Move Location of Documents Folder in Windows 10  Tutorials
How to sort, group, and filter files & folders in Windows 10's File Explorer  Digital Citizen Organize Folders and Files in Windows 10  CustomGuide Documents And Settings Win 10
How to Create a New Folder in Windows 10 - YouTube Windows 10 Tip: Manage Files and Folders with File Explorer

Closure

Thus, we hope this article has provided valuable insights into The Windows 10 Documents Folder: A Central Hub for Your Digital Life. We hope you find this article informative and beneficial. See you in our next article!

Windows 10 Insider Preview: A Look Into The Future Of Computing

Windows 10 Insider Preview: A Look into the Future of Computing

Introduction

With great pleasure, we will explore the intriguing topic related to Windows 10 Insider Preview: A Look into the Future of Computing. Let’s weave interesting information and offer fresh perspectives to the readers.

Windows 10 Insider Preview: A Look into the Future of Computing

Windows 10 Insider preview - YouTube

Windows 10, the flagship operating system from Microsoft, has evolved significantly since its initial release in 2015. While the stable releases are widely used, the Windows Insider program offers a unique opportunity for users to experience the future of Windows. This program, known as the Windows Insider Preview, allows users to test pre-release versions of Windows 10, providing valuable feedback to Microsoft and influencing the development of the operating system.

Understanding the Windows Insider Program:

The Windows Insider program serves as a bridge between Microsoft’s development team and the wider user community. Participants in this program, known as Insiders, get early access to new features, improvements, and updates, allowing them to test these changes in real-world scenarios. This feedback loop is crucial for Microsoft, as it provides valuable insights into the usability, performance, and stability of the upcoming features.

The Benefits of Joining the Windows Insider Program:

There are numerous benefits to participating in the Windows Insider program:

  • Early Access to New Features: Insiders get to experience new features and functionalities before they are released to the general public. This allows them to familiarize themselves with upcoming changes and provide valuable feedback to Microsoft.
  • Direct Influence on Windows Development: The feedback provided by Insiders directly influences the development of Windows 10. Microsoft actively considers the feedback received from Insiders, making changes and improvements based on their suggestions.
  • Enhanced Stability: By participating in the program, Insiders contribute to the stability of Windows 10. Early testing helps identify and resolve issues before they are released to the general public.
  • A Sense of Community: The Windows Insider program fosters a sense of community among its participants. Insiders can connect with each other, share their experiences, and collaborate on feedback.
  • Staying Ahead of the Curve: By participating in the program, Insiders stay ahead of the curve in terms of the latest Windows 10 features and updates. This allows them to be prepared for upcoming changes and leverage new functionalities as soon as they become available.

Channels Within the Windows Insider Program:

The Windows Insider program offers different channels catering to diverse user preferences and needs:

  • Dev Channel: This channel is for users who want the latest features and updates as they are developed. This channel receives the most frequent updates, often multiple times a week, and may include unstable builds.
  • Beta Channel: This channel is for users who want to test new features and updates before they are released to the general public, but prefer a more stable experience than the Dev Channel.
  • Release Preview Channel: This channel receives the same builds as the Stable channel, but a few days earlier. This channel is ideal for users who want to ensure a smooth transition to the next stable release.

Navigating the Windows Insider Preview:

Participating in the Windows Insider Preview requires a degree of technical understanding and a willingness to accept potential instability. Here are some key considerations:

  • Backup Your Data: It is essential to back up your data before joining the Windows Insider program. This ensures that your data is protected in case of unexpected issues or the need to reinstall Windows.
  • Be Prepared for Potential Instability: Preview builds are not as stable as the stable releases. You may encounter bugs, crashes, or other issues. Be prepared to troubleshoot these issues and provide feedback to Microsoft.
  • Understand the Risk: While Microsoft strives to ensure the stability of preview builds, there is always a risk of data loss or system instability. Joining the program requires an understanding of these risks and a willingness to accept them.

Frequently Asked Questions about the Windows Insider Preview:

  • Is the Windows Insider Preview free to join? Yes, the Windows Insider program is free to join.
  • What are the system requirements for joining the Windows Insider program? The system requirements for joining the Windows Insider program are the same as the system requirements for Windows 10.
  • How do I join the Windows Insider program? You can join the Windows Insider program by navigating to Settings > Update & Security > Windows Insider Program and following the on-screen instructions.
  • Can I switch between different channels in the Windows Insider program? Yes, you can switch between different channels in the Windows Insider program. However, you may need to reinstall Windows to switch between the Dev and Release Preview channels.
  • How do I provide feedback to Microsoft about the Windows Insider Preview? You can provide feedback to Microsoft through the Feedback Hub app, which is available on all Insider builds.

Tips for Participating in the Windows Insider Preview:

  • Join the Windows Insider Community: The Windows Insider community forums are a valuable resource for connecting with other Insiders, sharing experiences, and getting help with troubleshooting issues.
  • Read the Release Notes: Before installing a new preview build, it is essential to read the release notes to understand the new features, improvements, and known issues.
  • Use a Separate Test Device: If possible, it is recommended to use a separate test device for the Windows Insider program. This helps to avoid any potential disruptions to your primary device.
  • Report Bugs and Issues: When you encounter bugs or issues, it is important to report them to Microsoft through the Feedback Hub app. This helps Microsoft to identify and fix problems.
  • Keep Your Device Updated: It is essential to keep your device updated with the latest preview builds. This ensures that you are running the most stable and secure version of Windows.

Conclusion:

The Windows Insider Preview provides a unique opportunity for users to experience the future of Windows and contribute to its development. By participating in this program, Insiders gain early access to new features, directly influence the development of Windows 10, and enhance the stability of the operating system. While it requires a degree of technical understanding and a willingness to accept potential instability, the benefits of joining the Windows Insider program outweigh the risks for many users. By providing valuable feedback and participating in the community, Insiders play a vital role in shaping the future of Windows 10.

Gallery: Windows 10 Insider Preview build 10074 - Neowin How to Join Windows 10 Insider Preview Program - Easy Steps Microsoft Releases Windows 10 Insider Preview Build 16251
Review: Windows 10 Insider Preview -- a nearly finished OS  Computerworld Microsoft Releases New Insider Previewbuild For Windows Windows 10 Insider Preview Build 19635 - Here's What You Need To Know
Windows 10 Insider Preview Build 18282 - WinFuture.de Windows 10 Preview build 20262 released to Insiders

Closure

Thus, we hope this article has provided valuable insights into Windows 10 Insider Preview: A Look into the Future of Computing. We hope you find this article informative and beneficial. See you in our next article!

Understanding Open Ports On Windows 10 Firewall: A Comprehensive Guide

Understanding Open Ports on Windows 10 Firewall: A Comprehensive Guide

Introduction

With great pleasure, we will explore the intriguing topic related to Understanding Open Ports on Windows 10 Firewall: A Comprehensive Guide. Let’s weave interesting information and offer fresh perspectives to the readers.

Understanding Open Ports on Windows 10 Firewall: A Comprehensive Guide

How to Open or Close a Port in Windows 10 Firewall - WinBuzzer

The Windows 10 Firewall, a vital component of the operating system’s security architecture, acts as a gatekeeper, controlling the flow of network traffic in and out of your computer. While its primary function is to block unauthorized access, it also allows specific applications and services to communicate across the network through designated pathways known as ports.

What are Ports?

Imagine your computer as a building with multiple doors, each leading to a specific room. These doors are analogous to ports, representing virtual pathways that enable communication between your computer and the outside world. Each port is assigned a unique number, ranging from 0 to 65,535, facilitating the identification and routing of incoming and outgoing traffic.

Why Open Ports?

While the Windows 10 Firewall is designed to block unsolicited connections, certain applications and services require access to the internet or other network resources. Opening a port allows these applications to communicate freely, enabling crucial functions like:

  • Web Browsing: Opening port 80 allows your web browser to access websites on the internet.
  • Email Communication: Ports 25, 465, and 587 facilitate sending and receiving emails.
  • Remote Desktop Access: Port 3389 enables remote access to your computer, allowing you to control it from another location.
  • File Sharing: Ports like 139 and 445 enable file sharing between computers on a local network.
  • Gaming and Streaming: Specific ports are necessary for online games and streaming services to function properly.

The Importance of Controlled Access

While opening ports provides access to essential services, it also introduces security risks. Unnecessary open ports can create vulnerabilities, making your computer susceptible to attacks. Hackers can exploit open ports to gain unauthorized access to your system, potentially stealing sensitive data, installing malware, or launching denial-of-service attacks.

Understanding Windows 10 Firewall Rules

The Windows 10 Firewall utilizes a set of rules to determine which incoming and outgoing traffic is permitted or blocked. These rules specify:

  • Direction: Whether the rule applies to incoming or outgoing traffic.
  • Protocol: The type of communication protocol (e.g., TCP, UDP).
  • Port: The specific port number.
  • Action: Whether to allow or block the traffic.

Managing Open Ports on Windows 10

You can manage open ports on Windows 10 through the Windows Firewall with Advanced Security console. Here’s how:

  1. Open the Windows Firewall with Advanced Security console: Search for "Windows Firewall with Advanced Security" in the Start menu.
  2. Navigate to Inbound or Outbound Rules: Select "Inbound Rules" or "Outbound Rules" depending on the direction of traffic you want to manage.
  3. Create a New Rule: Click "New Rule" to create a new rule for a specific port.
  4. Choose Rule Type: Select "Port" as the rule type.
  5. Specify Protocol and Port: Choose the protocol (TCP or UDP) and enter the specific port number.
  6. Define Action: Select "Allow the connection" or "Block the connection" based on your requirements.
  7. Configure Profiles: Select the network profiles (e.g., Domain, Private, Public) for which the rule should apply.
  8. Name the Rule: Give the rule a descriptive name for easy identification.

Best Practices for Managing Open Ports

  • Limit Open Ports: Only open ports that are absolutely necessary for your applications and services to function correctly.
  • Regularly Review Open Ports: Periodically review the list of open ports and close any that are no longer required.
  • Use Strong Passwords: Protect your computer with strong passwords and enable multi-factor authentication where possible.
  • Keep Your System Updated: Install the latest security updates and patches for Windows and your applications to mitigate vulnerabilities.
  • Consider a Firewall Application: In addition to the Windows 10 Firewall, consider using a third-party firewall application for enhanced protection.

FAQs about Open Ports on Windows 10 Firewall

Q: How do I know which ports are open on my computer?

A: You can use a port scanner tool like Nmap or a network monitoring tool like Wireshark to identify open ports. These tools can scan your computer and list all the ports that are currently open.

Q: Is it safe to open a port on my computer?

A: Opening a port can be safe if it is done for a legitimate reason and the port is secured properly. However, opening unnecessary ports can increase the risk of security vulnerabilities.

Q: Can I close a port that is already open?

A: Yes, you can close a port by creating a new firewall rule that blocks traffic on that specific port.

Q: How do I know which ports are required for specific applications?

A: You can usually find the required ports for applications in their documentation or on the developer’s website.

Tips for Managing Open Ports on Windows 10 Firewall

  • Use a Port Scanner: Regularly scan your computer for open ports to identify any that are not necessary.
  • Prioritize Security: Always prioritize security over convenience. If a port is not essential, it’s best to keep it closed.
  • Stay Informed: Keep yourself updated on the latest security threats and vulnerabilities related to open ports.
  • Seek Professional Help: If you are unsure about managing open ports or have concerns about security, consult with a cybersecurity professional.

Conclusion

Open ports on Windows 10 Firewall are an essential aspect of network communication, enabling applications and services to function properly. However, they also introduce security risks. By understanding the importance of controlled access and following best practices for managing open ports, you can enhance the security of your computer and minimize the risk of attacks. Regularly reviewing open ports, keeping your system updated, and seeking professional help when needed are crucial steps in safeguarding your digital environment.

How to Open Firewall Ports in Windows 10 - YouTube How To Open Firewall Ports In Windows 10 Step By Step - vrogue.co How to open firewall port on Windows 10 - Pureinfotech
How To Open Firewall Ports In Windows 10 Step By Step - vrogue.co Discover Open TCP Ports On Windows 10: A Comprehensive Guide How to Open Ports in Windows Firewall? - Interserver Tips
How to Open Ports on a Windows Firewall - YouTube How to open firewall port on Windows 10 - Pureinfotech

Closure

Thus, we hope this article has provided valuable insights into Understanding Open Ports on Windows 10 Firewall: A Comprehensive Guide. We thank you for taking the time to read this article. See you in our next article!