Archives November 2023

Unruly Cursors: A Guide To Understanding And Resolving Erratic Cursor Behavior

Unruly Cursors: A Guide to Understanding and Resolving Erratic Cursor Behavior

Introduction

In this auspicious occasion, we are delighted to delve into the intriguing topic related to Unruly Cursors: A Guide to Understanding and Resolving Erratic Cursor Behavior. Let’s weave interesting information and offer fresh perspectives to the readers.

Unruly Cursors: A Guide to Understanding and Resolving Erratic Cursor Behavior

Erratic mouse cursor movement Solution [Solved[ - YouTube

The cursor, that ubiquitous blinking line or arrow, is an essential element in our digital interactions. Its smooth and predictable movement is crucial for navigating through documents, interacting with applications, and engaging with the digital world. However, there are times when the cursor’s behavior becomes erratic, jumping around the screen in an unpredictable manner, interrupting workflow and frustrating users. This phenomenon, known as "cursor jumping," can be a perplexing and disruptive issue.

This article delves into the multifaceted nature of cursor jumping, exploring its potential causes, offering practical solutions, and providing a comprehensive understanding of this common digital ailment.

Understanding the Roots of Cursor Jumping

The erratic behavior of the cursor can stem from various sources, ranging from hardware malfunctions to software glitches. A thorough understanding of these potential causes is essential for effectively diagnosing and resolving the issue.

1. Hardware Malfunctions:

  • Faulty Mouse or Touchpad: A malfunctioning mouse or touchpad can be the primary culprit behind cursor jumping. Worn-out buttons, faulty sensors, or internal component failures can all contribute to erratic cursor movement.
  • Damaged or Loose Cables: Damaged or loose cables connecting the mouse or touchpad to the computer can also lead to inconsistent cursor behavior. This is particularly true for older mice that rely on wired connections.
  • Interference: External electromagnetic interference can disrupt the communication between the mouse or touchpad and the computer, causing the cursor to jump around. This interference can originate from nearby electronic devices, wireless networks, or even power lines.

2. Software Issues:

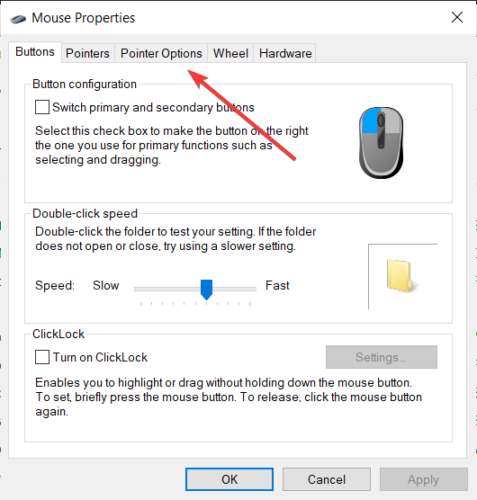
  • Driver Conflicts: Outdated, corrupted, or incompatible mouse or touchpad drivers can lead to cursor jumping. Drivers act as intermediaries between the hardware and the operating system, and their proper functioning is crucial for smooth cursor control.
  • Operating System Errors: Software bugs or errors within the operating system itself can also cause cursor jumping. These errors can disrupt the communication between the operating system and the mouse or touchpad, resulting in erratic cursor behavior.
  • Malware or Viruses: Malicious software, such as viruses or malware, can interfere with system processes, including those responsible for cursor control, leading to cursor jumping.
  • Conflicting Applications: Certain applications, particularly those with demanding resource requirements or known compatibility issues, can interfere with the cursor’s functionality, causing it to jump around.

3. Environmental Factors:

  • Surface Conditions: The surface on which the mouse is used can significantly affect its performance. Uneven surfaces, dust, or other debris can interfere with the mouse’s tracking capabilities, leading to cursor jumping.
  • Ambient Light: Excessive ambient light can interfere with the mouse’s optical sensor, causing the cursor to jump around. This is particularly relevant for optical mice that rely on reflected light for tracking.

Troubleshooting and Resolution Strategies

Once the potential causes of cursor jumping have been identified, a systematic approach to troubleshooting and resolving the issue can be implemented.

1. Hardware Troubleshooting:

  • Check Mouse or Touchpad Connection: Ensure that the mouse or touchpad is properly connected to the computer. Check the cable for any signs of damage or loose connections.
  • Test with a Different Mouse: If possible, test the computer with a different mouse to isolate the issue. If the cursor jumping persists, the problem likely lies with the computer itself.
  • Clean Mouse or Touchpad: Clean the mouse or touchpad thoroughly, removing any dust, debris, or other contaminants that may be interfering with its functionality.
  • Replace Faulty Mouse or Touchpad: If the problem persists despite cleaning and testing, the mouse or touchpad may be faulty and needs to be replaced.

2. Software Troubleshooting:

  • Update Mouse or Touchpad Drivers: Update the mouse or touchpad drivers to the latest version available for your operating system. This can often resolve driver-related conflicts and improve cursor control.
  • Run System Updates: Ensure that your operating system is up to date with the latest patches and updates. These updates often include bug fixes that can address cursor jumping issues.
  • Run System Scan for Malware: Scan your computer for malware using a reputable antivirus program. If malware is detected, remove it immediately.
  • Restart Computer: A simple restart can often resolve temporary software glitches that may be causing cursor jumping.
  • Disable Conflicting Applications: Temporarily disable any applications that are known to cause resource conflicts or have compatibility issues. This can help isolate the source of the problem.

3. Environmental Adjustments:

  • Use a Suitable Mouse Surface: Ensure that you are using a smooth, clean surface for your mouse. Avoid using uneven surfaces, carpets, or surfaces with excessive patterns.
  • Adjust Ambient Light: If using an optical mouse, adjust the ambient light levels to ensure that the sensor is not being overwhelmed by excessive light.

FAQs about Cursor Jumping

Q: My cursor is jumping only in specific applications. What could be the cause?

A: Cursor jumping confined to specific applications suggests a compatibility issue or resource conflict. The application itself might have a bug, or it could be demanding too many resources, leading to performance issues that affect the cursor.

Q: I recently installed a new program and my cursor started jumping. What should I do?

A: The newly installed program could be the culprit. Try uninstalling it and see if the cursor jumping stops. If it does, consider an alternative program or update the installed program to a newer version.

Q: I tried all the troubleshooting steps, but my cursor is still jumping. What else can I do?

A: If all other options fail, consider a clean installation of your operating system. This involves reinstalling the operating system from scratch, potentially resolving deep-rooted software conflicts or errors.

Tips for Preventing Cursor Jumping

  • Regularly Update Drivers: Keep your mouse and touchpad drivers up-to-date to ensure optimal performance and compatibility.
  • Maintain Clean Mouse Surface: Regularly clean your mouse surface to prevent dust, debris, or other contaminants from interfering with the mouse’s tracking capabilities.
  • Avoid Excessive Ambient Light: If using an optical mouse, minimize excessive ambient light to ensure accurate tracking.
  • Use a Quality Mouse: Invest in a high-quality mouse from a reputable brand to ensure reliable performance and durability.

Conclusion

Cursor jumping, while frustrating, is often a solvable issue. By understanding the potential causes, implementing systematic troubleshooting steps, and employing preventive measures, you can regain control of your cursor and enjoy a smooth and seamless digital experience. Remember, a well-behaved cursor is a vital component of a productive and enjoyable computing experience.

OS X erratic cursor movement - YouTube How To Fix Mouse Cursor Jumping In Windows 11 Youtube - vrogue.co Fix: Erratic / not smooth mouse movements in Windows 10
Fixed: strange erratic mouse pointer behavior - moving on its own uncontrollably across the Erratic behavior of the Tab cursor according the layout  MuseScore Erratic behavior of the Tab cursor according the layout  MuseScore
Resolving Cursor Loading Blinking Circle Issue in Windows  Quick Fix Tutorial - YouTube Understanding Cursors: A Comprehensive Guide to Defining and How Cursors Work Test 2024 [July

Closure

Thus, we hope this article has provided valuable insights into Unruly Cursors: A Guide to Understanding and Resolving Erratic Cursor Behavior. We appreciate your attention to our article. See you in our next article!

Unlocking Windows 11’s Full Potential: A Guide To Optimal Performance

Unlocking Windows 11’s Full Potential: A Guide to Optimal Performance

Introduction

With enthusiasm, let’s navigate through the intriguing topic related to Unlocking Windows 11’s Full Potential: A Guide to Optimal Performance. Let’s weave interesting information and offer fresh perspectives to the readers.

Unlocking Windows 11’s Full Potential: A Guide to Optimal Performance

How To Unlock Taskbar Windows 11 Tutorial - YouTube

Windows 11, Microsoft’s latest operating system, boasts numerous improvements and features designed to enhance user experience. However, achieving peak performance requires understanding the nuances of the operating system and its interaction with hardware. This article delves into the key aspects of optimizing Windows 11, exploring various techniques and strategies to unlock its full potential.

Understanding the Importance of Optimization

Optimizing Windows 11 is not merely about achieving faster boot times or smoother application launches. It’s about creating a system that operates efficiently, maximizing resource utilization, and minimizing bottlenecks. This translates to a more responsive and enjoyable user experience, allowing users to focus on their tasks without encountering frustrating delays or performance issues.

Key Areas for Optimization

1. System Resources:

  • CPU: The central processing unit (CPU) is the brain of your computer, handling all calculations and instructions. Optimizing CPU usage involves ensuring that applications are utilizing available resources effectively and avoiding excessive background processes that consume CPU cycles unnecessarily.
  • RAM: Random access memory (RAM) serves as short-term storage for active applications and data. Optimizing RAM usage means ensuring sufficient capacity to accommodate all running programs without resorting to excessive disk swapping, which can significantly slow down the system.
  • Storage: The type and speed of your storage drive significantly impact overall performance. Utilizing a fast SSD (Solid State Drive) for the operating system and frequently accessed applications can dramatically improve boot times and application launch speeds.

2. Background Processes and Services:

  • Startup Programs: Many applications automatically launch at system startup, consuming valuable resources and slowing down boot times. Identifying and disabling unnecessary startup programs can significantly improve system responsiveness.
  • Background Services: Windows 11 runs various background services that perform essential tasks like updates, security checks, and data synchronization. These services can sometimes consume excessive resources. Disabling or adjusting the settings of non-essential background services can free up system resources.

3. System Settings:

  • Power Plan: Windows 11 offers various power plans that prioritize different aspects of performance. Selecting the appropriate power plan for your usage patterns can optimize energy consumption and performance.
  • Visual Effects: Windows 11 offers various visual effects that enhance the user interface. However, these effects can consume significant resources. Disabling or reducing visual effects can improve performance, especially on older or less powerful hardware.

4. Software and Applications:

  • Driver Updates: Outdated or incompatible device drivers can cause performance issues. Regularly updating drivers to the latest versions ensures optimal compatibility and performance.
  • Antivirus Software: While essential for security, antivirus software can sometimes consume significant resources. Choosing a lightweight and efficient antivirus solution can minimize performance impact.
  • Defragmentation and Disk Cleanup: Over time, fragmented files and unused data can accumulate on your hard drive, slowing down access times. Regular defragmentation and disk cleanup can improve storage performance.

5. Hardware Considerations:

  • Hardware Upgrade: If your current hardware is insufficient to handle the demands of Windows 11, consider upgrading components like RAM, storage, or even the CPU.
  • Cooling: Overheating can significantly impact system performance. Ensure adequate cooling solutions are in place, such as fans or liquid cooling systems, to maintain optimal temperatures.

Practical Tips for Optimizing Windows 11

1. Task Manager Analysis:

Utilize the Task Manager to identify resource-intensive applications and processes. Analyze CPU and RAM usage patterns to identify potential bottlenecks and optimize resource allocation.

2. Startup Programs Management:

Use the "Startup" tab in Task Manager to disable unnecessary programs from launching at system startup. This can significantly reduce boot times and improve overall performance.

3. Services Management:

Access the "Services" window (services.msc) to identify and disable non-essential background services. Exercise caution when disabling services, as some may be crucial for system functionality.

4. Power Plan Optimization:

Adjust power plan settings to prioritize performance over energy savings, especially when demanding tasks are required.

5. Visual Effects Reduction:

Navigate to "System" settings > "Display" > "Graphics settings" and adjust visual effects to reduce resource consumption.

6. Driver Updates:

Use the "Device Manager" to identify and update outdated device drivers. Alternatively, utilize the manufacturer’s website to download the latest drivers for your specific hardware.

7. Disk Cleanup and Defragmentation:

Use the built-in "Disk Cleanup" tool to remove temporary files and other unnecessary data. For hard disk drives (HDDs), consider using the "Defragment and Optimize Drives" tool to improve storage performance.

8. Antivirus Optimization:

Consider using a lightweight and efficient antivirus solution that minimizes resource consumption. Optimize antivirus settings to reduce unnecessary scans and background processes.

9. Background Processes Management:

Use the "Settings" app to manage background app activity. Control which applications are allowed to run in the background and access system resources.

10. Hardware Maintenance:

Ensure proper cooling solutions are in place to prevent overheating. Consider dusting out internal components and replacing aging hardware components as necessary.

FAQs on Optimizing Windows 11

Q: Is it safe to disable services in Windows 11?

A: Disabling services can be risky if you are unsure of their purpose. Always research the service before disabling it, and consider creating a system restore point before making any changes.

Q: How can I identify which startup programs are unnecessary?

A: Examine the startup programs list in Task Manager. Look for applications you rarely use or that are not essential for system functionality.

Q: What are the best practices for managing background processes?

A: Use the "Settings" app to control background app activity. Limit the number of applications allowed to run in the background, especially those that consume significant resources.

Q: Does defragmentation still matter with SSDs?

A: Defragmentation is not necessary for SSDs as they use a different storage technology. However, disk cleanup tools can still be beneficial for removing unnecessary data and optimizing storage space.

Q: How do I choose the right power plan for my needs?

A: Consider your usage patterns. If you prioritize performance, select the "High Performance" plan. If you prioritize battery life, choose the "Power Saver" plan.

Conclusion

Optimizing Windows 11 performance is an ongoing process that requires continuous monitoring and adjustments. By understanding the key areas for optimization, implementing practical tips, and addressing potential performance bottlenecks, users can unlock the full potential of Windows 11, creating a system that operates efficiently, reliably, and seamlessly. Remember, a well-optimized system not only enhances user experience but also extends the lifespan of your hardware, ensuring maximum return on investment.

Unlock the Full Potential: Open Windows 11 Administrative Tools - Toptecmag Amazon.com: Windows 11 Guide for Absolute Beginners: 2024 Edition Manual to Mastering Windows 11 Windows 11 Unlocked!!! - YouTube
Unlocking Windows 11: The Ultimate Guide to Finding Your Product Key - YouTube What is Windows 11 in S mode?  Deep Dive Unlocking the Full Potential of Windows + Shift + S in Windows 11: 7 Tips and Tricks - Click
Unlock the Full Potential of Windows 11 Pro with a Genuine Product Key  by Aadiyogiteam  Medium Unlock windows potential control panel demystified – Artofit

Closure

Thus, we hope this article has provided valuable insights into Unlocking Windows 11’s Full Potential: A Guide to Optimal Performance. We thank you for taking the time to read this article. See you in our next article!

Enhancing Windows 10 Performance: A Comprehensive Guide

Enhancing Windows 10 Performance: A Comprehensive Guide

Introduction

With great pleasure, we will explore the intriguing topic related to Enhancing Windows 10 Performance: A Comprehensive Guide. Let’s weave interesting information and offer fresh perspectives to the readers.

Enhancing Windows 10 Performance: A Comprehensive Guide

How to Enhance Your Windows 10 Performance  Cyberogism

Windows 10, despite its widespread use and numerous features, can sometimes experience performance issues. These can range from sluggish application loading to system crashes, hindering productivity and overall user experience. Fortunately, numerous strategies exist to optimize Windows 10, ensuring a smoother, more efficient, and responsive operating system. This article provides a detailed overview of these techniques, covering both basic and advanced optimization methods.

Understanding the Importance of Optimization

Optimizing Windows 10 is crucial for a variety of reasons:

  • Improved System Responsiveness: A well-optimized system boots faster, loads programs quicker, and responds to user inputs with minimal delay, enhancing overall productivity.
  • Increased Efficiency: Optimization reduces resource consumption, allowing the system to perform tasks more efficiently, saving battery life and extending hardware lifespan.
  • Enhanced Security: A clean and optimized system is less vulnerable to malware and other security threats, ensuring data integrity and protecting user privacy.
  • Extended Hardware Lifespan: By reducing strain on the system, optimization can prolong the lifespan of hardware components, delaying the need for costly upgrades.
  • Improved User Experience: A smooth, responsive, and efficient operating system enhances the overall user experience, making daily tasks enjoyable and productive.

Common Causes of Performance Degradation

Before delving into optimization techniques, understanding the root causes of performance issues is essential. Common culprits include:

  • Cluttered Hard Drive: Over time, hard drives accumulate unnecessary files, temporary data, and system junk, hindering performance.
  • Excessive Startup Programs: Numerous programs configured to launch automatically at startup can consume resources, slowing down the system boot process.
  • Outdated Drivers: Outdated drivers can cause compatibility issues and affect system performance, leading to instability and malfunctions.
  • Malware Infections: Malicious software can consume resources, steal data, and compromise system security, impacting performance significantly.
  • Insufficient RAM: Limited RAM can lead to system slowdowns, especially when running resource-intensive applications.
  • Defragmentation Issues: Fragmented hard drives, where data is scattered across the disk, can slow down access speeds, impacting overall performance.
  • Background Processes: Numerous background processes running simultaneously can consume valuable resources, hindering system responsiveness.

Effective Optimization Strategies

Now, let’s explore practical strategies to optimize Windows 10, addressing each of the aforementioned issues:

1. Disk Cleanup and Disk Defragmentation:

  • Disk Cleanup: Regularly use the built-in Disk Cleanup tool to remove temporary files, system junk, and unnecessary data. This frees up valuable disk space, improving performance.
  • Disk Defragmentation: For traditional hard disk drives (HDDs), defragmentation is crucial. It reorganizes fragmented data, improving access speeds and enhancing system responsiveness. However, Solid State Drives (SSDs) do not require defragmentation, as they utilize a different data storage mechanism.

2. Managing Startup Programs:

  • Task Manager: Use the Task Manager (Ctrl+Shift+Esc) to view and manage programs that launch automatically at startup. Disable unnecessary programs to reduce resource consumption and speed up boot times.
  • System Configuration: Access the System Configuration utility (msconfig.exe) to manage startup programs and services. Carefully disable programs you don’t need, ensuring you understand the potential consequences of disabling critical services.

3. Updating Drivers:

  • Device Manager: Use the Device Manager to check for outdated drivers. Right-click on a device, select "Update Driver," and follow the prompts to install the latest versions.
  • Manufacturer Websites: Visit the manufacturer’s website for the latest driver updates specific to your hardware components.
  • Driver Update Software: Utilize specialized driver update software to automatically scan for and install the latest drivers for all your hardware components.

4. Scanning for Malware:

  • Windows Defender: Windows 10 comes with built-in antivirus protection, Windows Defender. Regularly run full system scans to detect and remove any malware infections.
  • Third-Party Antivirus: Consider using a reputable third-party antivirus solution for enhanced protection and additional features.

5. Optimizing RAM Usage:

  • Close Unnecessary Programs: Close programs you are not actively using to free up RAM.
  • Adjust Virtual Memory: If your system has limited RAM, adjust virtual memory settings to use more disk space as a temporary storage area. However, this can slow down performance compared to physical RAM.

6. Managing Background Processes:

  • Task Manager: Use the Task Manager to identify and terminate resource-intensive background processes that are not essential.
  • System Configuration: Disable unnecessary background services through the System Configuration utility (msconfig.exe).

7. Advanced Optimization Techniques:

  • Disable Visual Effects: While aesthetically pleasing, visual effects can consume resources. Disable unnecessary effects in the System Properties window (Performance tab) to improve performance.
  • Adjust Power Settings: Configure power settings to prioritize performance over energy saving. This can increase system responsiveness, especially during demanding tasks.
  • Clean Boot: Performing a clean boot disables unnecessary startup programs and services, isolating performance issues. This can help identify specific programs or services causing problems.
  • Registry Cleanup: Regularly clean the Windows Registry, removing invalid entries and optimizing system performance. However, caution is advised, as incorrect registry modifications can damage the operating system.
  • System Restore: Create a system restore point before making significant changes to your system. This allows you to revert to a previous state in case of issues.

Frequently Asked Questions (FAQs)

Q: Is optimizing Windows 10 necessary for all users?

A: While not mandatory, optimization is highly recommended for all Windows 10 users, especially those experiencing performance issues or seeking to maximize system efficiency.

Q: Can I optimize Windows 10 without technical expertise?

A: Yes, many basic optimization techniques are user-friendly and require no specialized knowledge. However, advanced techniques may require a deeper understanding of Windows 10 and its settings.

Q: What are the risks associated with optimization?

A: Incorrectly configuring system settings or using unreliable optimization tools can lead to system instability, data loss, or even damage the operating system. Therefore, proceed with caution and always back up your data before making significant changes.

Q: How often should I optimize Windows 10?

A: Regularly perform basic maintenance tasks like Disk Cleanup and defragmentation (for HDDs). Update drivers periodically and scan for malware regularly. Advanced optimization techniques can be performed as needed, depending on system performance and user preferences.

Tips for Optimizing Windows 10

  • Regularly clean your hard drive: Use Disk Cleanup and other tools to remove unnecessary files and data.
  • Manage startup programs: Disable unnecessary programs that launch automatically at startup.
  • Keep your drivers updated: Regularly check for and install the latest driver updates for your hardware components.
  • Run a full system scan for malware: Use Windows Defender or a third-party antivirus solution to detect and remove malware infections.
  • Close unnecessary programs: Exit programs you are not actively using to free up RAM.
  • Disable visual effects: Reduce resource consumption by disabling unnecessary visual effects in the System Properties window.
  • Adjust power settings: Prioritize performance over energy saving to enhance system responsiveness.
  • Avoid installing unnecessary software: Only install programs you truly need and avoid installing potentially harmful software.
  • Use a reputable optimization tool: If you choose to use third-party optimization software, ensure it is from a trusted source.
  • Back up your data: Create a backup of your important data before making significant changes to your system.

Conclusion

Optimizing Windows 10 is a continuous process that requires regular maintenance and attention. By implementing the strategies outlined in this article, users can significantly improve system performance, enhance responsiveness, and extend hardware lifespan. Remember to proceed with caution, understand the potential risks, and back up your data before making significant changes. By prioritizing system health and optimizing performance, users can enjoy a smoother, more efficient, and enjoyable Windows 10 experience.

�� How to Enable Windows 10 ULTIMATE Performance mode Guide - YouTube TIPS TO IMPROVE PC PERFORMANCE IN WINDOWS 10  READYBOOST - YouTube How to Enable Windows 10 Ultimate Performance Mode  Ultimate performance mode  Power Settings
How to Speed Up Your Windows 10 Performance (Best Settings Ever) How To Change Performance Options In Windows 10  Daves Computer Tips Cómo habilitar el modo Ultimate Performance en Windows 10 – Zobme
How to Enable Ultimate Performance Mode in Windows 10 (New) - YouTube How To Enable Ultimate Performance Mode On Windows 10  Images and Photos finder

Closure

Thus, we hope this article has provided valuable insights into Enhancing Windows 10 Performance: A Comprehensive Guide. We hope you find this article informative and beneficial. See you in our next article!

Navigating The Landscape Of Windows 10 Pricing In The Philippines: A Comprehensive Guide

Navigating the Landscape of Windows 10 Pricing in the Philippines: A Comprehensive Guide

Introduction

With great pleasure, we will explore the intriguing topic related to Navigating the Landscape of Windows 10 Pricing in the Philippines: A Comprehensive Guide. Let’s weave interesting information and offer fresh perspectives to the readers.

Windows 10 Pricing and Availability  Digital Trends

The Philippines, a vibrant digital economy, relies heavily on personal computers and mobile devices. For many, Windows 10 remains the preferred operating system, offering a familiar and robust platform for work, entertainment, and communication. Understanding the pricing landscape of Windows 10 in the Philippines is crucial for individuals and businesses alike. This comprehensive guide aims to provide clarity and insight into the various options available, empowering users to make informed decisions.

Windows 10 Licensing Models: A Primer

Windows 10 is offered through a variety of licensing models, each catering to different needs and budgets. These models are:

  • Windows 10 Home: Designed for individual users and home computers, this edition offers a range of features including basic security, multimedia support, and access to the Microsoft Store.
  • Windows 10 Pro: Tailored for professionals and small businesses, this edition builds upon Home with enhanced security features, remote desktop access, and support for domain joining.
  • Windows 10 Enterprise: Primarily intended for large organizations, this edition offers comprehensive security and management features, including advanced encryption, device management, and long-term support.
  • Windows 10 Education: Specifically designed for educational institutions, this edition provides features similar to Enterprise, with additional tools for classroom management and learning.

Pricing Dynamics in the Philippines: A Breakdown

The price of Windows 10 in the Philippines is influenced by several factors, including:

  • Licensing Model: As mentioned previously, the chosen edition (Home, Pro, Enterprise, or Education) significantly impacts the price.
  • Retail Channels: Prices can vary depending on the retailer, with online marketplaces often offering competitive options.
  • Promotional Offers: Microsoft and authorized retailers frequently run promotions and discounts, potentially lowering the cost of Windows 10 licenses.
  • Bundled Packages: Many retailers offer bundled packages that include Windows 10 alongside other software or hardware components, potentially providing a cost-effective solution.

Navigating the Market: Key Considerations

When purchasing a Windows 10 license in the Philippines, several factors should be considered:

  • Intended Use: The intended use of the computer will determine the most appropriate Windows 10 edition. Home users may find Home sufficient, while businesses or professionals may require Pro or Enterprise.
  • Budget: Set a budget before researching prices, allowing for a focused search and comparison of options.
  • Retailer Reputation: Choose reputable retailers with a track record of reliable service and competitive pricing.
  • Product Authenticity: Ensure the license purchased is genuine and comes with valid activation keys. Beware of counterfeit software.

Exploring Options: Unveiling the Price Spectrum

While specific prices fluctuate, a general overview of the price range for Windows 10 in the Philippines can be provided:

  • Windows 10 Home: Prices typically range from ₱3,000 to ₱5,000, depending on retailer and promotions.
  • Windows 10 Pro: Expect prices to be higher, typically ranging from ₱5,000 to ₱8,000.
  • Windows 10 Enterprise: Prices for this edition are generally higher, often exceeding ₱10,000.
  • Windows 10 Education: Pricing for this edition is usually negotiated directly with Microsoft or authorized resellers.

Beyond the Price Tag: Factors Affecting Value

While price is a key consideration, it is essential to evaluate the overall value proposition of Windows 10. This includes:

  • Performance and Stability: Windows 10 is renowned for its performance and stability, ensuring a smooth and reliable computing experience.
  • Security Features: Windows 10 incorporates robust security measures to protect users from malware, phishing attacks, and other online threats.
  • Software Compatibility: Windows 10 offers wide compatibility with a vast library of software applications, catering to diverse needs.
  • Ecosystem Integration: Windows 10 seamlessly integrates with other Microsoft services and products, such as Office 365, OneDrive, and Xbox Live.

Frequently Asked Questions

Q: Can I upgrade from a previous version of Windows to Windows 10 for free?

A: While a free upgrade path was offered in the past, this is no longer available. New licenses need to be purchased for Windows 10.

Q: How can I ensure I am purchasing a legitimate Windows 10 license?

A: Purchase from reputable retailers, verify the license key’s authenticity, and avoid suspiciously low prices.

Q: What are the differences between Windows 10 Home and Pro?

A: Windows 10 Pro offers enhanced security features, remote desktop access, and support for domain joining, making it suitable for businesses and professionals.

Q: Can I use a single Windows 10 license on multiple computers?

A: No, a single Windows 10 license is typically tied to a specific device.

Tips for Optimizing Your Windows 10 Purchase

  • Compare Prices: Research prices from multiple retailers and online marketplaces to find the best deals.
  • Look for Bundles: Consider purchasing Windows 10 as part of a bundled package that includes other software or hardware components.
  • Utilize Promotions: Keep an eye out for promotional offers and discounts from Microsoft and authorized retailers.
  • Check System Requirements: Ensure your computer meets the minimum system requirements for Windows 10 before purchasing.

Conclusion

Understanding the pricing landscape of Windows 10 in the Philippines is essential for making informed decisions. By considering the various licensing models, retail channels, and factors influencing value, users can choose the most appropriate option for their needs and budget. Windows 10, with its robust features and extensive ecosystem, continues to be a popular choice for individuals and businesses alike in the Philippines.

Windows 10 Pricing and Availability  Digital Trends PPT - Navigating the Windows 10 Experience: A Comprehensive Guide to Licenses and Upgr Navigating the OS Landscape: A Practical Approach to Transitioning from Windows 10
Navigating the Windows 10 Upgrade: A Comprehensive Guide - Fashion Magazine Microsoft Windows 10 Review, Features, Availability, System Requirement, Price Details iGyaan - Microsoft Reveals the Much-Anticipated Windows 10 Pricing
PPT - Navigating the Windows 10 Experience: A Comprehensive Guide to Licenses and Upgr Windows 10 Pricing Announced - IGN News - YouTube

Closure

Thus, we hope this article has provided valuable insights into Navigating the Landscape of Windows 10 Pricing in the Philippines: A Comprehensive Guide. We hope you find this article informative and beneficial. See you in our next article!

Unlocking The Power Of Proximity: A Deep Dive Into Near Field Communication Technology

Unlocking the Power of Proximity: A Deep Dive into Near Field Communication Technology

Introduction

With great pleasure, we will explore the intriguing topic related to Unlocking the Power of Proximity: A Deep Dive into Near Field Communication Technology. Let’s weave interesting information and offer fresh perspectives to the readers.

Unlocking the Power of Proximity: A Deep Dive into Near Field Communication Technology

Near Field Communication

Near field communication (NFC) has quietly revolutionized the way we interact with the world around us. This wireless technology, operating at extremely short distances, allows devices to communicate seamlessly, transforming everyday interactions into effortless transactions, data exchanges, and even secure authentication.

Understanding the Basics of NFC

NFC is a subset of radio frequency identification (RFID) technology, operating on the principle of electromagnetic induction. Unlike other wireless technologies that rely on radio waves to transmit data over longer distances, NFC operates in the near field, typically within a range of a few centimeters. This proximity-based communication ensures a secure and efficient transfer of information.

How NFC Works:

  1. Electromagnetic Induction: NFC devices, equipped with antennas, generate electromagnetic fields. When two NFC-enabled devices come within close proximity, their electromagnetic fields interact.
  2. Data Transfer: This interaction enables the transfer of data between devices. The data exchange can be either passive, where one device acts as a reader and the other as a tag, or active, where both devices participate in the communication process.
  3. Secure Communication: NFC leverages encryption protocols to ensure secure data transmission. This feature makes NFC ideal for applications requiring secure authentication, such as mobile payments and access control systems.

The Evolution of NFC Technology:

NFC’s journey began in the early 2000s, gaining momentum with the introduction of smartphones and contactless payment systems. The technology has since evolved significantly, with advancements in speed, range, and security.

Key Features of NFC:

  • Short-Range Communication: NFC operates within a very limited range, typically a few centimeters, ensuring secure communication and minimizing interference.
  • Low Power Consumption: NFC devices consume minimal power, making them suitable for battery-powered devices.
  • Fast Data Transfer: NFC allows for rapid data exchange, making it ideal for applications requiring quick transactions.
  • Secure Communication: NFC utilizes encryption protocols to protect data during transmission, making it secure for sensitive information.

Real-World Applications of NFC:

NFC has permeated various aspects of our lives, revolutionizing how we interact with technology and our surroundings. Here are some prominent applications:

1. Mobile Payments: NFC is the backbone of contactless payments, allowing users to make purchases using their smartphones or other NFC-enabled devices. This technology has transformed the retail landscape, providing a convenient and secure alternative to traditional payment methods.

2. Access Control: NFC is widely used for access control systems, enabling users to unlock doors, gates, and other secured areas using their NFC-enabled devices. This technology enhances security by providing a convenient and reliable authentication method.

3. Data Transfer: NFC facilitates the swift transfer of data between devices, including files, contacts, and other information. This feature simplifies the sharing process, eliminating the need for physical cables or complicated Bluetooth pairing procedures.

4. Transportation Ticketing: NFC is increasingly employed in public transportation systems for contactless ticketing. Passengers can simply tap their NFC-enabled devices to access public transport services, eliminating the need for physical tickets and streamlining the travel experience.

5. Healthcare: NFC finds applications in healthcare, enabling secure identification of patients, tracking medical records, and facilitating communication between medical devices. This technology enhances patient safety and improves the efficiency of healthcare operations.

6. Smart Home Integration: NFC enables seamless communication between smart home devices, allowing users to control appliances, lighting, and other home automation systems using their NFC-enabled devices. This technology provides a convenient and intuitive way to manage a smart home environment.

7. Marketing and Advertising: NFC offers innovative possibilities for marketing and advertising. Businesses can integrate NFC tags into their products or marketing materials, allowing customers to access product information, promotional offers, and interactive experiences using their NFC-enabled devices.

8. Security and Authentication: NFC plays a crucial role in secure authentication and access control. Its short-range communication and encryption capabilities make it ideal for verifying identities, granting access to secure areas, and preventing unauthorized access to sensitive information.

9. Industrial Applications: NFC finds applications in various industrial settings, including asset tracking, inventory management, and process automation. This technology enables efficient data collection, real-time monitoring, and improved operational efficiency.

10. Gaming and Entertainment: NFC is being integrated into gaming consoles and other entertainment devices, enabling players to interact with games and content in innovative ways. This technology opens up new possibilities for immersive and interactive gaming experiences.

Benefits of NFC Technology:

  • Convenience: NFC simplifies everyday interactions, eliminating the need for physical keys, cards, or cables.
  • Security: NFC leverages encryption protocols to ensure secure data transmission, protecting sensitive information from unauthorized access.
  • Efficiency: NFC enables fast and efficient data exchange, streamlining transactions and processes.
  • Versatility: NFC finds applications in various industries and sectors, offering a wide range of possibilities.
  • Cost-Effectiveness: NFC technology is relatively inexpensive, making it accessible for various applications.

Challenges and Considerations:

Despite its numerous benefits, NFC faces some challenges and considerations:

  • Limited Range: NFC’s short-range communication can be a limitation in certain scenarios where longer distances are required.
  • Interoperability: Ensuring interoperability between different NFC devices and platforms can be challenging.
  • Security Concerns: While NFC offers robust security features, potential vulnerabilities remain, requiring ongoing security measures.
  • User Adoption: Widespread user adoption is crucial for the success of NFC applications, requiring education and awareness campaigns.

FAQs about NFC:

Q: Is NFC the same as Bluetooth?

A: No, NFC and Bluetooth are distinct technologies. While both facilitate wireless communication, NFC operates at much shorter distances and relies on electromagnetic induction, while Bluetooth uses radio waves for longer-range communication.

Q: Is NFC secure?

A: Yes, NFC utilizes encryption protocols to ensure secure data transmission. However, it’s crucial to use reputable NFC-enabled devices and applications to minimize security risks.

Q: What are some common NFC-enabled devices?

A: Smartphones, tablets, smartwatches, payment cards, access cards, and some smart home devices are commonly equipped with NFC capabilities.

Q: How can I enable NFC on my device?

A: Enabling NFC on your device typically involves navigating to the settings menu and activating the NFC function. The specific steps may vary depending on your device and operating system.

Q: What are some tips for using NFC safely?

A:

  • Be cautious of public NFC readers: Avoid using your NFC-enabled device near public NFC readers unless you’re sure of their legitimacy.
  • Keep your device secure: Use strong passwords and enable security features on your device to protect your data.
  • Update your device software: Regular software updates often include security patches that enhance the protection of your device.

Conclusion:

NFC technology has become an integral part of our digital world, facilitating seamless communication and simplifying our everyday interactions. Its short-range communication, low power consumption, and robust security features make it ideal for a wide range of applications, from mobile payments and access control to smart home integration and industrial automation. As NFC technology continues to evolve, we can expect even more innovative and transformative applications in the future, shaping the way we interact with technology and our surroundings.

Near Field Communication (NFC) What is NFC? - GeeksforGeeks Near Field Communication NFC, NFC Technology Explained
Near Field Communication (NFC) Technology: UPSC Current Affairs What Is Near Field Communication Applications - CXJRFIDFactory near field communication
The Beginner’s Guide to NFCs (Near Field Communication) Uses of Near Field Communication (NFC) technology, enabling contactless  Download Scientific

Closure

Thus, we hope this article has provided valuable insights into Unlocking the Power of Proximity: A Deep Dive into Near Field Communication Technology. We thank you for taking the time to read this article. See you in our next article!

Navigating The QEMU Guest Agent For Windows 11: A Comprehensive Guide

Navigating the QEMU Guest Agent for Windows 11: A Comprehensive Guide

Introduction

In this auspicious occasion, we are delighted to delve into the intriguing topic related to Navigating the QEMU Guest Agent for Windows 11: A Comprehensive Guide. Let’s weave interesting information and offer fresh perspectives to the readers.

Qemu Windows 11

The QEMU Guest Agent, a vital component for seamless virtual machine management, plays a crucial role in enhancing the functionality and user experience within QEMU-based Windows 11 virtual environments. This guide aims to provide a comprehensive understanding of the QEMU Guest Agent, its significance, and the steps involved in its successful implementation.

Understanding the QEMU Guest Agent

The QEMU Guest Agent is a software program installed within a guest operating system (OS) running in a virtual machine environment powered by QEMU. Its primary purpose is to establish a communication bridge between the virtual machine and the host system, facilitating a wide range of functionalities that enhance management and interaction.

Key Functions of the QEMU Guest Agent

The QEMU Guest Agent performs a multitude of tasks, contributing significantly to the overall efficiency and user experience within a virtualized environment. These functions include:

  • Guest Operating System Management: The Guest Agent provides access to vital guest OS information, enabling tasks like retrieving the guest’s hostname, uptime, and other system details.
  • Virtual Machine Control: The Guest Agent empowers users to control the virtual machine from the host system. This includes functionalities like powering the virtual machine on or off, resetting it, and even sending signals to the guest OS.
  • File Transfer: The Guest Agent facilitates seamless data transfer between the host and the guest environment. This allows users to transfer files, install software, and manage the virtual machine’s contents with ease.
  • Network Management: The Guest Agent enables network configuration adjustments within the guest OS. This includes tasks like setting up network interfaces, configuring IP addresses, and managing network connectivity.
  • Guest System Monitoring: The Guest Agent provides real-time monitoring capabilities, allowing users to track resource usage, system performance, and other critical metrics within the guest environment.

The Importance of the QEMU Guest Agent

The QEMU Guest Agent is not merely a supplementary component; it is an essential tool for enhancing the overall virtual machine experience. Its presence unlocks a plethora of benefits, streamlining management, boosting performance, and simplifying interactions with the virtual environment.

Benefits of Using the QEMU Guest Agent:

  • Simplified Management: The Guest Agent streamlines virtual machine administration by providing a centralized interface for managing guest OS settings, controlling the virtual machine, and transferring files.
  • Enhanced Performance: The Guest Agent optimizes performance by enabling efficient communication between the host and guest, minimizing latency and maximizing resource utilization.
  • Increased Functionality: The Guest Agent unlocks a wide range of functionalities, including guest OS monitoring, network management, and advanced control options, enriching the virtual environment’s capabilities.
  • Improved User Experience: The Guest Agent simplifies interactions with the virtual machine, making it easier to manage, troubleshoot, and interact with the guest OS.

Downloading and Installing the QEMU Guest Agent for Windows 11

The process of obtaining and installing the QEMU Guest Agent for Windows 11 is straightforward and can be accomplished through the following steps:

  1. Identify the Appropriate Version: Ensure compatibility by downloading the QEMU Guest Agent version specifically designed for Windows 11. The QEMU project website or official repositories are reliable sources for obtaining the correct package.
  2. Download the Guest Agent Package: Download the QEMU Guest Agent package to your host system. This package typically comes in the form of an executable file (.exe).
  3. Transfer the Package to the Guest: Transfer the downloaded Guest Agent package to the Windows 11 virtual machine. This can be achieved using various methods, such as shared folders, network drives, or USB drives.
  4. Install the Guest Agent: Run the downloaded Guest Agent executable file within the Windows 11 virtual machine. Follow the on-screen instructions to complete the installation process.
  5. Configure the Guest Agent: After successful installation, configure the Guest Agent settings as required. This may involve specifying communication protocols, setting up authentication mechanisms, and configuring other relevant parameters.

Troubleshooting Common QEMU Guest Agent Issues

While the QEMU Guest Agent installation process is generally straightforward, users may encounter occasional issues. These issues can often be resolved by following these troubleshooting steps:

  • Verify Compatibility: Ensure that the downloaded Guest Agent version is compatible with the QEMU version and the Windows 11 operating system installed in the virtual machine.
  • Check Installation Permissions: Confirm that the user account running the Guest Agent installation has sufficient permissions to modify system files and folders.
  • Examine Network Configuration: Verify that the virtual machine’s network settings are properly configured and that the host and guest systems can communicate with each other.
  • Review Guest Agent Logs: Check the Guest Agent logs for error messages or other indications of problems. These logs can provide valuable insights into the root cause of the issue.
  • Consult QEMU Documentation: Refer to the QEMU documentation for detailed information on troubleshooting common Guest Agent issues and potential solutions.

FAQs Regarding the QEMU Guest Agent for Windows 11

Q: Is the QEMU Guest Agent compatible with all QEMU versions?

A: While the QEMU Guest Agent is generally compatible with most QEMU versions, it’s crucial to ensure compatibility by checking the documentation or release notes for the specific QEMU version and the Guest Agent package.

Q: Can I use the Guest Agent with other virtual machine platforms besides QEMU?

A: The QEMU Guest Agent is designed specifically for QEMU virtual machines. Other virtualization platforms may have their own guest agent solutions.

Q: Does the Guest Agent require any specific software dependencies?

A: The QEMU Guest Agent typically requires basic system utilities and libraries common to Windows 11. However, specific dependencies may vary based on the Guest Agent version and QEMU configuration.

Q: How do I configure the Guest Agent to communicate with the host system?

A: The Guest Agent configuration process typically involves specifying the communication protocol (e.g., TCP/IP, UDP), setting up authentication mechanisms (e.g., password-based, key-based), and defining other relevant parameters. Refer to the QEMU documentation for detailed configuration instructions.

Q: Can I use the Guest Agent to access the guest OS from a remote location?

A: While the Guest Agent provides remote access capabilities, it’s essential to configure appropriate security measures to protect the guest environment from unauthorized access. This may involve using secure communication protocols, implementing strong authentication mechanisms, and limiting access to authorized users.

Tips for Effectively Using the QEMU Guest Agent

  • Regularly Update the Guest Agent: Keep the Guest Agent software up to date to benefit from bug fixes, performance enhancements, and new features.
  • Configure Security Measures: Implement appropriate security measures to protect the Guest Agent and the guest environment from unauthorized access.
  • Monitor Guest Agent Logs: Regularly review the Guest Agent logs for any errors, warnings, or other indications of issues.
  • Utilize Guest Agent Features: Explore the full range of Guest Agent functionalities to enhance virtual machine management, performance, and user experience.
  • Consult QEMU Documentation: Refer to the QEMU documentation for comprehensive information on Guest Agent usage, configuration, and troubleshooting.

Conclusion

The QEMU Guest Agent is an indispensable tool for managing and interacting with Windows 11 virtual machines within the QEMU environment. By establishing a communication bridge between the host and guest, the Guest Agent unlocks a wide range of functionalities, enhancing performance, streamlining management, and simplifying interactions with the virtualized environment. By understanding the Guest Agent’s capabilities, its installation process, and its potential benefits, users can effectively leverage this powerful tool to optimize their QEMU-based Windows 11 virtual machine experience.

Qemu Windows 11 Chapter 11. Enhancing Virtualization with the QEMU Guest Agent and SPICE Agent  Red Hat Product Qemu-guest-agent - Proxmox VE
Qemu-guest-agent - Proxmox VE How do I enable QEMU guest agent? How do You install QEMU Guest Agent on Linux and Windows
Qemu On Windows Perform Consistent Snapshots with qemu guest agent • Feisky

Closure

Thus, we hope this article has provided valuable insights into Navigating the QEMU Guest Agent for Windows 11: A Comprehensive Guide. We appreciate your attention to our article. See you in our next article!

Photo Story 3.0 For Windows

photo story 3.0 for windows

Related Articles: photo story 3.0 for windows

Introduction

With great pleasure, we will explore the intriguing topic related to photo story 3.0 for windows. Let’s weave interesting information and offer fresh perspectives to the readers.

Photo Story 3.0 for Windows: A Comprehensive Look at a Powerful Storytelling Tool

Microsoft photostory 3-0 - ladegcalifornia

Photo Story 3.0 for Windows, released in 2006, was a revolutionary tool for creating engaging visual narratives. This program, available as a free download, offered users a user-friendly interface to transform collections of digital photographs into captivating slideshows accompanied by music, narration, and text. It became a popular choice for individuals and educators alike, allowing them to share personal memories, create educational presentations, and even develop professional-quality marketing materials.

Understanding the Essence of Photo Story 3.0

Photo Story 3.0’s core functionality revolved around its ability to seamlessly integrate images, audio, and text. Users could import photographs from various sources, including digital cameras, scanners, and personal computers. The program offered a simple drag-and-drop interface for arranging images in the desired order, enabling users to quickly create a visual flow for their stories.

A key feature of Photo Story 3.0 was its intuitive timeline. This visual representation of the slideshow allowed users to easily manipulate the timing of each image, adjust transitions between slides, and add narration or music at specific points. The program supported a wide array of audio formats, enabling users to add their own voice recordings, music from their computer, or even royalty-free tracks from online sources.

Text elements were another crucial component of Photo Story 3.0. Users could add captions, titles, and even credits to their slideshows. The program offered various text styles and templates, allowing for customization and visual appeal. Additionally, Photo Story 3.0 provided options for adding motion effects to images, further enhancing the visual impact of the slideshow.

The Advantages of Using Photo Story 3.0

Photo Story 3.0 offered several advantages that made it a compelling choice for various purposes:

  • Ease of Use: The program’s intuitive interface and drag-and-drop functionality made it accessible to users of all skill levels. Even individuals with limited computer experience could easily create professional-looking slideshows.
  • Creativity and Flexibility: Photo Story 3.0 provided a wide range of tools for customization, allowing users to express their creativity and personalize their slideshows. The program offered options for adding various transitions, effects, and text styles, enabling users to create unique and engaging narratives.
  • Versatility: Photo Story 3.0 could be used for various purposes, from creating personal memories to developing educational presentations and marketing materials. Its versatility made it a valuable tool for individuals, families, educators, and businesses.
  • Accessibility: The program was free to download and use, making it accessible to a broad audience. This affordability removed financial barriers and allowed individuals to explore the world of digital storytelling without significant investment.
  • Shareability: Photo Story 3.0 allowed users to easily share their creations with others. The program could export slideshows in various formats, including WMV (Windows Media Video) and DVD, ensuring compatibility with different devices and platforms.

The Legacy of Photo Story 3.0

While Photo Story 3.0 was discontinued by Microsoft in 2011, its impact on the digital storytelling landscape remains significant. The program’s ease of use, versatility, and accessibility made it a popular choice for individuals and organizations alike. Its influence can be seen in the development of modern slideshow creation software, many of which incorporate features inspired by Photo Story 3.0.

Frequently Asked Questions About Photo Story 3.0

Q: Is Photo Story 3.0 still available for download?

A: Unfortunately, Photo Story 3.0 is no longer available for download from Microsoft. The program was discontinued in 2011, and its official website no longer hosts the download.

Q: Can I still use Photo Story 3.0 if I have it installed on my computer?

A: Yes, if you have Photo Story 3.0 installed on your computer, you can continue to use it. However, you may encounter issues with compatibility and updates if you are using a newer operating system.

Q: Are there any alternatives to Photo Story 3.0?

A: Yes, there are several alternatives to Photo Story 3.0 available. Some popular options include:

  • Windows Movie Maker: This program is included with earlier versions of Windows and offers basic slideshow creation capabilities.
  • iMovie (Mac): This program is available on Apple devices and offers more advanced features for creating slideshows.
  • Animoto: This online service allows users to create slideshows with a variety of templates and music options.
  • PowerPoint: This presentation software can also be used to create slideshows with images, audio, and text.

Q: What are the system requirements for Photo Story 3.0?

A: Photo Story 3.0 requires a computer with:

  • Windows XP or Windows Vista operating system
  • 512 MB of RAM
  • 1 GB of free hard disk space
  • DirectX 9.0c compatible graphics card

Tips for Using Photo Story 3.0

  • Plan your story: Before you start creating your slideshow, take some time to plan out your story. Consider the message you want to convey and the images and audio you want to use.
  • Use high-quality images: The quality of your images will directly impact the quality of your slideshow. Use images that are sharp, well-lit, and free of distractions.
  • Choose appropriate music: The music you choose can set the tone for your slideshow. Select music that complements the mood and message of your story.
  • Keep it simple: Don’t try to cram too much information into your slideshow. Keep it concise and easy to follow.
  • Practice your narration: If you are adding narration to your slideshow, practice it beforehand to ensure it flows smoothly.
  • Experiment with transitions and effects: Photo Story 3.0 offers a variety of transitions and effects. Experiment with different options to find what works best for your story.
  • Export your slideshow in a high-quality format: To ensure that your slideshow looks its best, export it in a high-quality format, such as WMV or DVD.

Conclusion

Photo Story 3.0 for Windows was a groundbreaking tool that democratized digital storytelling. Its user-friendly interface, versatility, and accessibility made it a popular choice for individuals and organizations alike. While the program is no longer available for download, its legacy continues to inspire the development of modern slideshow creation software. Photo Story 3.0 demonstrated the power of visual storytelling and paved the way for a new era of creative expression in the digital age.

Download Microsoft Photo Story 3.0 �� Bajar Microsoft Photo Story 3.0 en español Photo Story 3 for Windows Offline Installer Plus Setup
Microsoft Photo Story 3.0 - Ứng dụng tạo slide ảnh miễn phí - Download.com.vn �� Bajar Microsoft Photo Story 3.0 en español �� Descargar Microsoft Photo Story 3.0 Gratis para Windows
Tudo Freeware!!!: Microsoft Photo Story 3.0 Photo Story 3 for Windows  Other Multimedia Software

Closure

Thus, we hope this article has provided valuable insights into photo story 3.0 for windows. We appreciate your attention to our article. See you in our next article!

Windows 11: A Comprehensive Review Of Recent Updates

Windows 11: A Comprehensive Review of Recent Updates

Introduction

With great pleasure, we will explore the intriguing topic related to Windows 11: A Comprehensive Review of Recent Updates. Let’s weave interesting information and offer fresh perspectives to the readers.

Windows 11: A Comprehensive Review of Recent Updates

A comprehensive overview of Windows 11 22H2, the OS’s first big yearly update  Ars Technica

Windows 11, Microsoft’s latest operating system, has been steadily evolving since its release in 2021. While its initial launch garnered mixed reactions, Microsoft has consistently delivered updates that address user feedback and introduce new features. This article provides a comprehensive overview of the latest Windows 11 updates, analyzing their impact on user experience, performance, and functionality.

The Evolution of Windows 11: A Timeline of Updates

To understand the significance of recent updates, it is essential to review the evolution of Windows 11 since its release. Here’s a brief timeline:

  • October 2021: Windows 11 officially launches with a redesigned user interface, improved security features, and a focus on gaming.
  • February 2022: The first major update brings enhancements to the Start Menu, Taskbar, and Widgets. It also includes new features like Android app support and improved performance for gaming.
  • September 2022: The "2022 Update" focuses on productivity and collaboration, introducing features like Focus Sessions, Live Captions, and improved integration with Microsoft Teams.
  • February 2023: The "Moment 2" update brings minor enhancements to the taskbar, File Explorer, and other areas, focusing on user interface refinements and stability improvements.
  • September 2023: The "Moment 3" update is expected to introduce significant changes, including a redesigned taskbar, improved search functionality, and a new AI-powered assistant.

Key Features and Improvements in Recent Updates

The most recent Windows 11 updates have concentrated on several key areas:

1. Enhanced User Experience:

  • Redesigned Taskbar: The taskbar has undergone several iterations, with the latest updates focusing on improving its functionality and aesthetics. Features like the ability to align icons to the center and the inclusion of a dedicated "overflow menu" for minimizing app icons enhance usability.
  • Improved Search Functionality: The search bar in the taskbar has been refined to offer more accurate and relevant results. The integration of AI-powered search technology promises to further improve search capabilities in future updates.
  • Modernized File Explorer: The File Explorer has received a visual overhaul, adopting a cleaner, more modern look. Updates have also introduced features like "Quick Access" and "Recent Files" for easier navigation and access to frequently used files.
  • Focus Sessions: The "Focus Sessions" feature, introduced in the "2022 Update," allows users to set specific timeframes for focused work sessions, blocking distracting notifications and enhancing productivity.

2. Enhanced Productivity and Collaboration:

  • Live Captions: This feature, also introduced in the "2022 Update," provides real-time captions for any audio playing on the computer, including video calls, presentations, and multimedia content. It significantly enhances accessibility and comprehension for users with hearing impairments.
  • Improved Microsoft Teams Integration: The latest updates have further integrated Microsoft Teams into Windows 11, making it easier to access and manage calls, meetings, and collaboration features directly within the operating system.

3. Enhanced Security and Privacy:

  • Improved Security Features: Windows 11 has always emphasized security, and recent updates have further strengthened security measures. These include advanced malware protection, enhanced phishing detection, and improved data encryption capabilities.
  • Enhanced Privacy Controls: Users have more control over their privacy settings, with options to manage data collection, location tracking, and advertising personalization.

4. Performance and Stability Enhancements:

  • Optimized Performance: The latest updates focus on improving system performance, addressing common issues like slow startup times and application lag. These updates also optimize resource usage and reduce system strain.
  • Increased Stability: Regular updates address bugs and stability issues, enhancing the overall reliability and responsiveness of the operating system.

Impact of Updates on User Experience

The recent updates to Windows 11 have significantly improved the user experience, making it more intuitive, efficient, and user-friendly. The redesigned user interface, the enhanced search functionality, and the focus on productivity and collaboration have all contributed to a more positive and productive experience for users.

Benefits of the Latest Updates

The recent updates to Windows 11 offer numerous benefits for users, including:

  • Enhanced Productivity: Features like Focus Sessions, improved multitasking capabilities, and seamless integration with Microsoft Teams have boosted productivity for both individual users and businesses.
  • Improved User Experience: The redesigned interface, enhanced search functionality, and improved performance have made Windows 11 more user-friendly and enjoyable to use.
  • Enhanced Security: The latest security updates have strengthened the operating system’s defenses against malware, phishing attacks, and other threats, ensuring a safer and more secure computing environment.
  • Increased Accessibility: Features like Live Captions and improved accessibility settings have made Windows 11 more inclusive for users with disabilities.

FAQs about Windows 11 Updates

1. Are the updates mandatory?

No, the updates are not mandatory. Users can choose to install them manually or postpone them for a later date. However, it is recommended to install updates as soon as possible to benefit from the latest security enhancements and performance improvements.

2. How do I update Windows 11?

To update Windows 11, open the "Settings" app and navigate to "Windows Update." The system will automatically check for available updates and prompt you to install them.

3. What are the minimum system requirements for Windows 11?

To run Windows 11, your computer must meet the following minimum system requirements:

  • Processor: 1 gigahertz (GHz) or faster with 2 or more cores
  • RAM: 4 gigabytes (GB)
  • Storage: 64 GB or larger storage device
  • Graphics: Compatible with DirectX 12 or later
  • Display: High-definition (720p) display with a minimum resolution of 1366 x 768 pixels

4. Is it safe to install the updates?

Yes, the updates are generally safe to install. Microsoft thoroughly tests all updates before releasing them to ensure stability and security. However, it is always recommended to back up your data before installing any significant updates.

5. Will the updates affect my existing applications?

Most applications should continue to work without any issues after installing the updates. However, some older applications may require updates or compatibility adjustments.

Tips for Optimizing Windows 11 Updates

  • Check for updates regularly: To ensure you have the latest security and performance improvements, check for updates regularly.
  • Back up your data: Before installing any significant updates, back up your important data to avoid data loss in case of unforeseen issues.
  • Free up disk space: Ensure you have sufficient disk space available before installing updates. This will help prevent installation errors and improve update performance.
  • Disable unnecessary programs: Temporarily disable unnecessary programs and background processes during the update process to improve performance and reduce potential conflicts.
  • Restart your computer: After installing an update, restart your computer to ensure the changes take effect properly.

Conclusion

Windows 11 has come a long way since its initial release. The latest updates have significantly improved the user experience, enhanced productivity and collaboration features, and strengthened security measures. The focus on stability, performance, and user feedback has resulted in a more polished and refined operating system that offers a compelling alternative to its predecessor. As Microsoft continues to develop and refine Windows 11, users can expect even more improvements and innovative features in the future, further enhancing the overall user experience.

New Windows 11 All Features: Full Depth Review Latest Windows 11 Windows 11: A Comprehensive Guide about Features and Updates Perunity - Latest Business Story Microsoft Windows 11 Review Pcmag - Riset
Windows 11 review: New OS has us asking, update or wait? - Video - CNET Windows 11 review - Your Windows Guide Windows 11 review  TechRadar
Microsoft rolls out Windows 11 22H2 major update » YugaTech  Philippines Tech News & Reviews Review Windows 11 - e-Book Contekan

Closure

Thus, we hope this article has provided valuable insights into Windows 11: A Comprehensive Review of Recent Updates. We hope you find this article informative and beneficial. See you in our next article!

Navigating The Print Test Page In Windows 10: A Comprehensive Guide

Navigating the Print Test Page in Windows 10: A Comprehensive Guide

Introduction

In this auspicious occasion, we are delighted to delve into the intriguing topic related to Navigating the Print Test Page in Windows 10: A Comprehensive Guide. Let’s weave interesting information and offer fresh perspectives to the readers.

How To Print A Test Page In Windows 10

In the realm of digital communication, printing remains a vital tool for document dissemination, archival, and physical representation. Windows 10, Microsoft’s flagship operating system, offers a suite of tools to manage and optimize this essential function, including a dedicated feature for assessing print quality: the Print Test Page. This comprehensive guide explores the intricacies of the Print Test Page, its significance, and its practical applications.

Understanding the Print Test Page: A Window into Printer Health

The Print Test Page is a diagnostic tool built into Windows 10 that enables users to evaluate the operational status of their printers. It serves as a visual representation of various printer functionalities, including:

  • Print Quality: The Print Test Page showcases the printer’s ability to reproduce colors, shades, and gradients accurately. It features a spectrum of colors, patterns, and text samples that highlight potential issues such as fading, banding, or misalignment.
  • Alignment and Calibration: The Test Page includes a grid pattern that helps identify alignment problems, such as skewing, distortion, or uneven margins. These elements are essential for ensuring accurate and aesthetically pleasing printouts.
  • Ink Levels: The Test Page often displays ink level indicators, providing a visual representation of remaining ink for each color cartridge. This information is crucial for monitoring ink levels and proactively scheduling replacements.
  • Paper Feed and Handling: The Test Page verifies the printer’s ability to handle different paper types and sizes, highlighting any potential paper jams or feeding issues.

Accessing the Print Test Page: A Simple Procedure

The Print Test Page is readily accessible through a straightforward procedure:

  1. Open the "Settings" App: Navigate to the Windows 10 "Settings" app by clicking the "Start" menu and selecting the cogwheel icon.
  2. Access "Devices": Within the "Settings" app, select "Devices."
  3. Choose "Printers & Scanners": Locate and click on "Printers & Scanners" from the left-hand menu.
  4. Select Your Printer: Identify the printer you wish to test from the list of connected devices.
  5. Access Printer Properties: Click on the printer’s name, and then select "Manage."
  6. Print Test Page: Locate and click the "Print Test Page" option.

Utilizing the Print Test Page: A Practical Guide

The Print Test Page serves as a valuable tool for troubleshooting printer issues and ensuring optimal print quality. Here’s a breakdown of its practical applications:

  • Diagnosing Print Quality Problems: If you encounter issues like faded colors, banding, or misalignment in your printouts, the Test Page provides a visual reference to pinpoint the source of the problem.
  • Verifying Ink Levels: The Test Page’s ink level indicators help monitor ink levels and anticipate potential shortages, preventing unexpected print interruptions.
  • Identifying Alignment Issues: The grid pattern on the Test Page highlights any alignment problems, ensuring accurate and consistent printouts.
  • Troubleshooting Paper Handling: The Test Page can help identify issues related to paper feeding, jams, or paper type incompatibility.

FAQs: Addressing Common Queries

Q: What if the Print Test Page displays errors or abnormalities?

A: If the Print Test Page reveals issues like faded colors, misalignment, or paper jams, it indicates a potential problem with the printer. Consult the printer’s user manual or contact the manufacturer for troubleshooting guidance.

Q: Can the Print Test Page help with troubleshooting specific print problems, like blurry text?

A: While the Test Page offers a general overview of printer health, it may not directly address specific print problems like blurry text. In such cases, consider adjusting print settings, checking for driver updates, or seeking specialized troubleshooting advice.

Q: Is there a way to customize the Print Test Page?

A: The content of the Print Test Page is typically standardized and cannot be customized by users.

Q: Can the Print Test Page be used for all types of printers?

A: The Print Test Page is a standard feature in most Windows-compatible printers, including inkjet, laser, and multifunction devices.

Tips for Optimizing Print Test Page Usage:

  • Use High-Quality Paper: Employing high-quality paper for printing the Test Page ensures accurate color reproduction and minimizes paper-related issues.
  • Clean the Printer Regularly: Regular cleaning of the printer’s print heads and rollers helps maintain optimal print quality and prevent paper jams.
  • Check Ink Levels Frequently: Monitoring ink levels allows for timely replacements and prevents unexpected print interruptions.
  • Utilize the Printer’s Built-in Diagnostics: Many printers have built-in diagnostic tools that can further assist in troubleshooting print-related problems.

Conclusion: A Vital Tool for Print Management

The Print Test Page is an indispensable tool for ensuring optimal printer performance and diagnosing potential issues. Its comprehensive assessment of printer functionality, including print quality, alignment, ink levels, and paper handling, provides a valuable diagnostic tool for maintaining print quality and troubleshooting problems. By utilizing this feature effectively, users can optimize their printing experience and ensure consistent, high-quality printouts.

How To Print A Test Page In Windows 10 How to Print a Test Page in Windows 10 How to Print a Test Page Windows 10 - YouTube
How To Print A Test Page In Windows 10 How to Print A Test Page in Windows 10 - IT&T Print and Documents How To Print A Test Page In Windows 10 - annacharlottas
How to Print a Test Page in Windows 10 How to print test page windows 10 - sadebaleader

Closure

Thus, we hope this article has provided valuable insights into Navigating the Print Test Page in Windows 10: A Comprehensive Guide. We hope you find this article informative and beneficial. See you in our next article!

Reclaiming Your Search: Managing Suggested Apps In Windows 11

Reclaiming Your Search: Managing Suggested Apps in Windows 11

Introduction

With great pleasure, we will explore the intriguing topic related to Reclaiming Your Search: Managing Suggested Apps in Windows 11. Let’s weave interesting information and offer fresh perspectives to the readers.

Reclaiming Your Search: Managing Suggested Apps in Windows 11

How to Change Apps Recommendation in Windows 11?  Basics Of Computer007 - YouTube

Windows 11’s search bar, a gateway to your digital world, often presents a curated list of suggested apps. While this feature aims to streamline your experience by offering frequently used applications, it can sometimes become intrusive, displaying apps you rarely utilize or even find irrelevant. This can lead to frustration as you navigate through the suggested list to reach your desired program.

This article explores the methods to customize and manage these app suggestions in Windows 11, allowing you to prioritize and personalize your search experience.

Understanding the Mechanism: How Windows 11 Determines Suggested Apps

Windows 11’s app suggestions are powered by a combination of factors:

  • Usage Frequency: Applications you frequently use are more likely to appear at the top of the suggested list.
  • Recent Activity: Recently opened programs are given prominence.
  • System Data: Windows 11 analyzes your system data, including file types you access and applications you interact with, to predict your needs.
  • User Preferences: Windows 11 also considers your personalized settings, such as the apps you pin to the taskbar or the ones you frequently use in the Start menu.

Methods to Manage Suggested Apps

Here are various approaches to customize the suggested app list:

1. Removing Individual Apps from the Search Bar:

  • Right-click on the app icon: Locate the app you wish to remove from the suggestions in the search bar. Right-click on its icon.
  • Select "Unpin from Search": A context menu will appear. Choose the option "Unpin from Search." This will immediately remove the app from the suggested list.

2. Clearing the Recent Apps List:

  • Access the "Recent" Section: Open the Start menu and navigate to the "Recent" section, typically found on the left side.
  • Click "Clear All": At the bottom of the "Recent" section, you will find a "Clear All" button. Click it to remove all recent app entries from the suggestions.

3. Disabling App Suggestions in Settings:

  • Open Settings: Press the Windows key + I to access the Windows Settings app.
  • Navigate to Search: Select "Search" from the left-hand menu.
  • Toggle "Show app suggestions in Search": Locate the "Show app suggestions in Search" toggle switch and turn it off. This will completely disable app suggestions in the search bar.

4. Utilizing the "Search" Feature’s Advanced Settings:

  • Access "Advanced Settings": In the "Search" settings, scroll down to the bottom and click on "Advanced Settings."
  • Adjust Search Preferences: This section allows you to customize various aspects of the search functionality, including the types of results you prefer. You can fine-tune your search experience by adjusting these settings.

5. Utilizing Third-Party Utilities:

  • Search for "Search Tweaker": There are numerous third-party utilities available that offer more granular control over the search functionality, including the ability to disable specific app suggestions. Search for "Search Tweaker" or similar terms online.

Benefits of Managing App Suggestions

  • Improved Search Efficiency: By removing unnecessary suggestions, you streamline your search experience, making it faster and more efficient.
  • Enhanced Focus: A cleaner search bar minimizes distractions and helps you focus on finding the specific files or applications you need.
  • Personalized Experience: Tailoring the suggested apps to your preferences creates a more personalized and user-friendly experience.
  • Control Over Data Privacy: While Windows 11’s app suggestions are primarily based on system usage data, some individuals may prefer to minimize the amount of data collected. Disabling app suggestions can contribute to this goal.

FAQs

Q: Will removing an app from suggestions prevent it from appearing in the Start menu or other locations?

A: No, removing an app from the search bar suggestions will not affect its presence in the Start menu, taskbar, or other areas of the operating system. It only removes it from the suggested list within the search bar.

Q: Can I permanently remove an app from the suggested list?

A: While removing an app from the suggestions will remove it temporarily, Windows 11 may reintroduce it based on your usage patterns. However, by consistently removing it, you can minimize its reappearance.

Q: Is there a way to completely disable the "Recent" section in the Start menu?

A: Currently, there is no built-in option to completely disable the "Recent" section in the Start menu. However, clearing the recent apps list regularly can help reduce the prominence of these entries.

Q: Why do I still see app suggestions even after disabling them in settings?

A: Occasionally, app suggestions may persist even after disabling them in settings. This can be due to a temporary glitch or a conflict with other applications. Restarting your computer often resolves this issue.

Tips

  • Regularly Review App Suggestions: Periodically review the suggested apps and remove any that you no longer use or find irrelevant.
  • Utilize Search Filters: Use the search bar’s filtering options to narrow down your results and focus on specific file types or applications.
  • Explore Alternative Search Methods: Experiment with other search methods, such as using the Windows File Explorer or the Cortana voice assistant, to find the most efficient way to locate your desired files and applications.

Conclusion

Managing suggested apps in Windows 11 is an essential aspect of personalizing your search experience. By understanding the mechanisms behind these suggestions and utilizing the available methods to customize them, you can reclaim control over your search bar, making it more efficient, focused, and tailored to your specific needs. Remember, a streamlined and personalized search experience is not only about finding files and applications quickly but also about enhancing your overall productivity and enjoyment of Windows 11.

How to change app recommendation settings in windows 11 ? - YouTube How to Manage Optional Features on Windows 11 Change App Recommendation Settings Windows 11
How to use Suggested Actions on Windows 11 2022 Update  Windows Central How to Change My App Recommendation Settings in Windows 11 How to Stop the Automatic Installation of Suggested Windows 11 Apps
Change App Recommendation Settings Windows 11 Windows 11 Change App Recommendation Settings

Closure

Thus, we hope this article has provided valuable insights into Reclaiming Your Search: Managing Suggested Apps in Windows 11. We appreciate your attention to our article. See you in our next article!