Archives October 2023

The Right-Click Revolution: Unveiling The Power Of Windows 10’s Context Menus

The Right-Click Revolution: Unveiling the Power of Windows 10’s Context Menus

Introduction

With enthusiasm, let’s navigate through the intriguing topic related to The Right-Click Revolution: Unveiling the Power of Windows 10’s Context Menus. Let’s weave interesting information and offer fresh perspectives to the readers.

The Right-Click Revolution: Unveiling the Power of Windows 10’s Context Menus

right click context menu direction changed in windows 10 - Computics Lab

In the digital landscape, efficiency is paramount. Every click, every keystroke, every interaction with a device contributes to the overall user experience. Windows 10, Microsoft’s latest operating system, recognizes this need for streamlined interaction and offers a powerful tool for enhancing productivity: the context menu.

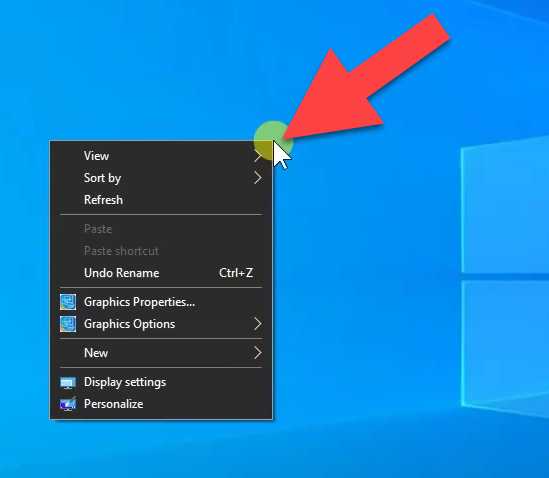
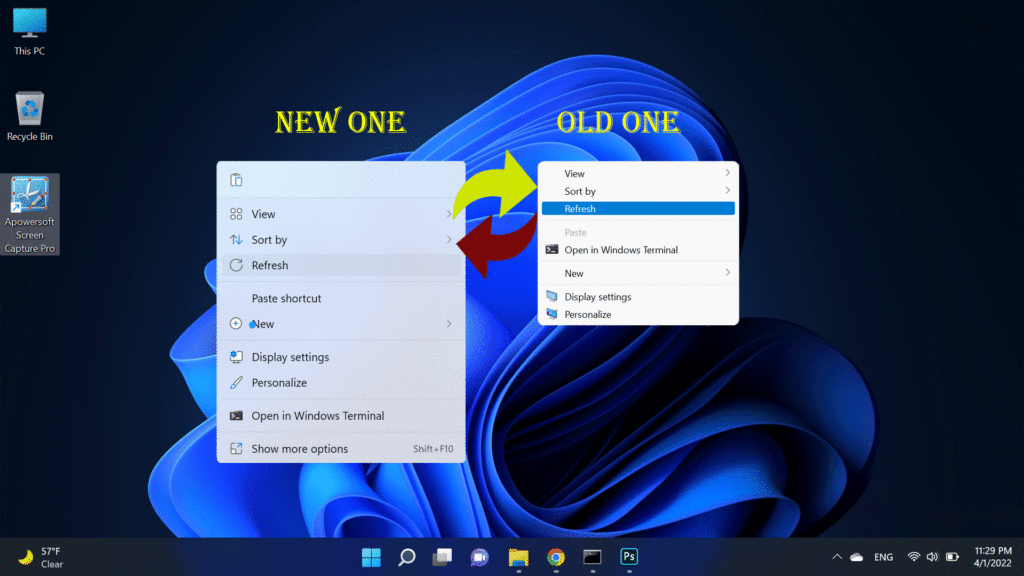
The context menu, often accessed via a right-click, is not merely a list of options; it’s a dynamic portal tailored to the specific element you’re interacting with. It provides a curated set of actions relevant to the context, eliminating the need for users to navigate through multiple menus or search for the appropriate command.

Understanding the Contextual Nature

Imagine you’re working on a document in Microsoft Word. Right-clicking on a selected word reveals a menu offering options like "Copy," "Cut," "Paste," and "Define." These actions are directly relevant to the word you’ve selected, providing immediate access to the tools needed for manipulating text.

Similarly, right-clicking on a file in File Explorer presents a menu containing options like "Open," "Delete," "Rename," and "Properties." Each option is tailored to the file’s nature, enabling users to perform actions specific to that file type without navigating through complex menus.

Beyond the Basics: A Deeper Dive into Functionality

The context menu transcends simple file and text manipulation. It empowers users with a range of functionalities, including:

  • Customization: Windows 10 allows users to personalize their context menus by adding or removing specific options. This flexibility enables users to tailor the menu to their individual needs and preferences.
  • System Management: The context menu provides access to system settings and utilities, allowing users to manage their computer’s performance, network connections, and other essential functions.
  • Third-Party Integration: Developers can integrate their applications with the context menu, expanding its capabilities and offering users seamless access to their tools and features.
  • Accessibility Features: Context menus are designed to be accessible to users with disabilities. For instance, users can utilize keyboard shortcuts to access the menu, eliminating the need for mouse interaction.

The Benefits of Contextual Interaction

The context menu’s value lies in its ability to streamline interaction and enhance user experience. By providing contextually relevant options, it simplifies tasks and reduces the cognitive load on users. This translates into:

  • Increased Efficiency: Users can perform tasks more quickly and efficiently by accessing relevant tools directly from the context menu.
  • Improved User Experience: The intuitive and context-sensitive nature of the menu makes interaction with Windows 10 more user-friendly and enjoyable.
  • Reduced Cognitive Load: By presenting only relevant options, the context menu minimizes distractions and helps users focus on their tasks.
  • Enhanced Accessibility: The menu’s customizable and keyboard-accessible features ensure that it is usable by a wider range of users.

Frequently Asked Questions

Q: How can I customize the context menu in Windows 10?

A: To customize the context menu, follow these steps:

  1. Open the Settings app.
  2. Navigate to Personalization > Themes > File Explorer.
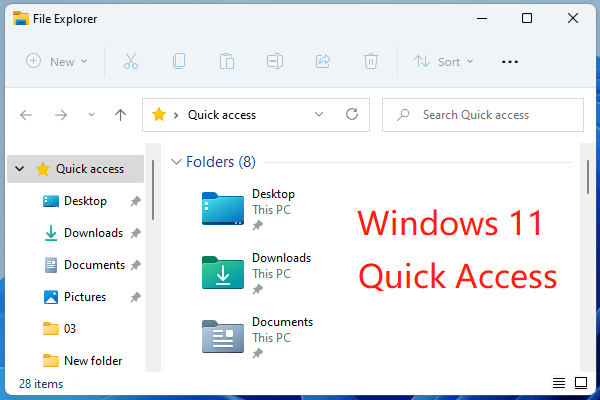
  3. Click on "Choose folders to show in Quick Access".
  4. Select or deselect the folders you want to appear in the context menu.

Q: How can I add third-party applications to the context menu?

A: Many third-party applications offer integration with the context menu. These applications typically provide instructions on how to add their options to the menu.

Q: Can I disable the context menu in Windows 10?

A: While you can’t completely disable the context menu, you can customize it by removing specific options. However, it is generally not recommended to disable the context menu as it offers significant functionality and accessibility benefits.

Tips for Optimizing Context Menu Usage

  • Explore the Options: Take the time to explore the different options available within the context menu. You might discover hidden features and functionalities that can enhance your workflow.
  • Utilize Keyboard Shortcuts: Many context menu options have associated keyboard shortcuts. Familiarizing yourself with these shortcuts can further streamline your interaction with the menu.
  • Customize for Your Needs: Use the customization features to tailor the context menu to your specific preferences and workflow.
  • Stay Informed: Keep an eye out for updates and new features related to the context menu. Windows 10 is constantly evolving, and new options and functionalities are frequently added.

Conclusion

The context menu is an integral part of the Windows 10 experience, offering a powerful and versatile tool for users of all levels. Its contextual nature, customizable options, and integration with third-party applications make it a valuable asset for enhancing productivity, improving user experience, and simplifying everyday tasks. By understanding its functionalities and utilizing its potential, users can unlock a new level of efficiency and control within the Windows 10 environment.

How To Customize The Context Menu In Windows 10 Right Click Menu - www.vrogue.co How To Customize The Right Click Context Menu In Wind - vrogue.co Edit, Add and Remove Items from the Windows Right Click Context Menu - YouTube
How To Customize The Context Menu In Windows 10 Right Click Menu - www.vrogue.co How to Customize the Right-click Menu on Windows 10  Beebom How to Customize the Right-click Menu on Windows 10 โ€“ Spyboy blog
How to enable Windows 10 right-click menu in Windows 11? - Technig Enable or disable right click context menus - Windows Explorer - YouTube

Closure

Thus, we hope this article has provided valuable insights into The Right-Click Revolution: Unveiling the Power of Windows 10’s Context Menus. We appreciate your attention to our article. See you in our next article!

Troubleshooting A Missing Second Monitor In Windows 11

Troubleshooting a Missing Second Monitor in Windows 11

Introduction

With great pleasure, we will explore the intriguing topic related to Troubleshooting a Missing Second Monitor in Windows 11. Let’s weave interesting information and offer fresh perspectives to the readers.

Troubleshooting a Missing Second Monitor in Windows 11

Windows 11 Not Detecting Second Monitor FIX  3 Methods - YouTube

The ability to utilize multiple monitors is a highly sought-after feature in modern computing, significantly enhancing productivity and user experience. However, encountering a situation where Windows 11 fails to detect a second monitor can be frustrating. This article aims to provide a comprehensive guide to troubleshooting this issue, covering a wide range of potential causes and solutions.

Understanding the Issue

Before delving into troubleshooting steps, it is essential to understand the underlying reasons why a second monitor may not be detected. The issue could stem from a variety of factors, including:

  • Hardware Problems: Faulty cables, loose connections, or malfunctioning hardware components can prevent the system from recognizing the second display.
  • Software Conflicts: Driver incompatibility, outdated software, or system settings can hinder the proper functioning of the display.
  • Operating System Errors: Windows 11 may encounter bugs or issues that prevent it from detecting and displaying on the second monitor.
  • Incorrect Configuration: Improper settings within the operating system or the graphics driver can lead to the display not being recognized.

Troubleshooting Steps

The following steps outline a systematic approach to diagnose and resolve the issue of a missing second monitor in Windows 11:

1. Verify Hardware Connections

  • Cable Integrity: Ensure the HDMI, DisplayPort, or VGA cable connecting the monitor to the computer is securely plugged into both ends. Check for any visible damage or loose connections.
  • Cable Compatibility: Confirm that the cable type matches the ports on both the monitor and the computer.
  • Monitor Power: Verify that the second monitor is powered on and receiving power.
  • Input Source: Select the correct input source on the monitor using the buttons on its control panel.

2. Update Graphics Drivers

  • Automatic Updates: Windows Update often automatically installs the latest graphics drivers. Check for updates by going to Settings > Windows Update > Check for updates.
  • Manual Updates: Visit the manufacturer’s website for your graphics card (e.g., NVIDIA, AMD, Intel) and download the latest drivers for your specific model and operating system.

3. Configure Display Settings

  • Detect Displays: Open Settings > System > Display. Click on Detect. This will attempt to identify any connected monitors.
  • Extend or Duplicate: Choose the desired display configuration. "Extend" allows you to use both monitors as one continuous workspace, while "Duplicate" mirrors the same content on both screens.
  • Resolution and Refresh Rate: Adjust the resolution and refresh rate settings for each monitor to ensure optimal performance.

4. Check for System Errors

  • Device Manager: Open Device Manager by searching for it in the Windows search bar. Expand the "Monitors" section. Look for any errors or exclamation marks next to the listed monitors.
  • Event Viewer: Access the Event Viewer by searching for it in the Windows search bar. Check for any error messages related to display drivers or hardware.

5. Troubleshoot Compatibility Issues

  • Disable Multiple Display Adapter: If your computer has multiple graphics cards, try disabling one to see if it resolves the issue.
  • Compatibility Mode: If you are using an older monitor, try running the display driver in compatibility mode. Right-click on the driver in Device Manager and select "Properties". Go to the "Compatibility" tab and select a previous version of Windows.

6. Reset Display Settings

  • System Settings: Navigate to Settings > System > Display. Click on "Advanced display settings" and then "Reset to default". This will revert the display settings to their original configuration.
  • Graphics Driver Settings: Open the control panel for your graphics card (e.g., NVIDIA Control Panel, AMD Radeon Software). Look for options to reset display settings or revert to default configurations.

7. Perform a Clean Boot

A clean boot starts Windows with a minimal set of drivers and programs, helping to identify software conflicts. Follow these steps:

  • System Configuration: Search for "msconfig" in the Windows search bar and open the System Configuration window.
  • Disable Startup Items: Navigate to the "Startup" tab and uncheck all the boxes.
  • Disable Services: Go to the "Services" tab and check the box for "Hide all Microsoft services". Click on "Disable all".
  • Restart: Restart the computer and see if the second monitor is detected.

8. Consider Hardware Issues

  • Monitor Test: Connect the monitor to a different computer to verify its functionality.
  • Cable Replacement: If the cable is suspected to be faulty, replace it with a new one.
  • Graphics Card Diagnosis: If other troubleshooting steps fail, consider testing the graphics card using a different computer or contacting a computer technician for diagnosis.

FAQs

Q: What if the second monitor is detected but not displaying anything?
A: This could indicate a problem with the monitor itself, a loose connection, or an incorrect input source selected on the monitor.

Q: Can I use a USB-C to HDMI adapter to connect the second monitor?
A: Yes, if your computer and monitor support USB-C and HDMI, respectively. However, ensure the adapter is of high quality and compatible with both devices.

Q: Why is the second monitor displaying at a lower resolution than the primary monitor?
A: The resolution of the second monitor might be limited by its capabilities or by the settings in the display settings.

Q: How do I ensure that my second monitor is the primary display?
A: In the Display settings, drag the icon representing the second monitor to the top of the list.

Tips

  • Check for updates: Regularly update both Windows 11 and your graphics drivers to ensure compatibility and stability.
  • Use a reliable cable: Invest in a high-quality HDMI or DisplayPort cable for a stable connection.
  • Monitor compatibility: Ensure the monitor is compatible with your computer’s graphics card and ports.
  • Avoid overloading the system: Too many connected devices can strain the system’s resources, potentially affecting display performance.

Conclusion

Resolving the issue of a missing second monitor in Windows 11 requires a systematic approach. By carefully checking hardware connections, updating drivers, and troubleshooting software conflicts, you can often restore the functionality of your dual-monitor setup. If all else fails, seeking professional assistance from a computer technician may be necessary to diagnose and repair any underlying hardware problems.

How To Fix Not Detecting Second Monitor On Windows 11 - YouTube How to fix Windows 11 Not Detecting Second Monitor (2023) How To Hide Taskbar On Second Monitor In Windows 11 Mashtips Want Move The Taskbar? Tough You
FIX! Not Detecting Second Monitor In Windows 11 - YouTube How to Fix Second Monitor Not Waking Up in Windows 11 - YouTube How To Fix Windows 11 Not Detecting Second Monitor 2022 (guide) - Vrogue
Fix Windows 11 Not Detecting Second Monitor (2022) - YouTube Troubleshooting Windows 11: Second Monitor Issues Explained - TechSynchron

Closure

Thus, we hope this article has provided valuable insights into Troubleshooting a Missing Second Monitor in Windows 11. We appreciate your attention to our article. See you in our next article!

Tailoring Windows 10: A Guide To Optional Features

Tailoring Windows 10: A Guide to Optional Features

Introduction

With enthusiasm, let’s navigate through the intriguing topic related to Tailoring Windows 10: A Guide to Optional Features. Let’s weave interesting information and offer fresh perspectives to the readers.

Tailoring Windows 10: A Guide to Optional Features

Microsoft to tailor Windows 10 setups based on how you use your PC

Windows 10, Microsoft’s flagship operating system, is renowned for its versatility and ability to adapt to diverse user needs. One key aspect of this adaptability lies in its optional features, allowing users to customize their experience and prioritize functionalities based on their specific requirements. These features, often overlooked, provide a valuable opportunity to streamline operations, enhance productivity, and personalize the Windows 10 environment.

Understanding Optional Features:

Optional features in Windows 10 are components that are not installed by default but can be added or removed at any time. They encompass a wide range of functionalities, from specialized tools for developers to enhancements for multimedia and gaming. This modular approach allows users to select only the features they need, minimizing resource consumption and streamlining performance.

Accessing and Managing Optional Features:

Windows 10 provides a user-friendly interface for managing optional features. To access this, navigate to Settings > Apps > Apps & features > Optional features. Here, users can view a list of available features, along with a brief description of their purpose. To add a feature, click on the "Add a feature" button and choose from the available options. Removal is similarly straightforward, with the option to uninstall features directly from the same interface.

Exploring Key Optional Features:

1. Windows Subsystem for Linux (WSL): This feature enables users to run Linux distributions directly within Windows 10, providing a seamless environment for developers and those who require Linux-specific tools. WSL allows for interoperability between Windows and Linux applications, making it a powerful tool for cross-platform development and system administration.

FAQs:

  • Q: What Linux distributions can I run with WSL?
    • A: WSL supports a wide range of popular Linux distributions, including Ubuntu, Debian, Fedora, and Kali Linux.
  • Q: Can I access Windows files from WSL?
    • A: Yes, WSL allows seamless access to Windows files and folders, enabling easy data sharing between the two environments.
  • Q: Is WSL suitable for gaming?
    • A: WSL is primarily designed for development and system administration tasks. While it can run some games, it is not a primary gaming platform.

Tips:

  • Install the latest version of WSL: Ensure you are running the most recent version of WSL for optimal performance and compatibility.
  • Utilize WSL for development: Leverage WSL’s strengths for cross-platform development, particularly when working with Linux-specific tools and libraries.
  • Explore WSL’s features: Experiment with WSL’s advanced features, such as the ability to run graphical applications and access Windows services.

2. .NET Desktop Development: This optional feature provides a framework for building desktop applications using the .NET platform. It includes tools and libraries for developing user interfaces, managing data, and interacting with system resources. This feature is essential for developers who specialize in creating desktop applications for Windows.

FAQs:

  • Q: What programming languages can I use with .NET Desktop Development?
    • A: .NET Desktop Development supports various programming languages, including C#, Visual Basic, and F#.
  • Q: Can I create web applications with .NET Desktop Development?
    • A: While .NET Desktop Development is primarily focused on desktop applications, it can be used to create web applications using ASP.NET Core.
  • Q: What are the benefits of using .NET Desktop Development?
    • A: .NET Desktop Development offers a robust and mature framework for building high-quality desktop applications with a wide range of features and capabilities.

Tips:

  • Utilize Visual Studio: Visual Studio provides a comprehensive IDE for .NET development, offering debugging tools, code completion, and project management capabilities.
  • Explore .NET libraries: Discover the extensive collection of .NET libraries available for various tasks, including data access, networking, and UI development.
  • Stay updated with .NET releases: Keep your .NET framework and tools up-to-date to benefit from new features and security patches.

3. Windows Sandbox: This feature allows users to create isolated virtual environments, providing a secure and controlled space for testing applications or running untrusted software. Windows Sandbox ensures that any changes made within the sandbox environment do not affect the host operating system, protecting the user’s data and system stability.

FAQs:

  • Q: What are the limitations of Windows Sandbox?
    • A: Windows Sandbox is limited to running applications and does not support installing operating systems or persistent data storage.
  • Q: Can I use Windows Sandbox for gaming?
    • A: Windows Sandbox is not suitable for gaming due to its performance limitations and lack of support for graphics-intensive applications.
  • Q: How do I configure Windows Sandbox?
    • A: Windows Sandbox can be configured using the Windows Settings app, allowing users to adjust memory allocation and other parameters.

Tips:

  • Use Windows Sandbox for testing: Leverage Windows Sandbox for safely testing potentially unsafe applications or experimenting with new software without affecting your main system.
  • Explore Windows Sandbox features: Discover the various features of Windows Sandbox, such as the ability to copy and paste files between the sandbox and host system.
  • Utilize Windows Sandbox for education: Use Windows Sandbox for educational purposes, allowing students to explore software or operating systems in a safe and controlled environment.

4. Windows Media Player: This optional feature provides a built-in media player for playback of audio and video files. Windows Media Player supports a wide range of formats, including MP3, WMA, WAV, AVI, and MP4. It also offers features such as playlist creation, volume control, and equalizer settings.

FAQs:

  • Q: What media formats does Windows Media Player support?
    • A: Windows Media Player supports a variety of audio and video formats, including MP3, WMA, WAV, AVI, and MP4.
  • Q: Can I create playlists with Windows Media Player?
    • A: Yes, Windows Media Player allows users to create and manage playlists for easy access to their favorite media files.
  • Q: Can I adjust audio settings with Windows Media Player?
    • A: Windows Media Player provides an equalizer and other audio settings for customization of sound output.

Tips:

  • Use Windows Media Player for basic playback: Windows Media Player is suitable for basic playback of audio and video files.
  • Explore third-party media players: For advanced features and customization, consider using third-party media players like VLC or Kodi.
  • Utilize Windows Media Player’s features: Explore Windows Media Player’s built-in features, such as playlist creation and audio settings, for a more personalized experience.

5. Microsoft Print to PDF: This optional feature allows users to print documents and web pages to PDF format, providing a convenient way to create and share digital copies. It eliminates the need for dedicated PDF printing software and integrates seamlessly with the Windows printing system.

FAQs:

  • Q: How do I use Microsoft Print to PDF?
    • A: To use Microsoft Print to PDF, simply select it as the printer when printing a document or web page.
  • Q: What are the benefits of using Microsoft Print to PDF?
    • A: Microsoft Print to PDF is a convenient and integrated solution for creating and sharing digital copies of documents and web pages.
  • Q: Can I customize PDF settings with Microsoft Print to PDF?
    • A: Microsoft Print to PDF allows users to adjust basic PDF settings, such as page size and orientation.

Tips:

  • Utilize Microsoft Print to PDF for digital copies: Use Microsoft Print to PDF to create digital copies of documents and web pages for sharing or archiving.
  • Explore other PDF creation tools: For advanced PDF editing and conversion capabilities, consider using dedicated PDF software like Adobe Acrobat.
  • Integrate Microsoft Print to PDF with other applications: Explore options for integrating Microsoft Print to PDF with other applications for automated PDF creation.

6. Xbox Game Bar: This optional feature provides a dedicated overlay for accessing gaming-related features and functionalities within Windows 10. It includes tools for capturing screenshots and videos, monitoring system performance, and accessing social features.

FAQs:

  • Q: How do I access Xbox Game Bar?
    • A: Xbox Game Bar can be accessed by pressing the Windows key + G while playing a game.
  • Q: What features does Xbox Game Bar offer?
    • A: Xbox Game Bar provides features for capturing screenshots and videos, monitoring system performance, and accessing social features.
  • Q: Is Xbox Game Bar compatible with all games?
    • A: Xbox Game Bar is compatible with most games on Windows 10. However, some games may have limitations or require specific settings.

Tips:

  • Utilize Xbox Game Bar for game recording: Use Xbox Game Bar’s recording features to capture gameplay moments or create video content.
  • Customize Xbox Game Bar settings: Adjust Xbox Game Bar’s settings to suit your preferences, including the display of performance overlays and social features.
  • Explore Xbox Game Bar’s features: Discover the full range of features offered by Xbox Game Bar, including the ability to control music playback and manage notifications.

7. Developer Mode: This feature unlocks advanced development tools and settings, allowing developers to test and debug applications in a more comprehensive environment. It provides access to features like debugging tools, device management, and advanced system settings.

FAQs:

  • Q: What are the risks of enabling Developer Mode?
    • A: Enabling Developer Mode may increase the risk of security vulnerabilities and system instability, as it allows for more access to system settings.
  • Q: How do I enable Developer Mode?
    • A: Developer Mode can be enabled through the Windows Settings app under the "For developers" section.
  • Q: What are the benefits of enabling Developer Mode?
    • A: Developer Mode provides access to advanced development tools and settings, enabling developers to test and debug applications in a more comprehensive environment.

Tips:

  • Enable Developer Mode only when necessary: Only enable Developer Mode when actively developing applications, as it may increase security risks.
  • Utilize Developer Mode’s features: Explore the various features and tools available in Developer Mode for advanced application development and debugging.
  • Disable Developer Mode when finished: Once development tasks are complete, disable Developer Mode to minimize security risks and maintain system stability.

Conclusion:

Optional features in Windows 10 empower users to tailor their operating system experience to their specific needs. By understanding and leveraging these features, users can optimize performance, enhance productivity, and personalize their Windows 10 environment. Whether it’s running Linux distributions, developing desktop applications, or exploring gaming features, optional features provide a valuable toolkit for customizing and enhancing the Windows 10 experience.

How to Manage Optional Features in Windows 10 [Tutorial] - YouTube Manage Optional Features in Windows 10 How to Install and Uninstall Windows 10 optional features?  RouterUnlock.com
Windows 10 Optional Features explained โ€“ BENISNOUS How to manage Windows 10's many 'optional features'  Windows Central Manage Optional Features in Windows 10  Tutorials
How to manage Windows 10's many 'optional features'  Windows Central How to manage Windows 10's many 'optional features'  Windows Central

Closure

Thus, we hope this article has provided valuable insights into Tailoring Windows 10: A Guide to Optional Features. We appreciate your attention to our article. See you in our next article!

Project IGI 3: A Long-Awaited Sequel For Windows 10

Project IGI 3: A Long-Awaited Sequel for Windows 10

Introduction

With enthusiasm, let’s navigate through the intriguing topic related to Project IGI 3: A Long-Awaited Sequel for Windows 10. Let’s weave interesting information and offer fresh perspectives to the readers.

Project IGI 3: A Long-Awaited Sequel for Windows 10

Download Project IGI for Windows 10, 8, 7 (2020 Latest)

Project IGI, a first-person shooter franchise known for its intense gameplay and gripping espionage narratives, holds a special place in the hearts of gamers. While the first two installments, Project IGI and Project IGI 2: Covert Strike, achieved significant popularity, the release of a third installment remained a long-awaited dream for many.

Despite the absence of an official Project IGI 3 from the developers, the community’s desire for a continuation has led to the emergence of unofficial projects and fan-made versions. These projects, while not officially endorsed by the original developers, offer a glimpse into the world of Project IGI on modern platforms like Windows 10.

Exploring the Unofficial Realm of Project IGI 3

The absence of an official Project IGI 3 has not deterred the passionate community from exploring alternative avenues. Several unofficial projects have emerged, each attempting to capture the essence of the original games and bring them to modern systems.

  • Project IGI 3: The Resurrection: This project, developed by a group of dedicated fans, aims to recreate the gameplay and atmosphere of the original Project IGI games. It features updated graphics, enhanced gameplay mechanics, and a new story that continues the legacy of the franchise.

  • Project IGI 3: The Legacy: This project takes a different approach, focusing on creating a standalone game that pays homage to the original series. It features a new protagonist, a unique story, and a variety of gameplay mechanics inspired by the classic Project IGI games.

Understanding the Challenges and Considerations

While these unofficial projects offer exciting possibilities for fans, it’s crucial to understand the complexities involved:

  • Legality and Copyright: These projects operate in a gray area regarding copyright and intellectual property. Using assets from the original games without permission from the developers can raise legal issues.

  • Quality and Stability: The quality and stability of these unofficial projects can vary significantly. While some projects demonstrate impressive technical capabilities, others may suffer from bugs, glitches, or incomplete features.

  • Lack of Official Support: These projects lack official support from the original developers. This means players might encounter difficulties with compatibility, updates, or bug fixes.

Navigating the Download Process

If you’re interested in exploring these unofficial projects, it’s crucial to proceed with caution. Downloading and installing them requires careful consideration:

  • Reliable Sources: Only download projects from reputable sources. Avoid suspicious websites or torrents, as they might contain malware or viruses.

  • Compatibility: Ensure the project is compatible with your Windows 10 system. Check the project’s website or forums for system requirements.

  • Backup: Always back up your system before installing any unofficial software. This will help you restore your computer if any issues arise.

FAQs: Addressing Common Concerns

Q: Is Project IGI 3 officially available for Windows 10?

A: No, there is no official Project IGI 3 released by the original developers. The projects available for download are unofficial and developed by fans.

Q: Are these unofficial projects safe to download?

A: Only download projects from reputable sources. Be cautious of suspicious websites or torrents, as they might contain malware or viruses.

Q: What are the system requirements for these unofficial projects?

A: System requirements vary depending on the specific project. Check the project’s website or forums for detailed information.

Q: Can I play these unofficial projects online with friends?

A: Most unofficial projects do not offer online multiplayer functionality.

Tips for Enjoying the Unofficial Project IGI 3 Experience

  • Research Thoroughly: Spend time researching the different unofficial projects and their features. Read reviews and forum discussions to gain insights into their quality and stability.

  • Manage Expectations: Understand that these projects are unofficial and may not meet the expectations of a professionally developed game.

  • Be Patient: Unofficial projects are often developed by passionate individuals in their free time. Be patient and understand that progress may be slow.

Conclusion: The Unofficial Legacy of Project IGI

While an official Project IGI 3 remains elusive, the unofficial projects demonstrate the enduring appeal of the franchise. These projects offer fans a chance to revisit the world of Project IGI on modern platforms, albeit with inherent limitations and risks. As the community continues to explore and develop these unofficial projects, the legacy of Project IGI will continue to thrive, albeit in an unofficial and evolving form.

Project IGI 3 Official World Premiere Gameplay Trailer - YouTube Project IGI 3 Official PC Game Free Download Here - GDV Project IGI 3 PC Game Download Free Full Version ISO Official  Pc games download, Game download
IGI 3 Game Download For PC [2023] Project Igi 3 Download For Windows 10 LATEST REGISTERED FULL VERSION SOFTWARES DOWNLOAD FREE: Project IGI 3 The Plan Full PC Game
Project IGI 3 Download For PC (Windows 7/10) Project IGI 3 image - IndieDB

Closure

Thus, we hope this article has provided valuable insights into Project IGI 3: A Long-Awaited Sequel for Windows 10. We hope you find this article informative and beneficial. See you in our next article!

O&O ShutUp10: A Comprehensive Guide To Enhanced Windows 11 Privacy And Performance

O&O ShutUp10: A Comprehensive Guide to Enhanced Windows 11 Privacy and Performance

Introduction

With enthusiasm, let’s navigate through the intriguing topic related to O&O ShutUp10: A Comprehensive Guide to Enhanced Windows 11 Privacy and Performance. Let’s weave interesting information and offer fresh perspectives to the readers.

O&O ShutUp10: A Comprehensive Guide to Enhanced Windows 11 Privacy and Performance

O&O ShutUp10 + Recommended Settings To Use on Windows 11 & 10 on 2023 for PC Guide + download

In the ever-evolving landscape of personal computing, user privacy and system performance remain paramount concerns. While Windows 11 offers a wealth of features and functionality, it also comes with a degree of built-in telemetry and data collection practices that may raise privacy concerns for some users. This is where O&O ShutUp10 emerges as a valuable tool, empowering users to regain control over their data and optimize their Windows 11 experience.

Understanding the Need for Privacy Control

Windows 11, like its predecessors, employs various methods to gather user data. This data collection, often referred to as telemetry, is used to improve system performance, personalize user experiences, and enhance security. However, the extent of this data collection can be a source of discomfort for users who prioritize privacy.

O&O ShutUp10 addresses this concern by providing a user-friendly interface to disable or restrict specific data collection practices. This allows users to tailor their privacy settings to their individual preferences, ensuring that only the necessary data is transmitted.

The Power of O&O ShutUp10

O&O ShutUp10 is a free and easy-to-use application designed to enhance user privacy and control within Windows 11. It operates by disabling or modifying specific Windows settings that are associated with data collection, telemetry, and other potentially intrusive features.

Key Features of O&O ShutUp10

  • Disabling Telemetry: O&O ShutUp10 allows users to disable various telemetry components, including the collection of usage data, error reporting, and diagnostic information. This minimizes the amount of data sent to Microsoft servers, enhancing user privacy.

  • Restricting Location Tracking: The tool provides options to disable location tracking services, preventing Windows from collecting and transmitting information about the user’s physical location.

  • Blocking Advertising: O&O ShutUp10 can disable personalized advertising, preventing targeted ads based on user browsing history and preferences.

  • Optimizing System Performance: By disabling unnecessary background processes and services, O&O ShutUp10 can contribute to improved system performance, especially on older or resource-constrained devices.

  • Customizable Settings: The application offers a wide range of customizable options, allowing users to fine-tune their privacy settings to their specific needs.

Using O&O ShutUp10 Effectively

O&O ShutUp10 is designed to be user-friendly and intuitive. Its straightforward interface makes it easy for users of all levels of technical expertise to navigate and customize their privacy settings.

  1. Download and Install: Download the latest version of O&O ShutUp10 from the official website and install it on your Windows 11 computer.

  2. Run the Application: Launch the O&O ShutUp10 application and review the available settings.

  3. Configure Settings: Use the provided checkboxes and sliders to enable or disable specific settings according to your preferences.

  4. Apply Changes: Once you have made your desired changes, click the "Apply" button to save your settings.

Benefits of Using O&O ShutUp10

  • Enhanced Privacy: O&O ShutUp10 empowers users to regain control over their data and minimize the amount of information shared with Microsoft.

  • Improved System Performance: By disabling unnecessary processes and services, the tool can contribute to smoother system operation and faster performance.

  • Personalized Customization: O&O ShutUp10 allows users to tailor their privacy settings to their specific needs and preferences.

Important Considerations

While O&O ShutUp10 offers significant benefits, it’s essential to understand its potential limitations and risks:

  • Potential Compatibility Issues: Disabling certain Windows features might cause compatibility issues with specific applications or system functions.

  • Security Concerns: It’s crucial to download and install O&O ShutUp10 from a trusted source to avoid malicious software.

  • Reverting Changes: If you encounter any issues or prefer to revert to default settings, O&O ShutUp10 provides options to undo changes.

FAQs

1. Is O&O ShutUp10 Safe to Use?

O&O ShutUp10 is generally considered safe to use, but it’s important to download it from a trusted source. Always verify the source of any software you download and install.

2. Does O&O ShutUp10 Affect System Stability?

While disabling certain features might affect system stability in some cases, O&O ShutUp10 allows users to revert changes and restore default settings.

3. Can I Use O&O ShutUp10 with Other Privacy Tools?

Yes, O&O ShutUp10 can be used alongside other privacy tools, but it’s important to ensure that they don’t conflict with each other.

4. Is O&O ShutUp10 Compatible with All Versions of Windows 11?

O&O ShutUp10 is specifically designed for Windows 11, but it’s always advisable to check for compatibility updates on the official website.

Tips for Using O&O ShutUp10

  • Start with Default Settings: Begin with the default settings and gradually adjust them based on your needs.

  • Research Settings: Before disabling any feature, take time to understand its purpose and potential impact on system functionality.

  • Create a System Restore Point: Before making significant changes, create a system restore point to easily revert to a previous state if necessary.

  • Monitor System Performance: After making changes, monitor your system’s performance to identify any potential issues.

Conclusion

O&O ShutUp10 presents a powerful and user-friendly solution for enhancing privacy and optimizing system performance in Windows 11. By providing control over data collection and unnecessary background processes, the tool empowers users to tailor their Windows experience to their specific needs and preferences. While it’s essential to exercise caution and understand the potential risks, O&O ShutUp10 remains a valuable tool for users who prioritize privacy and performance in their computing environment.

O&O ShutUp10++: For Windows 10 & 11, with Dark Mode - YouTube O&O ShutUp10++ Review: How to Improve Windows Privacy with One Click Improve your privacy with O&O ShutUp10++ for Windows 11 - gHacks Tech News
O&O ShutUp10++ : outil antispy gratuit pour Windows 10/11 - malekal.com O&O ShutUp10 ++ - Windows 11 gizlilik koruma aracฤฑ O&O ShutUp10++: Antispy-Tool fรผr Windows 11 verfรผgbar
O&O Shutup10++: Enhances Your Windows 11/10 Privacy NEW: O&O ShutUp10++ (Version 1.9.1424) for Windows 10 & 11! Numerous Windows 11 Settings and

Closure

Thus, we hope this article has provided valuable insights into O&O ShutUp10: A Comprehensive Guide to Enhanced Windows 11 Privacy and Performance. We hope you find this article informative and beneficial. See you in our next article!

Navigating The "OOBE Bypass NRO Not Recognized" Error In Windows 10: A Comprehensive Guide

Navigating the "OOBE Bypass NRO Not Recognized" Error in Windows 10: A Comprehensive Guide

Introduction

With great pleasure, we will explore the intriguing topic related to Navigating the "OOBE Bypass NRO Not Recognized" Error in Windows 10: A Comprehensive Guide. Let’s weave interesting information and offer fresh perspectives to the readers.

How do I fix Oobesettings error in Windows 10? โ€“ Depot Catalog

The "OOBE Bypass NRO Not Recognized" error encountered during Windows 10 installation can be a frustrating obstacle for users. This error typically occurs when the system is unable to locate or access the necessary files required to complete the Out-of-Box Experience (OOBE) process. This guide aims to provide a comprehensive understanding of this error, its causes, and effective solutions.

Understanding the OOBE Process and its Importance

The Out-of-Box Experience (OOBE) is a crucial stage in the Windows 10 installation process. It guides users through the initial setup, including language selection, region settings, network configuration, and account creation. This process ensures a smooth and personalized user experience.

Causes of the "OOBE Bypass NRO Not Recognized" Error

The error message "OOBE Bypass NRO Not Recognized" can stem from a variety of factors, including:

  • Corrupted Installation Media: Damaged or incomplete installation files can lead to missing or corrupted components, including the NRO (Network Registration Object) file, which is vital for network connectivity during OOBE.
  • Faulty Hardware: Issues with hard drives, RAM, or other hardware components can hinder the installation process and trigger this error.
  • Conflicting Software: Pre-existing software on the system, especially antivirus programs, can interfere with the installation process and cause the error.
  • Incorrect Boot Order: An improper boot order in the BIOS/UEFI settings can prevent the system from accessing the installation media correctly.
  • Unsupported Hardware: The system may lack the necessary drivers or compatibility for certain hardware components, leading to errors during installation.
  • Outdated BIOS/UEFI: An outdated BIOS/UEFI firmware can lead to compatibility issues with the Windows 10 installation.

Troubleshooting Strategies for Resolving the Error

Addressing the "OOBE Bypass NRO Not Recognized" error requires a systematic approach. Here’s a breakdown of potential solutions:

1. Verify Installation Media Integrity:

  • Using a Different Installation Media: If possible, try using a different installation DVD or USB drive to eliminate the possibility of corrupted files.
  • Verifying the Integrity of the Installation Media: If using a USB drive, ensure the installation files are properly copied and not corrupted. Consider verifying the integrity of the installation media using a tool like "7-Zip" or "WinRAR" to ensure all files are present and undamaged.

2. Check Hardware Functionality:

  • Run Memory Tests: Use a memory testing tool, such as "Memtest86+", to check for RAM errors.
  • Inspect Hard Drive Health: Use tools like "CrystalDiskInfo" or "HD Tune" to check for hard drive errors or potential failures.
  • Verify Hardware Compatibility: Ensure that the system hardware meets the minimum system requirements for Windows 10.

3. Resolve Software Conflicts:

  • Disable Antivirus Programs: Temporarily disable any antivirus software installed on the system during the installation process.
  • Uninstall Conflicting Software: Remove any potentially conflicting programs that might interfere with the installation.

4. Adjust Boot Order:

  • Access the BIOS/UEFI Settings: During system startup, press the appropriate key (usually F2, F10, or Del) to access the BIOS/UEFI settings.
  • Prioritize Boot Device: Ensure that the installation media (DVD or USB drive) is listed as the primary boot device in the boot order settings.

5. Update BIOS/UEFI Firmware:

  • Download the Latest BIOS/UEFI Update: Visit the manufacturer’s website and download the latest BIOS/UEFI update for the motherboard.
  • Flash the BIOS/UEFI: Follow the manufacturer’s instructions carefully to flash the BIOS/UEFI update.

6. Utilize Advanced Troubleshooting Options:

  • Boot into Safe Mode: Attempting to install Windows 10 in Safe Mode can sometimes resolve the issue by minimizing software interference.
  • Perform a Clean Install: If all else fails, consider performing a clean installation of Windows 10. This involves formatting the hard drive and reinstalling the operating system from scratch.

FAQs

Q: Can I bypass the OOBE process entirely?

A: While bypassing the OOBE process is possible, it’s generally not recommended. The OOBE process is designed to configure essential settings, personalize your experience, and ensure a smooth transition to Windows 10. Bypassing it can lead to issues with network connectivity, account setup, and overall system stability.

Q: Is there a way to fix the "OOBE Bypass NRO Not Recognized" error without reinstalling Windows?

A: While reinstalling Windows is often the most effective solution, certain troubleshooting steps, like verifying installation media integrity, checking hardware functionality, or disabling conflicting software, might resolve the issue without a full reinstall.

Q: Why is the "OOBE Bypass NRO Not Recognized" error occurring on a brand new computer?

A: This error can occur on a brand new computer due to issues with the installation media, faulty hardware, or even incorrect BIOS/UEFI settings. It’s important to carefully check these aspects before resorting to a clean installation.

Tips

  • Create a System Backup: Before attempting any troubleshooting steps, it’s essential to create a backup of your important data to avoid losing information.
  • Consult Manufacturer Documentation: Refer to the manufacturer’s website or documentation for specific instructions and troubleshooting tips related to your system model.
  • Seek Professional Assistance: If you’re unable to resolve the error after trying these solutions, consider seeking assistance from a qualified technician.

Conclusion

The "OOBE Bypass NRO Not Recognized" error can be a frustrating obstacle, but with a systematic approach and careful troubleshooting, it’s often possible to resolve the issue. By understanding the causes, implementing the appropriate solutions, and seeking professional help when necessary, users can overcome this error and successfully install Windows 10.

Error OOBEKEYBOARD, OOBELOCAL, OOBEREGION In Windows 10 - How To Fix How to Fix Windows 10 Repairing Disk Errors: The Comprehensive Guide - William Donut Fix Windows 10/11 Guest OOBEKEYBOARD, OOBELOCAL, OOBEREGION Errors in VirtualBox - YouTube
How to fix OOBEEULA error in Windows? How to bypass internet connection to install Windows 11 Fix OOBEKEYBOARD, OOBELOCAL, OOBEREGION Errors on Windows 11 or 10 - YouTube
4 Tricks to Install Windows 11 without Microsoft Account "Fixing 'Boot Device Not Found' Error on Windows 10: A Comprehensive Guide" - DC.iNet

Closure

Thus, we hope this article has provided valuable insights into Navigating the "OOBE Bypass NRO Not Recognized" Error in Windows 10: A Comprehensive Guide. We appreciate your attention to our article. See you in our next article!

The Unsung Heroes Of Connectivity: Understanding Network Adapter Drivers In Windows 10

The Unsung Heroes of Connectivity: Understanding Network Adapter Drivers in Windows 10

Introduction

With great pleasure, we will explore the intriguing topic related to The Unsung Heroes of Connectivity: Understanding Network Adapter Drivers in Windows 10. Let’s weave interesting information and offer fresh perspectives to the readers.

The Unsung Heroes of Connectivity: Understanding Network Adapter Drivers in Windows 10

Network adapter driver windows 10 - unionholoser

In the digital age, connectivity is paramount. We rely on our computers to seamlessly access the internet, share files, and communicate with others. While users often focus on the applications and websites they interact with, a crucial layer of technology often goes unnoticed: network adapter drivers. These seemingly mundane pieces of software act as the bridge between our physical hardware and the digital world, enabling smooth and reliable network communication.

The Role of Network Adapter Drivers: A Bridge Between Hardware and Software

Network adapter drivers are essential software components that facilitate communication between a computer’s network adapter and the operating system. Network adapters, also known as network interface cards (NICs), are physical components responsible for sending and receiving data over a network. They can be built into the motherboard, connected via PCI slots, or even integrated into external devices like USB dongles.

Imagine a network adapter as a translator, understanding the language of electrical signals sent and received over a network cable. The driver acts as an interpreter, translating this language into a format the operating system can understand and vice versa. This translation is vital for ensuring data packets are correctly sent, received, and processed by the computer.

Beyond Basic Functionality: The Benefits of Up-to-Date Drivers

While network adapter drivers are essential for basic network functionality, their role extends beyond simply connecting to a network. Modern drivers often incorporate features that enhance performance, security, and compatibility. Here are some key benefits of utilizing updated drivers:

1. Enhanced Network Performance:

  • Optimized Data Transmission: Drivers can optimize data transmission speeds by adjusting various parameters, such as packet size and transmission rate, based on the specific network adapter and network environment.
  • Improved Bandwidth Utilization: Modern drivers can effectively manage bandwidth allocation, ensuring efficient data flow and minimizing network congestion.
  • Reduced Latency: Drivers play a crucial role in minimizing latency, the time delay between sending and receiving data. This is particularly important for tasks like online gaming and video conferencing where real-time communication is crucial.

2. Enhanced Security:

  • Vulnerability Mitigation: Drivers can be updated to address security vulnerabilities discovered in older versions. This is crucial for protecting against malicious attacks that could exploit outdated drivers to gain unauthorized access to the system.
  • Advanced Security Features: Some drivers incorporate advanced security features, such as network traffic filtering and intrusion detection, to further enhance network security.

3. Improved Compatibility and Stability:

  • Support for New Standards: Updated drivers ensure compatibility with new networking standards, enabling access to faster and more efficient network technologies.
  • Hardware Optimization: Drivers are designed to work seamlessly with specific network adapters, ensuring optimal performance and stability.
  • Software Compatibility: Updated drivers can improve compatibility with new software applications that utilize network connectivity, ensuring smooth integration and functionality.

Understanding the Importance of Driver Updates

Regularly updating network adapter drivers is crucial for maintaining optimal network performance, security, and stability. Outdated drivers can lead to various issues, including:

  • Slow Network Speeds: Outdated drivers may not be optimized for current network technologies, resulting in slow data transfer speeds and network lag.
  • Connectivity Issues: Drivers can become incompatible with new network hardware or software, leading to connectivity problems and network outages.
  • Security Vulnerabilities: Outdated drivers can contain security vulnerabilities that attackers can exploit to gain access to the system and steal data.
  • System Instability: Outdated drivers can cause system instability, leading to crashes, freezes, and other performance issues.

Finding and Installing Network Adapter Drivers

Windows 10 automatically installs and updates drivers for many devices, including network adapters. However, manually updating drivers can offer several advantages:

  • Access to Latest Features: Manually updating drivers allows access to the latest features and improvements that may not be included in automatic updates.
  • Troubleshooting Compatibility Issues: Manually installing drivers can help resolve compatibility issues that may arise with automatic updates.
  • Customization Options: Some drivers offer customization options that allow users to fine-tune network settings for specific applications or network environments.

There are several ways to find and install network adapter drivers:

1. Device Manager:

  • Open Device Manager by searching for it in the Windows search bar.
  • Expand the "Network adapters" category to view your installed network adapters.
  • Right-click on the desired network adapter and select "Update driver."
  • Windows will automatically search for and install the latest driver.

2. Manufacturer’s Website:

  • Visit the website of the network adapter manufacturer (e.g., Intel, Realtek, Broadcom).
  • Navigate to the support or downloads section.
  • Search for the specific network adapter model and download the latest driver.
  • Follow the installation instructions provided by the manufacturer.

3. Third-Party Driver Update Utilities:

  • Several third-party driver update utilities can automatically scan your system for outdated drivers and provide updated versions.
  • Popular options include Driver Easy, Driver Booster, and Snappy Driver Installer.
  • Use these utilities with caution, as they may install unwanted software or potentially harmful drivers.

FAQs about Network Adapter Drivers in Windows 10

1. How do I know if my network adapter driver is outdated?

You can check for outdated drivers by:

  • Device Manager: In Device Manager, check for a yellow exclamation mark next to your network adapter. This indicates a driver issue.
  • Network Performance: If you experience slow network speeds, frequent disconnections, or other network connectivity issues, it may indicate an outdated driver.
  • Manufacturer’s Website: Visit the manufacturer’s website for your network adapter to check for available updates.

2. Is it safe to update network adapter drivers?

Generally, updating network adapter drivers is safe and recommended. However, it’s always best to download drivers from trusted sources, such as the manufacturer’s website. Avoid using untrusted sources or third-party utilities that may install malicious drivers.

3. What if I encounter problems after updating the driver?

If you experience issues after updating the driver, you can:

  • Uninstall the new driver: In Device Manager, right-click on the network adapter and select "Uninstall device." Then, restart your computer, and Windows will automatically reinstall the previous driver.
  • Reinstall the driver: Download the driver again from the manufacturer’s website and reinstall it.
  • Rollback the driver: In Device Manager, right-click on the network adapter, select "Properties," go to the "Driver" tab, and click "Roll Back Driver." This will revert to the previous driver version.

4. Can I disable the network adapter driver?

Disabling the network adapter driver will prevent your computer from accessing the network. This may be necessary for troubleshooting purposes or if the driver is causing issues. To disable the driver, open Device Manager, right-click on the network adapter, and select "Disable device."

5. How often should I update network adapter drivers?

It’s generally recommended to update network adapter drivers regularly, at least once every few months. However, you should also update drivers when new versions are released by the manufacturer, especially if you experience network connectivity issues or security vulnerabilities are discovered.

Tips for Managing Network Adapter Drivers in Windows 10

  • Keep Windows Updated: Regularly updating Windows ensures that you have the latest drivers and security patches for your network adapter.
  • Monitor Network Performance: Pay attention to network performance and check for any signs of slow speeds, disconnections, or other issues that might indicate outdated drivers.
  • Back Up Your Drivers: Before installing new drivers, it’s always a good idea to back up your current drivers. This allows you to easily revert to the previous version if you encounter any problems.
  • Use Trusted Sources: Download drivers only from trusted sources, such as the manufacturer’s website. Avoid using untrusted websites or third-party utilities that may install malicious drivers.
  • Consult Manufacturer Documentation: If you encounter any issues with network adapter drivers, refer to the manufacturer’s documentation for troubleshooting tips and support.

Conclusion: The Vital Role of Network Adapter Drivers in Windows 10

Network adapter drivers are often overlooked but play a crucial role in enabling seamless and reliable network communication. By ensuring that drivers are up-to-date, users can enjoy enhanced network performance, improved security, and greater compatibility with new technologies. Regularly updating drivers, monitoring network performance, and using trusted sources are essential for maintaining a stable and secure network connection. While these drivers may operate in the background, their importance in the digital age cannot be overstated. They are the unsung heroes of connectivity, facilitating the smooth flow of information that powers our modern world.

Windows 10: Update Network Adapter Drivers - GROK Knowledge Base Adapters: The Unsung Heroes of Connectivity โ€“ Adapter Academy Ethernet Adapter Driver Windows 10
Windows 10: Update Network Adapter Drivers - GROK Knowledge Base How to Update Network Adapter Driver Windows 11/10 How to install a network adapter driver windows 10 - spherekurt
How to install network adapter driver windows 10 - wellmusli How to Manually Install Intelยฎ Network Adapter Drivers in Windows*

Closure

Thus, we hope this article has provided valuable insights into The Unsung Heroes of Connectivity: Understanding Network Adapter Drivers in Windows 10. We hope you find this article informative and beneficial. See you in our next article!

Navigating Windows 11 With Ease: A Comprehensive Guide To The Quick Access Feature

Navigating Windows 11 with Ease: A Comprehensive Guide to the Quick Access Feature

Introduction

In this auspicious occasion, we are delighted to delve into the intriguing topic related to Navigating Windows 11 with Ease: A Comprehensive Guide to the Quick Access Feature. Let’s weave interesting information and offer fresh perspectives to the readers.

How To Enable Or Disable Quick Access Feature In Windows 11

Windows 11, with its redesigned interface and enhanced functionality, offers users a plethora of tools to streamline their workflow. Among these, the Quick Access feature stands out as a valuable asset for navigating frequently used files and folders with remarkable efficiency. This article delves into the intricacies of Quick Access, exploring its purpose, benefits, and practical applications, providing a comprehensive understanding of this powerful tool.

Understanding the Essence of Quick Access

Quick Access, previously known as "Recent Files" in earlier Windows versions, serves as a central hub for accessing recently used files and folders. Its core function lies in providing a readily available gateway to frequently accessed content, eliminating the need for extensive navigation through folders and directories. This streamlined approach significantly enhances productivity, particularly for users who regularly work with specific files or folders.

The Benefits of Quick Access

The advantages of utilizing Quick Access are manifold, contributing to a smoother and more efficient user experience:

  • Enhanced Productivity: By eliminating the need to navigate through complex file structures, Quick Access saves valuable time and effort, allowing users to focus on their tasks rather than searching for files.
  • Streamlined Workflow: Quick Access centralizes access to frequently used files and folders, creating a cohesive and organized workflow.
  • Improved Organization: The feature fosters a sense of organization by presenting a curated list of recently accessed files, making it easier to locate and manage important content.
  • Seamless Integration: Quick Access seamlessly integrates with other Windows features, such as File Explorer, making it a natural extension of the operating system.
  • Personalized Experience: Users can customize Quick Access to suit their specific needs, choosing which folders are displayed and how they are arranged.

Exploring the Functionality of Quick Access

Quick Access is accessed through the File Explorer window, prominently displayed on the left pane. It presents a list of recently accessed files and folders, categorized into two sections:

  • Recent Files: This section displays a list of the most recently opened files, regardless of their location.
  • Frequent Folders: This section showcases frequently accessed folders, providing a quick shortcut to commonly used directories.

Customization and Control: Tailoring Quick Access to Your Needs

While Quick Access offers a convenient default configuration, users have the flexibility to customize it to meet their specific requirements:

  • Pinning Folders: Users can pin frequently used folders to the Quick Access list, ensuring their constant visibility and accessibility.
  • Removing Items: Unwanted files or folders can be easily removed from the Quick Access list by right-clicking and selecting the "Remove from Quick Access" option.
  • Clearing History: The entire Quick Access history can be cleared by selecting "Clear recent files" or "Clear recent folders" from the options menu.
  • Choosing Displayed Folders: Users can specify which folders are displayed in the "Frequent Folders" section by navigating to the "View" tab in File Explorer and selecting "Options." This allows for a more tailored and personalized Quick Access experience.

Beyond the Basics: Advanced Quick Access Features

Quick Access offers advanced features that enhance its functionality and provide users with greater control over their file management:

  • Folder Synchronization: Users can synchronize specific folders with their OneDrive account, ensuring that their files are accessible from any device.
  • Offline Access: Files stored in OneDrive can be accessed offline, providing users with continued access even without an internet connection.
  • File Sharing: Quick Access simplifies file sharing by allowing users to easily share files with others directly from the File Explorer window.

FAQs Regarding Quick Access in Windows 11

Q: How do I access Quick Access in Windows 11?

A: Quick Access is readily available in the File Explorer window, displayed on the left pane. Simply open File Explorer by pressing the Windows key + E or by clicking the File Explorer icon on the taskbar.

Q: What happens when I clear the Quick Access history?

A: Clearing the Quick Access history removes all entries from the "Recent Files" and "Frequent Folders" sections. This does not delete the actual files or folders from your computer; it simply removes their presence from the Quick Access list.

Q: Can I disable Quick Access in Windows 11?

A: While Quick Access cannot be entirely disabled, users can prevent specific folders from appearing in the "Frequent Folders" section by navigating to the "View" tab in File Explorer, selecting "Options," and customizing the "Privacy" settings.

Q: How can I add a folder to Quick Access?

A: To add a folder to Quick Access, simply open the folder in File Explorer and pin it to the Quick Access list by right-clicking on the folder name and selecting "Pin to Quick Access."

Tips for Optimizing Quick Access

  • Regularly Review and Update: It is advisable to periodically review the Quick Access list, removing any unnecessary or outdated entries to maintain a streamlined and relevant list of files and folders.
  • Utilize Pinning: Pinning frequently used folders to Quick Access ensures their constant visibility, saving time and effort when navigating to these folders.
  • Customize the Displayed Folders: By customizing the "Frequent Folders" section, users can tailor Quick Access to their specific needs, ensuring that only relevant folders are displayed.
  • Explore OneDrive Integration: Leveraging OneDrive integration allows users to access their files from any device, enhancing accessibility and flexibility.

Conclusion

Quick Access in Windows 11 serves as an invaluable tool for navigating frequently used files and folders with ease. Its user-friendly interface, customizable features, and seamless integration with other Windows functionalities make it an essential component of a streamlined and efficient workflow. By understanding and utilizing the full potential of Quick Access, users can unlock significant time savings and optimize their productivity, making their daily interactions with Windows 11 more productive and enjoyable.

How to Use Quick Access in Windows 11 - Guiding Tech How to Enable or Disable Quick Access in Windows 11 โ€“ TechCult Remove/Disable/Clear/Turn off/Unpin/Stop Quick Access Windows 11
How to Customize Quick Access Settings in Windows 11?  Gear Up Windows Windows 11 File Explorer to Receive Quick Access Settings - WinBuzzer 8 Quick Ways To Open Ease of Access Center on Windows 11 - Guiding Tech
How To Enable Or Disable Quick Access In Windows 11  techcult How To Make Windows 11 Accessible (Ease Of Access)

Closure

Thus, we hope this article has provided valuable insights into Navigating Windows 11 with Ease: A Comprehensive Guide to the Quick Access Feature. We hope you find this article informative and beneficial. See you in our next article!

A Comprehensive Guide To Panasonic Toughbook CF-53 Drivers For Windows 10

A Comprehensive Guide to Panasonic Toughbook CF-53 Drivers for Windows 10

Introduction

With great pleasure, we will explore the intriguing topic related to A Comprehensive Guide to Panasonic Toughbook CF-53 Drivers for Windows 10. Let’s weave interesting information and offer fresh perspectives to the readers.

A Comprehensive Guide to Panasonic Toughbook CF-53 Drivers for Windows 10

Set Up Your Panasonic Toughbook CF-53

The Panasonic Toughbook CF-53, a ruggedized laptop renowned for its durability and performance, continues to be a popular choice for professionals in demanding environments. However, maximizing its capabilities necessitates the installation of appropriate drivers for Windows 10. This guide provides a comprehensive overview of the drivers needed for the CF-53, their importance, and how to ensure smooth operation.

Understanding the Importance of Drivers

Drivers are essential software components that enable the operating system to communicate with hardware devices. For the CF-53, drivers are critical for:

  • Recognizing and Utilizing Hardware Components: Drivers allow Windows 10 to identify and interact with the CF-53’s unique hardware components, such as the display, keyboard, touchpad, wireless network card, and various ports. Without proper drivers, these components may not function correctly or at all.
  • Optimizing Performance: Drivers contain specific instructions that optimize the performance of hardware components. This includes managing power consumption, enhancing data transfer rates, and ensuring smooth operation.
  • Enabling Advanced Features: Some drivers enable access to advanced features specific to the CF-53’s hardware, such as fingerprint recognition, smart card readers, or specialized ports.

Locating and Installing Drivers

Several methods are available to obtain and install the necessary drivers for the CF-53:

  • Panasonic Support Website: The official Panasonic support website is the primary source for drivers. Navigate to the support section, enter the CF-53 model number, and select Windows 10 as the operating system. The website will provide a list of available drivers, categorized by device type.
  • Device Manager: Windows 10 includes a built-in Device Manager that can automatically detect and install drivers for some devices. However, this method may not always provide the most up-to-date or optimized drivers.
  • Driver Update Utilities: Third-party driver update utilities can scan your system and identify outdated or missing drivers. However, exercise caution when using these tools, as some may bundle unwanted software or potentially compromise system security.

Key Drivers for the CF-53

The following drivers are essential for the CF-53 to function optimally under Windows 10:

  • Chipset Drivers: These drivers manage the communication between the CPU, memory, and other hardware components.
  • Graphics Drivers: Ensuring the proper graphics driver installation is crucial for optimal display resolution, color accuracy, and smooth performance of graphics-intensive applications.
  • Network Drivers: These drivers are essential for connecting to the internet, both wired and wirelessly.
  • Audio Drivers: Audio drivers enable sound output through the CF-53’s speakers or headphones.
  • Touchpad and Keyboard Drivers: These drivers ensure proper functionality of the CF-53’s input devices.
  • Bluetooth Drivers: If the CF-53 is equipped with Bluetooth capabilities, the corresponding drivers are essential for connecting wireless devices.
  • Optional Drivers: Depending on the CF-53 configuration, additional drivers may be required for specific features like fingerprint readers, smart card readers, or specialized ports.

Troubleshooting Driver Issues

If you encounter issues after installing drivers, several troubleshooting steps can be taken:

  • Reinstall Drivers: Try reinstalling the driver for the problematic device. Ensure you are using the latest version available from the Panasonic website.
  • Update Windows 10: Sometimes, outdated Windows 10 versions can cause driver compatibility issues. Ensure your system is running the latest Windows updates.
  • Check Device Manager: Review the Device Manager for any error messages or yellow exclamation marks. These indicate potential driver issues.
  • Run System File Checker: The System File Checker tool can repair corrupted system files that may be causing driver problems.
  • Contact Panasonic Support: If the issue persists, contact Panasonic support for assistance. They can provide tailored guidance based on your specific situation.

Frequently Asked Questions (FAQs)

Q: Can I use drivers from other Panasonic Toughbook models on the CF-53?

A: It is generally not recommended to use drivers from other models. Drivers are specifically tailored to the hardware configuration of each model, and using incompatible drivers can lead to system instability or malfunction.

Q: What if I cannot find the driver for a specific device on the Panasonic website?

A: If a driver is not readily available on the Panasonic website, consider contacting Panasonic support directly. They may be able to provide access to the driver or offer alternative solutions.

Q: How often should I update drivers for my CF-53?

A: It is recommended to check for driver updates periodically, especially when experiencing issues or when new operating system updates are released. However, avoid updating drivers unnecessarily, as this may introduce new problems.

Q: What are the risks of using outdated drivers?

A: Outdated drivers can lead to several issues, including:

  • Performance Degradation: Outdated drivers may not optimize hardware performance, leading to slower operation and reduced battery life.
  • Compatibility Issues: Outdated drivers may be incompatible with newer applications or operating system updates, causing crashes or malfunctions.
  • Security Vulnerabilities: Outdated drivers can contain security vulnerabilities that hackers can exploit.

Tips for Managing Drivers

  • Back Up Existing Drivers: Before installing new drivers, create a backup of your current drivers. This allows you to easily revert to the previous version if necessary.
  • Read Release Notes: Always review the release notes for new drivers before installing them. This provides information about new features, bug fixes, and potential known issues.
  • Use Trusted Sources: Only download drivers from official websites or reputable sources. Avoid downloading drivers from unknown or untrusted websites, as these may contain malware or viruses.

Conclusion

Installing the correct drivers for the Panasonic Toughbook CF-53 is essential for ensuring optimal performance, functionality, and security under Windows 10. By following the guidelines provided in this guide, users can confidently locate, install, and manage drivers, ensuring a smooth and reliable experience with their ruggedized laptop. Remember to prioritize using official Panasonic resources and to exercise caution when dealing with third-party driver utilities.

Panasonic Toughbook Cf 53 Vga Drivers - historyever Panasonic Toughbook Cf 53 User Manual vladimirovruslan739: PANASONIC TOUGHBOOK CF-53 DRIVERS
Panasonic Toughbook CF-53 Series - Notebookcheck.net External Reviews Panasonic Toughbook CF-53 - Specs, Tests, and Prices  LaptopMedia.com Panasonic Toughbook CF-53 MK2 - Support & Treiber, Handbuch, Datenblatt
Panasonic Toughbook CF-53 - Notebookcheck.net External Reviews Toughbook CF-53  Tough Mobile Tech

Closure

Thus, we hope this article has provided valuable insights into A Comprehensive Guide to Panasonic Toughbook CF-53 Drivers for Windows 10. We appreciate your attention to our article. See you in our next article!

The Enigma Of Missing 5G Wi-Fi: A Troubleshooting Guide

The Enigma of Missing 5G Wi-Fi: A Troubleshooting Guide

Introduction

With great pleasure, we will explore the intriguing topic related to The Enigma of Missing 5G Wi-Fi: A Troubleshooting Guide. Let’s weave interesting information and offer fresh perspectives to the readers.

The Enigma of Missing 5G Wi-Fi: A Troubleshooting Guide

DITO User Guide and Basic Troubleshooting for the DITO 5G Home WiFi

The arrival of 5G technology has ushered in a new era of wireless connectivity, promising faster speeds, lower latency, and greater capacity. However, the benefits of this advancement can be elusive if your computer fails to detect a 5G Wi-Fi network. This situation, while frustrating, is often resolvable through a systematic approach to troubleshooting.

Understanding the Issue

The inability of a computer to detect a 5G Wi-Fi network can stem from various factors, including:

  • Hardware limitations: Older computers may lack the necessary hardware components, such as a compatible Wi-Fi adapter, to support 5G networks.
  • Driver issues: Outdated or incompatible Wi-Fi drivers can prevent the computer from recognizing the 5G network.
  • Network configuration: Incorrect network settings on the computer or router can hinder 5G connectivity.
  • Signal interference: Other devices or environmental factors can interfere with the 5G signal, making it difficult for the computer to detect.
  • Router limitations: The router itself may not support 5G Wi-Fi or may be configured to prioritize older Wi-Fi standards.

Troubleshooting Strategies

Addressing the issue of missing 5G Wi-Fi requires a step-by-step approach, starting with the most basic solutions and progressively moving towards more complex troubleshooting steps.

1. Verify Compatibility:

  • Computer hardware: Ensure that your computer supports 5G Wi-Fi. This can be confirmed through the computer’s specifications or by consulting the manufacturer’s website.
  • Wi-Fi adapter: If your computer has an external Wi-Fi adapter, check its compatibility with 5G networks.
  • Router capabilities: Verify that your router is capable of broadcasting a 5G Wi-Fi signal. Refer to the router’s documentation or manufacturer’s website for confirmation.

2. Update Drivers:

  • Wi-Fi driver: Ensure that the latest Wi-Fi drivers are installed for your computer’s specific model. Outdated drivers can often prevent the computer from recognizing 5G networks. Drivers can be updated through the device manager in Windows or the system preferences in macOS.
  • Network adapter driver: If you are using an external Wi-Fi adapter, update its drivers as well.

3. Network Settings:

  • Enable 5G Wi-Fi: Check the network settings on your computer to ensure that 5G Wi-Fi is enabled. This can usually be accessed through the network and sharing center in Windows or the network preferences in macOS.
  • Router configuration: Access your router’s settings and verify that the 5G network is enabled and broadcasting. You may also need to adjust the network name (SSID) and password to match your computer’s settings.
  • Network security: Ensure that the router’s security settings are compatible with your computer’s operating system.

4. Signal Strength and Interference:

  • Location: Position your computer closer to the router to improve signal strength.
  • Obstacles: Remove any obstacles, such as walls or large metal objects, that could be blocking the 5G signal.
  • Other devices: Check for interference from other devices that may be using the same frequency band.

5. Reset Network:

  • Computer: Reset the network settings on your computer. This can be done by going to the network and sharing center in Windows or the network preferences in macOS.
  • Router: Reset your router to its factory settings. This will erase all custom configurations and restore the router to its default state.

6. Professional Assistance:

If the above steps fail to resolve the issue, it may be necessary to seek professional assistance from a computer technician or network administrator.

FAQs

Q: Is 5G Wi-Fi compatible with all computers?

A: No, not all computers support 5G Wi-Fi. Older computers may lack the necessary hardware components, such as a compatible Wi-Fi adapter.

Q: How can I check if my computer supports 5G Wi-Fi?

A: You can check the computer’s specifications or consult the manufacturer’s website.

Q: Can I upgrade my computer to support 5G Wi-Fi?

A: In some cases, it may be possible to upgrade your computer’s Wi-Fi adapter to support 5G. However, this may not be feasible for all computers.

Q: Why is my computer only detecting the 2.4 GHz network?

A: This could be due to the router’s settings, the computer’s network settings, or a lack of compatibility with 5G.

Q: What is the difference between 2.4 GHz and 5 GHz Wi-Fi?

A: 5 GHz Wi-Fi offers faster speeds and lower latency compared to 2.4 GHz Wi-Fi. However, 5 GHz signals have a shorter range and are more susceptible to interference.

Tips

  • Regularly update drivers: Keeping your Wi-Fi drivers up to date can prevent compatibility issues and ensure optimal performance.
  • Optimize network settings: Adjust the router’s settings to prioritize 5G connectivity and improve signal strength.
  • Minimize interference: Place your computer in a location with minimal interference from other devices.
  • Use a wired connection: For critical tasks that require high speeds and low latency, consider using a wired Ethernet connection.

Conclusion

The inability of a computer to detect a 5G Wi-Fi network can be a frustrating experience. However, by following a systematic troubleshooting process, you can identify the root cause and resolve the issue. Remember to verify compatibility, update drivers, check network settings, optimize signal strength, and consider professional assistance if necessary. By addressing these factors, you can unlock the full potential of 5G Wi-Fi and enjoy its benefits of faster speeds, lower latency, and enhanced connectivity.

How to fix Wi-Fi the next time it goes down (INFOGRAPHIC) 5G vs Wi-Fi 6: The Future of Internet Connectivity - CENGN DITO User Guide and Basic Troubleshooting for the DITO 5G Home WiFi
Wi-Fi vs. 5G โ€” Differences Explained 5G v/s Wi-Fi 6 โ€“ The Game Changers โ€“ Inflow Technologies Difference between 5G and Wi-Fi 6 - Huawei Enterprise Support Community
Wi-Fi Extender for Stronger Internet Connection  Verizon Business Au Galaxy 5G Mobile Wi-Fi (White) [SCR01SWU] (Condition : Instruction manual missing / Outer box

Closure

Thus, we hope this article has provided valuable insights into The Enigma of Missing 5G Wi-Fi: A Troubleshooting Guide. We appreciate your attention to our article. See you in our next article!