Archives October 2023

Harnessing The Power Of Multi-Device Audio Output In Windows 11: A Comprehensive Guide

Harnessing the Power of Multi-Device Audio Output in Windows 11: A Comprehensive Guide

Introduction

In this auspicious occasion, we are delighted to delve into the intriguing topic related to Harnessing the Power of Multi-Device Audio Output in Windows 11: A Comprehensive Guide. Let’s weave interesting information and offer fresh perspectives to the readers.

Harnessing the Power of Multi-Device Audio Output in Windows 11: A Comprehensive Guide

How To Change Audio Output Device In Windows 11 The M - vrogue.co

In the realm of modern computing, the ability to seamlessly manage and distribute audio output across multiple devices has become increasingly crucial. Windows 11, with its refined audio architecture and enhanced user interface, offers a sophisticated approach to this functionality, empowering users to tailor their audio experience to suit diverse scenarios and preferences. This article delves into the intricacies of multi-device audio output in Windows 11, elucidating its functionalities, benefits, and practical applications.

Understanding the Basics of Multi-Device Audio Output

At its core, multi-device audio output refers to the capability of a computer to simultaneously send audio signals to multiple connected devices, such as speakers, headphones, and even external audio systems. This enables users to enjoy a personalized and flexible audio experience, catering to various situations.

The Importance of Multi-Device Audio Output in Windows 11

The advent of multi-device audio output has revolutionized the way users interact with their computers, offering a myriad of advantages:

  • Enhanced Productivity: Imagine working on a document while listening to music on headphones or attending a virtual meeting while having background music playing on a separate speaker system. This capability allows for a seamless blend of productivity and entertainment, maximizing user efficiency.
  • Immersive Entertainment: Multi-device audio output enables users to create immersive entertainment setups, such as surround sound systems or multi-room audio configurations. This enriches the experience of movies, music, and gaming, providing a more captivating and engaging environment.
  • Accessibility and Inclusivity: For individuals with hearing impairments, the ability to direct audio to specific devices, such as hearing aids or assistive listening systems, can significantly enhance accessibility and communication.
  • Professional Applications: Multi-device audio output finds its place in professional settings, facilitating presentations, video conferencing, and audio production workflows. This feature allows for clear and dedicated audio output for different tasks, ensuring optimal communication and collaboration.

Navigating the World of Multi-Device Audio Output in Windows 11

Windows 11 presents a user-friendly interface for managing and configuring multi-device audio output. Here’s a step-by-step guide:

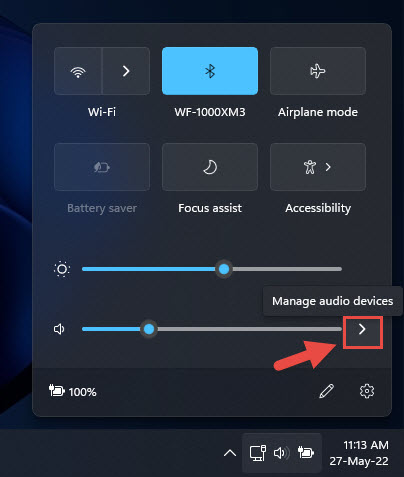
  1. Accessing the Audio Settings: Begin by clicking the speaker icon in the system tray, located at the bottom right corner of the taskbar. This will open the Quick Actions menu.
  2. Selecting the Output Device: In the Quick Actions menu, you will find a list of connected audio devices. Simply click on the desired device to select it as the primary output.
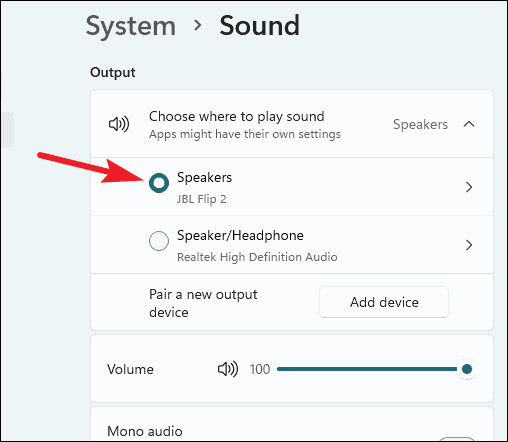
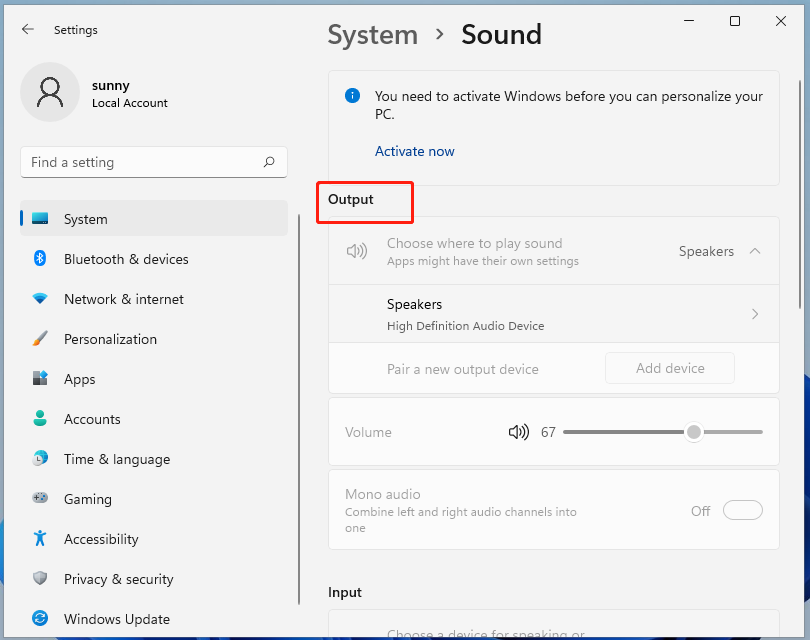
  3. Configuring Device Properties: To access more advanced settings for a specific device, right-click on its name in the Quick Actions menu and choose "Open Sound settings." This will open the "Sound" settings window.
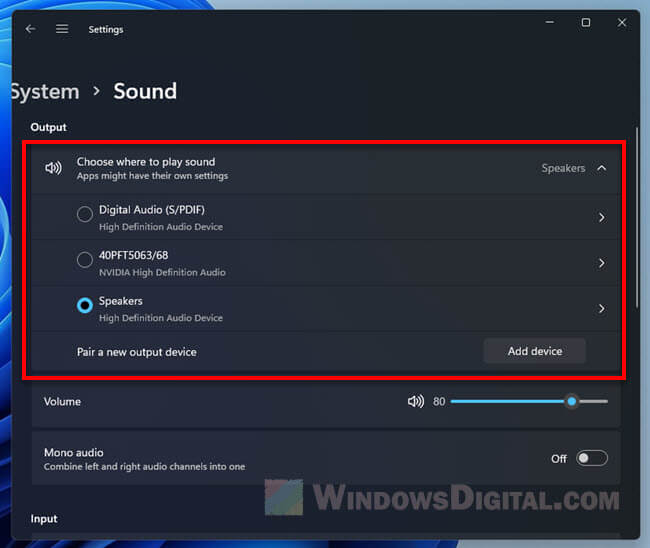
  4. Managing Multiple Devices: In the "Sound" settings window, you can find the "Output" tab. This tab allows you to manage the audio output for different applications. You can choose to direct the audio from specific applications to specific devices, ensuring a tailored audio experience for each program.

Advanced Techniques for Multi-Device Audio Output

For users seeking more granular control over their audio output, Windows 11 offers advanced features:

  • Spatial Sound: This feature allows for immersive audio experiences by simulating surround sound effects. Windows 11 supports various spatial sound formats, including Dolby Atmos and Windows Sonic, enhancing audio fidelity and creating a more captivating listening environment.
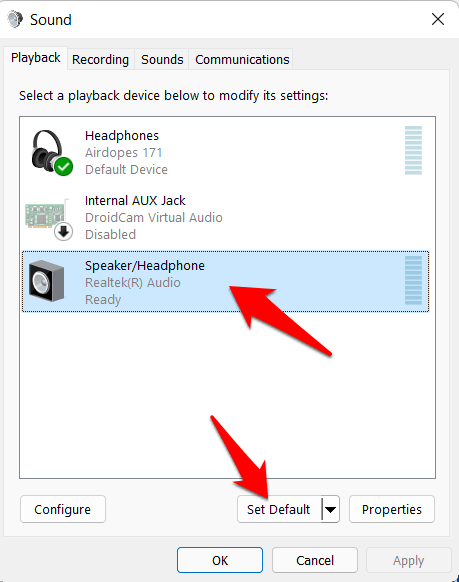
  • Audio Device Grouping: Users can group multiple audio devices together to create a unified audio output. This is particularly useful for creating surround sound systems or multi-room audio setups.
  • Audio Sharing: Windows 11 enables audio sharing through Bluetooth, allowing users to stream audio from their computer to compatible Bluetooth devices, such as speakers, headphones, and even smart home devices.

Troubleshooting Common Issues with Multi-Device Audio Output

While Windows 11 generally offers a seamless multi-device audio experience, occasional issues might arise. Here are some common troubleshooting steps:

  • Check Device Connections: Ensure all audio devices are properly connected to the computer and powered on.
  • Update Audio Drivers: Outdated audio drivers can cause compatibility issues. Check for driver updates through the Device Manager or the manufacturer’s website.
  • Restart Audio Services: Restarting the Windows Audio service can resolve temporary glitches.
  • Run Audio Troubleshooter: Windows 11 includes a built-in audio troubleshooter that can identify and resolve common audio issues.
  • Check for Software Conflicts: Certain software applications might interfere with audio output. Temporarily disabling or updating conflicting software can resolve the issue.

FAQs Regarding Multi-Device Audio Output in Windows 11

Q: Can I use multiple devices simultaneously for audio output?
A: Yes, Windows 11 allows you to simultaneously output audio to multiple devices. This enables you to listen to music on headphones while having a video playing on your speakers.

Q: Can I configure different applications to output audio to different devices?
A: Yes, you can assign specific applications to output audio to specific devices. This allows you to tailor the audio experience for each program.

Q: How do I create a surround sound system using multi-device audio output?
A: You can group multiple speakers together to create a surround sound system. Windows 11 supports various spatial sound formats, enhancing the immersive experience.

Q: Can I stream audio from my computer to Bluetooth devices?
A: Yes, Windows 11 supports audio sharing through Bluetooth, enabling you to stream audio to compatible Bluetooth devices.

Q: What are the benefits of using spatial sound with multi-device audio output?
A: Spatial sound enhances the audio experience by simulating surround sound effects, creating a more immersive and captivating listening environment.

Tips for Optimizing Multi-Device Audio Output in Windows 11

  • Use High-Quality Audio Devices: Investing in high-quality audio devices can significantly enhance the overall audio experience.
  • Configure Spatial Sound Settings: Experiment with different spatial sound formats to find the best configuration for your preferences and setup.
  • Utilize Audio Device Grouping: Group multiple devices together to create a unified audio output, especially for surround sound systems or multi-room audio setups.
  • Update Audio Drivers Regularly: Regularly updating audio drivers ensures optimal performance and compatibility.
  • Monitor Audio Output Levels: Ensure the volume levels on all connected audio devices are balanced for a harmonious audio experience.

Conclusion

Multi-device audio output in Windows 11 has transformed the way users interact with their computers, offering a level of flexibility and personalization previously unimaginable. By understanding the intricacies of this feature, users can unlock a world of enhanced productivity, immersive entertainment, and accessibility. Whether it’s enjoying a multi-room audio setup, tailoring the audio experience for different applications, or simply listening to music on headphones while working, multi-device audio output empowers users to customize their audio environment to suit their individual needs and preferences.

Set Audio Output Device For Apps Individually On Windows 11 - YouTube 5 Ways To Change Sound/Audio Output Device In Windows 11 How to Output Audio to Multiple Playback Devices in Windows 11 – GamingPH.com
How to Change Audio Output Device in Windows 11 Xbox One Audio Output Settings How To Change Audio Output Device In Windows 11 The M - vrogue.co
How To Change Audio Output Device In Windows 11 The M - vrogue.co Windows 11 Switch Audio Output Shortcut

Closure

Thus, we hope this article has provided valuable insights into Harnessing the Power of Multi-Device Audio Output in Windows 11: A Comprehensive Guide. We thank you for taking the time to read this article. See you in our next article!

A Comprehensive Guide To R For Data Science On Windows 10

A Comprehensive Guide to R for Data Science on Windows 10

Introduction

With enthusiasm, let’s navigate through the intriguing topic related to A Comprehensive Guide to R for Data Science on Windows 10. Let’s weave interesting information and offer fresh perspectives to the readers.

A Comprehensive Guide to R for Data Science on Windows 10

A Comprehensive Guide To R For Data Science  Data Science Using R  Flipboard

R, a powerful open-source programming language and free software environment, has become indispensable for data analysis, statistical computing, and graphical representation. Its flexibility, extensive libraries, and active community make it a preferred choice for researchers, data scientists, and analysts across various disciplines. This guide provides a comprehensive overview of installing and utilizing R on Windows 10, empowering users to harness its capabilities for their data-driven endeavors.

Understanding the Significance of R

R’s dominance in the data science realm stems from its versatility and adaptability. It excels in:

  • Statistical Analysis: R offers a comprehensive suite of statistical functions, enabling users to perform complex analyses, including hypothesis testing, regression modeling, and time series analysis.
  • Data Visualization: R’s graphical capabilities are unmatched, allowing for the creation of visually appealing and informative charts, plots, and graphs to communicate data insights effectively.
  • Machine Learning: R provides a wide range of machine learning algorithms, from basic linear regression to advanced deep learning techniques, facilitating predictive modeling and pattern recognition.
  • Data Manipulation and Transformation: R offers powerful data manipulation tools, enabling users to clean, transform, and reshape data for analysis and visualization.
  • Open-Source Nature: R’s open-source nature fosters collaboration and innovation, with a vibrant community contributing to its development and providing support.

Installing R on Windows 10

Installing R on Windows 10 is a straightforward process:

  1. Download the R Installer: Visit the official CRAN (Comprehensive R Archive Network) website (https://cran.r-project.org/) and download the appropriate R installer for your Windows 10 system.
  2. Run the Installer: Double-click the downloaded installer file and follow the on-screen instructions. Ensure you choose the default installation options for a seamless setup.
  3. Verify Installation: After installation, open the RGui application, which is typically located in the Start menu. The R console will appear, confirming successful installation.

Essential R Packages

R’s strength lies in its vast collection of packages, which extend its functionality and cater to specific data science needs. Some essential packages include:

  • tidyverse: A collection of packages for data manipulation, transformation, and visualization, including dplyr, ggplot2, and tidyr.
  • caret: Provides tools for machine learning model training, tuning, and evaluation.
  • data.table: Offers high-performance data manipulation and storage capabilities.
  • stringr: Facilitates efficient string manipulation and text processing.
  • lubridate: Provides tools for working with dates and times.

Installing R Packages

Installing R packages is simple:

  1. Open the R Console: Launch the RGui application.
  2. Use the install.packages() function: Type install.packages("package_name"), replacing "package_name" with the desired package name. For example, to install the tidyverse package, type install.packages("tidyverse").
  3. Confirm Installation: The package will be downloaded and installed. You can verify its presence by using the library() function, e.g., library(tidyverse).

Exploring R with RStudio

RStudio is an integrated development environment (IDE) specifically designed for R, offering a user-friendly interface for coding, debugging, and managing projects.

  1. Download and Install RStudio: Visit the official RStudio website (https://www.rstudio.com/) and download the appropriate RStudio installer for Windows 10.
  2. Launch RStudio: After installation, open RStudio. The IDE will automatically detect your R installation and provide a workspace for coding and analysis.

RStudio Features:

  • Code Editor: Provides syntax highlighting, code completion, and error detection for efficient coding.
  • Console: Displays output from R commands and provides a platform for interactive exploration.
  • Environment: Lists all objects and variables defined in your current R session.
  • Plots: Displays generated plots and charts within the IDE for easy visualization.
  • Project Management: Facilitates organization and management of R projects with multiple files and scripts.

Key Concepts in R Programming

  • Data Structures: R utilizes various data structures, including vectors, matrices, arrays, data frames, and lists, to store and manage data efficiently.
  • Operators: R supports arithmetic, logical, relational, and assignment operators for manipulating data and performing calculations.
  • Functions: R’s core functionality is built upon functions, which encapsulate reusable code blocks and enable modular programming.
  • Control Flow: R offers control flow structures like if-else, for, and while statements for controlling the execution of code blocks based on conditions.

Practical Applications of R

R’s capabilities extend to various real-world applications:

  • Data Analysis in Research: Scientists use R to analyze experimental data, generate statistical models, and draw meaningful conclusions.
  • Business Intelligence: Businesses leverage R for data exploration, customer segmentation, market analysis, and predictive modeling.
  • Finance and Risk Management: R is used for financial modeling, risk assessment, and portfolio optimization.
  • Healthcare and Medicine: R plays a vital role in analyzing medical data, identifying disease patterns, and developing personalized treatment strategies.
  • Social Sciences: Researchers utilize R for analyzing social surveys, conducting opinion polls, and understanding social trends.

FAQs on R for Data Science

1. Is R difficult to learn?

R can be learned at different levels, with a gradual learning curve. Basic concepts and syntax are relatively easy to grasp, while advanced techniques and libraries require more time and effort.

2. What are the prerequisites for learning R?

While prior programming experience is beneficial, it is not strictly necessary. A basic understanding of mathematics and statistics is helpful for understanding data analysis concepts.

3. What are the best resources for learning R?

Numerous online resources, books, and courses cater to different learning styles. Some popular options include:

  • R for Data Science: A comprehensive online book covering data manipulation, visualization, and machine learning.
  • DataCamp: An online platform offering interactive R courses for beginners and advanced learners.
  • Coursera: Provides online courses on R programming and data analysis from reputable universities.

4. Is R free to use?

Yes, R is completely free to use and distribute, making it accessible to everyone.

5. How does R compare to other data science languages like Python?

R and Python are both powerful languages for data science, each with its strengths and weaknesses. R excels in statistical analysis and visualization, while Python offers a wider range of libraries and frameworks for machine learning and web development.

Tips for Effective R Usage

  • Start with a clear goal: Define the specific data analysis task you aim to achieve before starting to code.
  • Use packages effectively: Explore and utilize relevant packages to enhance your workflow and achieve desired results.
  • Document your code: Add comments and explanations to your code to make it understandable and maintainable.
  • Practice regularly: Consistent practice is crucial for mastering R and applying its concepts effectively.
  • Engage with the community: Participate in forums, online communities, and conferences to learn from others and share your knowledge.

Conclusion

R’s versatility, powerful features, and active community make it an indispensable tool for data scientists, analysts, and researchers. By following this guide, users can successfully install, configure, and leverage R on Windows 10 to unlock its potential for data exploration, analysis, and visualization. As the field of data science continues to evolve, R’s role as a leading language is likely to grow, offering opportunities for innovation and discovery in diverse domains.

Data Science with R Programming: A Comprehensive Guide - Brainalyst R for Data Science - Installing R on Windows 10 - YouTube A Complete Tutorial to learn Data Science in R from Scratch  7wData
Data Science With R Tutorial For Beginners Data Science with R: A Step-by-Step Guide Data Science with R A Step By Step Guide With Visual Illustrations and Examples
R For Data Science A Beginner's Guide - Payhip R Cheat Sheet: Data Science Workflow With R - AI Summary

Closure

Thus, we hope this article has provided valuable insights into A Comprehensive Guide to R for Data Science on Windows 10. We appreciate your attention to our article. See you in our next article!

The Quick Launch Icon: A Legacy Feature In Windows 11

The Quick Launch Icon: A Legacy Feature in Windows 11

Introduction

With great pleasure, we will explore the intriguing topic related to The Quick Launch Icon: A Legacy Feature in Windows 11. Let’s weave interesting information and offer fresh perspectives to the readers.

The Quick Launch Icon: A Legacy Feature in Windows 11

How To Use Quick Launch Toolbar In Windows 11

The Quick Launch toolbar, a familiar element of earlier Windows operating systems, has been absent in Windows 11. This absence has sparked curiosity and questions among users who relied on this feature for quick access to frequently used applications and files. While the Quick Launch toolbar itself is not present, the functionality it provided can still be achieved through alternative methods, each offering its own advantages and considerations.

Understanding the Quick Launch Toolbar:

The Quick Launch toolbar was a dedicated area on the taskbar, typically positioned to the right of the Start button. It allowed users to pin shortcuts to frequently accessed applications, folders, and documents, facilitating rapid access without navigating through menus or searching. This convenience greatly enhanced user productivity, particularly for tasks requiring frequent access to specific files or programs.

Absence in Windows 11:

The absence of the Quick Launch toolbar in Windows 11 is attributed to the shift in design philosophy and user interface. Microsoft has focused on streamlining the user experience, emphasizing a cleaner, more modern aesthetic. The traditional taskbar has been redesigned, incorporating features like the Start menu and system icons, leaving less space for dedicated toolbars.

Alternatives to the Quick Launch Toolbar:

While the Quick Launch toolbar is no longer present, Windows 11 offers several alternative methods for achieving the same functionality:

1. Taskbar Pinning:

The taskbar remains a primary tool for quick access in Windows 11. Users can pin frequently used applications to the taskbar, similar to the Quick Launch functionality. This method offers a visually intuitive approach, keeping the pinned applications readily available for immediate launch.

2. Start Menu:

The Start menu provides a comprehensive list of installed applications and pinned items. Users can create folders within the Start menu to organize shortcuts and access them efficiently. This method offers a more structured and customizable approach to organizing frequently accessed items.

3. Desktop Shortcuts:

Creating shortcuts on the desktop remains a fundamental method for quick access to files and applications. Users can place shortcuts to frequently used items on the desktop for easy visibility and accessibility. This method offers a straightforward and customizable approach, allowing users to organize shortcuts according to their preferences.

4. Third-Party Taskbar Customization Tools:

Third-party software developers have created tools designed to customize the taskbar and add features similar to the Quick Launch toolbar. These tools offer a wider range of customization options, allowing users to create custom toolbars with specific functionalities tailored to their needs.

Advantages and Considerations:

Each alternative method offers its own advantages and considerations:

Taskbar Pinning:

  • Advantages:
    • Simple and intuitive, offering direct access to pinned applications.
    • Visually prominent, keeping frequently used applications readily available.
  • Considerations:
    • Limited to pinned applications, lacking the flexibility to pin folders or documents.
    • May clutter the taskbar if numerous applications are pinned.

Start Menu:

  • Advantages:
    • Provides a structured and customizable approach to organizing shortcuts.
    • Offers a comprehensive list of installed applications and pinned items.
  • Considerations:
    • Requires navigating through the Start menu to access shortcuts.
    • May require scrolling through the list of applications, especially with a large number of installed programs.

Desktop Shortcuts:

  • Advantages:
    • Straightforward and customizable, allowing users to organize shortcuts according to their preferences.
    • Offers direct access to files and applications from the desktop.
  • Considerations:
    • May clutter the desktop if numerous shortcuts are created.
    • Requires navigating through the desktop to access shortcuts.

Third-Party Taskbar Customization Tools:

  • Advantages:
    • Offers a wider range of customization options, allowing users to create custom toolbars with specific functionalities.
    • Provides greater flexibility and control over the taskbar.
  • Considerations:
    • Requires installing and configuring third-party software.
    • May introduce compatibility issues or security risks if not from reputable sources.

Conclusion:

While the Quick Launch toolbar is no longer a standard feature in Windows 11, the functionality it provided can still be achieved through alternative methods. The choice of approach depends on individual preferences and usage patterns. Whether users opt for taskbar pinning, Start menu organization, desktop shortcuts, or third-party tools, the essence of quick access to frequently used items remains a valuable aspect of the Windows user experience.

FAQs:

Q: Is it possible to bring back the Quick Launch toolbar in Windows 11?

A: While there is no official method to restore the Quick Launch toolbar in Windows 11, some third-party tools offer customization options that can mimic its functionality.

Q: Why did Microsoft remove the Quick Launch toolbar from Windows 11?

A: Microsoft’s decision to remove the Quick Launch toolbar is primarily attributed to the redesign of the taskbar and the emphasis on a cleaner, more modern user interface.

Q: What is the best alternative to the Quick Launch toolbar in Windows 11?

A: The best alternative depends on individual preferences and usage patterns. Taskbar pinning offers a simple and intuitive approach, while the Start menu provides a structured and customizable option. Desktop shortcuts are a straightforward method, and third-party tools offer greater flexibility and customization.

Q: Can I create a custom toolbar with similar functionality to the Quick Launch toolbar?

A: Yes, third-party taskbar customization tools allow users to create custom toolbars with specific functionalities tailored to their needs.

Tips:

  • Organize pinned applications on the taskbar according to their frequency of use.
  • Create folders within the Start menu to group related shortcuts.
  • Place desktop shortcuts in a specific area of the desktop for easy access.
  • Explore third-party taskbar customization tools to create a personalized experience.

Conclusion:

The absence of the Quick Launch toolbar in Windows 11 has prompted users to adapt to alternative methods for quick access to frequently used items. While the specific implementation may differ, the fundamental concept of efficient access remains a core principle of the Windows user experience. By utilizing the available tools and methods, users can maintain a seamless workflow and maximize their productivity.

Windows 11 : Add The Quick Launch Toolbar to the Taskbar - YouTube How to use Quick Launch Toolbar in Windows 11 Quick Launch Bar in Windows 11?
Quick Launch Bar in Windows 11? ↗️ Introducing My Quick Launch Windows 11 Widget - YouTube Add the Quick Launch Toolbar to the Taskbar in Windows 11
How to use Quick Launch Toolbar in Windows 11 Add the Quick Launch Toolbar to the Taskbar in Windows 11

Closure

Thus, we hope this article has provided valuable insights into The Quick Launch Icon: A Legacy Feature in Windows 11. We thank you for taking the time to read this article. See you in our next article!

Mastering Performance: A Comprehensive Guide To MSI Afterburner In Windows 11

Mastering Performance: A Comprehensive Guide to MSI Afterburner in Windows 11

Introduction

With enthusiasm, let’s navigate through the intriguing topic related to Mastering Performance: A Comprehensive Guide to MSI Afterburner in Windows 11. Let’s weave interesting information and offer fresh perspectives to the readers.

Mastering Performance: A Comprehensive Guide to MSI Afterburner in Windows 11

How to monitor FPS, CPU, and GPU usage in Games using MSI Afterburner in Windows 11  Step by Step

In the realm of PC gaming and performance optimization, MSI Afterburner stands as a cornerstone, renowned for its ability to unlock the full potential of graphics cards. This comprehensive guide delves into the intricacies of MSI Afterburner, its functionality within the Windows 11 environment, and its significance for users seeking to elevate their gaming experience and system performance.

Understanding MSI Afterburner: A Powerful Tool for Graphics Card Control

MSI Afterburner is a widely acclaimed freeware utility developed by the renowned hardware manufacturer, MSI. Its primary purpose is to provide users with an unparalleled level of control over their graphics card’s performance parameters, enabling fine-grained adjustments to achieve optimal results.

Key Features of MSI Afterburner:

  1. Overclocking: MSI Afterburner empowers users to increase the core clock speed and memory clock speed of their graphics cards, pushing them beyond their default limits. This results in enhanced frame rates and improved overall performance in demanding applications and games.

  2. Undervolting: The utility allows users to decrease the voltage supplied to the graphics card, which can reduce power consumption and heat generation, leading to a quieter and potentially more efficient system.

  3. Fan Control: MSI Afterburner offers precise control over the graphics card’s fan speed, enabling users to customize cooling profiles based on temperature thresholds or specific applications. This ensures optimal cooling and minimizes noise levels.

  4. Real-Time Monitoring: The software provides real-time monitoring of various system parameters, including GPU temperature, core clock speed, memory usage, and fan speed. This data is crucial for understanding system behavior and making informed adjustments.

  5. Customizable On-Screen Display (OSD): MSI Afterburner allows users to create and customize an on-screen display (OSD) that overlays crucial performance metrics onto the screen during gameplay or other applications. This provides real-time feedback without interrupting the user’s workflow.

  6. Benchmarking: MSI Afterburner includes a built-in benchmarking tool that allows users to assess the performance of their graphics card and compare it to other systems. This helps identify potential bottlenecks and optimize settings for maximum performance.

MSI Afterburner in Windows 11: Compatibility and Integration

MSI Afterburner seamlessly integrates with the Windows 11 environment, ensuring compatibility with the latest operating system features and drivers. The software’s user interface is intuitive and easy to navigate, making it accessible to both novice and experienced users.

Installation and Configuration:

  1. Download and Installation: Download the latest version of MSI Afterburner from the official MSI website. The installation process is straightforward and requires minimal user intervention.

  2. Driver Compatibility: Ensure that the latest graphics card drivers are installed for your specific hardware. This is crucial for optimal performance and compatibility with MSI Afterburner.

  3. Initial Configuration: Upon launching MSI Afterburner, users can access a comprehensive set of settings and customization options. The interface is divided into several tabs, each dedicated to specific functionalities.

  4. Overclocking and Undervolting: The "Overclocking" tab allows users to adjust core clock speed, memory clock speed, and voltage settings. It is essential to proceed with caution and gradually increase values to avoid system instability.

  5. Fan Control: The "Fan" tab enables users to configure custom fan curves based on temperature thresholds. This allows for optimal cooling while minimizing noise levels.

  6. On-Screen Display (OSD): The "OSD" tab provides options for creating and customizing an on-screen display that overlays performance metrics onto the screen during gameplay or other applications.

Benefits of Using MSI Afterburner in Windows 11:

  1. Enhanced Performance: By overclocking and undervolting the graphics card, MSI Afterburner unlocks significant performance gains, leading to higher frame rates and smoother gameplay.

  2. Optimized Cooling: Precise fan control ensures optimal cooling for the graphics card, minimizing thermal throttling and maximizing performance.

  3. Improved Stability: The ability to monitor system parameters in real-time allows users to identify potential instability issues and adjust settings accordingly.

  4. Customization and Control: MSI Afterburner empowers users with an unparalleled level of control over their graphics card’s performance, enabling them to tailor settings to specific applications and preferences.

  5. Accessibility and User Friendliness: The intuitive user interface and comprehensive documentation make MSI Afterburner accessible to both novice and experienced users.

FAQs: Addressing Common Queries

Q: Is MSI Afterburner safe to use?

A: MSI Afterburner is a safe and widely used utility, but it’s essential to proceed with caution when overclocking and undervolting. Start with small increments and monitor system stability closely.

Q: Does MSI Afterburner void my warranty?

A: Overclocking and undervolting may void your warranty, as it can potentially damage the graphics card. Consult your manufacturer’s warranty policy for specific details.

Q: Can I use MSI Afterburner with any graphics card?

A: MSI Afterburner supports a wide range of graphics cards from various manufacturers, including NVIDIA and AMD. Check the software’s compatibility list for specific models.

Q: How do I monitor my graphics card’s temperature?

A: The "Monitoring" tab in MSI Afterburner displays real-time information on GPU temperature, core clock speed, memory usage, and other parameters.

Q: Can I customize the on-screen display (OSD)?

A: Yes, the "OSD" tab allows users to customize the appearance, font, and content of the on-screen display.

Tips for Effective Use of MSI Afterburner:

  1. Start with Gradual Adjustments: When overclocking and undervolting, start with small increments and monitor system stability closely.

  2. Stress Test Your System: After making changes, run a stress test to ensure that the system remains stable under load.

  3. Monitor Temperatures: Keep a close eye on the GPU temperature to avoid excessive heat and potential damage.

  4. Experiment and Fine-Tune: MSI Afterburner offers a wide range of settings. Experiment with different configurations to find the optimal balance between performance and stability.

  5. Refer to Online Resources: Numerous online resources and forums provide valuable information and guidance on using MSI Afterburner effectively.

Conclusion: Unlocking Performance Potential with MSI Afterburner

MSI Afterburner stands as a powerful and versatile tool for optimizing graphics card performance within the Windows 11 environment. Its comprehensive features, user-friendly interface, and compatibility with a wide range of hardware make it an indispensable utility for gamers, content creators, and anyone seeking to maximize their system’s capabilities. By understanding the software’s functionalities and following best practices, users can unlock the full potential of their graphics cards, enhancing performance, improving stability, and elevating their overall gaming experience.

MSI Afterburner Windows 11 How To Setup MSI Afterburner on Windows 11 (2021)  Complete MSI Afterburner Tutorial - YouTube Msi afterburner windows 11 - gaicentre
MSI Afterburner Windows 11 Msi afterburner windows 11 - gaicentre Msi Afterburner Windows 11
The Complete Guide to MSI Afterburner (Beginner and Advanced) Msi afterburner windows 11 - gaicentre

Closure

Thus, we hope this article has provided valuable insights into Mastering Performance: A Comprehensive Guide to MSI Afterburner in Windows 11. We hope you find this article informative and beneficial. See you in our next article!

Exploring The Windows 10 File Explorer Search Bar: A Comprehensive Guide

Exploring the Windows 10 File Explorer Search Bar: A Comprehensive Guide

Introduction

With enthusiasm, let’s navigate through the intriguing topic related to Exploring the Windows 10 File Explorer Search Bar: A Comprehensive Guide. Let’s weave interesting information and offer fresh perspectives to the readers.

Exploring the Windows 10 File Explorer Search Bar: A Comprehensive Guide

How to search in Windows 10 with File Explorer  Digital Citizen

The Windows 10 File Explorer search bar, often referred to as the "Search Box" or "Search Bar," is an indispensable tool for navigating and finding files within your computer. It transcends basic search functionality, offering a robust and versatile way to locate specific files, folders, and even content within files. This guide will delve into the intricacies of the File Explorer search bar, exploring its features, benefits, and how it can enhance your Windows 10 experience.

Understanding the Search Bar’s Power:

The File Explorer search bar operates on the principle of keyword searching. Users can type in specific terms, file names, file types, or even partial information to initiate a search. The search bar leverages a powerful indexing system that analyzes file names, file contents, metadata, and even file properties to deliver highly accurate and relevant results.

Beyond Basic Search:

While the File Explorer search bar excels in basic searches, its true power lies in its advanced capabilities:

  • File Type Filtering: Users can refine their searches by specifying file types. For example, searching for "*.pdf" will only display PDF files.
  • Date Range Filtering: The search bar allows filtering by date, enabling users to find files modified, created, or accessed within a specific timeframe.
  • Content Searching: The search bar can delve into the content of files, allowing users to find files containing specific keywords, phrases, or even snippets of text.
  • File Size Filtering: Users can narrow their searches by specifying file size parameters, filtering for large or small files.
  • Location-Based Searching: The search bar can be confined to specific folders or drives, enabling targeted searches within designated areas.
  • Advanced Operators: The search bar supports advanced search operators such as quotation marks for exact phrase matching, asterisks for wildcard matching, and logical operators for combining search criteria.

Benefits of the File Explorer Search Bar:

  • Enhanced Productivity: The search bar streamlines file retrieval, saving time and effort compared to manually browsing through folders.
  • Improved Organization: The search bar encourages users to adopt a more organized approach to file management, as they can quickly find and access files based on specific criteria.
  • Increased Efficiency: The search bar’s advanced capabilities, such as content searching, enable users to find files based on their content rather than just their name, further enhancing efficiency.
  • Streamlined Workflow: The search bar integrates seamlessly with other Windows 10 features, such as the Start menu and Taskbar, creating a cohesive and efficient workflow.

FAQs about the File Explorer Search Bar:

Q: What happens when I search for a file that doesn’t exist?

A: If the search bar doesn’t find a matching file, it will display a message indicating that no files were found. You can then refine your search criteria or check if the file is located in a different folder or drive.

Q: Can I search for files within specific folders only?

A: Yes, you can limit your search to specific folders by navigating to that folder in File Explorer and then using the search bar.

Q: How can I search for files based on their content?

A: To search for files based on their content, simply type the keywords or phrases you are looking for in the search bar. The search bar will analyze the content of files and display results containing those keywords or phrases.

Q: Can I use multiple search criteria simultaneously?

A: Yes, you can combine multiple search criteria using advanced operators such as quotation marks, asterisks, and logical operators (AND, OR, NOT) to refine your search.

Q: How do I clear the search bar’s history?

A: To clear the search bar’s history, click the "Clear search history" option located at the bottom of the search results pane.

Tips for Effective File Explorer Search Bar Usage:

  • Use Specific Keywords: The more specific your keywords, the more accurate and relevant your search results will be.
  • Utilize File Type Filters: Filtering by file type can significantly narrow down your search results.
  • Leverage Date Range Filters: Date filters are useful for finding files modified, created, or accessed within a specific timeframe.
  • Explore Advanced Operators: Mastering advanced search operators can unlock more sophisticated search capabilities.
  • Utilize Location-Based Searching: Confine your searches to specific folders or drives for targeted results.
  • Experiment with Content Searching: Search for specific keywords or phrases within files to find relevant content.

Conclusion:

The Windows 10 File Explorer search bar is an invaluable tool for managing and navigating files on your computer. Its advanced capabilities, including file type filtering, date range filtering, content searching, and advanced operators, empower users to find specific files with ease and efficiency. By mastering the search bar’s features and implementing the tips outlined in this guide, users can streamline their workflow, improve organization, and enhance their overall Windows 10 experience.

Get Help With File Explorer In Windows 10 Your Ultimate Guide  itechguidez File Explorer in Windows 10 - Instructions and Video Lesson How to search in Windows 10 with File Explorer  Digital Citizen
Windows 10's File Explorer new search bar to finally get faster Show or Hide File Explorer Toolbar on Windows 10 - YouTube Get Help With File Explorer In Windows 10: Your Ultimate Guide
Search in File Explorer in Windows 10  Tutorials Get Help With File Explorer In Windows 10 Your Ultimate Guide  itechguides

Closure

Thus, we hope this article has provided valuable insights into Exploring the Windows 10 File Explorer Search Bar: A Comprehensive Guide. We thank you for taking the time to read this article. See you in our next article!

QBittorrent: A Comprehensive Guide To Downloading And Using On Windows 11

qBittorrent: A Comprehensive Guide to Downloading and Using on Windows 11

Introduction

With enthusiasm, let’s navigate through the intriguing topic related to qBittorrent: A Comprehensive Guide to Downloading and Using on Windows 11. Let’s weave interesting information and offer fresh perspectives to the readers.

qBittorrent: A Comprehensive Guide to Downloading and Using on Windows 11

qBittorrent Free Download for Windows 10, 11, 7 (32 / 64-bit)

In the realm of file sharing and downloading, torrent clients have become indispensable tools. Among them, qBittorrent stands out as a robust, feature-rich, and user-friendly option, particularly popular on Windows 11. This article provides a comprehensive guide to downloading, installing, and utilizing qBittorrent on the latest Windows operating system, highlighting its key functionalities and advantages.

Understanding qBittorrent: A Decentralized Approach to File Sharing

qBittorrent is a free and open-source BitTorrent client, renowned for its lightweight design, efficient resource management, and comprehensive feature set. Unlike its proprietary counterparts, qBittorrent operates independently of centralized servers, relying on a decentralized peer-to-peer (P2P) network for file sharing. This decentralized approach offers several advantages:

  • Enhanced Security: Eliminating reliance on centralized servers reduces vulnerability to censorship and data breaches.
  • Increased Privacy: User activity is not tracked or monitored by third parties, promoting anonymity and privacy.
  • Improved Reliability: The distributed nature of the network ensures file availability even if individual peers disconnect.

Downloading and Installing qBittorrent on Windows 11

Obtaining and installing qBittorrent on Windows 11 is a straightforward process:

  1. Visit the Official Website: Navigate to the official qBittorrent website (https://www.qbittorrent.org/).
  2. Select the Windows Installer: Locate the "Downloads" section and choose the 64-bit Windows installer.
  3. Run the Installer: Double-click the downloaded installer file and follow the on-screen prompts to complete the installation.
  4. Launch qBittorrent: Once the installation is finished, locate the qBittorrent icon on your desktop or in the Start Menu and launch the application.

Navigating the qBittorrent Interface

The qBittorrent interface is intuitive and user-friendly, consisting of the following key components:

  • Toolbar: Provides quick access to essential functions like adding torrents, starting/stopping downloads, and managing settings.
  • Torrent List: Displays all active and completed torrents, including download progress, speed, and remaining time.
  • Details Panel: Offers detailed information about the selected torrent, including its properties, files, and trackers.
  • Search Bar: Facilitates searching for specific torrents within the application.
  • Filters and Sorting Options: Allow users to organize and prioritize torrents based on various criteria.

Essential qBittorrent Features

qBittorrent boasts a wealth of features that enhance user experience and streamline torrent management:

  • Torrent Search: Integrates with popular torrent search engines, enabling users to discover and add torrents directly from within the application.
  • Download Scheduling: Allows users to schedule downloads to specific times or days, ensuring optimal bandwidth utilization.
  • RSS Feed Support: Enables automatic torrent downloads based on RSS feeds, keeping users updated on the latest releases.
  • Remote Control: Offers remote access and control over downloads via a web interface, allowing users to manage torrents from anywhere.
  • Advanced Settings: Provides comprehensive customization options for network settings, download speed limits, and other parameters.

Benefits of Using qBittorrent on Windows 11

Choosing qBittorrent for torrenting on Windows 11 offers several advantages:

  • Lightweight and Efficient: Its minimal resource consumption ensures smooth operation on even less powerful systems.
  • User-Friendly Interface: The intuitive and straightforward design makes it easy to navigate and use for both beginners and experienced users.
  • Open Source and Free: Being free and open-source eliminates licensing fees and provides access to the source code for transparency and customization.
  • Extensive Feature Set: Offers a comprehensive range of functionalities, including torrent search, download scheduling, RSS feed support, and remote control.
  • Strong Security and Privacy: The decentralized nature of the BitTorrent network and qBittorrent’s focus on user privacy provide a secure and anonymous torrenting experience.

FAQs: Addressing Common Concerns

Q: Is qBittorrent safe to use?

A: Yes, qBittorrent is a safe and reputable torrent client. It is open-source, meaning its code is publicly available for scrutiny and verification, reducing the risk of malicious code injection.

Q: How do I protect my privacy while using qBittorrent?

A: qBittorrent itself does not track or log user activity. However, it’s crucial to use a VPN service to encrypt your internet traffic and mask your IP address, further enhancing privacy while torrenting.

Q: Can I download movies and TV shows using qBittorrent?

A: While qBittorrent itself is a legal tool, downloading copyrighted content without permission is illegal. Ensure you are downloading content from legal sources and respect copyright laws.

Q: What are the best settings for qBittorrent on Windows 11?

A: The optimal settings depend on your individual needs and internet connection. However, generally, prioritizing download speed, limiting upload speed to avoid impacting your network performance, and enabling encryption for privacy are recommended practices.

Tips for Optimizing qBittorrent Performance

  • Choose Reliable Trackers: Select reputable and active trackers for faster download speeds and improved torrent availability.
  • Configure Bandwidth Limits: Set appropriate upload and download speed limits to avoid overwhelming your network and ensure smooth browsing and other online activities.
  • Utilize a VPN: Enhance privacy and security by using a reputable VPN service while torrenting.
  • Keep qBittorrent Updated: Regularly update qBittorrent to benefit from bug fixes, security enhancements, and new features.

Conclusion: A Reliable and Powerful Torrent Client for Windows 11

qBittorrent stands as a robust and reliable torrent client for Windows 11 users seeking a secure, feature-rich, and user-friendly solution. Its decentralized nature, open-source foundation, and comprehensive feature set make it an ideal choice for both novice and experienced torrent users. By adhering to best practices and utilizing its capabilities effectively, users can leverage qBittorrent to download files efficiently, securely, and with peace of mind.

How to download and install qBittorrent on Windows - YouTube qBittorrent Download for PC - DownloadBytes.com qBittorrent Download (2024 Latest) for Windows 11, 10, 8, 7
Download qBittorrent 64 bit for Windows 11, 10 PC. Free qBittorrent Download for PC Windows (7/10/11/8) qBittorrent Download for PC Windows (7/10/11/8)
QBittorrent - Best Free BitTorrent Clients For Windows 11 Free Download  TOPUWP How to Use BitTorrent  PCMag

Closure

Thus, we hope this article has provided valuable insights into qBittorrent: A Comprehensive Guide to Downloading and Using on Windows 11. We appreciate your attention to our article. See you in our next article!

Understanding Drive Letter Assignments In Windows 10

Understanding Drive Letter Assignments in Windows 10

Introduction

In this auspicious occasion, we are delighted to delve into the intriguing topic related to Understanding Drive Letter Assignments in Windows 10. Let’s weave interesting information and offer fresh perspectives to the readers.

Understanding Drive Letter Assignments in Windows 10

How to assign permanent letters to drives on Windows 10  Windows Central

The concept of "open h drive" in Windows 10 is a misconception. Windows 10, like previous versions of Windows, does not inherently possess a dedicated drive letter "H." The drive letters assigned to storage devices, including internal hard drives, external hard drives, USB drives, and network drives, are determined by the operating system based on various factors. These factors include:

  • Order of Connection: The order in which devices are connected to the computer can influence their assigned drive letters. Typically, devices connected first receive the earliest letters in the alphabetical sequence.
  • Existing Drive Letters: Windows 10 attempts to avoid assigning duplicate drive letters to different devices. If a drive letter is already assigned to a device, the system will assign the next available letter to the newly connected device.
  • Device Type: The type of device can also play a role in drive letter assignment. For example, internal hard drives often receive the letters "C" and "D," while removable media like USB drives are typically assigned letters starting from "E" or later.
  • System Configuration: Specific settings within Windows 10 can affect the drive letter assignment process. For instance, the "Disk Management" tool allows users to manually change drive letters.

Therefore, the presence of an "H" drive in Windows 10 is not a default feature. It only appears when a specific device is connected and assigned that letter by the operating system.

Understanding the Importance of Drive Letters

Drive letters serve as convenient labels for accessing different storage locations within Windows 10. These letters are used in file paths, which are the addresses that allow the operating system to locate specific files and folders on the computer. For example, the path "C:UsersDocumentsMyFile.txt" indicates that the file "MyFile.txt" is located in the "Documents" folder within the "Users" folder on the "C" drive.

Accessing and Managing Drive Letters

Several methods can be used to manage drive letters in Windows 10:

  • Disk Management: This tool, accessible through the "Computer Management" console, allows users to change, delete, or create drive letters for connected devices.
  • File Explorer: Windows 10’s File Explorer provides a user-friendly interface to view and interact with connected devices. By navigating to "This PC," users can see the assigned drive letters for all connected storage locations.
  • Command Prompt: Advanced users can use the "diskpart" command in the Command Prompt to manage drive letters and perform other disk-related operations.

Benefits of Understanding Drive Letters

Comprehending the concept of drive letters and their assignment in Windows 10 offers several benefits:

  • Enhanced File Management: Understanding drive letters helps users efficiently locate and organize files across different storage locations.
  • Improved Troubleshooting: When encountering issues with specific storage devices, knowing the assigned drive letter can assist in identifying the source of the problem.
  • Increased System Control: By managing drive letters, users can optimize their storage configuration and ensure efficient data access.

FAQs on Drive Letters in Windows 10

Q: How do I change a drive letter in Windows 10?

A: To change a drive letter, follow these steps:

  1. Open the "Disk Management" tool by searching for it in the Start menu.
  2. Right-click the desired drive in the "Disk Management" window.
  3. Select "Change Drive Letter and Paths."
  4. Click "Change" and choose a new drive letter from the list.
  5. Click "OK" to apply the changes.

Q: Why is my USB drive assigned a different drive letter each time I connect it?

A: Windows 10 assigns drive letters based on the order of connection and available drive letters. If other devices are already occupying certain letters, the USB drive might receive a different letter each time it’s connected.

Q: Can I permanently assign a drive letter to a specific device?

A: While it’s possible to manually change drive letters, there’s no guarantee that they will remain permanent. The next time you connect the device, Windows 10 may assign a different letter based on its internal logic.

Q: What happens if I delete a drive letter?

A: Deleting a drive letter does not erase data from the device. It simply removes the assigned label, making the device inaccessible until a new letter is assigned.

Tips for Managing Drive Letters in Windows 10

  • Use consistent naming conventions: Assign meaningful drive letters to different devices to facilitate identification and organization.
  • Monitor drive letter assignments: Regularly check the "Disk Management" tool to ensure drive letters are assigned appropriately.
  • Consider using external tools: Third-party tools are available that offer more advanced drive letter management features.
  • Back up important data: Before making any changes to drive letters, ensure that all critical data is backed up to prevent accidental loss.

Conclusion

Drive letters are essential components of the Windows 10 operating system, serving as labels for accessing various storage locations. Understanding how drive letters are assigned and managed is crucial for efficient file management, troubleshooting, and system control. By utilizing the tools and techniques discussed in this article, users can effectively manage drive letters in Windows 10 to optimize their storage configuration and enhance their overall computing experience.

How To Assign Change Drive Letter In Windows 10  winbuzzer How to change/assign a drive letter in Windows 10 - Tutorial  Windows 10 tutorials, Lettering 3 Simple Ways to Assign a Drive Letter in Windows 10/8/7 - EaseUS
Full Guide on Diskpart Assign Drive Letter in Windows 11/10/8/7 [Step-by-Step Guide] - EaseUS How to assign permanent letters to drives on Windows 10  Windows Central Assign Windows 10/11 and DVD drive letters
How to Assign / Change Drive Letter in Windows 10 - WinBuzzer Change and Assign Drive Letter in Windows 10  Tutorials

Closure

Thus, we hope this article has provided valuable insights into Understanding Drive Letter Assignments in Windows 10. We appreciate your attention to our article. See you in our next article!

Navigating The Driver Maze: Online Solutions For Windows 10

Navigating the Driver Maze: Online Solutions for Windows 10

Introduction

With great pleasure, we will explore the intriguing topic related to Navigating the Driver Maze: Online Solutions for Windows 10. Let’s weave interesting information and offer fresh perspectives to the readers.

Navigate the Maze with Driver Control  VEX Education

The modern computing landscape is an intricate web of hardware and software, each component relying on the other for seamless operation. This intricate dance is facilitated by drivers, small programs that allow the operating system to communicate with connected devices. While Windows 10 strives to automatically detect and install drivers, this process is not always flawless. This is where online driver pack solutions emerge as valuable allies, offering a streamlined approach to driver management.

Understanding the Need for Driver Packs

Imagine a scenario where you’ve just installed a new graphics card, a crucial component for gaming or creative tasks. The operating system, despite its best efforts, struggles to locate the appropriate driver. This leads to compatibility issues, poor performance, and even system instability. This is where driver packs, pre-compiled collections of drivers for various hardware components, step in.

The Advantages of Online Driver Pack Solutions

Online driver pack solutions, readily available on the internet, provide a convenient and efficient means to address driver-related issues. Their key benefits include:

  • Comprehensive Coverage: Driver packs typically encompass a vast library of drivers for a wide range of hardware, from graphics cards and sound cards to network adapters and printers. This ensures that most common components are covered.
  • Effortless Installation: These solutions automate the process of driver installation, eliminating the need for manual searching and downloading. They often feature user-friendly interfaces that guide users through the process.
  • Time-Saving: Driver packs significantly reduce the time spent on driver updates and troubleshooting. This is especially valuable for users who frequently upgrade their hardware or encounter driver conflicts.
  • Compatibility Assurance: Reputable driver pack providers prioritize compatibility testing to ensure that the drivers included in their packages are compatible with the specific operating system and hardware.
  • Resolution of Conflicts: Driver pack solutions can effectively resolve driver conflicts, a common issue that arises when multiple devices compete for resources. They often include tools to identify and replace conflicting drivers.

Popular Online Driver Pack Solutions for Windows 10

Several online driver pack solutions cater to Windows 10 users, each with its unique features and approach:

  • DriverPack Solution: This comprehensive package offers a vast database of drivers, supporting a wide array of hardware components. Its offline installer allows for installation even without an active internet connection.
  • Snappy Driver Installer (SDI): Known for its user-friendly interface and extensive driver library, SDI is a popular choice for both novice and advanced users. It also includes driver backup and restore features.
  • Driver Booster: This solution focuses on automatic driver updates. It scans the system for outdated drivers and provides a simple interface to update them with the latest versions.
  • Driver Easy: Similar to Driver Booster, Driver Easy simplifies the driver update process. It offers both free and paid versions, with the paid version providing additional features like driver backup and priority support.
  • DriverMax: DriverMax emphasizes driver backup and restore capabilities. It allows users to create backups of their current drivers, ensuring a safe rollback option in case of issues.

Choosing the Right Solution

Selecting the most suitable online driver pack solution depends on individual needs and preferences. Consider the following factors:

  • Hardware Compatibility: Ensure that the driver pack solution supports the specific hardware components in your system.
  • Driver Database Size: A larger database generally implies greater compatibility with a wider range of devices.
  • Ease of Use: Opt for a solution with a user-friendly interface that simplifies driver installation and management.
  • Additional Features: Evaluate the availability of features like driver backup, restore, and automatic updates.

FAQs: Addressing Common Concerns

Q: Are online driver pack solutions safe?

A: While reputable driver pack providers prioritize security and compatibility, it’s crucial to download solutions from trusted sources. Always verify the provider’s reputation and read user reviews before downloading and installing any driver pack.

Q: Can driver pack solutions damage my system?

A: Installing incompatible or outdated drivers can potentially harm your system. However, reputable driver pack solutions undergo thorough testing and compatibility checks to minimize the risk of system damage.

Q: Is it necessary to use a driver pack solution?

A: While Windows 10 often handles driver installations automatically, driver packs can be valuable for resolving driver conflicts, updating outdated drivers, or installing drivers for newer hardware.

Q: Do driver pack solutions require payment?

A: Some driver pack solutions offer free versions with basic functionalities. Others offer paid versions with additional features and support.

Tips for Utilizing Online Driver Pack Solutions Effectively

  • Backup Your System: Before installing any driver pack solution, create a system backup to ensure a safe rollback option in case of issues.
  • Verify Compatibility: Ensure that the chosen driver pack solution is compatible with your Windows 10 version and hardware.
  • Read User Reviews: Check user reviews and ratings to gauge the reliability and performance of the driver pack solution.
  • Prioritize Reputable Sources: Download driver pack solutions only from trusted websites and reputable providers.
  • Avoid Overloading the System: Do not install unnecessary drivers. Only install drivers for components that are actually present in your system.

Conclusion: Streamlining Driver Management

Online driver pack solutions offer a convenient and efficient approach to driver management, simplifying the process of updating, installing, and resolving driver-related issues. By providing comprehensive driver libraries, automated installation, and compatibility assurance, these solutions empower users to maintain optimal system performance and stability. While choosing a reputable provider and following best practices is crucial, driver packs can be valuable tools for navigating the complex world of driver management in Windows 10.

Navigate the Maze with Driver Control  VEX Education Navigate the Maze with Driver Control  VEX Education DriverPack Solution Online - 다운로드
DriverPack Solution скачать бесплатно для Windows 10 How to Install Windows Drivers Using DriverPack Solution, AIDA and Online Updates - HubPages DriverPack Solution Online Download Free for Windows 10, 7, 8 (64 bit / 32 bit)
DriverPack Solution Online 2024 Free Download - Microsoft Suggested Stažení DriverPack Solution Online Windows 10 (32/64 bit) Česky

Closure

Thus, we hope this article has provided valuable insights into Navigating the Driver Maze: Online Solutions for Windows 10. We thank you for taking the time to read this article. See you in our next article!

Net Framework 3 5 Windows 10 64 Bit Download

net framework 3 5 windows 10 64 bit download

Introduction

In this auspicious occasion, we are delighted to delve into the intriguing topic related to net framework 3 5 windows 10 64 bit download. Let’s weave interesting information and offer fresh perspectives to the readers.

Understanding and Installing .NET Framework 3.5 on Windows 10 64-bit: A Comprehensive Guide

How to Install .NET Framework 3.5 on Windows 10

The .NET Framework is a foundational software development platform created by Microsoft. It provides a comprehensive environment for building and running applications, encompassing libraries, tools, and languages. While newer versions have emerged, .NET Framework 3.5 continues to be relevant for older applications and certain scenarios. This guide delves into the intricacies of installing and utilizing .NET Framework 3.5 on Windows 10 64-bit, addressing common concerns and offering practical solutions.

The Significance of .NET Framework 3.5

.NET Framework 3.5, released in 2007, introduced significant advancements, including:

  • Windows Workflow Foundation (WF): Facilitating the development and execution of workflow-based applications, enabling automation and streamlining business processes.
  • Windows Communication Foundation (WCF): Simplifying the creation of distributed applications, enabling communication between different systems and platforms.
  • Windows Presentation Foundation (WPF): Providing a powerful framework for building visually rich user interfaces, enhancing the user experience.
  • LINQ (Language-Integrated Query): Offering a unified query syntax across various data sources, streamlining data access and manipulation.

These features, alongside its compatibility with previous versions, cemented .NET Framework 3.5 as a cornerstone for many applications. While newer versions offer expanded capabilities, a significant number of applications remain dependent on .NET Framework 3.5, making its installation crucial for maintaining compatibility and functionality.

Installation Methods: A Step-by-Step Approach

Installing .NET Framework 3.5 on Windows 10 64-bit can be achieved through two primary methods:

1. Using Windows Features:

  • Access Windows Features: Navigate to the "Control Panel" and select "Programs and Features". Alternatively, press "Windows Key + R" and type "appwiz.cpl" followed by "Enter".
  • Enable .NET Framework 3.5: Click on "Turn Windows features on or off". Within the list, locate ".NET Framework 3.5 (includes .NET 2.0 and 3.0)" and check the box.
  • Initiate Installation: Click "OK" and Windows will initiate the installation process, automatically downloading and installing the necessary components.

2. Offline Installation:

This method is beneficial when internet connectivity is limited or unavailable.

  • Download the Offline Installer: Obtain the offline installer file for .NET Framework 3.5 from a trusted source like the Microsoft website.
  • Run the Installer: Execute the downloaded installer file. The installation process will proceed without requiring an internet connection.

Resolving Potential Installation Issues

While the installation process is generally straightforward, certain scenarios might lead to complications:

  • Missing Updates: Windows Update might be required to proceed with the installation. Ensure your system is up-to-date.
  • Corrupted Files: If system files are corrupted, the installation might fail. Running the System File Checker (SFC) tool can help identify and repair corrupted files.
  • Firewall or Antivirus Interference: Firewall or antivirus software might block the installation process. Temporarily disabling them during installation can resolve the issue.

Frequently Asked Questions (FAQs)

Q: Is .NET Framework 3.5 compatible with Windows 10 64-bit?

A: Yes, .NET Framework 3.5 is compatible with Windows 10 64-bit. However, it might require enabling features or downloading components.

Q: Why is .NET Framework 3.5 still relevant?

A: Many legacy applications and software still rely on .NET Framework 3.5. Installing it ensures compatibility and proper functionality for such applications.

Q: What are the potential risks of installing .NET Framework 3.5?

A: .NET Framework 3.5 itself is generally safe, but outdated versions might have security vulnerabilities. Keeping your system updated and installing security patches is crucial.

Q: Can I uninstall .NET Framework 3.5 after installing it?

A: Yes, you can uninstall .NET Framework 3.5 through the "Programs and Features" section in the "Control Panel". However, this might break applications that rely on it.

Tips for a Smooth Installation

  • Prioritize Updates: Ensure your Windows 10 system is up-to-date with the latest updates before installing .NET Framework 3.5.
  • Check Compatibility: Verify that the application requiring .NET Framework 3.5 is compatible with Windows 10.
  • Use Offline Installer: Opt for the offline installer if internet access is limited or unreliable.
  • Troubleshoot Effectively: Utilize resources like Microsoft’s support website or community forums to address any installation issues.

Conclusion

.NET Framework 3.5 remains a crucial component for ensuring compatibility and functionality for a wide range of applications. While newer versions have emerged, the need for .NET Framework 3.5 persists in certain scenarios. Understanding its significance, installation methods, potential issues, and troubleshooting strategies empowers users to effectively leverage this framework on Windows 10 64-bit systems. By following the provided steps and guidance, users can successfully install and utilize .NET Framework 3.5, ensuring the smooth operation of their essential applications and software.

Net Framework 3.5 for Windows 10 - Download & Install Guide How to Download & Install .Net Framework 3.5 On Windows 10 - YouTube Net framework 3.5 sp1 windows 10 64 bit - vsehall
How to Install .NET Framework 3.5 on Windows 11/10 PC - YouTube Microsoft .NET Framework 3.5 Download & Install for Windows 10/11 Install .NET Framework 3.5 In Windows 10  Quick Easy Way - Device Management Blog
Microsoft -net 3-5 sp1 download full - holosersafety how to install net framework 3.5 on windows 10,8.1,7 / How To Enable / Install .NET Framework 3.

Closure

Thus, we hope this article has provided valuable insights into net framework 3 5 windows 10 64 bit download. We appreciate your attention to our article. See you in our next article!

Windows 11’s "Nearby Share" – A Modern Approach To Seamless File Transfer

Windows 11’s "Nearby Share" – A Modern Approach to Seamless File Transfer

Introduction

With enthusiasm, let’s navigate through the intriguing topic related to Windows 11’s "Nearby Share" – A Modern Approach to Seamless File Transfer. Let’s weave interesting information and offer fresh perspectives to the readers.

Windows 11’s "Nearby Share" – A Modern Approach to Seamless File Transfer

How to Use Nearby Sharing on Windows 11

Windows 11 introduces a user-friendly and versatile file transfer mechanism known as "Nearby Share," offering a convenient and secure method for sharing files between Windows devices within close proximity. This feature, drawing inspiration from similar functionalities on other platforms, empowers users to effortlessly transfer various file types, ranging from documents and photos to videos and music, without the need for cumbersome cables or complex configurations.

Understanding the Fundamentals of Nearby Share

At its core, Nearby Share leverages Bluetooth technology to establish a secure connection between devices, facilitating the transfer of files. This approach eliminates the need for internet connectivity, enabling users to share content even in areas with limited or no network access.

Key Features and Capabilities of Nearby Share

  • Ease of Use: Nearby Share presents a streamlined and intuitive user experience. Sharing files involves minimal steps, making it accessible to users of all technical backgrounds.
  • Cross-Device Compatibility: This feature extends its reach beyond Windows devices, enabling seamless file transfer between Windows PCs, tablets, and smartphones.
  • Secure File Transfer: The underlying Bluetooth technology ensures a secure connection, mitigating the risk of unauthorized access or data breaches.
  • File Type Versatility: Nearby Share supports a wide array of file types, including documents, images, videos, music, and more, making it a comprehensive solution for diverse sharing needs.
  • Sharing with Multiple Devices: Users can simultaneously share files with multiple nearby devices, eliminating the need for repetitive actions.
  • Device Discovery: Nearby Share automatically detects and displays nearby compatible devices, simplifying the process of identifying potential recipients.
  • Privacy Control: Users have granular control over their sharing settings, allowing them to choose which devices can discover them and receive files.

Enabling and Configuring Nearby Share

Enabling Nearby Share is a straightforward process:

  1. Access Settings: Open the Windows Settings app by pressing the Windows key + I.
  2. Navigate to System: Select "System" from the left-hand menu.
  3. Choose Connected Devices: Within the "System" settings, click on "Connected devices."
  4. Locate Nearby Share: Scroll down to the "Nearby Share" section.
  5. Toggle On: Switch the "Nearby Share" toggle to the "On" position.

Once enabled, users can further customize their sharing preferences:

  • Device Visibility: Choose whether to make your device discoverable by all nearby devices, or only by your contacts.
  • Sharing History: Decide whether to keep a history of shared files and devices.
  • File Types: Specify the types of files you wish to share.

Practical Applications of Nearby Share

Nearby Share proves its utility in a variety of scenarios:

  • Sharing Documents and Presentations: Collaborate with colleagues or classmates by quickly sharing documents and presentations without relying on email or cloud storage.
  • Transferring Photos and Videos: Seamlessly move photos and videos between devices, enabling easy sharing with friends and family or backing up important memories.
  • Transferring Music Files: Share playlists or individual songs with friends or transfer music files between devices.
  • Sharing Project Files: Collaborate on projects by transferring files between team members, facilitating efficient workflow.
  • Sharing Documents in Educational Settings: Students can readily share assignments and projects with classmates or instructors, promoting collaborative learning.

Addressing Common Concerns and FAQs

1. What is the range of Nearby Share?

The range of Nearby Share is typically limited to approximately 30 feet. However, the actual range may vary depending on factors such as environmental conditions and the presence of obstacles.

2. Is Nearby Share secure?

Yes, Nearby Share utilizes Bluetooth technology, which encrypts data during transfer, ensuring a secure connection and protecting files from unauthorized access.

3. Can I share files with devices that are not connected to the internet?

Yes, Nearby Share does not require internet connectivity to function. This allows users to share files even in areas with limited or no network access.

4. What happens if a file transfer is interrupted?

If a file transfer is interrupted, the process will resume automatically when the connection is re-established.

5. How do I prevent unwanted file sharing?

Users can control their sharing settings to limit device visibility and choose which devices can discover and receive files. They can also disable Nearby Share altogether.

6. Is Nearby Share available on all Windows 11 devices?

Nearby Share is available on Windows 11 PCs and tablets. It is not currently supported on all devices.

7. Can I share files with devices running different operating systems?

While Nearby Share primarily focuses on Windows devices, it may be possible to share files with devices running other operating systems, such as Android, through third-party applications or workarounds.

Tips for Optimizing Nearby Share

  • Ensure Bluetooth is Enabled: Verify that Bluetooth is enabled on both devices to facilitate a seamless connection.
  • Keep Devices Close: Maintain a close proximity between devices to ensure a stable connection and faster transfer speeds.
  • Check for Updates: Regularly update your devices to benefit from the latest features and bug fixes.
  • Optimize Device Settings: Adjust settings such as device visibility and file type preferences to enhance the sharing experience.
  • Address Connectivity Issues: If encountering connectivity issues, troubleshoot by restarting devices, checking Bluetooth settings, or ensuring that no other devices are interfering with the connection.

Conclusion

Windows 11’s Nearby Share stands as a testament to the evolving landscape of file transfer technologies. Its simplicity, security, and versatility make it a valuable tool for individuals, professionals, and educational institutions alike. By leveraging Bluetooth technology and offering a user-friendly interface, Nearby Share facilitates seamless and secure file sharing between Windows devices, promoting collaboration, efficiency, and convenience in various contexts. As technology continues to advance, Nearby Share is poised to become an indispensable part of the Windows ecosystem, empowering users to share content effortlessly and securely.

Nearby Share Windows 11 — Transfer Files Between Android to PC (2023) - YouTube Nearby Share is Finally Available on Windows, Allowing for a Seamless File Sharing Experience Nearby share for pc  nearby share windows 11  android to pc file transfer  how to use nearby
How to Enable and Use Nearby Sharing in Windows 11? 2024�� How To Use Nearby Share In Windows 11_best Methods - Rayabaan How to enable and use Nearby Sharing on Windows 11/10
Seamless File Sharing: Google Nearby Share for Windows How To Use Nearby Sharing On Windows 11  digisrun

Closure

Thus, we hope this article has provided valuable insights into Windows 11’s "Nearby Share" – A Modern Approach to Seamless File Transfer. We thank you for taking the time to read this article. See you in our next article!