Archives October 2023

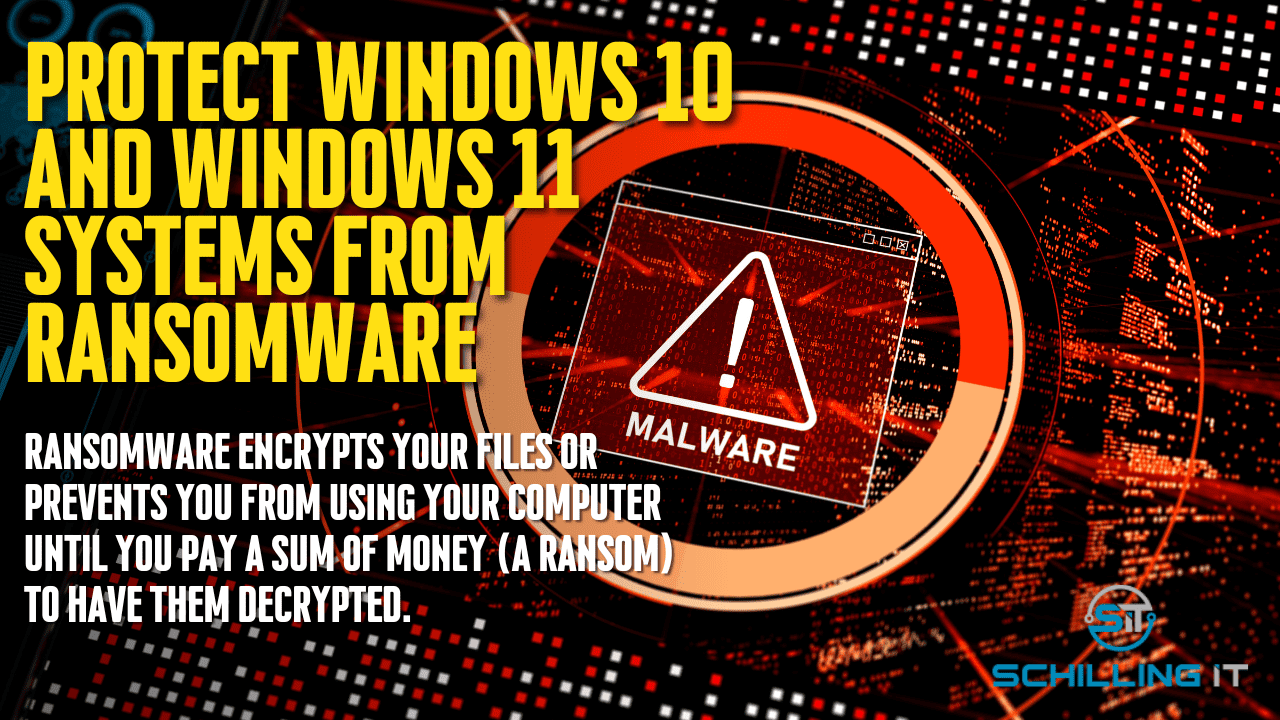
Shielding Windows 10: A Comprehensive Guide To Ransomware Protection

Shielding Windows 10: A Comprehensive Guide to Ransomware Protection

Introduction

With enthusiasm, let’s navigate through the intriguing topic related to Shielding Windows 10: A Comprehensive Guide to Ransomware Protection. Let’s weave interesting information and offer fresh perspectives to the readers.

Shielding Windows 10: A Comprehensive Guide to Ransomware Protection

Windows 10 Your Guide To Ransomware - vrogue.co

Ransomware, a malicious software designed to encrypt a user’s data and hold it hostage for a ransom payment, poses a significant threat to individuals and organizations alike. The ubiquitous nature of Windows 10, coupled with its diverse user base, makes it a prime target for ransomware attacks. This article provides a comprehensive guide to ransomware protection solutions for Windows 10, emphasizing the importance of proactive measures and outlining various strategies to mitigate this threat.

Understanding the Ransomware Threat

Ransomware operates by infiltrating a system, typically through malicious email attachments, compromised websites, or software vulnerabilities. Once installed, it encrypts files, rendering them inaccessible. The attacker then demands a ransom payment, often in cryptocurrency, in exchange for the decryption key.

The consequences of a successful ransomware attack can be severe:

  • Data Loss: Irrecoverable loss of critical files, including personal documents, photos, financial records, and business data.
  • Financial Loss: Ransom payments can be substantial, ranging from hundreds to millions of dollars.
  • Business Disruption: Operational downtime, lost productivity, and potential reputational damage.
  • Legal and Regulatory Compliance Issues: Data breaches and ransomware attacks can trigger legal actions and regulatory fines.

Layered Approach to Ransomware Protection

Effective ransomware protection for Windows 10 requires a layered approach that combines multiple security measures. This approach ensures a robust defense mechanism, reducing the risk of successful ransomware attacks.

1. Operating System Security

  • Keep Windows 10 Updated: Regular updates from Microsoft patch vulnerabilities that ransomware exploits. Enable automatic updates to ensure timely security patches.
  • Enable Windows Defender: Windows 10 includes built-in antivirus protection, Windows Defender, which helps detect and remove malware, including ransomware.
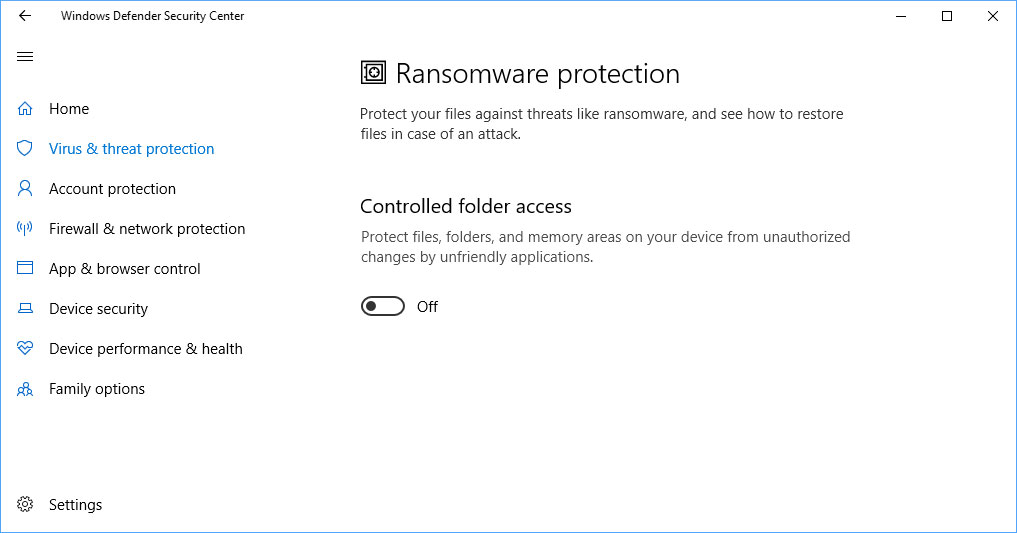
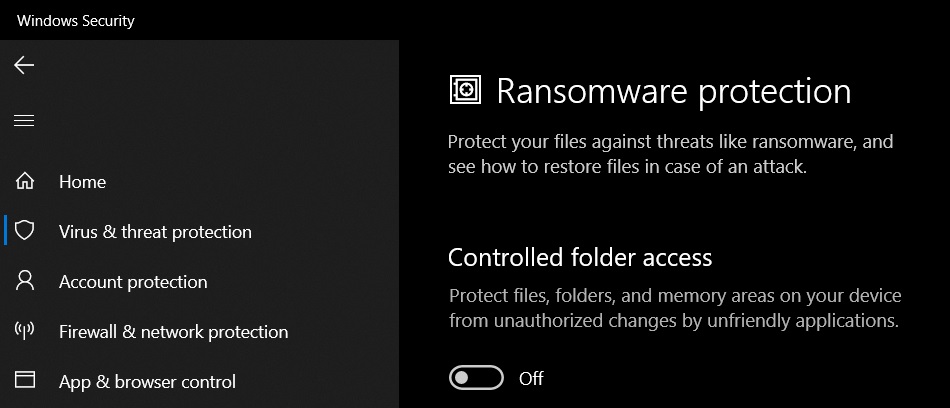
  • Utilize Advanced Security Features: Windows 10 offers advanced security features like Controlled Folder Access, which limits access to specific folders, and Exploit Protection, which mitigates vulnerabilities in applications.

2. Backup and Recovery

  • Implement Regular Backups: Create regular backups of critical data on external drives, cloud storage services, or network-attached storage devices.
  • Test Backup Recovery: Regularly test the backup and recovery process to ensure data can be restored effectively.
  • Offline Backups: Consider storing backups offline, such as on a separate physical drive or at a remote location, to protect against ransomware encryption.

3. User Education and Awareness

  • Train Users on Best Practices: Educate users about ransomware threats, phishing scams, and safe browsing habits.
  • Implement Strong Password Policies: Encourage the use of strong, unique passwords for all accounts and discourage the sharing of credentials.
  • Promote Email Security Awareness: Train users to identify phishing emails, avoid suspicious attachments, and verify sender authenticity.

4. Network Security

  • Firewall Protection: Implement a strong firewall to prevent unauthorized access to your network and block malicious traffic.
  • Network Segmentation: Segment the network to limit the impact of a compromised device.
  • Multi-Factor Authentication (MFA): Utilize MFA for critical network access points to enhance security and prevent unauthorized access.

5. Advanced Security Solutions

  • Ransomware Protection Software: Consider specialized ransomware protection software that monitors file activity, detects suspicious behavior, and can roll back changes made by ransomware.
  • Endpoint Detection and Response (EDR): EDR solutions provide advanced threat detection and response capabilities, including ransomware detection and remediation.
  • Threat Intelligence Services: Utilize threat intelligence services to stay informed about emerging ransomware threats and best practices for mitigation.

FAQs on Ransomware Protection for Windows 10

Q: What are the most common ways ransomware attacks occur?

A: Common attack vectors include:

  • Malicious Email Attachments: Opening infected attachments can trigger ransomware installation.
  • Exploiting Software Vulnerabilities: Outdated software can be vulnerable to ransomware exploits.
  • Phishing Websites: Visiting malicious websites can lead to ransomware downloads.
  • Exploiting Network Vulnerabilities: Weak network security can allow ransomware to spread within a network.

Q: How can I tell if my computer has been infected with ransomware?

A: Signs of a ransomware infection include:

  • Files becoming inaccessible: Data files may be encrypted and appear as gibberish.
  • Ransom demands: A ransom note may appear on your screen demanding payment.
  • Unusual system behavior: Your computer may run slower, freeze, or crash frequently.

Q: What should I do if I suspect my computer has been infected with ransomware?

A: If you suspect a ransomware infection, take the following steps:

  • Disconnect from the network: Disconnect your computer from the internet to prevent further spread.
  • Do not pay the ransom: Paying the ransom does not guarantee file recovery and may encourage further attacks.
  • Contact cybersecurity professionals: Seek expert assistance from cybersecurity specialists or IT professionals.

Q: Are there any free ransomware protection tools available for Windows 10?

A: While free tools may offer basic protection, comprehensive ransomware protection often requires paid software solutions. However, several free tools can help, including:

  • Windows Defender: Windows 10’s built-in antivirus protection.
  • Malwarebytes: A free antivirus software with ransomware protection features.
  • HitmanPro.Alert: A free tool that monitors file activity and alerts users to suspicious behavior.

Tips for Effective Ransomware Protection

  • Regularly review and update security settings: Ensure your Windows 10 security settings are up-to-date and configured for maximum protection.
  • Be cautious of email attachments and links: Avoid opening attachments from unknown senders or clicking suspicious links.
  • Use strong and unique passwords: Implement strong passwords for all online accounts and avoid reusing the same password across multiple accounts.
  • Enable multi-factor authentication (MFA) for critical accounts: MFA adds an extra layer of security by requiring additional verification beyond a password.
  • Keep software up to date: Regularly update all software, including operating systems, applications, and antivirus programs.
  • Back up your data regularly: Implement a robust backup strategy to ensure you can recover your data in case of a ransomware attack.
  • Consider using a dedicated ransomware protection solution: Invest in specialized ransomware protection software for enhanced security.

Conclusion

Ransomware presents a significant threat to Windows 10 users. By implementing a layered approach to security, including operating system updates, regular backups, user education, and advanced security solutions, individuals and organizations can significantly reduce their risk of falling victim to ransomware attacks. Proactive security measures, combined with vigilance and awareness, are crucial for safeguarding data and mitigating the impact of potential ransomware incidents. Remember, staying informed and taking preventive steps is the best defense against this evolving threat.

Complete Guide To Ransomware Protection On Windows 10 - vrogue.co Complete Guide To Ransomware Protection On Windows 10 - vrogue.co How to Enable Ransomware Protection in Windows 10 - Tech Advisor
Windows 10 security: Here's how to shield your files from ransomware, says Microsoft  ZDNET Complete Guide To Ransomware Protection In Microsoft Shield Your Data: Comprehensive Guide to Ransomware Protection
Windows 10 Your Guide To Ransomware - vrogue.co Protect Windows 10 and Windows 11 Systems From Ransomware

Closure

Thus, we hope this article has provided valuable insights into Shielding Windows 10: A Comprehensive Guide to Ransomware Protection. We hope you find this article informative and beneficial. See you in our next article!
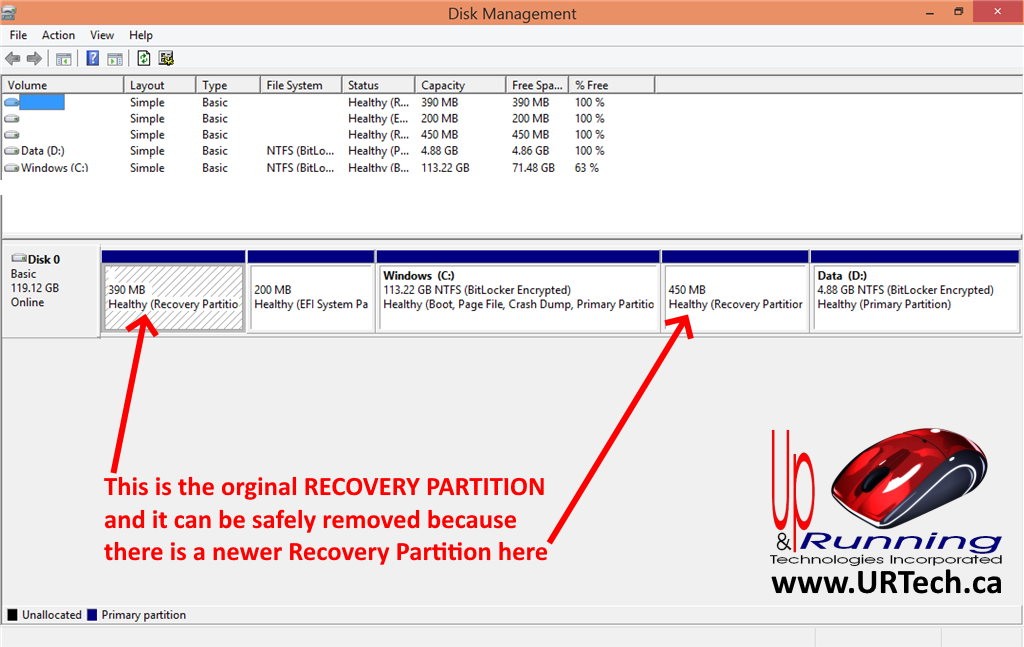
.NET Framework 3.5: A Legacy Framework For Windows 10

.NET Framework 3.5: A Legacy Framework for Windows 10

Introduction

With enthusiasm, let’s navigate through the intriguing topic related to .NET Framework 3.5: A Legacy Framework for Windows 10. Let’s weave interesting information and offer fresh perspectives to the readers.

.NET Framework 3.5: A Legacy Framework for Windows 10

Install .Net Framework 3.5 on Windows 10 - YouTube

The .NET Framework, a foundational software development platform for Windows, has undergone significant evolution throughout its lifespan. While newer versions like .NET 6 and .NET 7 have emerged, .NET Framework 3.5 remains relevant for Windows 10 users, particularly when legacy applications require its support. This article delves into the intricacies of .NET Framework 3.5 on Windows 10, exploring its features, benefits, and considerations for modern users.

Understanding .NET Framework 3.5

.NET Framework 3.5, released in 2007, represents a major update to the .NET Framework platform. It builds upon the foundations established by previous versions, introducing new features and functionalities that cater to a wider range of applications. It encompasses the .NET Framework 2.0 and 3.0, along with additional components, providing a comprehensive development environment.

Key Features of .NET Framework 3.5

.NET Framework 3.5 offers a rich set of features that have made it a popular choice for developers:

  • Windows Presentation Foundation (WPF): WPF is a powerful framework for building visually compelling and interactive user interfaces, particularly for desktop applications. It utilizes a declarative programming model, allowing developers to define the user interface through XML-based markup.
  • Windows Communication Foundation (WCF): WCF facilitates secure and reliable communication between applications, both within and across networks. It provides a unified programming model for building distributed applications, allowing developers to leverage various communication protocols like HTTP, TCP, and MSMQ.
  • Windows Workflow Foundation (WF): WF empowers developers to create and manage complex workflows within applications. It offers a visual design environment for modeling workflows, simplifying the development process for tasks involving multiple steps or decision points.
  • LINQ (Language-Integrated Query): LINQ revolutionizes data access in .NET by integrating query capabilities directly into the language. It allows developers to query data from various sources, including databases, XML files, and in-memory collections, using a consistent syntax.
  • ASP.NET AJAX: ASP.NET AJAX extends the capabilities of ASP.NET, enabling developers to build interactive and dynamic web applications. It leverages JavaScript and AJAX techniques to enhance user experience and provide seamless communication between the client and server.

Benefits of .NET Framework 3.5 for Windows 10

While newer versions of .NET exist, .NET Framework 3.5 continues to offer several benefits:

  • Legacy Application Compatibility: Numerous applications, especially those developed before the transition to .NET Core and .NET, rely on .NET Framework 3.5. Installing this framework ensures compatibility with these applications, preventing potential functionality issues.
  • Widely Supported: .NET Framework 3.5 remains a widely supported framework, with Microsoft providing security updates and bug fixes. This ensures that applications built on this framework remain secure and stable.
  • Mature Ecosystem: A vast ecosystem of libraries, frameworks, and tools has grown around .NET Framework 3.5. This wealth of resources provides developers with a wide range of options for building various applications.
  • Performance Optimization: .NET Framework 3.5 has been optimized for performance over its lifespan, providing a reliable and efficient environment for executing applications.

Considerations for Using .NET Framework 3.5 on Windows 10

While .NET Framework 3.5 offers benefits, it’s essential to consider the following aspects:

  • Security Updates: As a legacy framework, .NET Framework 3.5 may not receive security updates as frequently as newer versions. It’s crucial to keep the operating system and framework updated to mitigate security vulnerabilities.
  • Limited Feature Set: .NET Framework 3.5 lacks the advanced features and functionalities found in modern .NET versions. For new development projects, it’s recommended to consider using newer .NET platforms.
  • Compatibility Issues: Some applications designed for newer .NET versions may not be compatible with .NET Framework 3.5. It’s crucial to verify compatibility before deploying applications.

Installing .NET Framework 3.5 on Windows 10

Installing .NET Framework 3.5 on Windows 10 is a straightforward process:

  1. Open "Windows Features": Go to "Settings" > "Apps" > "Optional features" and click on "Add a feature."
  2. Select ".NET Framework 3.5": Locate ".NET Framework 3.5 (includes .NET 2.0 and 3.0)" in the list and check the box.
  3. Confirm Installation: Click on "OK" to begin the installation process. You may need to download additional files from Microsoft during the installation.

FAQs Regarding .NET Framework 3.5 on Windows 10

Q: Is .NET Framework 3.5 still supported by Microsoft?

A: Yes, Microsoft continues to provide security updates and bug fixes for .NET Framework 3.5, ensuring its continued stability and security.

Q: Can I run .NET Framework 3.5 applications on newer versions of Windows?

A: While .NET Framework 3.5 is officially supported on Windows 10, it’s not guaranteed to be compatible with all newer Windows versions. Microsoft recommends checking for compatibility before installing and running applications.

Q: Can I install .NET Framework 3.5 alongside newer versions of .NET?

A: Yes, you can install and use .NET Framework 3.5 alongside newer .NET versions like .NET 6 or .NET 7. However, it’s essential to ensure that applications are correctly configured to target the intended framework.

Q: Is it recommended to use .NET Framework 3.5 for new development projects?

A: For new development projects, it’s generally recommended to use newer versions of .NET, such as .NET 6 or .NET 7. These versions offer a modern development experience, improved performance, and advanced features.

Q: How can I determine if an application requires .NET Framework 3.5?

A: The application’s installation instructions or documentation will typically specify the required .NET Framework version. If the documentation is unavailable, you can attempt to run the application. If it fails to launch or encounters errors, it might require .NET Framework 3.5.

Tips for Using .NET Framework 3.5 on Windows 10

  • Keep the Framework Updated: Regularly check for and install security updates and bug fixes for .NET Framework 3.5 to maintain a secure and stable environment.
  • Consider Modern Alternatives: For new development projects, explore newer .NET versions like .NET 6 or .NET 7, which offer a modern development experience and advanced features.
  • Verify Compatibility: Before installing and running applications, verify their compatibility with .NET Framework 3.5 to avoid potential issues.
  • Consult Documentation: Refer to the application’s documentation or installation instructions for guidance on the required .NET Framework version and any specific configuration settings.

Conclusion

.NET Framework 3.5 remains a crucial component for Windows 10 users, particularly when legacy applications require its support. While newer versions of .NET offer advanced features and modern development experiences, .NET Framework 3.5 continues to provide stability and compatibility for existing applications. By understanding its features, benefits, and considerations, users can effectively leverage .NET Framework 3.5 on Windows 10 to ensure compatibility and maintain a secure and functional computing environment.

Net Framework 3.5 for Windows 10 - Download & Install Guide How To Install net Framework 3.5 on Windows 10 version 22H2 Install .Net Framework 3.5 on Windows 10 - YouTube
How to Install Microsoft .NET Framework 3.5 – TechCult Cara Install .NET Framework 3.5 di Windows 10 ~ ProFastCV How to download the .NET Framework 3.5 on Windows 10
How to Install Net Framework 3.5 on Windows 10 Offline Installer Without CD or Errors 0x800f081f How to Install .NET Framework 3.5 on Windows 10

Closure

Thus, we hope this article has provided valuable insights into .NET Framework 3.5: A Legacy Framework for Windows 10. We appreciate your attention to our article. See you in our next article!

Unlocking The Potential: Optimizing Windows 10 For Enhanced Performance

Unlocking the Potential: Optimizing Windows 10 for Enhanced Performance

Introduction

In this auspicious occasion, we are delighted to delve into the intriguing topic related to Unlocking the Potential: Optimizing Windows 10 for Enhanced Performance. Let’s weave interesting information and offer fresh perspectives to the readers.

Unlocking the Potential: Optimizing Windows 10 for Enhanced Performance

How to Optimize Windows 10 For GAMING 2022  Unlock PC's Max Potential (FPS Boost + Lower

Windows 10, a ubiquitous operating system powering millions of devices, can sometimes fall short of its full potential, resulting in sluggish performance and frustrating user experiences. However, through a series of strategic optimizations, users can unlock the true power of their Windows 10 machines, experiencing noticeable improvements in speed, responsiveness, and overall efficiency. This article will delve into a comprehensive guide for optimizing Windows 10, covering various aspects that contribute to a smoother and more enjoyable computing experience.

The Importance of Optimization

A well-optimized Windows 10 system offers numerous benefits, including:

  • Increased Responsiveness: Programs launch faster, windows open instantly, and navigating the operating system becomes fluid and intuitive.
  • Enhanced Productivity: Users can focus on their tasks without being hampered by delays or system lag, significantly boosting productivity and efficiency.
  • Improved Battery Life: Optimizations can reduce resource consumption, leading to extended battery life on laptops and tablets.
  • Reduced System Stress: By streamlining processes and managing resources effectively, system stability is enhanced, reducing the likelihood of crashes and errors.
  • Extended Hardware Lifespan: A well-maintained and optimized system can extend the lifespan of hardware components by reducing strain and wear.

A Comprehensive Approach to Optimization

Optimizing Windows 10 is not a one-size-fits-all process. It requires a multi-faceted approach, encompassing various aspects of system configuration and maintenance. The following sections outline key areas to focus on:

1. System Housekeeping: Cleaning Up and Decluttering

  • Disk Cleanup: Over time, temporary files, system cache, and other unnecessary data accumulate, consuming valuable disk space and hindering performance. Regularly running the built-in Disk Cleanup utility can free up significant space.
  • Deleting Unwanted Programs: Unused programs, especially those installed by default, can consume resources and clutter the system. Uninstalling them can free up memory and improve performance.
  • Managing Startup Programs: Many programs launch automatically on startup, consuming valuable resources and slowing down the boot process. Using the Task Manager’s Startup tab, users can disable unnecessary programs from launching automatically.
  • Removing Bloatware: Pre-installed software, often referred to as bloatware, can be resource-intensive and unnecessary. While some bloatware may be difficult to remove, users can explore options like third-party uninstaller tools or clean installations of Windows 10.

2. Fine-Tuning System Settings: Tailoring Windows 10 to Your Needs

  • Visual Effects: Windows 10 offers various visual effects, some of which can be resource-intensive. Adjusting these settings, such as reducing transparency or disabling animations, can improve performance, especially on older hardware.
  • Power Options: Choosing the appropriate power plan can significantly impact battery life and system performance. For optimal performance, select the "High Performance" power plan, although this will consume more power.
  • Indexing Options: Windows indexing allows for faster searches by creating a database of files. However, if the indexing process is consuming excessive resources, adjusting indexing options can improve performance.
  • Virtual Memory: Virtual memory acts as an extension of RAM, using hard drive space to store data when RAM is full. Adjusting the virtual memory settings can improve performance if the system is frequently running out of RAM.
  • Update Management: Windows updates are crucial for security and bug fixes. However, they can sometimes be resource-intensive. Scheduling updates during off-peak hours or pausing updates temporarily can minimize performance impact.

3. Hardware Considerations: Optimizing the Physical Components

  • RAM: The amount of RAM directly impacts system performance. Increasing RAM can significantly improve speed, especially when running demanding applications or multiple programs simultaneously.
  • Storage: A fast storage drive, such as an SSD, can drastically improve system responsiveness, especially during boot-up and application loading.
  • Processor: A powerful processor is essential for handling complex tasks and running demanding applications. Consider upgrading to a newer, more powerful processor if your current one is struggling to keep up.
  • Cooling: Adequate cooling is crucial for preventing overheating and ensuring optimal performance. Ensure proper airflow and clean fans regularly to maintain optimal cooling.

4. Software Optimization: Leveraging Tools and Utilities

  • System Optimization Utilities: Third-party utilities like CCleaner, Advanced SystemCare, or IObit Smart Defrag can help optimize system performance by cleaning up temporary files, managing startup programs, and defragmenting hard drives.
  • Defragmentation: Defragmentation rearranges fragmented files on the hard drive, improving access speed. While less crucial with SSDs, defragmenting traditional hard drives can still improve performance.
  • Antivirus Software: Antivirus software is essential for protecting your system, but it can sometimes consume resources. Choosing a lightweight and efficient antivirus solution can minimize performance impact.

Frequently Asked Questions

Q: How often should I optimize my Windows 10 system?

A: Regular optimization is crucial for maintaining optimal performance. A good practice is to perform a comprehensive optimization at least once a month, with additional cleaning and maintenance tasks performed weekly or as needed.

Q: Is it safe to use third-party optimization utilities?

A: While many third-party optimization utilities are legitimate, some may contain malware or unwanted software. It is essential to choose reputable software from trusted sources and read user reviews before installing any utility.

Q: Can optimizing my system affect my warranty?

A: Generally, optimizing your system using built-in tools and reputable software will not affect your warranty. However, it is always advisable to consult the manufacturer’s documentation or contact support if you have any concerns.

Q: Can I optimize my system without installing any software?

A: Yes, Windows 10 offers several built-in tools for optimizing system performance. These tools can effectively address many common performance issues without requiring third-party software.

Tips for Optimizing Windows 10 Performance

  • Regularly update drivers: Outdated drivers can lead to compatibility issues and performance degradation. Ensure that all drivers, particularly for graphics cards and network adapters, are up to date.
  • Use a reliable antivirus: A robust antivirus solution is crucial for protecting your system from malware and other threats. Ensure that your antivirus software is regularly updated and performing scans.
  • Close unnecessary programs: Running multiple programs simultaneously can consume valuable resources. Close programs that are not actively in use to free up memory and improve performance.
  • Disable unnecessary services: Some services running in the background may not be essential for system functionality. Disabling unnecessary services can improve performance, but proceed with caution as some services may be required for specific applications or features.
  • Monitor resource usage: Use the Task Manager to monitor resource usage and identify processes consuming excessive resources. Terminating these processes can improve performance.

Conclusion

Optimizing Windows 10 for faster performance is a continuous process that requires attention to various aspects of system configuration, maintenance, and hardware considerations. By implementing the strategies outlined in this article, users can significantly improve the responsiveness, efficiency, and overall user experience of their Windows 10 devices. Remember that regular maintenance, system housekeeping, and a proactive approach to optimization are key to unlocking the full potential of Windows 10 and enjoying a smooth, efficient, and enjoyable computing experience.

How to Optimize Windows 10 Performance to Get Ultra-Fast Speed How To Optimize Windows 10 For Best Performance 12 Easy Steps Ensure Better Of 7bestsoftware How to Optimize Windows 10 for Best Performance
How to Optimize Windows 10 for Best Performance (2022) Performance Options Windows 10 25 Best Methods To Optimize Windows 10 Performance
Optimize windows performance - by Technotaught �� How to Optimize Windows 10 Performance ! (Part 1) - YouTube

Closure

Thus, we hope this article has provided valuable insights into Unlocking the Potential: Optimizing Windows 10 for Enhanced Performance. We thank you for taking the time to read this article. See you in our next article!

Windows 11 Pro: A Comprehensive Guide To Features, Activation, And Benefits

Windows 11 Pro: A Comprehensive Guide to Features, Activation, and Benefits

Introduction

In this auspicious occasion, we are delighted to delve into the intriguing topic related to Windows 11 Pro: A Comprehensive Guide to Features, Activation, and Benefits. Let’s weave interesting information and offer fresh perspectives to the readers.

Windows 11 Pro: A Comprehensive Guide to Features, Activation, and Benefits

Buy WINDOWS 11 PRO USER GUIDE: A Comprehensive User Guide for Beginners and Seniors to Master

Windows 11 Pro is the professional-grade version of Microsoft’s latest operating system. It offers a range of enhanced features and functionalities designed for businesses, professionals, and power users who require a robust and secure computing experience. This guide explores the key aspects of Windows 11 Pro, delving into its features, activation process, and the benefits it provides.

Understanding the Significance of Windows 11 Pro

Windows 11 Pro is more than just an upgrade from its predecessor. It represents a significant leap forward in terms of user experience, performance, and security. Its features cater to the needs of individuals and organizations seeking advanced capabilities for productivity, collaboration, and data protection.

Core Features of Windows 11 Pro

Windows 11 Pro boasts a comprehensive set of features that differentiate it from the standard Windows 11 Home edition. These features are designed to address the specific requirements of businesses and professionals, enhancing their workflow and safeguarding their data.

  • Enhanced Security: Windows 11 Pro prioritizes security with features like BitLocker drive encryption, which safeguards sensitive data stored on the device. This feature is particularly crucial for businesses handling confidential information.
  • Domain Join: Businesses can seamlessly integrate their Windows 11 Pro devices into existing Active Directory domains, enabling centralized management and control over user accounts, network resources, and security policies.
  • Remote Desktop: This feature allows users to access and control their Windows 11 Pro device remotely, enabling them to work from anywhere with a secure internet connection. This is a valuable tool for remote workers and businesses with dispersed teams.
  • Hyper-V: Windows 11 Pro includes Hyper-V, a powerful virtualization technology that allows users to run multiple operating systems simultaneously on a single device. This is particularly useful for software developers, testers, and IT professionals who need to work with different environments.
  • Windows Sandbox: This feature provides a secure, isolated environment for running untrusted applications without affecting the main operating system. This helps protect against malware and other security threats.
  • Windows Update for Business: This feature allows businesses to control and manage Windows updates across their devices, ensuring they receive the latest security patches and feature updates in a timely manner.
  • Group Policy Management: Windows 11 Pro provides advanced group policy management tools that enable administrators to configure and manage user settings, security policies, and application deployments across the entire network.
  • Windows Hello for Business: This feature enhances user authentication with biometric login options like facial recognition and fingerprint scanning, providing a more secure and convenient login experience.

Activation: The Key to Unlocking Windows 11 Pro Features

Activation is a crucial step in utilizing the full potential of Windows 11 Pro. It verifies the legitimacy of the operating system and unlocks all its features, including the advanced functionalities designed for businesses and professionals.

How to Activate Windows 11 Pro

There are several ways to activate Windows 11 Pro:

  • Product Key: This is the most common method. A product key is a unique 25-character code that is used to activate the operating system. You can obtain a product key by purchasing a new copy of Windows 11 Pro or by upgrading from a previous version.
  • Digital License: A digital license is an electronic method of activation that is linked to your Microsoft account. If you have previously activated Windows 11 Pro on another device, you can use your digital license to activate it on a new device.
  • Volume Licensing: Businesses can use volume licensing agreements to obtain multiple copies of Windows 11 Pro at a discounted price. Volume licensing also provides access to additional features and support services.

The Importance of Genuine Activation

Activating Windows 11 Pro with a valid product key or digital license is crucial for several reasons:

  • Unlocking All Features: Activation unlocks all the features of Windows 11 Pro, including those designed for businesses and professionals.
  • Security and Stability: Genuine activation ensures that your device is protected from malware and other security threats. It also enhances the overall stability and performance of the operating system.
  • Legal Compliance: Using an unactivated or pirated version of Windows 11 Pro is illegal and can result in legal consequences.
  • Software Updates: Genuine activation allows you to receive the latest software updates and security patches, ensuring that your device is protected from vulnerabilities.

Benefits of Windows 11 Pro

Windows 11 Pro offers a wide range of benefits for businesses, professionals, and power users:

  • Enhanced Productivity: Windows 11 Pro provides a streamlined and intuitive user interface, along with advanced features that boost productivity, such as improved multitasking capabilities, optimized file management tools, and seamless integration with Microsoft productivity apps like Office 365.
  • Improved Security: Windows 11 Pro features robust security measures, including BitLocker drive encryption, Windows Defender Antivirus, and Windows Hello for Business, which protect against malware, data breaches, and unauthorized access.
  • Enhanced Collaboration: Features like Remote Desktop and Domain Join facilitate seamless collaboration among team members, regardless of their location. This enhances communication and streamlines workflows for businesses and organizations.
  • Scalability and Flexibility: Windows 11 Pro is designed to be scalable and flexible, allowing businesses to easily manage and deploy it across multiple devices, ensuring consistent functionality and security.
  • Cost-Effectiveness: Windows 11 Pro provides a cost-effective solution for businesses, as it offers a comprehensive set of features and functionalities that can replace multiple specialized software applications, reducing overall software costs.

FAQs about Windows 11 Pro

Q: What is the difference between Windows 11 Home and Windows 11 Pro?

A: Windows 11 Pro is the professional-grade version of Windows 11, offering advanced features for businesses and professionals, including enhanced security, domain join, remote desktop, Hyper-V, and other functionalities not available in Windows 11 Home.

Q: Can I upgrade from Windows 11 Home to Windows 11 Pro?

A: Yes, you can upgrade from Windows 11 Home to Windows 11 Pro. You will need to purchase a Windows 11 Pro product key and follow the upgrade process.

Q: How do I find my Windows 11 Pro product key?

A: If you purchased a new copy of Windows 11 Pro, your product key should be included in the packaging. You can also find your product key on your digital license, which is linked to your Microsoft account.

Q: Can I use a Windows 10 product key to activate Windows 11 Pro?

A: No, Windows 10 product keys are not compatible with Windows 11 Pro. You will need a separate Windows 11 Pro product key to activate the operating system.

Q: Is Windows 11 Pro compatible with my current hardware?

A: Windows 11 Pro has specific hardware requirements. You can check the compatibility of your device by visiting the Microsoft website.

Tips for Using Windows 11 Pro

  • Regularly Update Your System: Keep your Windows 11 Pro device up-to-date with the latest security patches and software updates to ensure optimal performance and security.
  • Utilize Built-in Security Features: Take advantage of the robust security features included in Windows 11 Pro, such as BitLocker drive encryption and Windows Defender Antivirus, to protect your data and device from threats.
  • Optimize System Performance: Regularly clean your system of temporary files and unused applications to improve performance and free up storage space.
  • Explore Advanced Features: Take the time to explore the advanced features of Windows 11 Pro, such as Hyper-V, Remote Desktop, and Windows Sandbox, to enhance your workflow and productivity.
  • Utilize Group Policy Management: If you are managing multiple devices, leverage group policy management tools to configure and manage user settings, security policies, and application deployments across your network.

Conclusion

Windows 11 Pro is a powerful and versatile operating system that offers a wide range of features and benefits designed for businesses, professionals, and power users. Its advanced security measures, robust management tools, and enhanced collaboration features make it an ideal choice for organizations seeking a reliable and secure computing environment. By understanding the key features, activation process, and benefits of Windows 11 Pro, users can unlock its full potential and optimize their computing experience for productivity, security, and collaboration.

"Get More Done with Windows 11 Pro: A Comprehensive Guide to Features, Benefits, and Why it Windows 11 Pro Activation Key Buy Windows 11 User Guide for Beginners: A Comprehensive Guide to Master Windows 11 Operating
Windows 11: A Comprehensive Guide about Features and Updates Perunity - Latest Business Story Windows 11 Pro License Key Microsoft Windows 11 Pro  StackSocial
Windows 11 Pro Full Overview Windows 11 Pro Features - vrogue.co Windows 11 Professional License Activation Product Key 7BA

Closure

Thus, we hope this article has provided valuable insights into Windows 11 Pro: A Comprehensive Guide to Features, Activation, and Benefits. We hope you find this article informative and beneficial. See you in our next article!

Understanding Disk Partitioning In Windows 10: A Comprehensive Guide

Understanding Disk Partitioning in Windows 10: A Comprehensive Guide

Introduction

In this auspicious occasion, we are delighted to delve into the intriguing topic related to Understanding Disk Partitioning in Windows 10: A Comprehensive Guide. Let’s weave interesting information and offer fresh perspectives to the readers.

Understanding Disk Partitioning in Windows 10: A Comprehensive Guide

Understanding Different Disk Partitions In Windows 10

Disk partitioning is a fundamental aspect of managing storage space in Windows 10. It involves dividing a physical hard drive into multiple logical sections, each treated as a separate storage unit. This practice offers numerous advantages, enhancing system organization, performance, and security. This comprehensive guide delves into the intricacies of disk partitioning in Windows 10, providing a clear understanding of its purpose, benefits, and practical implementation.

The Essence of Disk Partitioning

Imagine a large, empty room. Partitioning is akin to dividing this space into smaller, dedicated areas, each serving a specific purpose. Similarly, disk partitioning divides a physical hard drive into logical sections, known as partitions. Each partition acts as an independent storage unit, enabling the user to organize files, install operating systems, or dedicate space for specific applications.

Benefits of Disk Partitioning

1. Enhanced Organization and Management: Partitioning allows for a structured approach to file organization. Users can dedicate partitions for specific purposes, such as storing operating systems, applications, personal data, or backups. This eliminates the clutter of a single, monolithic storage space and facilitates efficient file management.

2. Improved Security: Partitioning provides a layer of security by isolating different data sets. For instance, installing an operating system on a separate partition safeguards it from potential data corruption or malware attacks that might affect other partitions. This approach minimizes the impact of system failures and facilitates data recovery.

3. Enhanced Performance: By dedicating partitions to specific tasks, the system can optimize resource allocation and improve overall performance. For example, installing an operating system on a separate partition with faster read/write speeds can significantly enhance boot times and application launch speeds.

4. Flexibility and Scalability: Partitioning allows for the flexible allocation of storage space. Users can adjust partition sizes based on their evolving needs, adding or removing partitions as required. This flexibility is crucial in managing storage space efficiently, especially when dealing with large data volumes or multiple operating systems.

5. Simplified Data Recovery: Partitioning facilitates data recovery in the event of system failures or hard drive malfunctions. By separating data into different partitions, recovery efforts can focus on specific sections, minimizing the impact on other data sets.

Types of Partitions in Windows 10

1. Primary Partitions: These are the fundamental partitions that can boot an operating system. Windows 10 allows a maximum of four primary partitions on a single hard drive.

2. Extended Partitions: Extended partitions are used to create logical partitions within a single primary partition. This allows for the creation of more than four partitions on a hard drive, albeit with the limitation that only one extended partition can be present.

3. Logical Partitions: These are created within an extended partition and cannot boot an operating system directly. They are typically used for storing data, applications, or backups.

Creating Partitions in Windows 10

Windows 10 provides built-in tools for managing disk partitions, simplifying the process. Here’s a step-by-step guide:

1. Accessing Disk Management:

  • Press the Windows key + X to open the Quick Access menu.
  • Select "Disk Management" from the list.

2. Identifying Available Space:

  • The Disk Management window displays all connected hard drives and their partitions.
  • Identify the drive you wish to partition and locate any unallocated space.

3. Creating a New Partition:

  • Right-click on the unallocated space and select "New Simple Volume."
  • Follow the on-screen wizard to configure the new partition’s size, drive letter, and file system.

4. Formatting the Partition:

  • The wizard will prompt you to format the new partition. Choose the desired file system (typically NTFS for Windows 10) and assign a volume label.

5. Completing the Process:

  • Click "Finish" to complete the partition creation process.

Considerations for Partitioning

  • Disk Space Allocation: Carefully consider the size of each partition, allocating sufficient space for the intended purpose.
  • File System Choice: Select the appropriate file system for each partition, taking into account compatibility and performance requirements.
  • Backup Strategy: Implement a robust backup strategy to safeguard data in the event of system failures or accidental data loss.

FAQs Regarding Disk Partitioning in Windows 10

1. Is partitioning necessary for Windows 10?

While not mandatory, partitioning offers significant benefits in terms of organization, security, and performance. It is recommended for users who want to manage their storage space effectively, especially those with large data volumes or multiple operating systems.

2. Can I partition a drive that already has an operating system installed?

Yes, you can partition a drive with an existing operating system, but proceed with caution. Ensure you have sufficient unallocated space and back up your data before proceeding.

3. How do I resize existing partitions?

Windows 10’s Disk Management tool allows resizing existing partitions, but it may not always be possible to shrink or expand them to the desired size. Third-party partitioning tools often offer more flexibility in resizing operations.

4. Can I delete a partition?

Yes, you can delete a partition, but ensure it does not contain critical data. Remember that deleting a partition will erase all data within it.

5. What is the difference between GPT and MBR partitioning?

GPT (GUID Partition Table) and MBR (Master Boot Record) are two partitioning schemes. GPT supports larger hard drives and offers better security features, while MBR is compatible with older systems.

Tips for Effective Disk Partitioning in Windows 10

  • Plan Ahead: Carefully consider the purpose and size of each partition before creating them.
  • Use a Partitioning Tool: Third-party partitioning tools offer more advanced features and flexibility compared to Windows 10’s built-in tools.
  • Back Up Data: Always back up your data before making any changes to your disk partitions.
  • Monitor Partition Usage: Regularly monitor partition usage to ensure sufficient space for all your needs.

Conclusion

Disk partitioning is a powerful tool for managing storage space in Windows 10. By dividing a hard drive into logical sections, users can enhance organization, improve security, optimize performance, and simplify data recovery. Understanding the benefits, types, and processes involved in partitioning allows for informed decisions regarding storage management, ensuring a more efficient and secure computing experience.

How to partition Windows 10 - Tech Advisor Understanding Different Disk Partitions In Windows 10 Get Comprehensive Understanding of Windows 10 Recovery Partition - MiniTool Partition Wizard
How to Partition an External Hard Disk in Windows 10 & 11 Disk Partition Windows 10  Disk Partition Kse Kre?  create and format hard disk partition How To Partition A Hard Drive In Windows 10 [Free, No Software Required]
Create and Format a Hard Disk Partition in Windows 10 SOLVED: Windows 10 Hard Drive Partitions Explained In Simple Terms – Up & Running Inc – Tech How

Closure

Thus, we hope this article has provided valuable insights into Understanding Disk Partitioning in Windows 10: A Comprehensive Guide. We hope you find this article informative and beneficial. See you in our next article!

The Power Of Preinstallation Environment (PE) Windows 10: A Comprehensive Guide

The Power of Preinstallation Environment (PE) Windows 10: A Comprehensive Guide

Introduction

In this auspicious occasion, we are delighted to delve into the intriguing topic related to The Power of Preinstallation Environment (PE) Windows 10: A Comprehensive Guide. Let’s weave interesting information and offer fresh perspectives to the readers.

The Power of Preinstallation Environment (PE) Windows 10: A Comprehensive Guide

Ultimate Guide To Creating Windows Preinstallation Environment (WinPE)

The Preinstallation Environment (PE) Windows 10 is a specialized, minimal version of the Windows 10 operating system designed for specific tasks, primarily during the pre-installation or recovery phases of a computer’s lifecycle. It is a versatile tool that offers a range of functionalities, making it indispensable for IT professionals, system administrators, and even home users with advanced troubleshooting needs.

Understanding the Essence of PE Windows 10

Imagine a simplified version of Windows 10, stripped down to its core components, focused on providing essential tools for specific purposes. This is precisely what PE Windows 10 represents. It is a self-contained environment, residing on a bootable media like a USB drive or DVD, capable of running independently from the main operating system. This characteristic makes it ideal for situations where the primary operating system is inaccessible or malfunctioning.

Key Features and Benefits of PE Windows 10

The PE Windows 10 environment is a powerhouse of functionalities, enabling users to perform critical tasks that would otherwise be impossible with a compromised operating system. Some of its key features include:

  • Boot from External Media: PE Windows 10 can be loaded from external media like USB drives or DVDs, bypassing the need for a functional hard drive. This is particularly useful for troubleshooting boot issues, recovering data, or installing a new operating system.

  • Basic System Tools: PE Windows 10 provides a set of essential system tools, including Disk Management, Command Prompt, and Windows Explorer. These tools allow for tasks like disk partitioning, file manipulation, and system diagnostics.

  • Network Connectivity: PE Windows 10 offers basic network capabilities, enabling users to connect to the internet or a local network. This facilitates downloading updates, accessing online resources, or transferring files.

  • Driver Support: PE Windows 10 includes a limited set of drivers for common hardware components, ensuring basic functionality during troubleshooting or installation processes.

  • Customization Options: While not as extensive as the full Windows 10 operating system, PE Windows 10 allows for some level of customization, enabling users to add specific tools or drivers for their specific needs.

The Importance of PE Windows 10

PE Windows 10 plays a crucial role in several scenarios, making it an invaluable tool for various users:

  • System Recovery: When a computer fails to boot or experiences critical errors, PE Windows 10 can be used to diagnose the problem, repair corrupted files, or even restore the system to a previous state.

  • Operating System Installation: PE Windows 10 provides the necessary environment for installing a new operating system, including partitioning the hard drive, formatting drives, and configuring the system settings.

  • Data Recovery: In the event of data loss or hard drive failure, PE Windows 10 can be used to access the affected drive, recover valuable data, and transfer it to a safe location.

  • Hardware Troubleshooting: PE Windows 10 can be used to diagnose hardware issues, identify malfunctioning components, and perform necessary repairs or replacements.

  • System Optimization: PE Windows 10 can be used to perform system optimization tasks, such as cleaning up temporary files, defragmenting the hard drive, or managing system resources.

Creating a PE Windows 10 Environment

Creating a bootable PE Windows 10 environment requires specific tools and steps. While the process might appear complex, it can be accomplished with readily available resources and instructions:

  1. Download PE Builder Tools: Several free and paid PE builder tools are available online, allowing users to create a bootable PE environment. Popular options include WinPE Builder, WinBuilder, and AOMEI PE Builder.

  2. Select a Source Windows Installation: The PE builder tool requires a source Windows 10 installation file (ISO image) to extract the necessary components.

  3. Customize the PE Environment: Users can customize the PE environment by adding specific tools, drivers, or applications based on their needs.

  4. Create a Bootable Media: The PE builder tool creates a bootable USB drive or DVD, containing the PE Windows 10 environment.

FAQs on PE Windows 10

Q: What are the differences between PE Windows 10 and the full Windows 10 operating system?

A: PE Windows 10 is a minimal version of Windows 10, stripped down to essential components, designed for specific tasks, primarily during pre-installation or recovery phases. It lacks many features found in the full Windows 10 operating system, including most applications, user interface customizations, and full hardware support.

Q: Can I use PE Windows 10 to access my personal files and applications?

A: While PE Windows 10 offers basic file management capabilities, it is not designed for accessing personal files or running applications. It primarily focuses on system-level tasks and troubleshooting.

Q: Do I need to install PE Windows 10 on my computer?

A: No, PE Windows 10 is a self-contained environment that runs from a bootable media, such as a USB drive or DVD. It does not require installation on your computer’s hard drive.

Q: Can I use PE Windows 10 to upgrade my current operating system?

A: PE Windows 10 is not designed for upgrading existing operating systems. It is primarily used for troubleshooting, recovery, and clean installations.

Q: Is PE Windows 10 free to use?

A: PE Windows 10 itself is free to use. However, some PE builder tools might require a license fee.

Tips for Using PE Windows 10

  • Back Up Important Data: Before using PE Windows 10 for system recovery or troubleshooting, ensure you have backed up all critical data to prevent accidental loss.

  • Choose a Reliable PE Builder Tool: Select a reputable and well-supported PE builder tool to ensure a stable and functional PE environment.

  • Customize the PE Environment Based on Needs: Add specific tools, drivers, or applications to the PE environment based on the tasks you need to perform.

  • Test the PE Environment Before Use: Test the bootable PE media on a test machine to ensure it functions correctly before using it on your main computer.

Conclusion

The Preinstallation Environment (PE) Windows 10 is a powerful and versatile tool that provides a unique set of capabilities for troubleshooting, recovery, and system management. Its ability to run independently from the main operating system, coupled with its essential system tools, makes it an indispensable resource for IT professionals, system administrators, and even home users with advanced troubleshooting needs. By understanding the benefits and functionalities of PE Windows 10, users can leverage its power to address various system-related challenges and ensure a smooth computing experience.

Ultimate Guide To Creating Windows Preinstallation Environment (WinPE) Microsoft Windows Preinstallation Environment User's Guide  Manualzz Windows Preinstallation Environment - Winpe Tools
Hiren's BootCD PE (Preinstallation Environment) baseado no Windows 10 PE x64. - YouTube What is Windows PE Ultimate Guide To Creating Windows Preinstallation Environment (WinPE)
Ultimate Guide To Creating Windows Preinstallation Environment (WinPE) Windows Preinstallation Environment - BetaWiki

Closure

Thus, we hope this article has provided valuable insights into The Power of Preinstallation Environment (PE) Windows 10: A Comprehensive Guide. We thank you for taking the time to read this article. See you in our next article!

Remove Learn About This Picture

remove learn about this picture

Introduction

In this auspicious occasion, we are delighted to delve into the intriguing topic related to remove learn about this picture. Let’s weave interesting information and offer fresh perspectives to the readers.

Please provide me with the picture you would like me to write about. I need to see the image to understand its content and context before I can write an article about it.

Remove Learn about this picture Desktop icon in Windows 11

Once you provide the picture, I can write a comprehensive article that:

  • Explains the picture’s content and context in detail.
  • Analyzes its significance and potential impact.
  • Provides relevant information and background knowledge.
  • Includes engaging and informative FAQs, tips, and a conclusion.

I will ensure the article is written in a professional, expository style, avoiding first and second-person pronouns and AI jargon.

How To Delete Windows 11 Desktop Spotlight Learn Abou - vrogue.co Remove Windows Spotlight "Learn about this picture" icon from Desktop Guide on How to Remove Learn About This Picture in Windows 11
Delete Windows Spotlight Learn More About This Picture Icon From Windows 11 Desktop  itechguides How to remove Learn more about this picture icon in Windows 11 - YouTube How to Remove 'Learn About this Picture' on Windows 11
Cách xóa biểu tượng Learn about this picture khi bật hình nền Spotlight trên Windows 11 22H2 How to Remove “Learn about this picture” Desktop Icon in Windows 11 » Winhelponline

Closure

Thus, we hope this article has provided valuable insights into remove learn about this picture. We hope you find this article informative and beneficial. See you in our next article!

Bypassing Windows 10’s Out-of-Box Experience (OOBE): A Comprehensive Guide

Bypassing Windows 10’s Out-of-Box Experience (OOBE): A Comprehensive Guide

Introduction

With great pleasure, we will explore the intriguing topic related to Bypassing Windows 10’s Out-of-Box Experience (OOBE): A Comprehensive Guide. Let’s weave interesting information and offer fresh perspectives to the readers.

Bypassing Windows 10’s Out-of-Box Experience (OOBE): A Comprehensive Guide

HOW TO BYPASS OOBE - Out-of-Box Experience - YouTube

The Windows 10 Out-of-Box Experience (OOBE) is a series of setup steps that users encounter when first installing or reinstalling the operating system. It guides users through essential configuration tasks, such as choosing language, region, network connection, and account creation. While this process is designed for user convenience, it can become a hurdle in certain scenarios, leading to the need for bypassing the OOBE.

This guide provides a detailed explanation of bypassing the Windows 10 OOBE, exploring its various methods, potential applications, and associated considerations.

Understanding the Need for OOBE Bypass

Bypassing the OOBE is not a typical requirement for standard Windows 10 installations. It primarily finds use in specific situations, including:

  • Automated Deployments: In enterprise environments, organizations often deploy Windows 10 to multiple devices simultaneously. Bypassing the OOBE streamlines this process, allowing administrators to preconfigure settings and user accounts, saving time and effort.
  • Testing and Development: Developers and testers often need to access a fresh Windows 10 installation quickly for testing purposes. Bypassing the OOBE allows them to skip the setup process and directly access the operating system.
  • Recovering Damaged Systems: In cases where the Windows 10 installation is corrupted or damaged, bypassing the OOBE might be necessary to access the system and perform recovery operations.
  • Customizing Installations: Users who want to customize their Windows 10 installation with specific settings or drivers may find it advantageous to bypass the OOBE and apply these customizations before the initial setup.

Methods for Bypassing the OOBE

Several methods can be employed to bypass the Windows 10 OOBE, each with its own advantages and drawbacks:

1. Using an Unattended Installation:

This method involves creating an unattended installation file using a tool like Windows System Image Manager (DISM). The unattended file contains pre-defined settings and configurations that automatically apply during the installation process, effectively bypassing the OOBE. This method is commonly used in enterprise environments for mass deployment.

2. Utilizing the "Skip the OOBE" Command:

This command, "oobe /skipwelcome", can be entered during the boot process to skip the initial welcome screen and proceed directly to the desktop. This method is relatively simple but may not be suitable for all scenarios, as it lacks the ability to configure settings beforehand.

3. Employing the "Sysprep" Utility:

Sysprep is a powerful tool that prepares a Windows 10 installation for deployment or imaging. It can be used to generalize the installation, removing specific user configurations and settings, allowing for a clean and customizable OOBE experience.

4. Leveraging the "SetupComplete.cmd" Script:

This script, located in the "C:WindowsSystem32Sysprep" directory, allows for custom commands and scripts to be executed after the OOBE. This method provides flexibility in automating specific tasks or customizations after bypassing the OOBE.

5. Using a Third-Party Tool:

Several third-party tools are available specifically designed to bypass the Windows 10 OOBE. These tools often provide a graphical interface and additional features for configuring settings and customizing the installation process.

Considerations and Risks

While bypassing the OOBE can be beneficial in certain situations, it’s essential to be aware of the potential risks and considerations:

  • Security Concerns: Bypassing the OOBE can potentially expose the system to security vulnerabilities if appropriate security measures are not implemented.
  • Configuration Issues: Incorrect configuration settings during OOBE bypass can lead to system instability or functionality issues.
  • Software Compatibility: Certain software applications may rely on specific settings configured during the OOBE. Bypassing it might result in compatibility problems.
  • Data Loss: In some cases, bypassing the OOBE might inadvertently lead to data loss if the system is not properly prepared.

Importance of Proper Implementation

Bypassing the OOBE should be undertaken with caution and thorough understanding of its implications. Proper planning, testing, and implementation are crucial to ensure a successful and secure experience.

FAQs on Bypassing the OOBE

Q: Can I bypass the OOBE on every Windows 10 installation?

A: While the methods discussed can bypass the OOBE, it’s not recommended for every installation. It’s primarily intended for specific scenarios like automated deployments or troubleshooting.

Q: What are the security implications of bypassing the OOBE?

A: Bypassing the OOBE can expose the system to security vulnerabilities if security measures are not implemented during the installation process.

Q: Can I customize Windows 10 settings after bypassing the OOBE?

A: Yes, you can still customize Windows 10 settings after bypassing the OOBE. However, certain settings may require a clean installation or re-applying the configuration.

Q: What happens if I encounter errors during the OOBE bypass process?

A: Errors during the OOBE bypass process can lead to system instability or even data loss. It’s essential to back up data before attempting this process.

Q: Is it possible to revert back to the standard OOBE after bypassing it?

A: Depending on the method used, it might be possible to revert back to the standard OOBE by performing a clean installation of Windows 10.

Tips for Bypassing the OOBE

  • Back Up Data: Before attempting to bypass the OOBE, ensure you have a complete backup of your data to prevent potential loss.
  • Research Thoroughly: Understand the different methods and their implications before proceeding.
  • Test Carefully: Test the bypass process in a controlled environment before applying it to a production system.
  • Consult Documentation: Refer to official Microsoft documentation for detailed instructions and best practices.
  • Seek Expert Help: If you are unsure about any aspect of the process, seek guidance from a qualified IT professional.

Conclusion

Bypassing the Windows 10 OOBE is a specialized technique that can streamline deployments, facilitate testing, and enable customization. However, it’s important to approach it with caution, understanding its potential risks and ensuring proper implementation. By following the guidelines outlined in this guide, users can leverage this technique effectively while minimizing potential issues. Remember, a thorough understanding of the process, combined with proper planning and execution, is key to a successful and secure experience.

Bypassing the OOBE in Windows 10 - YouTube All about OOBE or Out of Box Experience in Windows 10 - Technoresult All about OOBE or Out of Box Experience in Windows 10 - Technoresult
Rerunning the initial Windows setup (OOBE - Out Of box Experience) - YouTube OOBE error in Windows 10 Out-of-Box Experience Windows Out Of Box Experience: OOBESETTINGSMULTIPLEPAGE error on Windows 10  Learn [Solve IT]
How to: Complete the Windows 10 Out of Box Experience - Microsoft Community Out of Box Experience in Windows 10

Closure

Thus, we hope this article has provided valuable insights into Bypassing Windows 10’s Out-of-Box Experience (OOBE): A Comprehensive Guide. We thank you for taking the time to read this article. See you in our next article!

The Silent Update: Troubleshooting Audio Issues After Windows 10 Upgrades

The Silent Update: Troubleshooting Audio Issues After Windows 10 Upgrades

Introduction

With enthusiasm, let’s navigate through the intriguing topic related to The Silent Update: Troubleshooting Audio Issues After Windows 10 Upgrades. Let’s weave interesting information and offer fresh perspectives to the readers.

The Silent Update: Troubleshooting Audio Issues After Windows 10 Upgrades

How to Fix No Sound After Windows 10 Update - YouTube

The Windows 10 operating system, known for its frequent updates, can occasionally introduce unexpected complications, one of which is the loss of audio functionality after an upgrade. This issue, while frustrating, is often resolvable through a methodical approach that addresses potential causes and employs various troubleshooting techniques. This article aims to provide a comprehensive guide for navigating this common post-update challenge, offering clarity, actionable steps, and insights into the underlying reasons behind the silence.

Understanding the Cause of Audio Loss:

The absence of sound after a Windows 10 update can stem from several factors, each demanding a specific approach for resolution. The most common culprits include:

  • Driver Conflicts: Windows updates often introduce new drivers, which may conflict with existing audio drivers, leading to incompatibility and audio malfunction.
  • Corrupted System Files: The update process can sometimes corrupt essential system files, including those responsible for audio output, resulting in a breakdown of audio functionality.
  • Hardware Issues: While less likely, hardware malfunctions, such as faulty sound cards or speakers, can also manifest as audio loss after an update.
  • Software Interference: Certain applications or software installed on the system can interfere with audio output, particularly if they use audio drivers or have conflicting settings.
  • Windows Audio Service Errors: The Windows Audio service, responsible for managing audio output, can encounter errors or become disabled during the update process, leading to silence.

Troubleshooting Strategies for Audio Recovery:

Addressing the silence after a Windows 10 update requires a systematic approach, starting with basic checks and progressively delving into more advanced solutions. The following steps provide a comprehensive guide:

  1. Restart the Computer: The simplest solution often proves effective. A restart can resolve temporary glitches or conflicts that may have occurred during the update process.

  2. Check Audio Settings: Verify that the volume is not muted and that the correct output device is selected in the Windows sound settings.

  3. Update Audio Drivers: Outdated or incompatible drivers are a common culprit. Visit the manufacturer’s website for your sound card or motherboard and download the latest drivers compatible with your Windows 10 version.

  4. Run the Windows Audio Troubleshooter: Windows includes a built-in troubleshooter designed to diagnose and fix audio issues. Access it through the "Settings" app, navigate to "Update & Security," then select "Troubleshoot" and choose "Playing Audio."

  5. Check for Hardware Malfunctions: If the issue persists, consider testing the speakers or headphones on another device to rule out hardware failure.

  6. Disable and Re-enable Audio Services: The Windows Audio service might be disabled or malfunctioning. Open the "Services" window (search for "services.msc" in the Start menu), locate the "Windows Audio" service, right-click, and select "Restart." If the service is disabled, enable it.

  7. Perform a System Restore: If the problem arose immediately after the update, a system restore might revert the system to a previous state, restoring audio functionality. Access system restore through the "Control Panel," navigate to "System and Security," and select "System."

  8. Run a System File Checker (SFC) Scan: Corrupted system files can cause audio problems. Open the Command Prompt as administrator and type "sfc /scannow" to initiate a scan and repair any corrupted files.

  9. Reinstall Audio Drivers: If driver conflicts persist, uninstall the current drivers and reinstall them from the manufacturer’s website.

  10. Contact Microsoft Support: If all else fails, contact Microsoft support for further assistance or guidance on more advanced troubleshooting steps.

Frequently Asked Questions (FAQs) on Audio Loss After Windows 10 Updates:

Q: What if the audio issue persists after following all the steps?

A: If the issue remains unresolved, it might indicate a more complex problem. Consider contacting Microsoft support for further guidance or seeking professional assistance from a computer technician.

Q: Can I prevent audio issues from occurring after future updates?

A: While not entirely preventable, you can minimize the risk by backing up your system before major updates, ensuring your drivers are up-to-date, and avoiding unnecessary software installations that might conflict with audio functionality.

Q: Is there a way to restore audio functionality without reinstalling Windows?

A: In most cases, reinstalling Windows should be a last resort. The troubleshooting steps outlined in this guide aim to resolve audio issues without resorting to a complete reinstall.

Tips for Preventing Audio Loss After Updates:

  • Update Drivers Regularly: Keep your audio drivers up-to-date by downloading the latest versions from the manufacturer’s website.
  • Back Up Your System: Create a system image backup before installing major updates to ensure a safe restore point if issues arise.
  • Avoid Unnecessary Software Installations: Limit the installation of software that might interfere with audio functionality, particularly those that rely on their own audio drivers.
  • Monitor for Updates: Stay informed about upcoming Windows updates and their potential impact on your system.

Conclusion:

Audio loss after a Windows 10 update can be a frustrating experience, but it is often resolvable through systematic troubleshooting. By understanding the potential causes, employing a methodical approach, and utilizing the available tools and resources, users can regain their audio functionality and restore their computing experience. Remember that seeking professional help from Microsoft support or a computer technician is always an option if the issue proves persistent.

How to Fix: No Sound After Windows 10/11 Update - Sound Missing 2024 [Solved] - YouTube How to Fix Sound or Audio Problems on Windows 10  windows 10 sound issues after update - 2019 How to fix audio after applying system update (KB5015878) on Windows 10  Windows Central
Fix Audio problem after Windows update KB5015878 in Windows 10 - YouTube How To Resolve/Fix Audio or Sound Problems After Update Windows 10 in 2020? - YouTube Fix Audio problem after Windows update KB5015878 in Windows 10 - YouTube
How to fix audio after applying system update (KB5015878) on Windows 10 How to Fix Sound Problems After Windows 10 Upgrade Solved

Closure

Thus, we hope this article has provided valuable insights into The Silent Update: Troubleshooting Audio Issues After Windows 10 Upgrades. We hope you find this article informative and beneficial. See you in our next article!

Navigating File Transfers In Windows 11: A Comprehensive Guide To Bluetooth Connectivity

Navigating File Transfers in Windows 11: A Comprehensive Guide to Bluetooth Connectivity

Introduction

In this auspicious occasion, we are delighted to delve into the intriguing topic related to Navigating File Transfers in Windows 11: A Comprehensive Guide to Bluetooth Connectivity. Let’s weave interesting information and offer fresh perspectives to the readers.

How to Transfer Files via Bluetooth on Windows 11

The evolution of technology has brought forth a myriad of ways to share data. Among them, Bluetooth has emerged as a reliable and versatile solution, particularly for short-range file transfers. While Windows 11 offers a robust and user-friendly interface, navigating the intricacies of Bluetooth file sharing can sometimes be challenging. This article delves into the specifics of receiving files via Bluetooth on Windows 11, providing a comprehensive guide to ensure seamless and efficient data exchange.

The Fundamentals of Bluetooth File Transfer

Bluetooth, a wireless communication technology, operates on a short-range frequency, typically within a 10-meter radius. Its primary function is to facilitate data transfer between devices, including smartphones, laptops, tablets, and peripherals. In the context of Windows 11, Bluetooth serves as a bridge for transferring files between your computer and compatible devices, such as another computer, a smartphone, or a printer.

Enabling Bluetooth on Windows 11

Prior to initiating any file transfer, ensuring that Bluetooth is enabled on your Windows 11 device is crucial. To activate Bluetooth:

  1. Open Settings: Click the "Start" button, then select "Settings."
  2. Navigate to Bluetooth & Devices: In the Settings menu, choose "Bluetooth & devices."
  3. Enable Bluetooth: Toggle the Bluetooth switch to the "On" position.

Pairing Your Devices for File Transfer

Pairing your Windows 11 computer with the sending device is the next crucial step. This process establishes a secure connection, allowing the devices to communicate and exchange data.

  1. Discoverable Mode: On the sending device (e.g., a smartphone), ensure Bluetooth is enabled and the device is set to "discoverable mode." This allows your Windows 11 computer to locate it.
  2. Device Search: In the Windows 11 Bluetooth & devices settings, click "Add Bluetooth or other device."
  3. Select Bluetooth: Choose "Bluetooth" from the available options.
  4. Pair with Device: Your computer will scan for discoverable devices. Select the desired device from the list and follow the on-screen instructions to complete the pairing process.

Receiving Files via Bluetooth on Windows 11

Once the devices are paired, you can initiate the file transfer process. The receiving device, in this case, your Windows 11 computer, will automatically detect files sent via Bluetooth.

  1. File Transfer Request: Upon receiving a file transfer request, a notification will pop up on your Windows 11 screen.
  2. Accept or Decline: Choose "Accept" to receive the file or "Decline" to dismiss the request.
  3. File Location: The received file will be saved to your "Downloads" folder by default. However, you can customize the destination folder if desired.

Alternative Methods for Receiving Files

While the traditional Bluetooth file transfer method is straightforward, there are alternative approaches available, offering additional flexibility and control.

  1. File Transfer Apps: Numerous file transfer applications are available for Windows 11, providing a more streamlined and feature-rich experience. Some popular options include:
    • SHAREit: A cross-platform file transfer application with a user-friendly interface.
    • Xender: Known for its high transfer speeds and compatibility with various devices.
    • AirDroid: Allows for file transfer, remote control, and other functionalities.
  2. Cloud Storage Services: Utilizing cloud storage services like Dropbox, Google Drive, or OneDrive can be an efficient way to share files. The sender uploads the file to the cloud, and the receiver can access it through the service’s web interface or mobile app.

Troubleshooting Common Bluetooth File Transfer Issues

Despite the simplicity of the process, occasional issues may arise during Bluetooth file transfers. Here are some common problems and their potential solutions:

  1. Device Invisibility: If your Windows 11 computer cannot locate the sending device, ensure Bluetooth is enabled on both devices and the sending device is in discoverable mode.
  2. Pairing Failure: If pairing fails, try restarting both devices and attempting the pairing process again. Ensure the devices are within range and there are no obstacles hindering the Bluetooth signal.
  3. Slow Transfer Speeds: Bluetooth transfer speeds can be relatively slow compared to other methods. Consider using a wired connection for large files or using a file transfer app that optimizes speed.
  4. File Corruption: If received files are corrupted, try re-sending the files or ensure the sending device has sufficient storage space and battery life.

FAQs about Receiving Files via Bluetooth on Windows 11

Q: Can I transfer any type of file via Bluetooth?

A: While Bluetooth supports a wide range of file types, it may not be suitable for transferring large files or files with sensitive information.

Q: Is Bluetooth file transfer secure?

A: Bluetooth uses encryption to secure data transfers. However, it’s essential to ensure that your devices are paired with trusted devices and avoid sharing sensitive information over unsecure connections.

Q: Can I transfer files between two Windows 11 computers via Bluetooth?

A: Yes, file transfers between two Windows 11 computers are possible via Bluetooth.

Q: What is the maximum file size I can transfer via Bluetooth?

A: The maximum file size depends on the Bluetooth version and the capabilities of the devices involved. Generally, Bluetooth 4.0 and above supports larger files, while older versions may have limitations.

Tips for Seamless Bluetooth File Transfer on Windows 11

  • Keep Devices Close: Ensure the devices are within Bluetooth range (typically 10 meters) for optimal signal strength.
  • Minimize Interference: Avoid transferring files in areas with strong Wi-Fi signals or other wireless devices, as they can interfere with Bluetooth connectivity.
  • Update Drivers: Ensure your Bluetooth driver is up-to-date for optimal performance and compatibility.
  • Consider Alternative Methods: For large files or files with sensitive information, consider using alternative methods like wired connections, cloud storage, or file transfer apps.

Conclusion

Receiving files via Bluetooth on Windows 11 presents a convenient and accessible method for data exchange between compatible devices. By understanding the fundamentals of Bluetooth connectivity, pairing devices effectively, and troubleshooting potential issues, users can seamlessly transfer files and leverage the versatility of this wireless technology. While Bluetooth may not be the most efficient solution for every scenario, it remains a valuable tool for sharing data, particularly for smaller files and short-range transfers.

How to Transfer Files between Two Windows 11 PCs with Bluetooth?  Gear Up Windows How to Use Bluetooth on Windows 11 How to Transfer File From Android to Windows 11 via Bluetooth
How to Transfer Files Using Bluetooth on Windows 11 - YouTube How to transfer files via Bluetooth in Windows 11 (without external apps) - YouTube Receive Files Bluetooth Windows 11
How to Send or Receive files via Bluetooth on Windows 11/10 How to Transfer Files between Two Windows 11 PCs with Bluetooth?  Gear Up Windows

Closure

Thus, we hope this article has provided valuable insights into Navigating File Transfers in Windows 11: A Comprehensive Guide to Bluetooth Connectivity. We thank you for taking the time to read this article. See you in our next article!