Archives September 2023

Troubleshooting Windows 10 Boot Issues: A Comprehensive Guide

Troubleshooting Windows 10 Boot Issues: A Comprehensive Guide

Introduction

In this auspicious occasion, we are delighted to delve into the intriguing topic related to Troubleshooting Windows 10 Boot Issues: A Comprehensive Guide. Let’s weave interesting information and offer fresh perspectives to the readers.

Troubleshooting Windows 10 Boot Issues: A Comprehensive Guide

How To Fix Windows 10 Startup and Boot Problems - YouTube

The inability to boot into Windows 10 can be a frustrating experience, leaving users stranded and unable to access their data or applications. This guide aims to provide a comprehensive understanding of common boot issues and equip users with the tools and knowledge to diagnose and resolve them effectively.

Understanding Boot Processes and Common Issues

Before delving into troubleshooting techniques, it’s essential to grasp the fundamental steps involved in the Windows 10 boot process. When a computer powers on, the BIOS (Basic Input/Output System) takes control, performing initial hardware checks and loading the operating system from the hard drive. This process involves multiple stages:

  1. POST (Power-On Self Test): The BIOS performs a series of checks on critical hardware components, including RAM, CPU, and storage devices.
  2. Boot Device Selection: The BIOS identifies and selects the boot device (usually a hard drive or SSD) containing the operating system.
  3. Boot Loader Loading: The BIOS loads the boot loader, a small program responsible for initiating the operating system.
  4. Operating System Initialization: The boot loader loads the Windows kernel and other essential files, ultimately leading to the familiar Windows desktop.

Numerous factors can disrupt this intricate boot sequence, leading to various error messages or a complete failure to load Windows. Common culprits include:

  • Hardware Malfunctions: Faulty RAM, a failing hard drive, or a loose connection can prevent the system from booting.
  • Software Conflicts: Incompatible drivers, corrupted system files, or malware infections can interfere with the boot process.
  • Boot Configuration Issues: Incorrect boot order settings in the BIOS, corrupted boot files, or missing system files can hinder the loading of the operating system.
  • System Updates: Faulty or incomplete updates can introduce errors that disrupt the boot process.

Troubleshooting Techniques: A Step-by-Step Approach

Addressing Windows 10 boot issues involves a systematic approach, starting with simple checks and progressively moving towards more complex solutions:

1. Basic Checks:

  • Power Cycle: A simple restart can resolve temporary glitches or software conflicts.
  • Hardware Inspection: Visually inspect the system for loose connections, damaged cables, or dust accumulation.
  • BIOS Settings: Check the boot order in the BIOS to ensure the correct boot device is selected.
  • External Devices: Disconnect any unnecessary peripherals, such as USB drives or external hard drives, to eliminate potential conflicts.

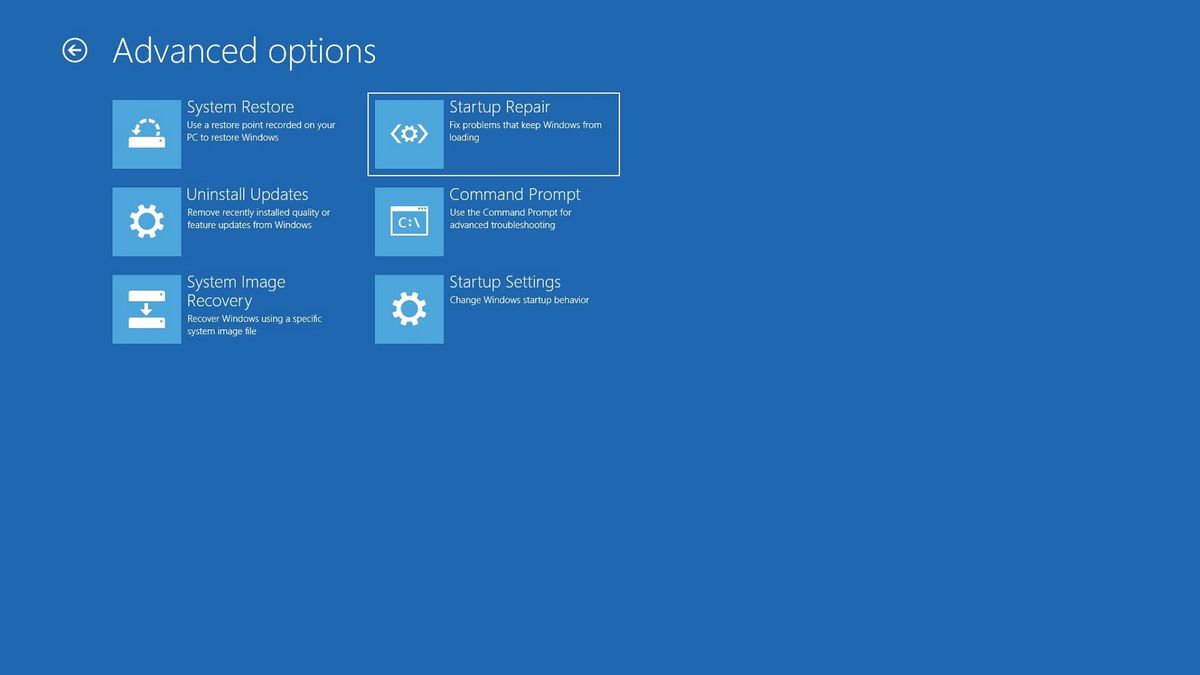
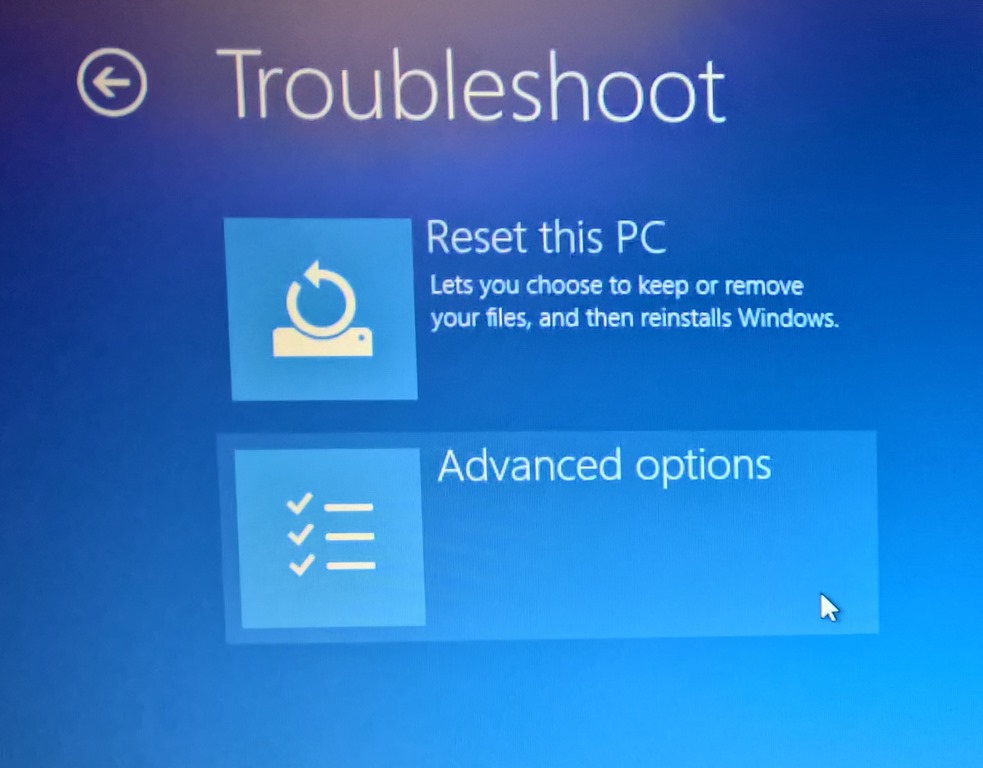
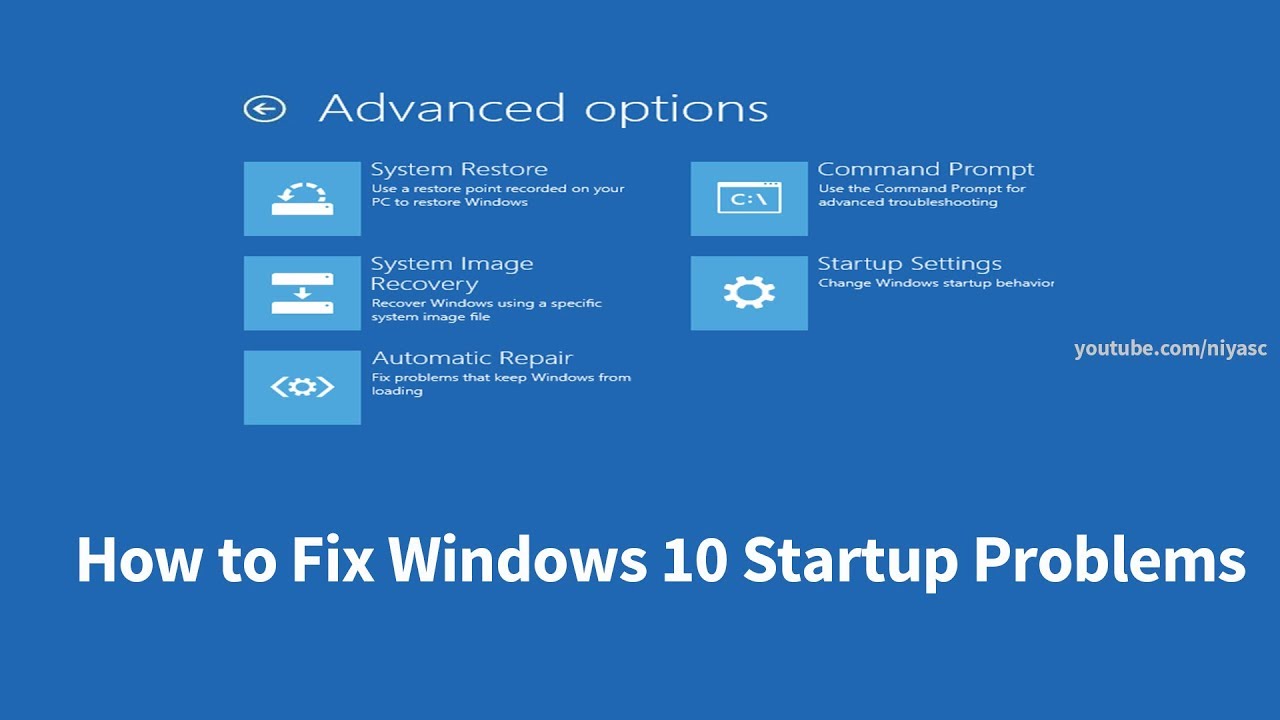
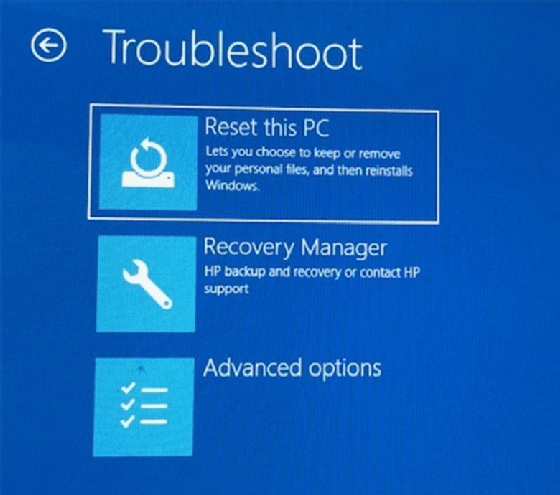
2. Advanced Boot Options:

  • Safe Mode: Boot into Safe Mode to isolate issues caused by third-party applications or drivers. This mode loads a minimal set of system files and drivers.
  • System Restore: Utilize System Restore to revert the system to a previous working state. This option restores system files and settings to a point before the boot issue occurred.
  • Startup Repair: This built-in tool attempts to repair common boot problems, such as corrupted boot files or missing system files.

3. Repairing Boot Files:

  • Bootrec.exe: This command-line tool is included in the Windows Recovery Environment (WinRE) and offers several options for repairing boot files:
    • bootrec /fixmbr: Repairs the Master Boot Record (MBR), which is the first sector on the hard drive containing essential boot information.
    • bootrec /fixboot: Rewrites the boot sector on the system partition, addressing issues with the boot loader.
    • bootrec /scanos: Scans the hard drive for Windows installations and lists them.
    • bootrec /rebuildbcd: Rebuilds the Boot Configuration Data (BCD), which stores information about the operating systems installed on the computer.

4. Reinstalling Windows:

  • Clean Installation: If all other troubleshooting steps fail, a clean installation of Windows 10 may be necessary. This involves formatting the hard drive and reinstalling the operating system from scratch.
  • In-place Upgrade: This option upgrades the existing Windows installation to the latest version without deleting user data.

5. Seeking Professional Assistance:

  • Data Recovery: If the issue involves a corrupted hard drive or data loss, seeking professional data recovery services is crucial.
  • Hardware Repair: If suspected hardware malfunctions are causing the boot issues, consulting a qualified technician for diagnosis and repair is recommended.

FAQs: Addressing Common Concerns

1. What are the most common error messages encountered during the boot process?

  • "BOOTMGR is missing": Indicates a corrupted or missing boot manager.
  • "Operating System not found": Suggests a problem with the boot loader or the operating system files.
  • "STOP error": A blue screen with a STOP code indicates a system crash caused by hardware or software issues.
  • "Windows cannot access the specified device": Points to a problem with the hard drive or its connection.

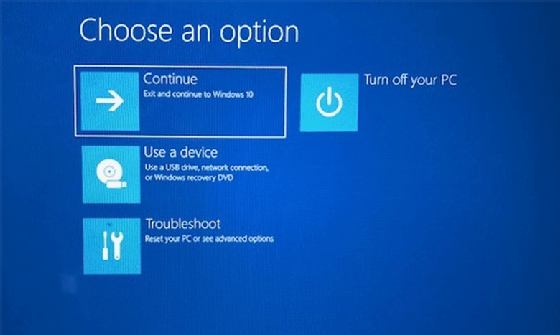
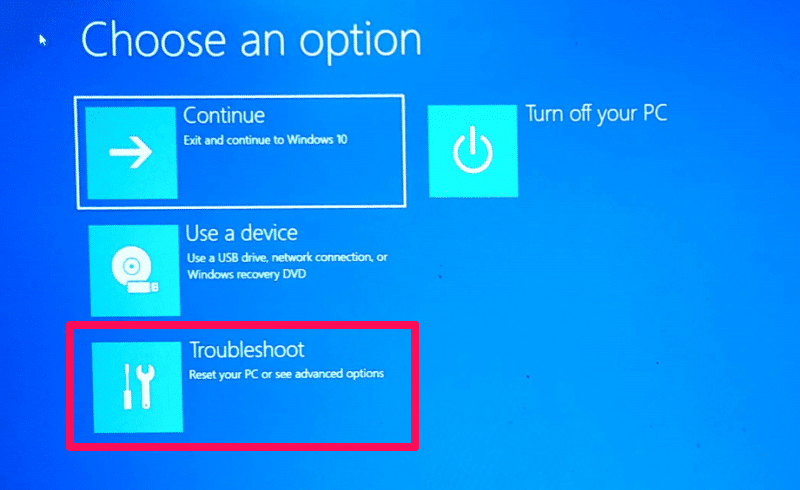
2. How do I access the Windows Recovery Environment (WinRE)?

  • During Boot: Repeatedly press the F8 key during the boot process to access the Advanced Boot Options menu.
  • Using a Recovery Drive: Boot from a USB recovery drive or DVD created using the Windows Media Creation Tool.

3. Can I repair the boot files without reinstalling Windows?

Yes, using the Bootrec.exe tool in the Windows Recovery Environment can often repair corrupted boot files without requiring a full reinstall.

4. What if my system won’t boot into Safe Mode?

If Safe Mode is inaccessible, consider using a bootable USB drive or CD containing a recovery tool like Hiren’s BootCD to access advanced options.

5. How do I prevent future boot issues?

  • Regularly Back Up Data: Create regular backups of important data to ensure data recovery in case of system failure.
  • Update Drivers: Keep device drivers updated to ensure compatibility and stability.
  • Run Anti-Malware Scans: Regularly scan for malware to prevent infections that can disrupt the boot process.
  • Avoid Installing Unnecessary Software: Limit the number of applications installed to minimize potential conflicts.

Tips for Effective Troubleshooting:

  • Document Symptoms: Record detailed error messages, boot behavior, and any recent changes made to the system.
  • Isolate the Issue: Try to narrow down the cause of the boot problem by removing or disabling components or applications.
  • Use a Bootable USB Drive: Create a bootable USB drive with a recovery tool or a live Linux distribution for troubleshooting.
  • Seek Support: If you’re unable to resolve the issue, don’t hesitate to seek help from online forums, technical support websites, or qualified computer technicians.

Conclusion: A Comprehensive Approach to Boot Troubleshooting

Windows 10 boot issues can arise from various factors, ranging from hardware malfunctions to software conflicts. By understanding the boot process and employing a methodical troubleshooting approach, users can effectively diagnose and address these problems. Remember to prioritize data backup, keep drivers updated, and practice safe computing habits to minimize the risk of future boot issues. If all else fails, seeking professional assistance can provide the necessary expertise to restore your system to working order.

8 Ways to Fix Boot Device Problem in Windows 10 โ€“ TechCult How to access Windows 10 troubleshooting tools step by step  TechTarget How To Easily Boot Windows 10 In Safe Mode?
How to use Startup Repair to fix boot problems with Windows 10  Windows Central Troubleshooting Windows 10 How to Fix Windows 10 Startup Problems -4 Ways-
Fix Boot Device Problem In Windows 10  techteds How to access Windows 10 troubleshooting tools step by step  TechTarget

Closure

Thus, we hope this article has provided valuable insights into Troubleshooting Windows 10 Boot Issues: A Comprehensive Guide. We appreciate your attention to our article. See you in our next article!

Reliving The Golden Age: Exploring PlayStation 1 Emulation On Windows 10 64-bit

Reliving the Golden Age: Exploring PlayStation 1 Emulation on Windows 10 64-bit

Introduction

With great pleasure, we will explore the intriguing topic related to Reliving the Golden Age: Exploring PlayStation 1 Emulation on Windows 10 64-bit. Let’s weave interesting information and offer fresh perspectives to the readers.

Reliving the Golden Age: Exploring PlayStation 1 Emulation on Windows 10 64-bit

Ps1 emulator for windows 10 64 bit - pilotmember

The PlayStation 1, fondly known as PS1, marked a pivotal moment in gaming history. Its iconic library of titles, groundbreaking 3D graphics, and innovative controller design captivated millions. While the hardware itself may be aging, the desire to revisit these classics remains strong. Thankfully, emulation offers a viable path for modern gamers to experience the magic of the PS1 on contemporary systems like Windows 10 64-bit.

Understanding Emulation: Bridging the Gap

Emulation, in essence, involves creating a virtual environment that mimics the hardware and software of a specific platform. In the context of PS1 emulation, this means replicating the functionality of the original PlayStation console within a modern computer. This allows users to run PS1 games on their Windows 10 machines, bypassing the need for the original hardware.

Benefits of PS1 Emulation on Windows 10 64-bit

The resurgence of interest in PS1 emulation stems from several advantages it offers:

  • Accessibility: Emulation provides a readily accessible means to play PS1 games without needing to locate, maintain, or purchase the original hardware. This is particularly beneficial for those who may not have access to the original console or wish to avoid the hassle of acquiring one.
  • Convenience: Emulation eliminates the need for physical media like CDs or DVDs. Users can simply download and install game files, streamlining the game setup process.
  • Enhanced Functionality: Emulators often offer features not present on the original hardware, such as save state functionality, allowing users to pause gameplay at any point and resume later. Additionally, emulators can often enhance game performance, providing smoother gameplay and higher frame rates than the original hardware could achieve.
  • Preservation: Emulation plays a vital role in preserving gaming history. It allows users to access and enjoy games that may be difficult or impossible to find in their original form. This ensures that these classic titles remain accessible for future generations.
  • Customization: Emulators offer a level of customization that was not possible on the original hardware. Users can adjust game settings, resolutions, and even control mappings to personalize their gaming experience.

Choosing the Right PS1 Emulator

Several emulators exist for PS1 games on Windows 10, each with its strengths and weaknesses. Some popular options include:

  • ePSXe: A long-standing and widely recognized emulator known for its stability and compatibility with a wide range of games.
  • PCSX2: Originally designed for PlayStation 2 emulation, PCSX2 also supports PS1 games with excellent performance and features.
  • Mednafen: A versatile emulator that supports various systems, including PS1, known for its accuracy and performance.
  • RetroArch: A multi-system emulator that includes a PS1 core, offering a unified interface for managing and playing various retro games.

Setting Up and Using a PS1 Emulator

The process of setting up a PS1 emulator on Windows 10 64-bit generally involves the following steps:

  1. Download and Install the Emulator: Choose an emulator based on your preferences and system specifications. Download the emulator from a reputable source and follow the installation instructions.
  2. Obtain PS1 Game Files: Locate the game files, typically in the form of ISO or BIN files. You can find these files online, but ensure they are sourced legally and ethically.
  3. Configure the Emulator: Once installed, configure the emulator to your liking. This may involve adjusting settings like resolution, frame rate, and controller mapping.
  4. Load and Play the Game: Load the game file into the emulator and enjoy playing your favorite PS1 classics.

Frequently Asked Questions (FAQs)

Q: Is PS1 emulation legal?

A: Emulation itself is generally legal. However, distributing copyrighted game files without permission from the copyright holder is illegal. It is important to acquire PS1 game files legally, either by purchasing them digitally or obtaining them from legitimate sources.

Q: Do I need a powerful computer to run PS1 emulators?

A: PS1 emulators are relatively lightweight and can run smoothly on most modern computers. However, for optimal performance, a machine with a decent processor and graphics card is recommended.

Q: Can I use my PlayStation controller with the emulator?

A: Yes, you can use a PlayStation controller with most PS1 emulators. Many emulators support various controller types, including the original PlayStation controller, USB controllers, and even Bluetooth controllers.

Q: What if a game doesn’t work properly?

A: Some games may require specific settings or configuration adjustments within the emulator. Consult online resources and forums for troubleshooting tips and solutions for specific games.

Tips for Optimizing PS1 Emulation

  • Use a dedicated graphics card: While PS1 games are not graphically demanding, a dedicated graphics card can significantly improve performance and visual quality.
  • Adjust the emulator settings: Experiment with different settings, such as resolution, frame rate, and controller mapping, to find the optimal configuration for your system and preferences.
  • Use high-quality game files: Ensure that the game files you are using are not corrupted or incomplete, as this can lead to performance issues or crashes.
  • Check for updates: Emulator developers regularly release updates to improve compatibility, performance, and stability. Keep your emulator up to date to ensure the best possible experience.

Conclusion

Emulation provides a valuable avenue for modern gamers to experience the rich history of PlayStation 1 gaming. By replicating the console’s functionality on Windows 10 64-bit systems, users can revisit classic titles, enjoy enhanced features, and preserve a significant part of gaming history. While legal considerations regarding game files remain important, the availability of emulators offers a convenient and accessible way to enjoy the PlayStation 1’s legacy.

RetroBat 12TB PlayStation 1 and 2 Complete Emulation Hard Drive for Windows - RetroMini Store Best ps1 emulator for windows 10 - hmholoser Sony PlayStation (1) - Reliving Golden Age - Pixel Refresh
PlayStation One Emulator Setup Windows 10 Test - YouTube FREE DOWNLOAD PLAYSTATION (PS1, PSX) EMULATOR FOR PC - YouTube Sony PlayStation (1) - Reliving Golden Age - Pixel Refresh
Cara Bermain Game PS1 Dengan Emulator  SukaDunia.com Playstation 1 emulator - architectlena

Closure

Thus, we hope this article has provided valuable insights into Reliving the Golden Age: Exploring PlayStation 1 Emulation on Windows 10 64-bit. We appreciate your attention to our article. See you in our next article!

Navigating The Cost Of Windows 11: A Comprehensive Guide

Navigating the Cost of Windows 11: A Comprehensive Guide

Introduction

With great pleasure, we will explore the intriguing topic related to Navigating the Cost of Windows 11: A Comprehensive Guide. Let’s weave interesting information and offer fresh perspectives to the readers.

Windows 11 Pricing & Costs Guide

Windows 11, Microsoft’s latest operating system, has introduced a plethora of new features and design enhancements, but understanding its cost structure is crucial for both individuals and businesses. This article aims to provide a comprehensive guide to the various ways one can acquire Windows 11, outlining the different pricing models, licensing options, and factors influencing the overall cost.

Understanding the Cost Landscape:

Windows 11’s pricing is not a one-size-fits-all scenario. It varies significantly depending on factors like the intended use (personal or commercial), the type of device (new or existing), and the chosen licensing option.

1. New Devices:

Purchasing a new computer pre-installed with Windows 11 is the most common and often the most convenient way to obtain the OS. In this case, the cost of the operating system is typically included in the overall price of the device. The price of the computer will naturally vary depending on its specifications, brand, and retailer.

2. Upgrading Existing Devices:

For users with compatible Windows 10 devices, upgrading to Windows 11 is a free option. This upgrade path is available directly through the Windows Update feature, allowing users to transition to the latest OS without incurring additional costs. However, it’s important to note that not all Windows 10 devices meet the minimum system requirements for Windows 11, and upgrading may not be possible in some cases.

3. Standalone Licenses:

Windows 11 can also be purchased as a standalone license, allowing users to install it on a new or existing computer. These licenses can be acquired directly from Microsoft or authorized retailers. The cost of a standalone license varies depending on the type of license, with options including:

  • Windows 11 Home: Designed for personal use, it offers a wide range of features for everyday tasks, entertainment, and light productivity.
  • Windows 11 Pro: This license is intended for professionals and small businesses, offering additional features like enhanced security, remote desktop capabilities, and support for domain joining.
  • Windows 11 Enterprise: This version is targeted at large organizations and offers advanced features for managing and securing a large network of devices.

4. Subscription-Based Options:

Microsoft also offers subscription-based options for Windows 11 through its Microsoft 365 service. These subscriptions provide access to the latest version of Windows, along with other Microsoft productivity apps like Office, OneDrive cloud storage, and security features.

Factors Influencing Windows 11 Cost:

Several factors contribute to the overall cost of Windows 11, impacting the final price tag:

  • Device Type: New computers often come pre-installed with Windows 11, while upgrading existing devices may be free or require a standalone license purchase.
  • Licensing Options: The choice between different licensing options (Home, Pro, Enterprise) directly affects the price, with each version offering different features and functionalities.
  • Retailer Pricing: Prices can vary across different retailers and online marketplaces, so comparing prices before purchasing is essential.
  • Promotional Offers: Microsoft and retailers often run promotions and discounts, impacting the cost of Windows 11.
  • Additional Software: Depending on the chosen license, users may need to purchase additional software like antivirus or productivity suites, adding to the overall cost.

Benefits of Windows 11:

While cost is a crucial factor, it’s important to consider the benefits of upgrading to Windows 11:

  • Enhanced Security: Windows 11 incorporates advanced security features like hardware-based security, improved threat detection, and enhanced privacy controls.
  • Improved Performance: The new OS boasts optimized performance, faster boot times, and improved resource management.
  • Modernized Interface: Windows 11 features a refreshed user interface with a sleek, modern design, improved multitasking capabilities, and a focus on user-friendliness.
  • Integration with Microsoft Services: Windows 11 seamlessly integrates with Microsoft services like OneDrive, Teams, and Xbox, enhancing the overall user experience.
  • Support for Latest Technologies: Windows 11 provides support for the latest hardware technologies, including Intel 12th Gen processors, AMD Ryzen processors, and PCIe 4.0 storage.

Frequently Asked Questions:

Q: Is Windows 11 a free upgrade for all Windows 10 users?

A: While Windows 11 is a free upgrade for compatible Windows 10 devices, not all devices meet the minimum system requirements. It’s essential to check the compatibility of your device before attempting to upgrade.

Q: Can I purchase Windows 11 separately from a new computer?

A: Yes, Windows 11 can be purchased as a standalone license from Microsoft or authorized retailers.

Q: What are the main differences between Windows 11 Home and Pro?

A: Windows 11 Home is designed for personal use, while Pro offers additional features for professionals and small businesses, including enhanced security, remote desktop capabilities, and support for domain joining.

Q: Is Windows 11 worth the upgrade?

A: The decision to upgrade to Windows 11 depends on individual needs and preferences. The new OS offers improved performance, security, and a modernized interface, but it’s crucial to ensure compatibility and consider the potential costs involved.

Tips for Saving Money on Windows 11:

  • Check for Compatibility: Before purchasing a standalone license, ensure your device meets the minimum system requirements for Windows 11.
  • Compare Prices: Research and compare prices across different retailers and online marketplaces to find the best deals.
  • Look for Promotions: Keep an eye out for promotional offers and discounts from Microsoft and retailers.
  • Consider Subscription Options: If you regularly use other Microsoft services like Office, a Microsoft 365 subscription may provide a more cost-effective option.
  • Explore Alternative Operating Systems: Consider alternative operating systems like Linux, which are often free and open-source.

Conclusion:

Windows 11 represents a significant evolution in the Microsoft operating system, offering a range of features and benefits for both individuals and businesses. While the cost of acquiring Windows 11 can vary significantly depending on factors like licensing options, device type, and retailer pricing, understanding the different acquisition methods and pricing models is essential for making informed decisions. By carefully considering your needs, comparing prices, and exploring available options, you can find the most cost-effective way to access the latest version of Windows and leverage its benefits.

Windows 11 cost - iconhety Buy Windows 11 User Guide for Beginners: A Comprehensive Guide to Master Windows 11 Operating How Much is Windows 11? - PC Guide
Buy WINDOWS 11 PRO USER GUIDE: A Comprehensive User Guide for Beginners and Seniors to Master Cost windows 11 - kselocation Buy WINDOWS 11 HOME User Manual: A Comprehensive Illustrated Guide to Navigating the New
Windows 11 Comprehensive Guide And Cheat Sheet, 54% OFF Cost windows 11 - updateposa

Closure

Thus, we hope this article has provided valuable insights into Navigating the Cost of Windows 11: A Comprehensive Guide. We appreciate your attention to our article. See you in our next article!

The "Platform Configuration Not Found" Error: Understanding And Resolving A Common Issue

The "Platform Configuration Not Found" Error: Understanding and Resolving a Common Issue

Introduction

In this auspicious occasion, we are delighted to delve into the intriguing topic related to The "Platform Configuration Not Found" Error: Understanding and Resolving a Common Issue. Let’s weave interesting information and offer fresh perspectives to the readers.

The "Platform Configuration Not Found" Error: Understanding and Resolving a Common Issue

Common Network Issues and How To Resolve Them  CWS Blog

In the realm of software development and deployment, encountering an error message can be a frustrating experience. One such error, often encountered in various contexts, is the "Platform Configuration Not Found" message. This error, while seemingly straightforward, can be indicative of a range of underlying issues, requiring a systematic approach to diagnosis and resolution.

Understanding the Error:

The "Platform Configuration Not Found" error signifies that the software or application in question cannot locate the necessary configuration settings required for its proper operation. These settings typically define the environment in which the software runs, including variables, paths, and other crucial parameters.

Causes of the Error:

The root cause of this error can vary depending on the specific software, operating system, and deployment environment. Some common culprits include:

  • Missing or Corrupted Configuration Files: The most straightforward reason for this error is the absence or corruption of the configuration file(s) responsible for storing the necessary settings. This can occur due to accidental deletion, file system corruption, or improper file permissions.
  • Incorrect File Paths: The software might be attempting to access the configuration files from an incorrect location. This can happen due to typos in the file path within the software’s code, incorrect environment variables, or changes in the file system structure.
  • Environment Variable Issues: Configuration settings are often accessed through environment variables, which are dynamic values that define the software’s environment. If these variables are not set correctly or are missing, the software might fail to find the necessary configuration information.
  • Software Installation Errors: Incomplete or faulty software installations can lead to missing or corrupted configuration files, causing the "Platform Configuration Not Found" error.
  • Configuration Conflicts: If multiple software components share the same configuration files, conflicts can arise, leading to incorrect or missing settings.
  • Permission Issues: Insufficient file permissions for the software to access the configuration files can also trigger this error.

Troubleshooting and Resolution:

Addressing the "Platform Configuration Not Found" error requires a systematic approach, involving the following steps:

  1. Verify Configuration File Existence and Integrity: Begin by confirming the existence and integrity of the configuration file(s) involved. Check for any missing or corrupted files, and try restoring them from backups if available.
  2. Examine File Paths: Carefully inspect the file paths used by the software to access the configuration files. Verify that the paths are correct, and consider using absolute paths to eliminate any ambiguity.
  3. Check Environment Variables: Review the relevant environment variables, ensuring they are correctly set and point to the appropriate locations. Use environment variable editors or command-line tools to modify or verify these variables.
  4. Reinstall or Repair Software: If the issue persists, consider reinstalling or repairing the software to address potential installation errors. This process might restore the necessary configuration files.
  5. Resolve Configuration Conflicts: Identify any potential conflicts between different software components sharing the same configuration files. Consider using separate configuration files or modifying the conflicting settings to ensure compatibility.
  6. Adjust File Permissions: Ensure that the software has sufficient permissions to access the configuration files. Use operating system tools or command-line commands to adjust file permissions as needed.
  7. Consult Documentation and Support: If the error remains unresolved, consult the software’s documentation or contact the software vendor’s support team for assistance. They might provide specific instructions or troubleshooting tips for your particular scenario.

Importance of Configuration Files:

Configuration files are essential for software functionality, enabling the software to adapt to different environments and user preferences. They provide a flexible mechanism to define variables, settings, and other parameters without requiring changes to the software’s core code.

Benefits of Proper Configuration:

  • Flexibility and Customization: Configuration files allow users to customize the software’s behavior to suit their specific needs.
  • Environment-Specific Settings: Different environments, such as development, testing, and production, can have unique requirements. Configuration files enable the software to adapt to these differences seamlessly.
  • Reduced Code Complexity: By separating configuration settings from the core code, configuration files simplify the software’s structure and maintenance.
  • Improved Security: Sensitive information, such as database credentials, can be stored in configuration files, keeping them separate from the main code and enhancing security.

FAQs:

Q: What are some common causes of the "Platform Configuration Not Found" error?

A: This error can arise from various factors, including missing or corrupted configuration files, incorrect file paths, environment variable issues, software installation errors, configuration conflicts, and insufficient file permissions.

Q: How can I verify the existence and integrity of configuration files?

A: You can use file system tools or command-line commands to check for the existence and integrity of the configuration files. Look for any missing or corrupted files and try restoring them from backups if available.

Q: What should I do if I suspect environment variable issues?

A: Review the relevant environment variables, ensuring they are correctly set and point to the appropriate locations. Use environment variable editors or command-line tools to modify or verify these variables.

Q: Can I resolve the error by reinstalling the software?

A: Reinstalling or repairing the software can address potential installation errors that might have caused missing or corrupted configuration files. However, this should be considered as a last resort.

Q: What are the best practices for managing configuration files?

A: Best practices include using version control systems to track changes, keeping sensitive information separate from the main code, and using standardized formats for configuration files.

Tips:

  • Back Up Configuration Files: Regularly back up your configuration files to prevent data loss in case of accidental deletion or corruption.
  • Use Version Control Systems: Implement version control systems to track changes made to configuration files, enabling easier rollback and comparison of different versions.
  • Employ Secure Storage: Store sensitive information, such as database credentials, in separate configuration files with appropriate access control measures.
  • Document Configuration Settings: Clearly document the purpose and values of each configuration setting to facilitate understanding and maintenance.
  • Automate Configuration Management: Use configuration management tools to automate the deployment and management of configuration files, ensuring consistency and accuracy across different environments.

Conclusion:

The "Platform Configuration Not Found" error, while initially perplexing, can be resolved with a systematic approach. Understanding the potential causes, implementing the appropriate troubleshooting steps, and adhering to best practices for configuration management can significantly minimize the likelihood of encountering this error. By effectively managing configuration files, software developers and administrators can ensure smooth operation and maintainability, ultimately contributing to a more reliable and robust software ecosystem.

Error 0xc1900223: Understanding and Resolving the Issue with the Feature Update to Windows 10 Network Troubleshooting - Methodology, Steps & Techniques - DNSstuff Understanding and Resolving a Common Error - DZone
Resolving Common WordPress Errors - Sagicor Payment Gateway - Kingston WordPress Meetup Nov 2020 AWS PERFORMANCE 101, understanding & resolving common issues. Understanding and Resolving Error Code R013: A Comprehensive Guide
[Infographic] All you need to know about AWS API Gateway and resolving the most common request PPT - Understanding and Resolving Windows Error Code 0x80240022 PowerPoint Presentation - ID

Closure

Thus, we hope this article has provided valuable insights into The "Platform Configuration Not Found" Error: Understanding and Resolving a Common Issue. We appreciate your attention to our article. See you in our next article!

A Comprehensive Guide To R On Windows 10 (64-bit)

A Comprehensive Guide to R on Windows 10 (64-bit)

Introduction

In this auspicious occasion, we are delighted to delve into the intriguing topic related to A Comprehensive Guide to R on Windows 10 (64-bit). Let’s weave interesting information and offer fresh perspectives to the readers.

A Comprehensive Guide to R on Windows 10 (64-bit)

How to upgrade to 64 bit windows 10 from 32 bit - managementcopax

R, a powerful and versatile programming language and free software environment, has become an indispensable tool for data analysis, statistical computing, and graphical visualization across diverse fields. While R is platform-independent, its implementation on Windows 10 (64-bit) presents a robust and user-friendly experience for a wide range of users. This comprehensive guide explores the nuances of R on this operating system, highlighting its capabilities and benefits.

Understanding R: A Powerful Tool for Data Science

R’s core strength lies in its ability to handle statistical computations, data analysis, and graphical representations with unparalleled flexibility and efficiency. Its extensive collection of packages, known as CRAN (Comprehensive R Archive Network), provides users with pre-built functions and tools for a vast array of tasks, from basic statistical analysis to complex machine learning algorithms.

Why Choose Windows 10 (64-bit)?

Windows 10 (64-bit) provides an ideal environment for running R due to its inherent stability, compatibility, and resource management capabilities. Its 64-bit architecture allows for larger memory allocation, crucial for handling massive datasets and complex computations that are common in data analysis. Additionally, Windows 10’s user-friendly interface and extensive software compatibility make it a suitable choice for both novice and experienced R users.

Installing R on Windows 10 (64-bit): A Step-by-Step Guide

Installing R on Windows 10 (64-bit) is a straightforward process:

  1. Download the R Installer: Visit the official CRAN website (https://cran.r-project.org/) and navigate to the "Download R for Windows" section. Select the "base" package for the appropriate version (64-bit).
  2. Run the Installer: Double-click the downloaded installer file. Follow the on-screen instructions, accepting the default settings for a standard installation.
  3. Verify Installation: Open the Start menu and search for "R." The R console should launch, indicating a successful installation.

Essential R Packages for Data Analysis

The power of R lies in its extensive collection of packages. These packages provide pre-built functions and tools for specific tasks, significantly streamlining the data analysis process. Some essential packages for beginners include:

  • dplyr: A powerful package for data manipulation, offering functions for filtering, sorting, grouping, and summarizing data.
  • ggplot2: A versatile package for creating high-quality, customizable graphics and visualizations.
  • tidyr: A package designed for data tidying and reshaping, facilitating efficient data manipulation and analysis.
  • readr: A package for importing and exporting data from various file formats, including CSV, Excel, and text files.
  • stringr: A package for working with strings, providing functions for manipulating and analyzing textual data.

Using RStudio: An Integrated Development Environment (IDE)

While the R console provides a basic environment for working with R, RStudio enhances the experience by offering a comprehensive IDE. It provides features like:

  • Code Editor: A syntax-highlighting editor that facilitates code writing and debugging.
  • Console: An interactive environment for executing R code and viewing output.
  • Workspace: A space for managing variables, data frames, and other objects.
  • Plots and Graphs: An area for visualizing data using various plotting functions.
  • Project Management: A system for organizing projects and managing dependencies.

Exploring R’s Capabilities: A Practical Example

Let’s demonstrate R’s power with a simple example: analyzing a dataset of student grades.

# Load the dplyr package
library(dplyr)

# Create a sample dataset
grades <- data.frame(
  Student = c("Alice", "Bob", "Charlie", "David", "Eve"),
  Math = c(85, 78, 92, 88, 95),
  Science = c(90, 85, 88, 91, 89),
  English = c(82, 87, 90, 85, 92)
)

# Calculate the average grade for each student
grades %>% 
  mutate(Average = (Math + Science + English) / 3)

# Sort students by their average grade in descending order
grades %>% 
  arrange(desc(Average))

This code snippet demonstrates how R can be used to manipulate and analyze data, calculate statistics, and present results in a structured manner.

FAQs about R on Windows 10 (64-bit)

Q: What are the system requirements for running R on Windows 10 (64-bit)?

A: R generally requires minimal system resources. A modern computer with at least 4GB of RAM and a 64-bit processor is sufficient for most tasks.

Q: Is R free to use?

A: Yes, R is an open-source language and is completely free to use, distribute, and modify.

Q: How do I update R on Windows 10 (64-bit)?

A: To update R, simply download the latest installer from the CRAN website and run it. The installer will automatically update your existing R installation.

Q: Can I use R on other operating systems besides Windows 10?

A: Yes, R is platform-independent and can be installed on other operating systems like macOS, Linux, and Unix.

Q: Where can I find resources for learning R?

A: Numerous resources are available for learning R, including online tutorials, books, courses, and communities. The official R website (https://www.r-project.org/) provides comprehensive documentation and resources.

Tips for Using R on Windows 10 (64-bit)

  • Use an IDE like RStudio: RStudio provides a user-friendly environment for coding, debugging, and visualizing data.
  • Start with basic packages: Begin with essential packages like dplyr, ggplot2, and tidyr to build a solid foundation.
  • Explore CRAN: The CRAN repository hosts a vast collection of packages for various tasks, so explore it to find tools relevant to your projects.
  • Leverage online communities: Join online forums and communities to seek help, share knowledge, and learn from others.
  • Practice regularly: Consistent practice is key to mastering R. Work on small projects and gradually tackle more complex tasks.

Conclusion

R on Windows 10 (64-bit) provides a powerful and user-friendly environment for data analysis, statistical computing, and graphical visualization. Its flexibility, extensibility, and wide range of packages make it a versatile tool for both beginners and experienced data scientists. By understanding the fundamentals of R and exploring its capabilities, users can harness its power to unlock valuable insights from data and make informed decisions.

Sap ERP Books: How To Switch From 32-Bit Windows 10 To 64-Bit Windows 10 Manually Update CH340 CH341 Driver on Windows 10 64 Bit  Easy Step-by-Step Guide - YouTube How to Upgrade Windows 10 from 32 bit to 64 bit (For Free) - YouTube
How to Upgrade Windows 10 32-Bit to 64-Bit (Free) - YouTube Simple Guide for Installing R on Windows 10 PPT - A Comprehensive Guide to Installing Windows 10_ Step-by-Step Tutorial PowerPoint
How to Upgrade Windows 10 32Bit to 64Bit without Losing Data for FREE - YouTube How do i upgrade to 64 bit windows 10 - utnanax

Closure

Thus, we hope this article has provided valuable insights into A Comprehensive Guide to R on Windows 10 (64-bit). We appreciate your attention to our article. See you in our next article!

Navigating The World Of Panasonic Toughbook CF-53 Drivers For Windows 10: A Comprehensive Guide

Navigating the World of Panasonic Toughbook CF-53 Drivers for Windows 10: A Comprehensive Guide

Introduction

In this auspicious occasion, we are delighted to delve into the intriguing topic related to Navigating the World of Panasonic Toughbook CF-53 Drivers for Windows 10: A Comprehensive Guide. Let’s weave interesting information and offer fresh perspectives to the readers.

Set Up Your Panasonic Toughbook CF-53

The Panasonic Toughbook CF-53, renowned for its rugged durability and reliable performance, is a popular choice for professionals in various demanding fields. However, ensuring optimal functionality of this powerful device necessitates a careful approach to driver installation, particularly when transitioning to Windows 10. This guide provides a comprehensive understanding of Panasonic Toughbook CF-53 drivers for Windows 10, exploring their importance, installation methods, troubleshooting techniques, and common FAQs.

The Importance of Drivers: Unlocking the Full Potential of Your Toughbook CF-53

Drivers act as the crucial link between your operating system (Windows 10 in this case) and the hardware components of your Toughbook CF-53. They translate the commands from the operating system into language that specific hardware components understand, enabling seamless communication and optimal performance.

Without the appropriate drivers, your Toughbook CF-53’s hardware components might not function correctly, leading to a range of issues:

  • Non-functional peripherals: Your touchpad, keyboard, webcam, or even the integrated display might not work as intended.
  • Performance degradation: The lack of drivers can hinder the overall performance of your device, resulting in slow response times and sluggish operation.
  • Hardware incompatibility: Certain hardware components might not be recognized by Windows 10 without the proper drivers, leading to system instability or even crashes.
  • Missed updates: Critical updates and security patches for your hardware might not be installed without the appropriate drivers.

Therefore, installing the correct drivers for your Toughbook CF-53 is essential to maximize its capabilities, ensure optimal performance, and maintain its security.

Identifying and Acquiring the Right Drivers: A Step-by-Step Approach

  1. Determine your Toughbook CF-53 model: The specific driver requirements vary depending on the exact model of your Toughbook CF-53. You can identify your model by checking the label on the device or consulting the documentation that came with it.

  2. Visit the Panasonic Support Website: The official Panasonic Support website is the primary source for acquiring the correct drivers for your Toughbook CF-53. Navigate to the website and utilize the search function to locate your specific model.

  3. Download the drivers: Once you have identified your model, search for the "Drivers and Downloads" section on the support page. Select Windows 10 as your operating system and download the relevant drivers for each component.

  4. Organize your downloads: Create a dedicated folder on your computer to store the downloaded drivers. This will make the installation process more organized and efficient.

Installing Drivers: A Straightforward Process

  1. Run the installation file: Locate the downloaded driver files and double-click the installation file for each component. Follow the onscreen instructions provided by the driver installer.

  2. Restart your computer: After installing the drivers, it is recommended to restart your computer to ensure that the new drivers are properly loaded and activated.

  3. Verify functionality: Once your computer has restarted, test the functionality of the corresponding hardware components to ensure that the drivers have been installed successfully.

Troubleshooting Common Driver Issues: Addressing Potential Challenges

While the driver installation process is generally straightforward, you might encounter certain issues. Here are some common challenges and solutions:

  • Missing or outdated drivers: If you are experiencing hardware issues, ensure that you have downloaded and installed the latest drivers from the Panasonic Support website.

  • Driver conflicts: If installing a new driver causes system instability or crashes, try uninstalling the driver and restarting your computer. You can also attempt to update other drivers to resolve any conflicts.

  • Incompatible drivers: If you are unable to find the correct drivers for your Toughbook CF-53 model on the Panasonic Support website, try searching for generic drivers for the specific hardware component on the manufacturer’s website.

  • Driver corruption: If you suspect driver corruption, try reinstalling the driver from the original installation file or downloading a fresh copy from the Panasonic Support website.

FAQs: Addressing Common Concerns about Panasonic Toughbook CF-53 Drivers for Windows 10

Q: Can I use drivers from other Panasonic Toughbook models on my CF-53?

A: While some drivers might be compatible across different Toughbook models, it is strongly recommended to use the drivers specifically designed for your CF-53 model. Using incompatible drivers can lead to performance issues, system instability, or even hardware damage.

Q: Are there any third-party driver providers for my CF-53?

A: While third-party driver providers might offer drivers for your CF-53, using drivers from unofficial sources is not recommended. These drivers may not be compatible, contain malware, or lack proper support. Stick to the official Panasonic Support website for reliable and secure drivers.

Q: How often should I update my drivers?

A: It is recommended to regularly check for driver updates, especially when new versions of Windows 10 are released. You can also configure Windows Update to automatically install driver updates.

Q: What should I do if I encounter a driver issue that I cannot resolve?

A: If you are unable to resolve driver issues on your own, contact Panasonic Support for assistance. They can provide guidance, troubleshooting steps, or even remote support to help you resolve the problem.

Tips for Maintaining Optimal Driver Performance

  • Regularly check for updates: Visit the Panasonic Support website periodically to check for driver updates for your CF-53.

  • Use Windows Update: Configure Windows Update to automatically install driver updates for your device.

  • Back up your drivers: Before installing new drivers, create a backup of your current drivers to facilitate easy rollback if necessary.

  • Avoid unnecessary driver installations: Only install drivers that are specifically required for your CF-53 or its components. Installing unnecessary drivers can lead to conflicts and performance issues.

Conclusion: Empowering Your Toughbook CF-53 with the Right Drivers

Installing the correct drivers for your Panasonic Toughbook CF-53 is crucial for maximizing its performance, ensuring optimal functionality, and maintaining its security. By following the steps outlined in this guide, you can confidently navigate the world of drivers and unlock the full potential of your rugged and reliable Toughbook CF-53.

Remember to always use drivers from official sources, such as the Panasonic Support website, to ensure compatibility, security, and proper support. Regularly check for updates, and seek assistance from Panasonic Support if you encounter any driver-related issues. With the right drivers, your Toughbook CF-53 will be equipped to tackle even the most demanding tasks with unwavering performance and reliability.

Panasonic Toughbook Cf 53 Vga Drivers - historyever vladimirovruslan739: PANASONIC TOUGHBOOK CF-53 DRIVERS Panasonic Toughbook Cf 53 User Manual
Panasonic Toughbook CF-53 - Notebookcheck.net External Reviews Panasonic Toughbook CF-53S i5-3340M 2.7GHz 8GB 320GB Windows 10 Pro โ€“ Refresh Computers Online Panasonic Toughbook 53 CF-53SJCZYLM 14" Laptop CF-53SJCZYLM B&H
Panasonic Toughbook CF-53.2 i5-4310U 2.0GHz 8GB 320GB Windows 10 Pro โ€“ Refresh Computers Online Panasonic Toughbook CF-53 Reviews and Ratings - TechSpot

Closure

Thus, we hope this article has provided valuable insights into Navigating the World of Panasonic Toughbook CF-53 Drivers for Windows 10: A Comprehensive Guide. We appreciate your attention to our article. See you in our next article!

Unlocking The Power Of Compressed Files: A Guide To Opening RAR Files On Windows 11

Unlocking the Power of Compressed Files: A Guide to Opening RAR Files on Windows 11

Introduction

In this auspicious occasion, we are delighted to delve into the intriguing topic related to Unlocking the Power of Compressed Files: A Guide to Opening RAR Files on Windows 11. Let’s weave interesting information and offer fresh perspectives to the readers.

Unlocking the Power of Compressed Files: A Guide to Opening RAR Files on Windows 11

Open Rar Files Windows 11

In the digital age, we encounter compressed files frequently. These files, often ending in extensions like .rar, .zip, or .7z, are efficient ways to store and share large amounts of data. While Windows 11 provides native support for .zip files, opening .rar files requires a dedicated program. This article explores the various methods available to open .rar files on Windows 11, focusing on free, reliable options.

The Importance of .RAR Files

RAR, short for Roshal Archive, is a popular compression format known for its robust compression algorithms and strong encryption capabilities. It offers several advantages:

  • Efficient Storage: RAR files can significantly reduce the size of data, making it easier to store and transmit.
  • Enhanced Security: RAR supports encryption, safeguarding sensitive data from unauthorized access.
  • Archive Management: RAR allows for the creation of multi-volume archives, splitting large files into smaller parts for easier transfer.
  • Self-Extracting Archives: RAR supports the creation of self-extracting archives, enabling users to extract files without needing a dedicated program.

Free Options for Opening RAR Files on Windows 11

Several free and reliable software options are available to open .rar files on Windows 11:

1. 7-Zip:

  • Features: 7-Zip is a powerful open-source file archiver and extractor, supporting a wide range of compression formats, including RAR, ZIP, 7z, and more. It boasts high compression ratios, robust encryption, and a user-friendly interface.
  • Availability: 7-Zip is available for free download from its official website (https://www.7-zip.org/).
  • Benefits: 7-Zip offers excellent performance, a vast array of supported formats, and a completely free license.

2. PeaZip:

  • Features: PeaZip is another free and open-source file archiver that supports a wide range of compression formats, including RAR, ZIP, 7z, and many others. It features a user-friendly interface, multi-core processing support for faster extraction, and robust security features.
  • Availability: PeaZip is available for free download from its official website (https://peazip.org/).
  • Benefits: PeaZip offers a comprehensive feature set, a clean interface, and excellent compatibility with various archive formats.

3. WinRAR:

  • Features: WinRAR is a popular commercial file archiver, known for its extensive features, including robust compression, encryption, and archive management capabilities. It offers a free trial period, after which a license is required for continued use.
  • Availability: WinRAR can be downloaded from its official website (https://www.win-rar.com/).
  • Benefits: WinRAR provides a comprehensive feature set, excellent compression ratios, and a long history of reliability.

4. Online RAR Extractors:

  • Features: Several online RAR extractors are available, allowing users to extract files directly from their web browser without needing to download any software. These services often have limitations on file size and may require an internet connection.
  • Availability: Numerous online RAR extractors can be found through a simple web search.
  • Benefits: Online RAR extractors offer convenience and accessibility, especially when limited storage space or software installation is a concern.

Choosing the Right Option

The best option for opening RAR files on Windows 11 depends on individual needs and preferences.

  • For users seeking a free, powerful, and feature-rich solution, 7-Zip or PeaZip are excellent choices.
  • Those willing to invest in a commercial solution with a comprehensive feature set may prefer WinRAR.
  • For occasional use or when convenience is paramount, online RAR extractors provide a quick and easy solution.

FAQs

Q: Can I open a RAR file without any software?

A: While Windows 11 does not natively support RAR files, some self-extracting RAR archives can be executed directly, automatically extracting their contents. However, this functionality is limited and may not be available for all RAR files.

Q: Is it safe to use online RAR extractors?

A: While many online RAR extractors are legitimate, it’s essential to exercise caution. Ensure the website is reputable, has a secure connection (HTTPS), and avoids asking for sensitive personal information. Be aware that some online extractors might contain malware or attempt to collect user data.

Q: What are the benefits of using a dedicated RAR extractor over online services?

A: Dedicated RAR extractors offer several advantages over online services, including:

  • Offline Access: You can access and extract files without an internet connection.
  • Enhanced Security: Dedicated software typically offers better security features, like password protection and encryption.
  • Advanced Features: Dedicated extractors often provide additional features like archive management, file splitting, and self-extracting archive creation.

Q: Can I extract individual files from a RAR archive?

A: Yes, most RAR extraction software allows you to select specific files within an archive for extraction. This feature is useful when you only need a portion of the archive’s contents.

Tips

  • Always scan downloaded RAR files for viruses before opening them, especially if the source is unknown.
  • Back up important data before extracting files from a RAR archive to avoid accidental data loss.
  • Consider using a password manager to securely store passwords for encrypted RAR archives.
  • If you frequently work with RAR files, invest in a dedicated RAR extractor for improved performance and features.

Conclusion

Opening RAR files on Windows 11 is a straightforward process with various free and reliable software options available. 7-Zip, PeaZip, and WinRAR are excellent choices, each offering its unique features and benefits. By understanding the different options and following best practices, users can easily access and utilize the data stored within RAR archives.

Open Rar Files Windows 11 Open Rar Files Windows 11 How to Extract or Unzip Files in Windows 11 - Open Compressed Files in Windows 11 - YouTube
How to Open RAR Files on Windows 11 How to Open RAR Files on Windows 11?  Blowing Ideas Open Rar Files Windows 11
How to Open RAR Files in Windows 11 Easy Steps To Open RAR Files On Windows 10 And 11

Closure

Thus, we hope this article has provided valuable insights into Unlocking the Power of Compressed Files: A Guide to Opening RAR Files on Windows 11. We thank you for taking the time to read this article. See you in our next article!

Unlinking Work Accounts From Windows 11: A Comprehensive Guide

Unlinking Work Accounts from Windows 11: A Comprehensive Guide

Introduction

With enthusiasm, let’s navigate through the intriguing topic related to Unlinking Work Accounts from Windows 11: A Comprehensive Guide. Let’s weave interesting information and offer fresh perspectives to the readers.

Unlinking Work Accounts from Windows 11: A Comprehensive Guide

How to Remove Account and Unlink a PC from OneDrive in Windows 11 - Geek Rewind

In the contemporary digital landscape, work and personal lives are increasingly intertwined. Many individuals utilize their personal Windows 11 devices for both professional and personal tasks, often linking their work accounts for seamless access to company resources. However, circumstances may arise where removing a work account from Windows 11 becomes necessary. This could be due to a change in employment, security concerns, or simply a desire to maintain a clear separation between work and personal data.

This article aims to provide a comprehensive guide on removing work accounts from Windows 11, outlining the process, benefits, and potential considerations.

Understanding the Implication of Removing a Work Account

Before delving into the removal process, it’s crucial to understand the implications of removing a work account from Windows 11. Removing a work account will result in the following:

  • Loss of access to work-related files and applications: Any documents, applications, or data associated with the work account will no longer be accessible on the device.
  • Disconnection from company resources: The user will no longer have access to shared drives, company email, or other work-related services.
  • Potential impact on company policies: Depending on the company’s policies, removing a work account might trigger specific actions, such as the automatic deletion of local data or the requirement to return company-owned equipment.

Methods to Remove a Work Account from Windows 11

There are two primary methods to remove a work account from Windows 11:

1. Through Settings:

  • Step 1: Open the Windows 11 Settings app by pressing the Windows key + I.
  • Step 2: Navigate to "Accounts" and then select "Access work or school."
  • Step 3: Locate the work account you wish to remove and click on it.
  • Step 4: Click on the "Disconnect" button.
  • Step 5: Confirm the removal by clicking "Disconnect" again.

2. Through Control Panel:

  • Step 1: Open the Control Panel by searching for it in the Windows search bar.
  • Step 2: Navigate to "User Accounts" and then click on "Manage another account."
  • Step 3: Select the work account you wish to remove.
  • Step 4: Click on the "Remove the account" option.
  • Step 5: Confirm the removal by clicking "Delete the account."

Important Considerations

  • Data backup: Before removing a work account, ensure you have backed up any essential data stored locally on your device. This is particularly important if the company’s policies dictate the deletion of local data upon account removal.
  • Company policies: Familiarize yourself with the company’s policies regarding work account removal. Some companies might have specific procedures or requirements that need to be followed.
  • Alternative access methods: If you require access to work resources after removing the account, explore alternative methods, such as using a company-provided VPN or accessing files through a cloud storage platform.

Benefits of Removing a Work Account

Removing a work account from Windows 11 offers several benefits, including:

  • Enhanced privacy and security: Separating personal and work data enhances privacy and reduces the risk of data breaches or unauthorized access.
  • Improved performance: Removing a work account can potentially improve system performance, especially if the account is associated with numerous files or applications.
  • Reduced clutter: Removing a work account can declutter your Windows 11 environment, making it easier to navigate and manage your personal files and applications.
  • Clearer separation: It provides a clearer separation between work and personal life, allowing for a more focused and productive work experience.

FAQs on Removing a Work Account from Windows 11

1. What happens to my work data after removing the account?

The fate of your work data depends on the company’s policies. Some companies may automatically delete local data upon account removal, while others might retain it on their servers. It’s crucial to clarify the company’s policy before removing the account.

2. Can I re-add the work account later?

Yes, you can re-add the work account later if needed. However, you might need to contact your IT administrator or follow specific procedures to re-establish the connection.

3. Does removing the work account affect my personal account?

No, removing a work account does not affect your personal account. Your personal files, applications, and settings will remain unaffected.

4. What if I encounter issues during the removal process?

If you encounter any issues, consult your IT administrator or refer to Microsoft’s official documentation for troubleshooting steps.

Tips for Removing a Work Account from Windows 11

  • Communicate with your IT administrator: Before removing the work account, inform your IT administrator to ensure a smooth transition and address any potential concerns.
  • Document the process: Keep a record of the steps taken during the removal process, including any relevant company policies or instructions.
  • Review your data: Before proceeding, review your data to ensure that all essential files and applications have been backed up or saved elsewhere.
  • Test access: After removing the account, test your access to work resources to confirm the removal was successful and to address any potential issues.

Conclusion

Removing a work account from Windows 11 can be a necessary step for various reasons. By following the outlined process and considering the associated implications, users can effectively remove work accounts while maintaining their personal data and privacy. Remember to communicate with your IT administrator, back up essential data, and review company policies before proceeding. This approach ensures a smooth transition and minimizes any potential disruptions.

Unlink OneDrive from your Windows 11 computer 5 Ways  Your Organization Manages Updates on this PC in Windows 11 How to remove a Work Account from Windows 11 - Super User
How To Remove Work Or School Account In Windows 11 10  thewindowsclub How to Disable OneDrive on Windows 11 Unlink OneDrive from your Windows 11 computer
How to Disable OneDrive in Windows 11 - Itechguides How to remove a Work Account from Windows 11 - Super User

Closure

Thus, we hope this article has provided valuable insights into Unlinking Work Accounts from Windows 11: A Comprehensive Guide. We hope you find this article informative and beneficial. See you in our next article!

The Power Of 16GB RAM: A Comprehensive Look At Windows 11 Performance

The Power of 16GB RAM: A Comprehensive Look at Windows 11 Performance

Introduction

In this auspicious occasion, we are delighted to delve into the intriguing topic related to The Power of 16GB RAM: A Comprehensive Look at Windows 11 Performance. Let’s weave interesting information and offer fresh perspectives to the readers.

The Power of 16GB RAM: A Comprehensive Look at Windows 11 Performance

How to find out your RAM specs on a Windows 11 PC

In the realm of modern computing, RAM (Random Access Memory) plays a pivotal role in determining a system’s responsiveness and overall performance. With the advent of Windows 11, the demand for sufficient RAM has become even more pronounced, as the operating system leverages its capabilities to deliver a seamless and efficient user experience. This article delves into the significance of 16GB RAM in the context of Windows 11, exploring its benefits, potential limitations, and practical considerations for users seeking optimal system performance.

Understanding the Role of RAM

RAM serves as the computer’s short-term memory, holding data that the processor needs to access quickly. Think of it as a temporary workspace where the computer stores the information it’s actively using, allowing for rapid retrieval and processing.

Why 16GB RAM is Crucial for Windows 11

Windows 11, with its advanced features and demanding applications, requires substantial RAM to function efficiently. Here’s why 16GB RAM is becoming the standard for a smooth and productive Windows 11 experience:

  • Enhanced Multitasking: Modern users often juggle multiple applications simultaneously, demanding a significant amount of RAM to handle each process effectively. 16GB allows users to run demanding programs like video editing software, web browsers with numerous tabs, and resource-intensive games without encountering noticeable lag or slowdowns.

  • Improved Application Responsiveness: With sufficient RAM, applications load faster, respond to user inputs promptly, and navigate seamlessly. This translates to a more intuitive and enjoyable user experience, eliminating frustrating delays and interruptions.

  • Faster Boot Times: Windows 11’s boot process utilizes a significant amount of RAM. Having 16GB ensures a faster startup time, allowing users to access their system quickly and efficiently.

  • Increased System Stability: Insufficient RAM can lead to system instability, crashes, and erratic behavior. 16GB provides a buffer, preventing these issues and ensuring a more reliable and stable computing experience.

  • Support for Virtualization and Cloud Gaming: Modern technologies like virtualization and cloud gaming rely heavily on RAM to deliver a smooth and immersive experience. 16GB allows users to run virtual machines or stream high-quality games without sacrificing performance.

Potential Limitations and Considerations

While 16GB RAM is generally considered sufficient for most users, certain scenarios might necessitate more RAM for optimal performance:

  • Heavy Gaming: High-end gaming requires substantial RAM to handle complex graphics rendering and large game files. Users who engage in demanding gaming might benefit from 16GB or more, depending on the specific game’s requirements.

  • Professional Workloads: Video editing, 3D modeling, and other resource-intensive professional applications can benefit from even larger amounts of RAM, exceeding 16GB.

  • Multiple Virtual Machines: Running multiple virtual machines simultaneously requires a significant amount of RAM to allocate resources effectively.

FAQs

Q: Is 16GB RAM enough for Windows 11?

A: Generally, 16GB RAM is considered sufficient for most users running Windows 11. However, users with specific demanding workloads, such as professional applications or high-end gaming, might require more RAM for optimal performance.

Q: Will Windows 11 run smoothly with 8GB RAM?

A: Windows 11 can run on 8GB RAM, but users might experience performance limitations, particularly when multitasking or running resource-intensive applications. 16GB or more is recommended for a smoother and more responsive experience.

Q: Can I upgrade my RAM to 16GB?

A: Most modern computers allow RAM upgrades. Consult your motherboard’s specifications to determine the maximum supported RAM capacity and compatibility with specific RAM modules.

Q: How do I check my current RAM usage?

A: You can check your RAM usage through the Windows Task Manager. Press Ctrl+Shift+Esc to open the Task Manager, then click on the "Performance" tab. The "Memory" section displays the current RAM usage and available memory.

Tips for Optimizing RAM Usage

  • Close Unused Applications: Regularly close applications you are not actively using to free up RAM for other processes.

  • Limit Startup Programs: Reduce the number of applications that automatically launch at startup to minimize RAM consumption.

  • Use Disk Cleanup: Regularly run Disk Cleanup to remove unnecessary files and free up disk space, indirectly improving RAM performance.

  • Consider RAM Upgrades: If you consistently experience performance issues due to insufficient RAM, consider upgrading to 16GB or more, depending on your specific needs.

Conclusion

In conclusion, 16GB RAM is a crucial component for a smooth and efficient Windows 11 experience. It enables users to run multiple applications simultaneously, enjoy faster boot times, and benefit from improved system stability. While 16GB is generally sufficient for most users, those with demanding workloads might require more RAM for optimal performance. By understanding the importance of RAM and implementing optimization strategies, users can ensure a responsive and productive computing experience with Windows 11.

How to Check RAM, GPU, and CPU Usage in Windows 11 Windows 11 Performance Test Windows 10 vs. Windows 11 Performance Test (2022)
How Much RAM Does Windows 11 Use? 16GB RAM Installed Only 8GB Usable in Windows 11 How to fix high RAM usage when Windows 11 is idle?
How to find out your RAM specs on Windows 11 PCs How to display CPU, GPU and RAM usage natively on Windows 11 - gHacks Tech News

Closure

Thus, we hope this article has provided valuable insights into The Power of 16GB RAM: A Comprehensive Look at Windows 11 Performance. We hope you find this article informative and beneficial. See you in our next article!

Understanding Windows 10 ISO Files: A Comprehensive Guide

Understanding Windows 10 ISO Files: A Comprehensive Guide

Introduction

With great pleasure, we will explore the intriguing topic related to Understanding Windows 10 ISO Files: A Comprehensive Guide. Let’s weave interesting information and offer fresh perspectives to the readers.

Understanding Windows 10 ISO Files: A Comprehensive Guide

[GUIDE] How To Upgrade To Windows 10 Using ISO File

Windows 10 ISO files are digital representations of the entire Windows 10 operating system. They contain all the necessary files and data to install or reinstall Windows 10 on a computer. These files are typically downloaded from Microsoft’s official website and serve as a foundational tool for various scenarios related to Windows 10 management.

Understanding the Significance of Windows 10 ISO Files

Windows 10 ISO files are crucial for several reasons:

  • Clean Installation: They allow for a fresh, clean installation of Windows 10, eliminating any potential issues caused by pre-existing software or data. This is often recommended when troubleshooting system errors or upgrading from an older version of Windows.
  • Reinstallation: In case of system failure, a Windows 10 ISO file can be used to reinstall the operating system, restoring it to its original state.
  • Customizing Installation: ISO files enable users to customize the installation process by selecting specific features and components, tailoring the operating system to their individual needs.
  • Offline Installation: These files can be used to install Windows 10 on a computer without an internet connection, making them ideal for situations where network access is limited.
  • Creating Bootable Media: Windows 10 ISO files are used to create bootable USB drives or DVDs, allowing for a clean installation or repair of the operating system.

Exploring the Benefits of Using Windows 10 ISO Files

The use of Windows 10 ISO files offers numerous benefits:

  • Control and Flexibility: They provide users with complete control over the installation process, allowing for customization and tailored configurations.
  • Troubleshooting and Repair: ISO files are invaluable tools for troubleshooting system errors and repairing corrupted installations.
  • Upgrading and Maintaining: They facilitate seamless upgrades to newer versions of Windows 10 and ensure the system’s stability and performance.
  • Data Preservation: By creating a bootable media, users can back up important data before reinstalling Windows, preventing accidental loss.
  • Accessibility: Windows 10 ISO files are readily available for download from Microsoft’s official website, making them accessible to all users.

Frequently Asked Questions (FAQs) Regarding Windows 10 ISO Files

Q: How do I download a Windows 10 ISO file?

A: To download a Windows 10 ISO file, visit the official Microsoft website and navigate to the "Download Windows 10" section. You will be required to select the desired edition and language, and then the download will begin.

Q: What is the difference between a Windows 10 ISO file and a Windows 10 setup file?

A: A Windows 10 ISO file is a complete image of the operating system, while a setup file is a smaller, executable file used to initiate the installation process.

Q: Can I use a Windows 10 ISO file to upgrade from a previous version of Windows?

A: While it is possible to use a Windows 10 ISO file to upgrade from a previous version, it is generally recommended to use the built-in upgrade feature offered by Microsoft.

Q: Is it legal to download a Windows 10 ISO file?

A: Yes, downloading a Windows 10 ISO file from Microsoft’s official website is entirely legal. However, downloading it from unofficial sources may be illegal and could pose security risks.

Q: How do I create a bootable USB drive using a Windows 10 ISO file?

A: Several tools are available to create bootable USB drives from Windows 10 ISO files, such as the Microsoft Media Creation Tool or Rufus. These tools guide you through the process, making it straightforward.

Tips for Using Windows 10 ISO Files

  • Download from a Trusted Source: Always download Windows 10 ISO files from Microsoft’s official website to ensure legitimacy and security.
  • Verify File Integrity: After downloading the ISO file, verify its integrity using a checksum tool to ensure it has not been corrupted during the download process.
  • Back Up Your Data: Before proceeding with any installation or repair using a Windows 10 ISO file, back up all essential data to avoid accidental loss.
  • Understand the Installation Process: Familiarize yourself with the installation process before starting to avoid any unexpected issues or complications.
  • Use a Reliable USB Drive: When creating a bootable USB drive, use a high-quality, reliable drive to ensure a successful and smooth installation.

Conclusion

Windows 10 ISO files are essential tools for managing and maintaining your Windows 10 operating system. They provide users with flexibility, control, and a reliable method for clean installations, reinstallation, upgrades, and troubleshooting. By understanding the importance of these files and following best practices, users can leverage their capabilities to ensure a smooth and efficient Windows 10 experience.

See Full Details about a Windows 10 ISO file  Windows 10 Tutorials [GUIDE] How To Upgrade To Windows 10 Using ISO File How to create a Windows 10 ISO file using an Install.ESD image  Windows Central
Windows 10 iso file - qlerotd [GUIDE] How To Upgrade To Windows 10 Using ISO File [GUIDE] How To Upgrade To Windows 10 Using ISO File
How to upgrade to Windows 10 using Windows 10 ISO file - Microsoft Community Windows 10 ISO files: What you need to know  Bingalo

Closure

Thus, we hope this article has provided valuable insights into Understanding Windows 10 ISO Files: A Comprehensive Guide. We thank you for taking the time to read this article. See you in our next article!