Archives September 2023

Navigating Windows 11: A Guide To Taskbar Customization And Application Access

Navigating Windows 11: A Guide to Taskbar Customization and Application Access

Introduction

With enthusiasm, let’s navigate through the intriguing topic related to Navigating Windows 11: A Guide to Taskbar Customization and Application Access. Let’s weave interesting information and offer fresh perspectives to the readers.

How to Customize the Taskbar in Windows 11 [Guide]  Beebom

Windows 11, with its redesigned interface and modern aesthetics, introduces a new paradigm for interacting with your computer. While the familiar taskbar remains a central element, navigating its functionalities and customizing its appearance can be a crucial step in enhancing your productivity and streamlining your workflow. This article delves into the intricate world of the Windows 11 taskbar, focusing on the process of adding application icons for quick and efficient access.

Understanding the Taskbar: A Gateway to Your Applications

The taskbar, situated at the bottom of the screen by default, serves as a visual hub for your active applications, system processes, and quick access tools. It provides a convenient platform for launching programs, switching between open windows, and interacting with system settings. Each application that is currently running or has been recently used is represented by an icon, offering a visual snapshot of your ongoing activities.

Adding Application Icons: A Step-by-Step Guide

The process of adding application icons to the taskbar is straightforward and can be accomplished through various methods:

1. Drag and Drop:

  • Locate the Application: Open the desired application through the Start menu or File Explorer.
  • Drag and Drop: Click and hold the application’s icon in the taskbar and drag it to the desired location.
  • Release: Release the mouse button to pin the icon to the taskbar.

2. Right-Click Menu:

  • Open the Application: Launch the application you wish to add to the taskbar.
  • Right-Click the Taskbar: Right-click on an empty area of the taskbar.
  • Select "Taskbar Settings": Choose this option from the context menu.
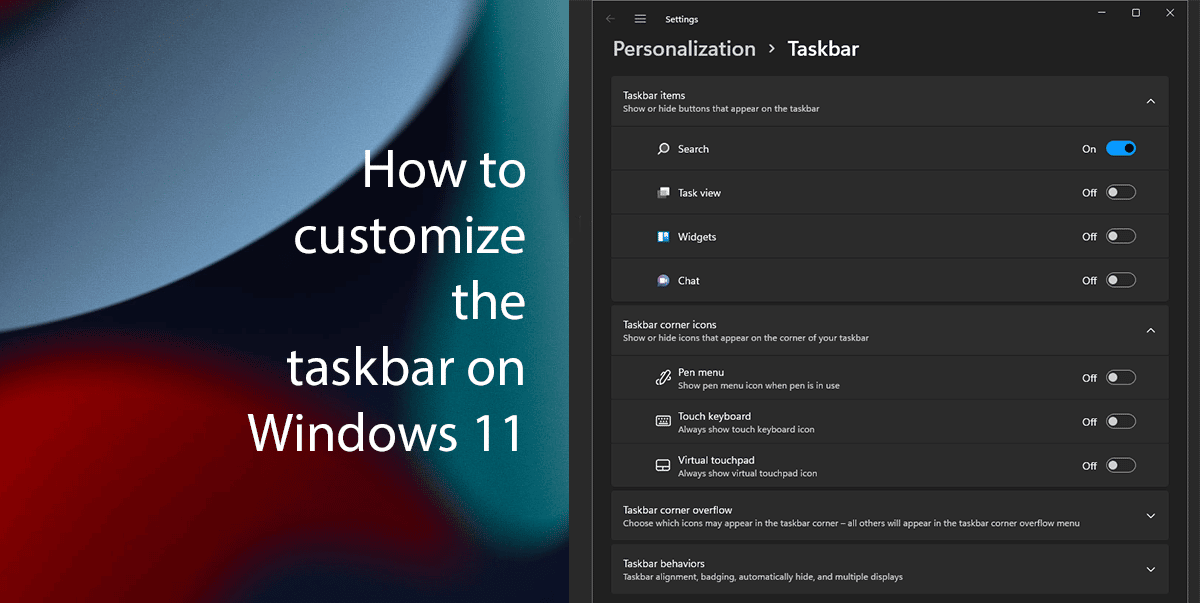
  • Navigate to "Taskbar Items": Locate this section within the settings panel.
  • Select "Taskbar icons": Click on this option to manage the icons displayed on the taskbar.
  • Toggle "Show system icons": This setting controls the visibility of icons like volume, network, and battery.
  • Enable "Taskbar alignment": Choose the alignment of the taskbar, either at the bottom or the top of the screen.

3. Start Menu Pinning:

  • Locate the Application: Open the Start menu and find the application you want to add.
  • Right-Click the Application: Right-click on the application’s icon.
  • Select "Pin to taskbar": This option will add the application icon directly to the taskbar.

Benefits of Taskbar Icon Customization:

  • Increased Efficiency: Quick access to frequently used applications streamlines your workflow, reducing time spent searching through menus.
  • Improved Organization: A customized taskbar allows you to prioritize and visually organize your most essential applications.
  • Enhanced Productivity: With your most used programs readily available, you can focus on tasks without distractions.
  • Personalized Interface: Tailoring your taskbar reflects your individual preferences and enhances your overall computing experience.

FAQs: Addressing Common Queries

Q: How do I remove an icon from the taskbar?

A: Right-click on the icon you want to remove and select "Unpin from taskbar".

Q: Can I rearrange the icons on the taskbar?

A: Yes, you can drag and drop icons to change their order.

Q: What happens if I close an application that is pinned to the taskbar?

A: The icon will remain on the taskbar, but it will become inactive. You can relaunch the application by clicking on its icon.

Q: Can I add folders or files to the taskbar?

A: Currently, the taskbar only supports pinning applications.

Q: How can I customize the appearance of the taskbar icons?

A: Windows 11 offers limited options for customizing icon appearance. However, you can change the overall taskbar theme through the "Personalization" settings.

Tips for Effective Taskbar Customization:

  • Prioritize Essential Applications: Pin only the applications you use most frequently to avoid clutter.
  • Use Folders for Organization: Group related applications within folders to improve visual clarity.
  • Experiment with Alignment: Try placing the taskbar at the top of the screen for a different visual experience.
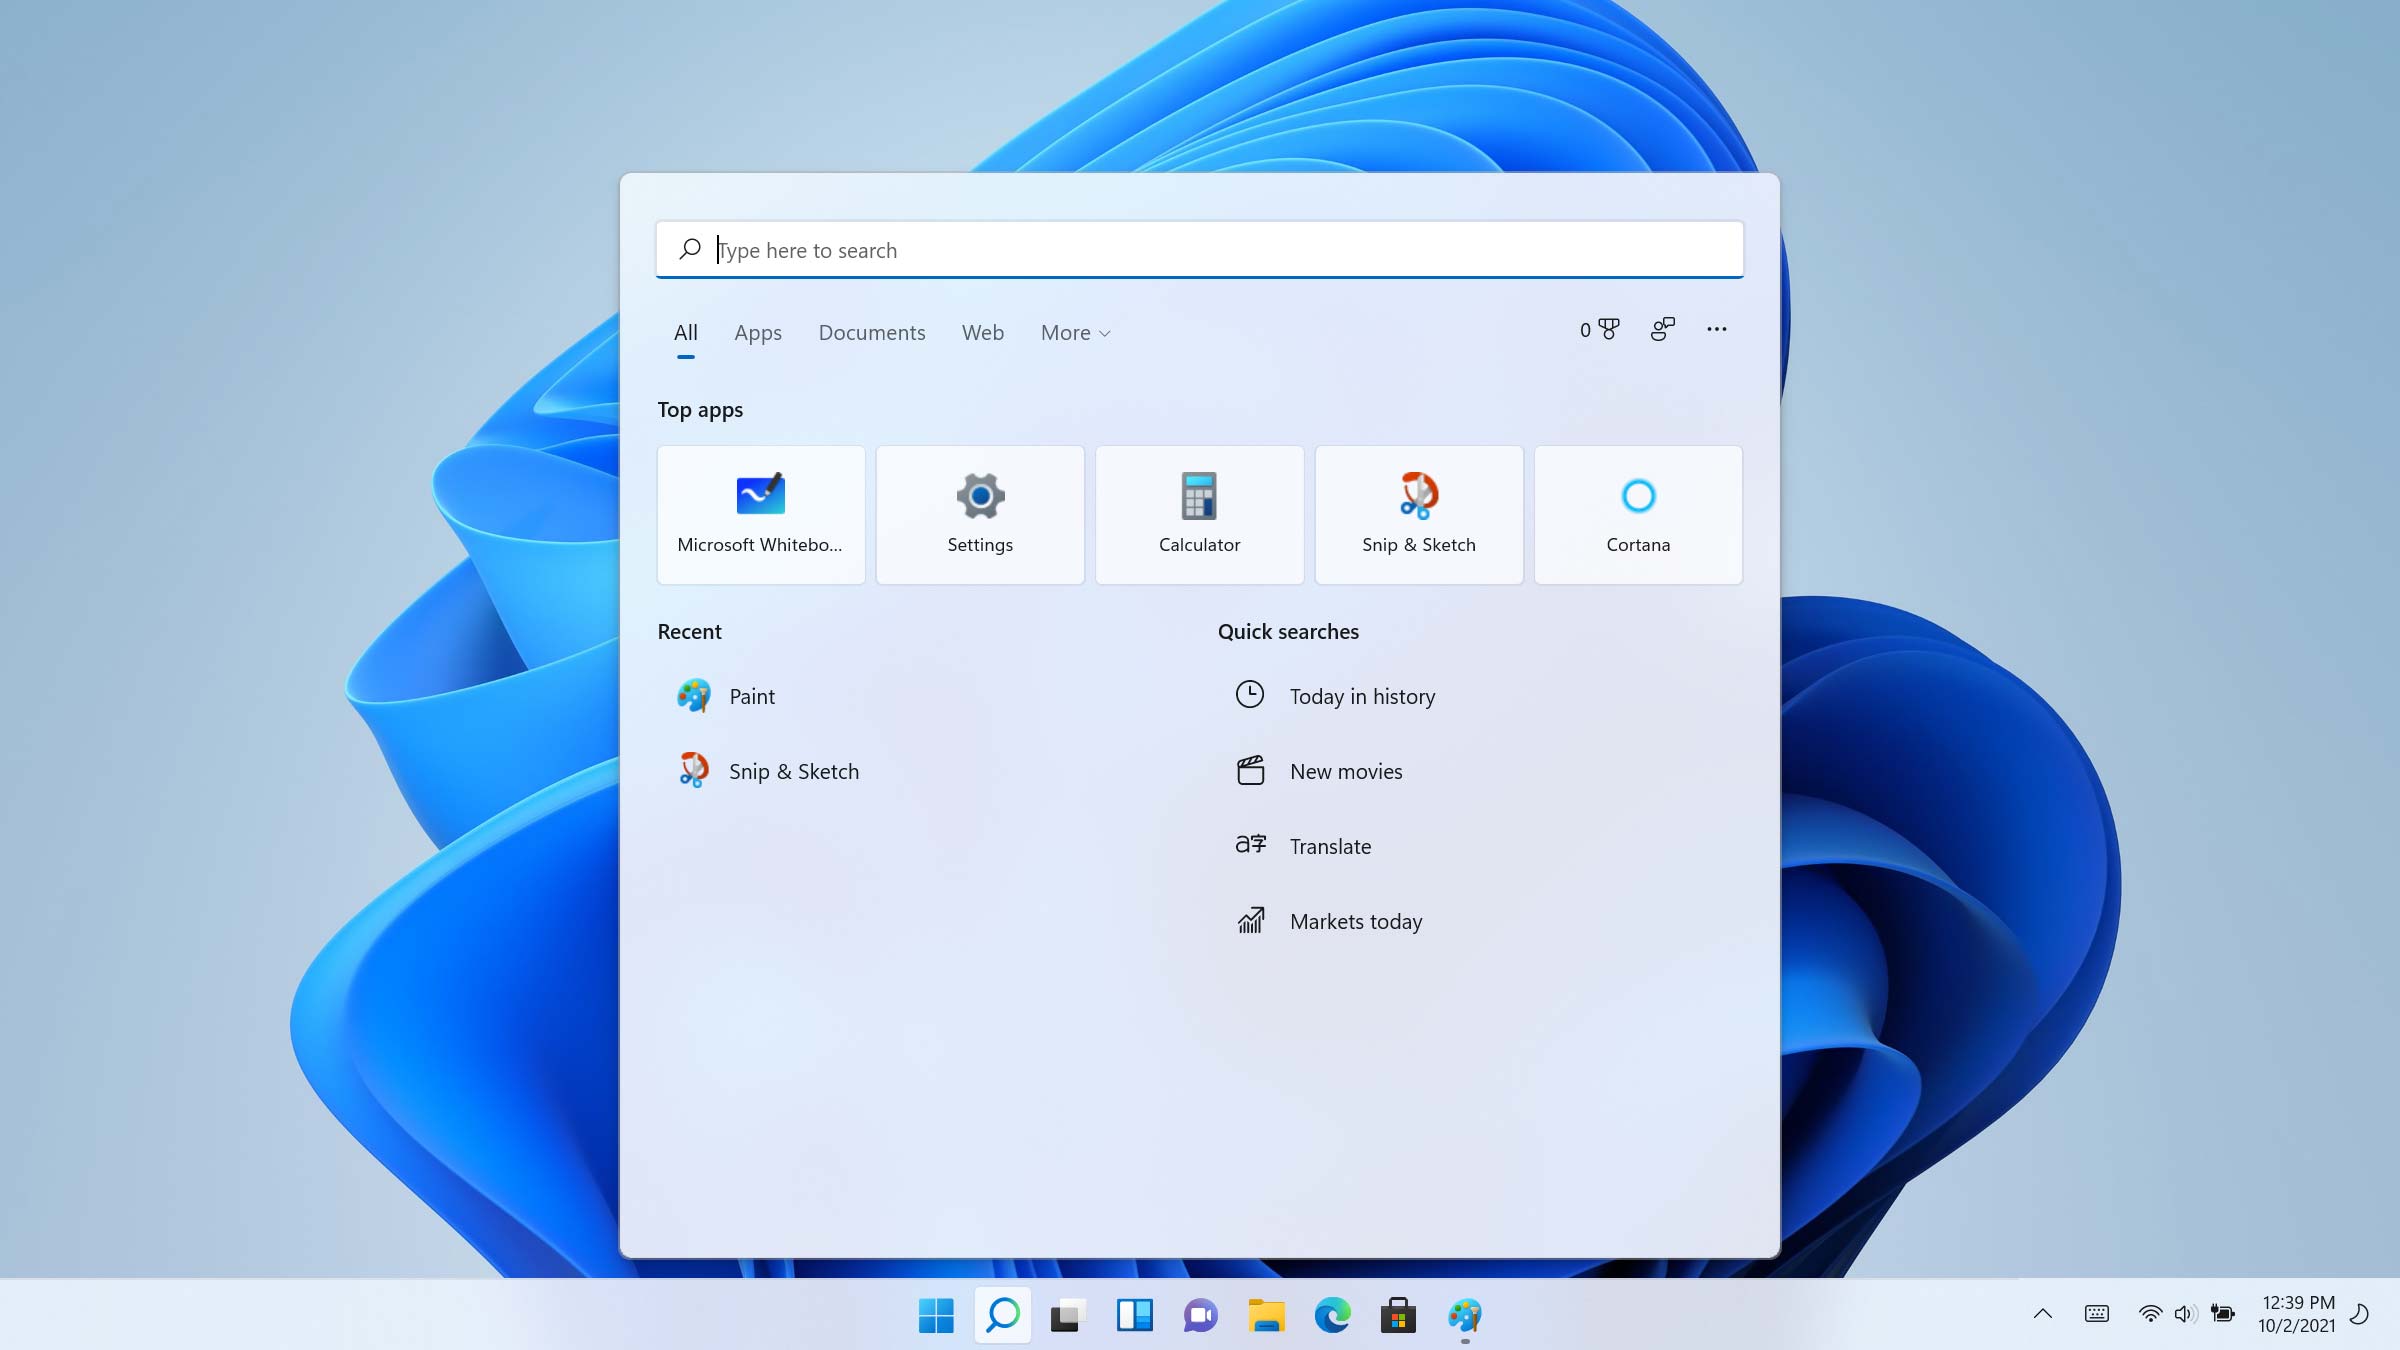
  • Utilize Search Functionality: The taskbar’s search bar can be used to quickly find applications, files, and system settings.

Conclusion:

The Windows 11 taskbar, with its customizable nature, offers a powerful tool for enhancing your computing experience. By understanding the process of adding application icons, you can streamline your workflow, improve organization, and unlock greater efficiency in your daily tasks. Through strategic customization and thoughtful organization, you can transform your taskbar into a personalized gateway to your digital world.

Windows 11 Taskbar Customization Guide โ€” Tech How How to customize the taskbar on Windows 11  iThinkDifferent How to customize Windows 11 Taskbar area - YouTube
How to Customize the Windows 11 Start Menu and Taskbar  Petri (2022) How To Customize Windows 11 Taskbar Step By Step Guide HTMD Blog How to customize the Windows 11 Start menu and taskbar  Laptop Mag
Windows 11 Taskbar Customization (Tutorial) - YouTube How To Customize Windows 11 Taskbar - YouTube

Closure

Thus, we hope this article has provided valuable insights into Navigating Windows 11: A Guide to Taskbar Customization and Application Access. We appreciate your attention to our article. See you in our next article!

Windows 10: A Constant Evolution Of Features And Improvements

Windows 10: A Constant Evolution of Features and Improvements

Introduction

With enthusiasm, let’s navigate through the intriguing topic related to Windows 10: A Constant Evolution of Features and Improvements. Let’s weave interesting information and offer fresh perspectives to the readers.

Windows 10: A Constant Evolution of Features and Improvements

The Evolution of Microsoft Windows Through The Years

Windows 10, since its initial release in 2015, has undergone a continuous cycle of updates and refinements, introducing new features and enhancing existing functionalities. These advancements aim to improve user experience, enhance productivity, and bolster security, making the operating system more adaptable and responsive to evolving user needs.

A Glimpse into the Evolution: Key Feature Updates

The journey of Windows 10 has seen significant feature updates, often delivered through major feature releases, known as "feature updates," and smaller, more frequent "quality updates." These updates have introduced a plethora of changes, ranging from visual enhancements to fundamental system improvements.

1. Enhanced User Interface and Personalization:

  • Start Menu Revamp: The Start Menu, a cornerstone of Windows, has undergone significant transformations. The introduction of Live Tiles, which dynamically display updates and information, provided a more interactive and informative experience. Subsequent updates refined the Start Menu’s layout and organization, making it more intuitive and efficient.
  • Action Center: Introduced in Windows 10, the Action Center serves as a centralized hub for notifications, quick actions, and system settings. It consolidates various system alerts and allows users to manage them effectively.
  • Dark Mode: The addition of a system-wide dark mode in Windows 10 offered a visually appealing alternative to the traditional light theme. This feature not only improved aesthetic appeal but also reduced eye strain in low-light environments.
  • Theme Customization: Windows 10 provides extensive customization options for themes, allowing users to personalize the operating system to their preferences. From color palettes to accent colors, users can tailor the visual experience to match their individual style.

2. Enhanced Security and Privacy:

  • Windows Defender: Windows Defender, the built-in antivirus and anti-malware solution, has undergone significant improvements over time. It offers real-time protection against threats, including ransomware and phishing attacks.
  • Windows Hello: Windows Hello leverages biometric authentication, such as facial recognition and fingerprint scanning, to secure user accounts. This secure login method enhances user security by eliminating the need for passwords.
  • Privacy Controls: Windows 10 provides granular control over privacy settings, allowing users to manage data collection and sharing. Users can selectively control access to their location, camera, microphone, and other sensitive information.
  • Windows Security: This centralized security dashboard consolidates various security settings and tools, providing users with a comprehensive view of their system’s security status.

3. Productivity and Collaboration:

  • Microsoft Edge: The new Microsoft Edge browser, built on the Chromium engine, offers improved performance, compatibility, and security. It also features a robust set of extensions and integration with other Microsoft services.
  • Cortana: The voice assistant, Cortana, has evolved from a simple voice command tool to a more comprehensive personal assistant. It can help users manage tasks, schedule appointments, and access information through voice commands.
  • Windows Ink: Windows Ink introduced a suite of tools for pen-based input, allowing users to interact with the operating system more naturally. It supports handwritten notes, drawing, and annotation features.
  • Microsoft Teams: This collaboration platform allows users to communicate, collaborate, and share files, enhancing teamwork and productivity.

4. Performance and System Optimization:

  • Game Mode: Game Mode prioritizes system resources for games, enhancing performance and reducing lag. This feature is particularly beneficial for gamers who demand optimal gaming experiences.
  • Storage Sense: This feature automatically manages storage space by identifying and deleting unnecessary files, ensuring optimal system performance.
  • Windows Update Optimization: Windows Update has been optimized to deliver updates more efficiently, reducing download times and minimizing disruption to users.
  • Power Optimization: Windows 10 incorporates features that optimize power consumption, extending battery life and reducing energy usage.

5. Accessibility Features:

  • Narrator: The Narrator screen reader provides aural feedback for visually impaired users, enabling them to interact with the operating system effectively.
  • Magnifier: The Magnifier tool enlarges portions of the screen, making it easier for users with visual impairments to see content.
  • High Contrast: The High Contrast mode enhances visual clarity for users with low vision, making text and icons more visible.

Addressing Common Concerns: FAQs

Q: How often are updates released for Windows 10?

A: Windows 10 receives both major feature updates and smaller quality updates regularly. Feature updates are typically released twice a year, while quality updates are released on a monthly basis.

Q: Are Windows 10 updates mandatory?

A: While updates are generally recommended for security and performance reasons, users can defer updates for a certain period. However, it is crucial to keep the system updated for optimal security and functionality.

Q: What are the system requirements for Windows 10?

A: Windows 10 requires a minimum of 1 GB of RAM for 32-bit systems and 2 GB for 64-bit systems. It also necessitates a minimum of 16 GB of storage space for 32-bit systems and 20 GB for 64-bit systems.

Q: Are there any costs associated with upgrading to Windows 10?

A: For eligible devices, upgrading to Windows 10 is generally free. However, purchasing a new device or upgrading to a newer version of Windows 10 may incur costs.

Q: How can I ensure my data is protected during updates?

A: Windows 10 includes built-in data protection mechanisms. It is recommended to back up important data before installing updates to ensure its safety.

Tips for Optimizing Windows 10 Experience

  • Regularly Update: Keep your system updated with the latest patches and features to ensure optimal security and performance.
  • Manage Storage: Use Storage Sense to automatically clean up unnecessary files and free up disk space.
  • Optimize Power Settings: Adjust power settings to extend battery life and reduce energy consumption.
  • Utilize Windows Search: Use the Windows Search bar to quickly find files, applications, and settings.
  • Explore Accessibility Features: If you require assistance with vision, hearing, or mobility, explore the accessibility features available in Windows 10.

Conclusion

Windows 10 has evolved into a powerful and versatile operating system, constantly adapting to changing user needs. Its continuous updates and improvements enhance user experience, bolster security, and optimize performance. By embracing the features and updates offered by Windows 10, users can unlock its full potential and enjoy a more efficient, secure, and personalized computing experience.

Evolution of Microsoft Windows from 1986 to 2021 Shows Just How Far We've Come - TechEBlog Windows 10 22H2 new features and changes - Pureinfotech The Evolution of Windows #infographic - Visualistan
Evolution of Windows OS. Windows Operating System was launchedโ€ฆ  by Jeewantha Lahiru  Medium Visualistan โ€” The Evolution of Windows #infographic The Windows 10 Evolution Youtube - vrogue.co
Microsoft shows off the Windows 10 Start Menu evolution New Windows 10 preview build features UI, Edge improvements - SlashGear

Closure

Thus, we hope this article has provided valuable insights into Windows 10: A Constant Evolution of Features and Improvements. We hope you find this article informative and beneficial. See you in our next article!

Navigating Windows 10 Boot Issues: A Comprehensive Guide

Navigating Windows 10 Boot Issues: A Comprehensive Guide

Introduction

In this auspicious occasion, we are delighted to delve into the intriguing topic related to Navigating Windows 10 Boot Issues: A Comprehensive Guide. Let’s weave interesting information and offer fresh perspectives to the readers.

Navigating the Boot Configuration Maze: A Comprehensive Guide to Fixing Boot Configuration File

The inability to boot into Windows 10 can be a frustrating experience, leaving users stranded and unable to access their files and applications. This guide aims to provide a comprehensive understanding of the potential causes behind this issue and offer solutions to help users regain access to their operating system.

Understanding the Boot Process

To troubleshoot Windows 10 boot problems, it is essential to understand the sequence of events that occur when a computer starts. The process begins with the Power On Self Test (POST), which checks the hardware components for functionality. If the POST is successful, the system searches for a bootable device, typically a hard drive or a USB drive. Once the bootable device is identified, the operating system’s boot loader is loaded, which in turn loads the operating system’s kernel and other necessary files. Finally, the user interface appears, allowing users to interact with the system.

Common Causes of Windows 10 Boot Issues

Numerous factors can disrupt the boot process, leading to a failure to load Windows 10. These factors can be categorized as follows:

1. Hardware Issues:

  • Faulty Hard Drive: A damaged or failing hard drive can prevent the operating system from loading. This can be caused by physical damage, wear and tear, or logical errors.
  • Defective RAM: RAM plays a crucial role in loading the operating system. Defective RAM can cause errors during the boot process, leading to a failure to load Windows 10.
  • Loose or Damaged Connections: Loose or damaged connections between the motherboard and other components, such as the hard drive, RAM, or graphics card, can also lead to boot issues.
  • Overheating: Overheating components, particularly the CPU and GPU, can cause instability and lead to boot failures.
  • Power Supply Problems: A faulty power supply can cause insufficient power to the system, leading to boot issues.

2. Software Issues:

  • Corrupted Boot Files: The boot files are essential for loading the operating system. Corruption in these files can prevent Windows 10 from booting successfully.
  • Driver Conflicts: Incompatible or outdated device drivers can cause conflicts during the boot process, leading to a failure to load Windows 10.
  • Malware Infection: Malware can damage system files, including boot files, and interfere with the boot process.
  • Recent Software Changes: Installing new software, updating drivers, or making significant system changes can sometimes cause conflicts that disrupt the boot process.
  • Windows Updates: While Windows updates are generally beneficial, they can sometimes introduce bugs or conflicts that lead to boot issues.

3. Other Factors:

  • Incorrect Boot Order: The boot order in the BIOS/UEFI settings determines which device the system tries to boot from first. An incorrect boot order can prevent Windows 10 from loading.
  • BIOS/UEFI Settings: Incorrect or outdated BIOS/UEFI settings can sometimes interfere with the boot process.
  • External Devices: Connected external devices, such as USB drives or external hard drives, can sometimes interfere with the boot process.

Troubleshooting Windows 10 Boot Issues

Once the potential causes have been identified, it’s time to troubleshoot the issue. Here are some steps to take:

1. Basic Troubleshooting:

  • Restart the Computer: A simple restart can sometimes resolve temporary issues that prevent Windows 10 from booting.
  • Check for Loose Connections: Ensure all connections between the motherboard and other components are secure.
  • Disconnect External Devices: Disconnect all external devices, except for the keyboard and mouse, to see if they are interfering with the boot process.
  • Check for Overheating: Ensure that the computer is not overheating. Consider cleaning the fans and vents to improve airflow.

2. Advanced Troubleshooting:

  • Boot into Safe Mode: Safe Mode starts Windows 10 with a limited set of drivers and services. This can help identify if a specific driver or service is causing the boot issue.
  • Use System Restore: System Restore can revert the system to a previous point in time, potentially resolving issues caused by recent software changes.
  • Run a Startup Repair: Startup Repair can automatically fix common boot problems.
  • Use a Boot Repair Tool: Third-party boot repair tools, such as EasyBCD, can help repair boot files and resolve boot errors.
  • Perform a Clean Install of Windows 10: If all other solutions fail, a clean install of Windows 10 may be necessary. This will erase all data on the hard drive, so it’s essential to back up important files before proceeding.

3. Hardware Diagnostics:

  • Run Hardware Diagnostics: Most manufacturers provide diagnostic tools that can test the hardware components, such as the hard drive, RAM, and motherboard.
  • Replace Faulty Components: If hardware diagnostics identify a faulty component, it should be replaced.

FAQs: Addressing Common Queries

Q: What if I see a black screen with a blinking cursor during boot?

This could indicate a problem with the hard drive, RAM, or boot files. Try running a hard drive check or replacing the RAM.

Q: What if I see a blue screen with an error message during boot?

This indicates a system error. The error message can provide clues about the cause of the problem. Check the error message for details, and consult online resources for troubleshooting tips.

Q: What if I can’t access the BIOS/UEFI settings?

If you can’t access the BIOS/UEFI settings, try restarting the computer and pressing the appropriate key (usually F2, F10, or Delete) during the boot process.

Q: Can I recover my data if I need to perform a clean install?

Yes, you can back up your data to an external drive or cloud storage before performing a clean install.

Tips for Preventing Windows 10 Boot Issues:

  • Keep Windows 10 Updated: Regularly install Windows updates to ensure that the operating system is secure and stable.
  • Back Up Your Data: Regularly back up important data to prevent data loss in case of a boot failure.
  • Monitor System Health: Monitor system health using built-in tools or third-party software to identify potential problems early.
  • Run Antivirus Software: Regularly scan your system for malware to prevent infections that can disrupt the boot process.
  • Avoid Installing Unnecessary Software: Only install software from trusted sources and avoid installing unnecessary software that could cause conflicts.

Conclusion:

Windows 10 boot issues can be frustrating, but with a systematic approach to troubleshooting, most problems can be resolved. By understanding the boot process, identifying potential causes, and applying appropriate solutions, users can regain access to their operating system and restore functionality. Remember to always back up important data before performing any major troubleshooting steps. While this guide offers a comprehensive overview, it’s essential to consult official documentation and seek professional assistance if necessary.

[Complete Guide] How to Fix Inaccessible Boot Device Error Windows 10 Windows 10 Boot Repair - Ultimate Usage Guide 8 Ways to Fix Boot Device Problem in Windows 10 โ€“ TechCult
How To Fix Windows 10 Startup and Boot Problems - YouTube Windows 10 Boot Manager and Boot Issue Fix How to use Startup Repair to fix boot problems with Windows 10  Windows Central
Windows 10 Won't Boot? 12 Fixes to Get Your PC Running Again Windows 10 Boot Manager and Boot Issue Fix

Closure

Thus, we hope this article has provided valuable insights into Navigating Windows 10 Boot Issues: A Comprehensive Guide. We hope you find this article informative and beneficial. See you in our next article!

Understanding Windows 10 Pro OEM Licenses: A Comprehensive Guide

Understanding Windows 10 Pro OEM Licenses: A Comprehensive Guide

Introduction

With great pleasure, we will explore the intriguing topic related to Understanding Windows 10 Pro OEM Licenses: A Comprehensive Guide. Let’s weave interesting information and offer fresh perspectives to the readers.

Understanding Windows 10 Pro OEM Licenses: A Comprehensive Guide

Windows 10 Pro OEM Key  The Tech Act

The world of software licensing can be a complex labyrinth, especially for users seeking the most cost-effective and legitimate way to utilize operating systems like Windows 10. This guide aims to provide a comprehensive understanding of Windows 10 Pro OEM licenses, specifically focusing on their global availability and the benefits they offer.

Defining the Terms: OEM and Global

OEM stands for Original Equipment Manufacturer. In the context of software licensing, an OEM license refers to a specific type of software license that is tied to a particular piece of hardware. This means that the license is typically sold by the hardware manufacturer (like a computer manufacturer) and is pre-installed on the device. The license is not transferable to another device, and the user cannot purchase the software separately from the hardware.

Global refers to the geographical scope of the license. A global Windows 10 Pro OEM license means that the license is valid for activation and use in any region worldwide. This differs from regional licenses, which may be restricted to specific countries or continents.

Benefits of Windows 10 Pro OEM Licenses

  1. Cost-Effectiveness: OEM licenses are often significantly cheaper than retail versions of Windows 10 Pro. This makes them an attractive option for individuals and businesses looking to save on software costs, particularly when purchasing new hardware.

  2. Convenience: The license is pre-installed on the device, eliminating the need for separate installation and activation processes. This provides a seamless user experience, particularly for those unfamiliar with software installation procedures.

  3. Global Accessibility: Global licenses offer flexibility and convenience for users who travel or work internationally. They ensure compatibility and functionality regardless of the user’s location.

  4. Security and Updates: OEM licenses grant access to the full range of features and security updates offered by Windows 10 Pro. This ensures that users are protected from the latest threats and have access to the latest functionalities.

Considerations for Using Windows 10 Pro OEM Licenses

  1. Hardware Dependence: The license is tied to the specific hardware on which it was initially installed. Transferring the license to another device is typically not allowed.

  2. No Upgrade Rights: OEM licenses do not typically include upgrade rights. This means that users cannot upgrade to a newer version of Windows without purchasing a separate license.

  3. Limited Support: OEM licenses may offer limited technical support compared to retail versions. Support is usually provided by the hardware manufacturer.

Frequently Asked Questions (FAQs) About Windows 10 Pro OEM Licenses

Q: Can I use a Windows 10 Pro OEM license on a different computer?

A: No. OEM licenses are tied to the specific hardware on which they were initially installed. They cannot be transferred to another device.

Q: What if I upgrade my hardware components?

A: Upgrading certain components like RAM or storage might not affect the license. However, replacing the motherboard or CPU typically requires a new license.

Q: What happens if I lose my Windows 10 Pro OEM license key?

A: It is generally recommended to keep a copy of your license key safe. If you lose it, you may need to contact the hardware manufacturer or Microsoft for assistance.

Q: Can I buy a Windows 10 Pro OEM license separately?

A: Generally, OEM licenses are not sold separately. They are typically bundled with the hardware.

Q: What are the main differences between Windows 10 Pro OEM and Windows 10 Pro retail licenses?

A: The key difference lies in the transferability and upgrade rights. OEM licenses are tied to specific hardware and do not offer upgrade rights, while retail licenses are transferable and often include upgrade options.

Tips for Using Windows 10 Pro OEM Licenses

  1. Keep your license key safe: Store your license key securely in a safe place.

  2. Contact the hardware manufacturer for support: If you have any issues with your license or need technical assistance, contact the hardware manufacturer.

  3. Ensure compatibility: Before purchasing a device with a pre-installed Windows 10 Pro OEM license, ensure that the hardware meets the minimum system requirements for Windows 10.

Conclusion

Windows 10 Pro OEM licenses can be a cost-effective and convenient option for individuals and businesses seeking a legitimate and functional operating system. Understanding the intricacies of these licenses, including their global availability and the considerations associated with their use, is crucial for making informed decisions. By carefully assessing individual needs and considering the benefits and limitations, users can determine if a Windows 10 Pro OEM license is the right choice for their specific requirements.

Microsoft Windows 10 Pro OEM System builder License Key Microsoft Windows 10 Pro OEM Key  Get your Cheap License CD Key โ€“ RoyalCDKeys Windows 10 Pro OEM Key  Buy on Kinguin
Windows 10 Pro Oem Microsoft windows 10 pro oem license  How to buy a windows 10 Pro OEM license?. 2019-05-07 Windows 10 Pro Oem Digital License - Licenศ›ฤƒ Blog
Windows 10 pro digital license - ftras Windows 10 Pro OEM licenses for businesses

Closure

Thus, we hope this article has provided valuable insights into Understanding Windows 10 Pro OEM Licenses: A Comprehensive Guide. We thank you for taking the time to read this article. See you in our next article!

Navigating The World Of Windows 10 Pro: A Comprehensive Guide

Navigating the World of Windows 10 Pro: A Comprehensive Guide

Introduction

In this auspicious occasion, we are delighted to delve into the intriguing topic related to Navigating the World of Windows 10 Pro: A Comprehensive Guide. Let’s weave interesting information and offer fresh perspectives to the readers.

All You Need to Know About Windows 10 Professional: A Comprehensive Guide - Aartisto Web Media

Windows 10 Pro, a robust and feature-rich operating system, has become a mainstay for individuals and businesses seeking a reliable and versatile computing experience. Understanding the intricacies of acquiring and utilizing this operating system is crucial for maximizing its potential. This guide aims to provide a comprehensive overview of Windows 10 Pro, covering its key features, download process, and essential considerations.

Understanding Windows 10 Pro: A Powerful Platform

Windows 10 Pro stands out from its consumer counterpart, Windows 10 Home, by offering advanced functionalities tailored for professional and business users. These features include:

  • Enhanced Security: Windows 10 Pro incorporates robust security measures like BitLocker drive encryption, Windows Defender Advanced Threat Protection, and Domain Join capabilities, safeguarding sensitive data and ensuring secure network access.
  • Remote Desktop Access: The Remote Desktop feature allows users to remotely access and manage their computers, enabling seamless collaboration and productivity from any location.
  • Group Policy Management: This feature grants administrators greater control over system settings and user configurations, streamlining network administration and ensuring consistent security policies.
  • Windows Update for Business: This feature provides businesses with greater control over software updates, allowing them to schedule deployments and ensure seamless integration with their existing IT infrastructure.
  • Hyper-V Virtualization: Windows 10 Pro enables users to run multiple operating systems simultaneously on a single computer, facilitating software testing, development, and resource optimization.

Acquiring Windows 10 Pro: A Step-by-Step Guide

Obtaining a legitimate copy of Windows 10 Pro is crucial for enjoying its full potential and avoiding potential legal issues. The process involves the following steps:

  1. Purchase a License: Windows 10 Pro licenses are available through authorized retailers, original equipment manufacturers (OEMs), and Microsoft’s online store. Ensure the license is genuine and compatible with your system.
  2. Download the Installation Media: Once the license is secured, download the Windows 10 Pro installation media (ISO file) from Microsoft’s website. This file contains all the necessary files to install the operating system.
  3. Create Bootable Media: Use a USB drive or DVD to create bootable media from the downloaded ISO file. This will allow you to install Windows 10 Pro on your computer.
  4. Install Windows 10 Pro: Boot your computer from the created bootable media and follow the on-screen instructions to install Windows 10 Pro. The installation process typically involves formatting the hard drive, selecting your language and region, and activating the license.

Essential Considerations for a Smooth Transition

While the download and installation process may seem straightforward, several factors require attention for a smooth transition:

  • System Requirements: Before proceeding with the download and installation, ensure your computer meets the minimum system requirements for Windows 10 Pro. This includes processor, RAM, storage space, and graphics capabilities.
  • Data Backup: Prior to installing Windows 10 Pro, back up all your essential data. This includes files, documents, applications, and settings. A data backup safeguards your information in case of unforeseen issues during the installation process.
  • Driver Compatibility: Ensure your computer’s drivers are compatible with Windows 10 Pro. Outdated drivers can lead to compatibility issues and system instability.
  • Software Compatibility: Check the compatibility of your existing software applications with Windows 10 Pro. Some applications may require updates or alternative versions to function properly on the new operating system.

FAQs: Addressing Common Concerns

Q: What are the differences between Windows 10 Home and Windows 10 Pro?

A: Windows 10 Pro offers advanced features tailored for professional and business users, including enhanced security measures, remote desktop access, group policy management, and virtualization capabilities. Windows 10 Home is designed for personal use and lacks these advanced functionalities.

Q: Can I upgrade from Windows 10 Home to Windows 10 Pro?

A: Yes, you can upgrade from Windows 10 Home to Windows 10 Pro. This can be done through the Windows Store or by purchasing a product key and using the "Change product key" option in Windows settings.

Q: How do I activate Windows 10 Pro?

A: Windows 10 Pro activation is typically done automatically during the installation process using the product key. If activation fails, you can use the "Activate Windows" option in Windows settings to manually enter the product key.

Q: What are the benefits of using Windows 10 Pro?

A: Windows 10 Pro offers enhanced security, remote access capabilities, group policy management, and virtualization features, making it ideal for professional and business users who require a robust and versatile operating system.

Tips for Optimizing Your Windows 10 Pro Experience

  • Regular Updates: Keep Windows 10 Pro up-to-date with the latest security patches and feature updates to ensure optimal performance and security.
  • Performance Optimization: Use the built-in Performance Monitor to identify and address any performance bottlenecks. You can also disable unnecessary background processes and services to improve system responsiveness.
  • Customization: Personalize your Windows 10 Pro experience by customizing the Start menu, taskbar, and desktop settings to suit your preferences.
  • Utilize Built-in Features: Explore and utilize the wide range of built-in features in Windows 10 Pro, such as Cortana, OneDrive, and Microsoft Edge, to enhance your productivity and efficiency.

Conclusion: Embracing the Power of Windows 10 Pro

Windows 10 Pro offers a comprehensive and powerful operating system that caters to the needs of professional users and businesses. By understanding its features, navigating the download process, and considering essential factors, users can unlock its full potential and optimize their computing experience. Whether it’s enhancing security, enabling remote access, or streamlining network administration, Windows 10 Pro empowers users to achieve greater productivity and efficiency.

Microsoft Windows 10 Pro  Shacknews Microsoft Windows 10 Pro - Bright Technologies Windows 10 Pro Version 22H2 Build 19045.2364 incl Office 2021 en-US December 2022 (x64)  Viแบฟt
Windows 10 Pro How Is the World Adjusting To Windows 10?  Movie TV Tech Geeks News Microsoft Windows 10 Pro - Gasy Publishing
How To Navigate Windows 10 - SSCSD Educational Technology Windows 10 Pro And Windows 11 Pro Difference - IMAGESEE

Closure

Thus, we hope this article has provided valuable insights into Navigating the World of Windows 10 Pro: A Comprehensive Guide. We hope you find this article informative and beneficial. See you in our next article!

Understanding Drive Letters And Their Significance

Understanding Drive Letters and Their Significance

Introduction

With great pleasure, we will explore the intriguing topic related to Understanding Drive Letters and Their Significance. Let’s weave interesting information and offer fresh perspectives to the readers.

Understanding Drive Letters and Their Significance

What Is A Drive Letter

In the realm of computer systems, drive letters are an essential element for organizing and accessing data. These alphabetical designations, such as "C," "D," or "J," represent physical storage devices or logical partitions within a computer. Each drive letter acts as a unique identifier, allowing the operating system and applications to locate and interact with the corresponding storage space.

The Importance of Drive Letters

Drive letters play a crucial role in several aspects of computer operation:

  • File System Navigation: Drive letters provide a hierarchical structure for organizing files and folders. The operating system uses drive letters to differentiate between storage locations and navigate through the file system efficiently.
  • Application Installation and Data Storage: Applications often require specific drive letters for installation and data storage. This ensures that applications are correctly installed and their data is stored in the designated location.
  • Data Backup and Recovery: Drive letters are essential for backing up data to external storage devices or creating system images. They facilitate the process of restoring data to the original location or a different storage device.
  • Network Sharing: Drive letters are used to share files and folders across a network. By assigning a drive letter to a shared resource, users on the network can easily access and manage files.

Exploring the "J" Drive

The "J" drive, like any other drive letter, represents a specific storage location within a computer system. However, the meaning and purpose of the "J" drive can vary significantly depending on the system configuration and user preferences.

Possible Interpretations of the "J" Drive:

  • External Storage Device: The "J" drive could be assigned to an external hard drive, USB flash drive, or other removable storage device. This allows users to access data stored on these devices directly from their computer.
  • Network Share: The "J" drive might represent a shared folder on another computer within the network. This enables users to access and manage files stored on the shared resource.
  • Virtual Drive: In some cases, the "J" drive could be a virtual drive created by software such as a virtual machine or a disk imaging tool. This allows users to create and access virtual storage spaces on their computer.
  • Dedicated Storage Location: The "J" drive might be assigned to a specific partition on the hard drive for a particular purpose, such as storing large media files or backing up system data.

Determining the Purpose of the "J" Drive

To understand the purpose of the "J" drive on a specific computer, it is necessary to examine the system configuration and identify the associated storage device or resource.

Steps to Identify the "J" Drive:

  1. Check the "My Computer" or "This PC" Window: Open the "My Computer" or "This PC" window and observe the list of drives displayed. If the "J" drive is present, it will be listed alongside other drives.
  2. Examine the Device Manager: Open the Device Manager and check the "Disk Drives" section. This will display a list of connected storage devices, including the one associated with the "J" drive.
  3. Review Network Connections: If the "J" drive represents a network share, it will appear in the "Network" section of "My Computer" or "This PC."
  4. Consult System Information: Review system information tools, such as "System Properties," to identify the drive letter assignments and associated storage devices.

Benefits of Understanding Drive Letters

Understanding drive letters and their associated storage locations is essential for managing data effectively. This knowledge empowers users to:

  • Organize Data Efficiently: By assigning specific drive letters to different types of data, users can create a structured and logical organization for their files.
  • Optimize Storage Utilization: Understanding the available storage space on each drive allows users to allocate resources efficiently and avoid potential storage limitations.
  • Back Up Data Safely: Drive letters provide a clear framework for backing up data to external storage devices or creating system images, ensuring data safety and recovery options.
  • Troubleshoot System Issues: By identifying the drive letter associated with a particular storage device or resource, users can diagnose and troubleshoot system problems more effectively.

FAQs about Drive Letters

Q: Why are drive letters assigned alphabetically?

A: Historically, drive letters were assigned alphabetically to simplify the organization and identification of storage devices. However, modern operating systems allow for more flexible drive letter assignments, including the use of non-alphabetical characters.

Q: Can I change the drive letter assigned to a storage device?

A: Yes, drive letters can be changed in most operating systems. However, it is important to ensure that the changes do not interfere with existing applications or data storage configurations.

Q: What happens if I delete a drive letter?

A: Deleting a drive letter will not physically erase the data stored on the associated device. However, it will make the data inaccessible until the drive letter is re-assigned.

Q: How can I access data stored on a network drive?

A: To access data stored on a network drive, the drive must be mapped to a drive letter on the local computer. This can be done through the "Network" section of "My Computer" or "This PC."

Q: What is the difference between a physical drive and a logical drive?

A: A physical drive refers to the actual storage device, such as a hard drive or SSD. A logical drive, on the other hand, is a partition created on a physical drive, which acts as a separate storage space.

Tips for Managing Drive Letters

  • Use a Consistent Naming Convention: Create a consistent naming convention for drive letters to ensure clear identification and organization.
  • Avoid Using Drive Letters for Critical System Files: Do not assign drive letters to partitions containing critical system files, as this can lead to system instability.
  • Back Up Data Regularly: Regularly back up data stored on all drives to prevent data loss in case of hardware failure or accidental deletion.
  • Monitor Disk Space: Keep track of the available disk space on each drive to avoid running out of storage.
  • Use Disk Management Tools: Utilize disk management tools provided by the operating system to create, format, and manage partitions and drive letters.

Conclusion

Drive letters are an essential part of the computer system, providing a framework for organizing and accessing data. Understanding the purpose and significance of drive letters is crucial for managing data effectively, ensuring data safety, and troubleshooting system issues. By employing best practices and utilizing available tools, users can optimize their storage utilization and ensure a seamless and efficient computing experience.

Understanding Drive Letters - Partition Magic online help Understanding Drive Letters - Partition Magic online help Rename and/or Change Drive Letters For Installed Drives - YouTube
Disk Partitions and Drive Lettering What is a Drive Letter and How to Find Drive Letter on a Computer How to show drive letters before drive names in Windows 10
Drive Letters  PDF Drive Letter and multiple drives - Super User

Closure

Thus, we hope this article has provided valuable insights into Understanding Drive Letters and Their Significance. We hope you find this article informative and beneficial. See you in our next article!

Navigating The World Of NinjaTrader 8: A Comprehensive Guide For Windows 11 Users

Navigating the World of NinjaTrader 8: A Comprehensive Guide for Windows 11 Users

Introduction

With great pleasure, we will explore the intriguing topic related to Navigating the World of NinjaTrader 8: A Comprehensive Guide for Windows 11 Users. Let’s weave interesting information and offer fresh perspectives to the readers.

How to Use NinjaTrader 8 - Complete Beginner's Tutorial / Guide for Traders - YouTube

NinjaTrader 8, a powerful and versatile trading platform, offers a comprehensive suite of tools for both novice and experienced traders. This guide aims to provide a thorough understanding of NinjaTrader 8, focusing on its compatibility with Windows 11 64-bit systems, its key features, and how to effectively utilize its capabilities.

Understanding the Significance of NinjaTrader 8

NinjaTrader 8 stands out as a robust trading platform renowned for its customization options, advanced charting capabilities, and diverse order types. Its compatibility with Windows 11 64-bit systems ensures smooth operation and efficient performance on modern computers, making it an ideal choice for traders seeking a reliable and feature-rich environment.

Exploring the Key Features of NinjaTrader 8

  • Advanced Charting: NinjaTrader 8 provides an extensive array of charting tools, allowing traders to visualize market data with precision. Users can customize chart types, indicators, and drawing tools to create personalized views that suit their trading strategies.

  • Multiple Timeframes: The platform supports the analysis of data across various timeframes, enabling traders to gain insights into market trends and identify potential trading opportunities. This multi-timeframe analysis is crucial for understanding the broader market context and making informed decisions.

  • Automated Trading: NinjaTrader 8 empowers traders with the ability to automate their trading strategies through its powerful strategy development environment. This feature allows traders to implement pre-defined rules and execute trades automatically, potentially improving efficiency and reducing emotional biases.

  • Real-time Data: Access to real-time market data is essential for timely trading decisions. NinjaTrader 8 provides access to live quotes from various brokers and data providers, ensuring traders have up-to-the-minute information at their disposal.

  • Backtesting and Optimization: NinjaTrader 8 facilitates backtesting, allowing traders to evaluate the performance of their strategies against historical data. This process helps in validating strategies, identifying potential weaknesses, and optimizing parameters for improved future results.

Installing and Configuring NinjaTrader 8 on Windows 11

The installation process of NinjaTrader 8 on Windows 11 is straightforward. Users can download the latest version from the official NinjaTrader website, which includes detailed installation instructions. The software is compatible with both 64-bit and 32-bit versions of Windows 11.

Customizing NinjaTrader 8 for Optimal Trading

NinjaTrader 8 offers extensive customization options to cater to individual trading preferences. Users can personalize the platform’s layout, color schemes, and various settings to create a trading environment that aligns with their workflow and trading style.

Utilizing the Power of NinjaTrader 8

  • Developing Trading Strategies: NinjaTrader 8 provides a robust strategy development environment that allows traders to create custom strategies using its powerful scripting language. This feature enables users to implement complex trading logic and automate their trading processes.

  • Backtesting and Optimization: Backtesting is a crucial step in refining trading strategies. NinjaTrader 8 provides advanced backtesting capabilities, enabling traders to evaluate their strategies against historical data and identify areas for improvement.

  • Order Management: The platform offers a comprehensive order management system, allowing traders to place and manage orders efficiently. Users can choose from various order types, including market orders, limit orders, and stop orders, to execute their trades according to their specific requirements.

Frequently Asked Questions (FAQs)

Q: Is NinjaTrader 8 compatible with Windows 11?

A: Yes, NinjaTrader 8 is fully compatible with Windows 11, both 32-bit and 64-bit versions.

Q: Can I use NinjaTrader 8 on a 64-bit system?

A: Yes, NinjaTrader 8 is designed for 64-bit systems, providing optimal performance and compatibility with modern hardware.

Q: What are the system requirements for running NinjaTrader 8 on Windows 11?

A: NinjaTrader 8 requires a minimum of 4 GB of RAM, a dual-core processor, and a graphics card capable of displaying 1024×768 resolution. However, for optimal performance, it is recommended to use a system with at least 8 GB of RAM and a quad-core processor.

Q: Is NinjaTrader 8 free to use?

A: NinjaTrader 8 offers a free simulated trading environment, allowing users to explore the platform’s features and test their strategies without risking real capital. However, to access real-time data and live trading capabilities, a paid subscription is required.

Q: How do I get started with NinjaTrader 8?

A: To begin using NinjaTrader 8, download the software from the official website and follow the installation instructions. You can then explore the platform’s features and create a demo account to practice your trading skills.

Tips for Maximizing NinjaTrader 8 Performance

  • Optimize System Resources: Ensure your computer has sufficient RAM, processor power, and storage space to run NinjaTrader 8 smoothly.
  • Regular Updates: Keep your NinjaTrader 8 software updated to benefit from the latest features, bug fixes, and performance improvements.
  • Utilize the Help Resources: NinjaTrader 8 provides extensive documentation, tutorials, and support resources to assist users in navigating the platform and maximizing its potential.

Conclusion

NinjaTrader 8 provides a comprehensive and powerful trading platform for both novice and experienced traders. Its compatibility with Windows 11 64-bit systems ensures smooth operation and efficient performance on modern computers. By leveraging its advanced charting capabilities, automated trading features, and comprehensive order management system, traders can effectively analyze markets, implement strategies, and execute trades with confidence. The platform’s extensive customization options allow users to tailor the trading environment to their specific needs and preferences, ensuring a seamless and productive trading experience.

Guided Tour of New NinjaTrader 8 User Driven Features - YouTube How to set up Ninjatrader 8 on your PC and how to set up data connections and charts. - YouTube Beginners Guide on using NinjaTrader 8 charts effectively? - YouTube
Ninjatrader 8 Trading Platform - Comprehensive Review - YouTube Ninjatrader 8 Requirements: A Comprehensive Guide โ€“ DerivFx.com NinjaTrader 8 Review โ€“ Everything You Need to Know
NinjaTrader 8 Data Feeds - Every Question Answered NinjaTrader 8 Quick Start Guide - YouTube

Closure

Thus, we hope this article has provided valuable insights into Navigating the World of NinjaTrader 8: A Comprehensive Guide for Windows 11 Users. We thank you for taking the time to read this article. See you in our next article!

Navigating The Labyrinth: Understanding And Resolving Windows 11 Loading Issues

Navigating the Labyrinth: Understanding and Resolving Windows 11 Loading Issues

Introduction

In this auspicious occasion, we are delighted to delve into the intriguing topic related to Navigating the Labyrinth: Understanding and Resolving Windows 11 Loading Issues. Let’s weave interesting information and offer fresh perspectives to the readers.

Navigating the Labyrinth: An Executive Guide to Data Management (English Edition) eBook

Windows 11, the latest iteration of Microsoft’s operating system, promises a modern, streamlined experience. However, the transition to this new platform can sometimes be met with challenges. Encountering difficulties while loading Windows 11 can be frustrating, disrupting workflow and hindering access to essential tools. This article aims to provide a comprehensive guide to understanding the common causes of these loading issues and outlining practical solutions for a smoother user experience.

The Importance of a Smooth Windows 11 Experience

A seamless Windows 11 loading process is paramount for several reasons. It ensures:

  • Efficient workflow: Uninterrupted access to applications and data is crucial for productivity.
  • Enhanced user experience: A responsive system fosters a positive and engaging interaction.
  • System stability: Consistent loading behavior contributes to a stable and reliable operating environment.
  • Security: A properly functioning system ensures optimal security measures are in place.

Unveiling the Culprits: Common Causes of Windows 11 Loading Problems

Several factors can contribute to loading difficulties in Windows 11. Understanding these causes is the first step towards finding effective solutions.

1. Hardware Compatibility:

Windows 11 has specific hardware requirements. If your computer does not meet these criteria, you may encounter loading issues. Key requirements include:

  • Processor: 1 gigahertz (GHz) or faster with 2 or more cores.
  • RAM: 4 GB or more.
  • Storage: 64 GB or larger storage device.
  • System firmware: UEFI, Secure Boot capable.
  • Graphics card: Compatible with DirectX 12 or later.

2. Storage Space:

Insufficient storage space can hinder Windows 11’s ability to load properly. Ensure you have enough free space on your primary drive for the operating system to function efficiently.

3. Corrupted System Files:

Damaged or corrupted system files can disrupt the loading process. These issues can arise due to faulty software installations, malware infections, or hardware failures.

4. Driver Issues:

Outdated or incompatible device drivers can lead to conflicts and loading problems. Ensuring that all your drivers are up-to-date and compatible with Windows 11 is crucial.

5. Boot Sector Errors:

Errors in the boot sector, responsible for initiating the operating system’s loading process, can cause difficulties. These errors can be caused by faulty hardware, power outages, or malware.

6. Conflicting Applications:

Certain applications, especially older or incompatible ones, can interfere with Windows 11’s loading process. These conflicts can cause system instability and loading issues.

7. Malware Infection:

Malware can corrupt system files, alter boot settings, and cause various loading problems.

8. Overheating:

Excessive heat can cause hardware malfunctions, leading to system instability and loading issues.

9. BIOS Settings:

Incorrect BIOS settings, such as boot order or UEFI configuration, can prevent Windows 11 from loading properly.

10. Power Issues:

Unstable power supply or power surges can disrupt the loading process and cause data corruption.

11. Software Conflicts:

Conflicts between different software programs can lead to system instability and loading problems.

12. Network Issues:

Network connectivity issues can affect Windows 11’s ability to download updates and other necessary files, potentially causing loading problems.

Troubleshooting Techniques: Resolving Windows 11 Loading Problems

Once the potential causes are identified, you can implement appropriate troubleshooting steps to resolve the loading issues.

1. Check Hardware Compatibility:

  • System Requirements: Verify your computer meets the minimum system requirements for Windows 11.
  • Device Manager: Check Device Manager for any errors or conflicts related to hardware components.
  • BIOS Settings: Ensure BIOS settings are optimized for Windows 11, including boot order and UEFI configuration.

2. Free Up Storage Space:

  • Disk Cleanup: Use the built-in Disk Cleanup tool to remove temporary files, system files, and other unnecessary data.
  • Uninstall Unnecessary Programs: Remove programs you no longer use to free up space.
  • Move Data to External Storage: Transfer large files or data to an external hard drive or cloud storage.

3. Repair Corrupted System Files:

  • System File Checker (SFC): Run the SFC scan to repair corrupted system files.
  • Deployment Image Servicing and Management (DISM): Use the DISM tool to restore corrupted system files.
  • Windows Memory Diagnostic: Run the Windows Memory Diagnostic tool to check for RAM issues.

4. Update Drivers:

  • Windows Update: Use Windows Update to install the latest drivers for your devices.
  • Device Manufacturer Websites: Visit the manufacturer’s website to download and install the latest drivers.

5. Repair Boot Sector Errors:

  • Bootrec.exe: Use the Bootrec.exe command-line tool to repair boot sector errors.
  • Startup Repair: Use the Startup Repair option in the Windows Recovery Environment to automatically fix boot problems.

6. Identify and Remove Conflicting Applications:

  • Safe Mode: Boot into Safe Mode to identify and disable conflicting applications.
  • Clean Boot: Perform a clean boot to isolate applications that may be causing problems.

7. Scan for Malware:

  • Antivirus Software: Use a reliable antivirus program to scan your system for malware.
  • Malware Removal Tools: Download and use specialized malware removal tools to remove stubborn infections.

8. Monitor System Temperature:

  • Hardware Monitoring Tools: Use hardware monitoring tools to check system temperature.
  • Improve Cooling: Ensure proper airflow and ventilation to prevent overheating.

9. Reset BIOS Settings:

  • BIOS Menu: Access the BIOS menu and reset settings to default values.
  • Clear CMOS: Clear the CMOS (Complementary Metal-Oxide Semiconductor) to reset BIOS settings.

10. Check Power Supply:

  • Power Supply Unit (PSU): Ensure your PSU is sufficient for your system’s power requirements.
  • Power Surge Protection: Use a surge protector to protect your computer from power fluctuations.

11. Uninstall Conflicting Software:

  • Recent Installations: Identify and uninstall any recently installed software that may be causing conflicts.
  • Third-Party Software: Remove any third-party software that might be interfering with Windows 11.

12. Troubleshoot Network Issues:

  • Internet Connection: Verify your internet connection is stable and working properly.
  • Network Drivers: Update network drivers to ensure proper connectivity.

Frequently Asked Questions (FAQs)

1. What are the minimum system requirements for Windows 11?

Windows 11 requires a processor with 1 GHz or faster with 2 or more cores, 4 GB or more of RAM, 64 GB or larger storage device, UEFI, Secure Boot capable system firmware, and a graphics card compatible with DirectX 12 or later.

2. Can I upgrade from Windows 10 to Windows 11?

Yes, you can upgrade from Windows 10 to Windows 11 if your system meets the minimum requirements. However, it’s recommended to back up your data before proceeding.

3. What if my computer doesn’t meet the requirements for Windows 11?

If your computer doesn’t meet the minimum requirements, you can either upgrade your hardware or continue using Windows 10.

4. Can I install Windows 11 on a USB drive?

Yes, you can create a bootable USB drive with Windows 11 installation files and install it on your computer.

5. How can I fix a corrupted boot sector?

You can use the Bootrec.exe command-line tool or the Startup Repair option in the Windows Recovery Environment to repair boot sector errors.

6. What are the best ways to free up storage space?

You can use the built-in Disk Cleanup tool, uninstall unnecessary programs, and move data to external storage to free up space.

7. What should I do if my computer is overheating?

Ensure proper airflow and ventilation, clean out dust from your computer, and consider using a cooling pad.

8. How can I identify and remove conflicting applications?

You can boot into Safe Mode or perform a clean boot to isolate and disable conflicting applications.

9. What are some tips for preventing future loading issues?

Regularly update your drivers, use a reliable antivirus program, keep your system clean and organized, and monitor system temperature.

Conclusion

Resolving Windows 11 loading problems can be a complex process, but by understanding the common causes and implementing appropriate troubleshooting techniques, you can restore smooth system operation. Regular maintenance, driver updates, and system optimization are crucial for preventing future issues and ensuring a seamless and efficient Windows 11 experience. By taking proactive steps and following the guidelines outlined in this article, you can navigate the intricacies of Windows 11 loading and enjoy the benefits of its modern features and functionalities.

Navigating The Labyrinth Screenshots ยท SteamDB Navigating the Labyrinth of Success (AI Generated) Stock Illustration - Illustration of depth Person Navigating a Maze or Labyrinth, Symbolizing Problem-solving and Strategy Stock
Navigating The Labyrinth on Steam Navigating the Labyrinth Translations โ€“ Technics Publications navigating the labyrinth  Washington Area Bicyclist Association
Navigating the Labyrinth of AI Integration: A Journey of Understanding and Implementation 10 Best Navigating the Career Labyrinth: A Guide to Personal Growth

Closure

Thus, we hope this article has provided valuable insights into Navigating the Labyrinth: Understanding and Resolving Windows 11 Loading Issues. We hope you find this article informative and beneficial. See you in our next article!

Navigating The Digital Workplace: A Guide To The Office 365 Login App On Windows 10

Navigating the Digital Workplace: A Guide to the Office 365 Login App on Windows 10

Introduction

With enthusiasm, let’s navigate through the intriguing topic related to Navigating the Digital Workplace: A Guide to the Office 365 Login App on Windows 10. Let’s weave interesting information and offer fresh perspectives to the readers.

Microsoft Office 365 Login Tutorial Video  Office 365 Sign In - YouTube

In today’s digitally driven world, seamless access to essential applications and data is paramount. For organizations embracing the cloud-based productivity suite of Microsoft Office 365, the dedicated login app for Windows 10 serves as a crucial gateway to their digital workspace. This application simplifies the process of accessing a range of services, including email, online document editing, file storage, and collaboration tools, ensuring a smooth and efficient workflow for users.

Understanding the Office 365 Login App

The Office 365 login app, integrated into Windows 10, is a specialized tool designed to streamline the authentication process for accessing Microsoft’s suite of cloud-based services. It acts as a central point of entry, eliminating the need for users to individually log in to each application separately. This unified approach offers several advantages, including:

  • Simplified Access: The app consolidates multiple logins into a single, intuitive interface, reducing the time and effort required to access various services.
  • Enhanced Security: By centralizing authentication, the app strengthens security by requiring users to enter their credentials only once, minimizing the risk of unauthorized access.
  • Improved User Experience: A consistent login experience across all Office 365 applications creates a seamless and user-friendly environment, fostering productivity and reducing frustration.

The Role of the Office 365 Login App in Windows 10

The Office 365 login app is deeply integrated into the Windows 10 operating system, playing a vital role in managing user accounts and access to services. Its functionality extends beyond simply providing a login interface; it also manages user profiles, synchronizes data, and ensures seamless communication between different applications.

Key Features of the Office 365 Login App:

  • Single Sign-On (SSO): The app allows users to log in once and gain access to all Office 365 applications, eliminating the need for repeated authentication.
  • Account Management: Users can manage their Office 365 accounts, including adding and removing accounts, updating passwords, and configuring security settings.
  • Data Synchronization: The app ensures seamless data synchronization across devices, enabling users to access their documents, emails, and other files from any location.
  • Application Integration: The app integrates seamlessly with various Windows 10 applications, including Microsoft Edge, File Explorer, and the Windows Start menu, providing a unified user experience.

Benefits of Using the Office 365 Login App:

  • Increased Productivity: The simplified login process and seamless integration with other applications enhance productivity by reducing the time and effort required to access and use Office 365 services.
  • Enhanced Security: Centralized authentication strengthens security by minimizing the number of login attempts and reducing the risk of unauthorized access.
  • Improved Collaboration: Seamless data synchronization and application integration facilitate collaboration among team members, enabling them to work together efficiently on shared projects.
  • Simplified Management: The app streamlines account management for IT administrators, allowing them to easily manage user accounts and access privileges.

FAQs about the Office 365 Login App on Windows 10:

Q: How do I access the Office 365 login app on Windows 10?

A: The Office 365 login app is integrated into Windows 10. When you attempt to access an Office 365 application, such as Outlook or Word, you will be prompted to log in using the app. You can also find the app by searching for "Office 365" in the Windows Start menu.

Q: What are the system requirements for the Office 365 login app?

A: The Office 365 login app is compatible with all supported versions of Windows 10. To ensure optimal performance, it is recommended to have a stable internet connection and a modern processor.

Q: How do I troubleshoot issues with the Office 365 login app?

A: If you encounter issues with the app, you can try the following troubleshooting steps:

  • Check your internet connection: Ensure that you have a stable and reliable internet connection.
  • Restart your computer: Restarting your computer can resolve temporary glitches and errors.
  • Update Windows 10: Ensure that you have the latest updates for Windows 10 installed.
  • Contact Microsoft Support: If the issue persists, contact Microsoft support for assistance.

Q: Is the Office 365 login app secure?

A: The Office 365 login app is designed with security in mind. It uses industry-standard encryption protocols to protect your login credentials and data. Microsoft continuously updates the app to address potential security vulnerabilities.

Tips for Using the Office 365 Login App:

  • Enable Two-Factor Authentication: Enhance the security of your account by enabling two-factor authentication, which requires an additional verification step during login.
  • Keep Your Passwords Strong: Use strong and unique passwords for your Office 365 account and avoid using the same password for multiple accounts.
  • Regularly Update Windows 10: Install the latest Windows 10 updates to ensure that your system has the latest security patches and bug fixes.
  • Report Suspicious Activity: If you notice any suspicious activity on your account, report it to Microsoft support immediately.

Conclusion

The Office 365 login app on Windows 10 is a powerful tool that simplifies access to Microsoft’s cloud-based productivity suite, enhancing user experience, improving security, and boosting productivity. By leveraging its features and adhering to best practices, organizations can ensure seamless access to essential applications and data, fostering a more efficient and secure digital workplace. The app’s integration with Windows 10 makes it an indispensable tool for any organization utilizing Office 365 services, enabling users to navigate the digital world with ease and confidence.

Office 365 Login, Overview, and Sharing - YouTube How to login to Office 365 - GCIT How to Login Office 365 Account? Microsoft Office 365 Login Sign In  office.com Sign In - YouTube
How Microsoft Office 365 Suite transforms the Digital Workplace Introducing the new Office 365 App Launcher  Microsoft 365 Blog Customize The Login Page Of Office 365, 59% OFF
Office 365 Login - Microsoft Office 365 Your modern workplace in the cloud with Office 365  SII Group

Closure

Thus, we hope this article has provided valuable insights into Navigating the Digital Workplace: A Guide to the Office 365 Login App on Windows 10. We thank you for taking the time to read this article. See you in our next article!

Transitioning Your Digital Life: A Comprehensive Guide To Migrating Your PC To A New Machine

Transitioning Your Digital Life: A Comprehensive Guide to Migrating Your PC to a New Machine

Introduction

With enthusiasm, let’s navigate through the intriguing topic related to Transitioning Your Digital Life: A Comprehensive Guide to Migrating Your PC to a New Machine. Let’s weave interesting information and offer fresh perspectives to the readers.

Transitioning Your Digital Life: A Comprehensive Guide to Migrating Your PC to a New Machine

8 benefits of cloud migration & how to migrate - ArticleCity.com

The inevitable moment arrives for every computer user: the need for a new machine. Whether driven by age, performance limitations, or simply the allure of cutting-edge technology, upgrading your PC presents a significant undertaking. However, this transition needn’t be a daunting task. With careful planning and execution, you can seamlessly transfer your digital life, including your files, applications, and settings, to your new computer, ensuring a smooth and efficient experience.

Understanding the Importance of a Smooth Transition

Migrating your PC to a new machine goes beyond simply acquiring new hardware. It’s about preserving the essence of your digital identity, encompassing everything from your cherished photos and documents to the software you rely on daily. A successful migration allows you to seamlessly resume your work, entertainment, and online activities on your new computer without any disruptions or loss of data.

Key Considerations for a Successful Migration

Several key aspects contribute to a successful PC migration:

  • Data Backup: This is the cornerstone of any migration process. A comprehensive backup of your data ensures that no information is lost during the transition. This includes backing up your operating system, applications, user profiles, and all your essential files.
  • Software Compatibility: Ensure that the applications you currently use are compatible with the new operating system and hardware of your new computer. Some software may require updates or alternative versions for compatibility.
  • Transfer Method Selection: Several methods exist for transferring data to your new PC, each with its own advantages and disadvantages. You can opt for external storage devices, cloud-based services, or specialized migration tools.
  • New PC Configuration: Before starting the migration, configure your new PC with the necessary settings and software. This includes installing the operating system, drivers, and any essential applications.
  • Final Steps: Once the data transfer is complete, verify that all files, applications, and settings are properly transferred and functioning correctly on your new PC.

Exploring Different Migration Methods

The chosen method for transferring data to your new PC plays a crucial role in the overall success of the migration process. Here’s a breakdown of popular methods and their respective pros and cons:

1. External Storage Devices:

  • Pros: Simple, reliable, and readily available.
  • Cons: Requires physical transfer of data, time-consuming for large datasets, susceptible to physical damage.

2. Cloud-Based Services:

  • Pros: Convenient, accessible from any device, automatic backups.
  • Cons: Requires a stable internet connection, potential security concerns, limited storage capacity for free accounts.

3. Specialized Migration Tools:

  • Pros: Automated process, streamlined transfer of user profiles, settings, and applications.
  • Cons: Requires purchasing a dedicated tool, may not be compatible with all operating systems or applications.

4. Direct Transfer (System Image):

  • Pros: Transfers entire system and data, preserves all settings and applications.
  • Cons: Requires sufficient storage space on both PCs, potential compatibility issues with different hardware.

FAQs: Addressing Common Concerns

Q: What is the best method for transferring my data?

A: The optimal method depends on your specific needs and preferences. Consider the size of your data, the level of complexity you’re comfortable with, and the availability of resources like stable internet access or external storage devices.

Q: Do I need to reinstall all my applications on the new PC?

A: Depending on the chosen method, some applications might automatically transfer to your new PC. However, most applications will require a fresh installation on the new computer.

Q: How can I ensure the security of my data during the transfer?

A: Employ strong passwords, utilize encrypted storage devices, and choose reputable cloud services with robust security measures. Consider using a VPN for added security, especially when transferring data over public Wi-Fi networks.

Q: What if I encounter problems during the migration?

A: It’s crucial to have a backup of your data before starting the migration. If issues arise, you can restore your data from the backup and troubleshoot the specific problem.

Tips for a Smooth Transition:

  • Plan Ahead: Create a checklist of essential tasks, including data backup, application compatibility checks, and new PC configuration.
  • Backup Everything: Don’t underestimate the importance of a comprehensive backup. Back up your entire system, including the operating system, applications, and all your personal data.
  • Test the New PC: Before starting the migration, test your new PC to ensure everything is working properly, including the internet connection and hardware components.
  • Be Patient: Data transfer can take time, especially for large datasets. Be prepared to dedicate a few hours to the process.
  • Seek Professional Help: If you’re not comfortable with the migration process, consider seeking assistance from a computer technician or IT specialist.

Conclusion: Embracing the Future of Computing

Migrating your PC to a new machine is an essential step in embracing the latest technology and enhancing your computing experience. By carefully planning and executing the transition, you can ensure a seamless transfer of your digital life, preserving your files, applications, and settings. Remember, a well-planned migration minimizes disruption and maximizes your productivity on your new computer, allowing you to focus on what matters most โ€“ your digital endeavors.

Data Migration - What it is, and how you can to do it faster Seven Tips for a Successful Data Migration - Law Technology Today Beginner Guide: Dell Migrate for Data Migration Between PCs
Complete Cloud Migration Guide Best Practices for Migrating Data to the Cloud  Kanda Software How to Migrate Your Data From an Old Computer to a New One
How to Prepare Your Employees to Migrate to New Software Transitioning to Digital Nomad Life: A Comprehensive Guide - Nomadly Working

Closure

Thus, we hope this article has provided valuable insights into Transitioning Your Digital Life: A Comprehensive Guide to Migrating Your PC to a New Machine. We appreciate your attention to our article. See you in our next article!