Archives September 2023

Navigating The User Folder Landscape In Windows 11: A Comprehensive Guide

Navigating the User Folder Landscape in Windows 11: A Comprehensive Guide

Introduction

With enthusiasm, let’s navigate through the intriguing topic related to Navigating the User Folder Landscape in Windows 11: A Comprehensive Guide. Let’s weave interesting information and offer fresh perspectives to the readers.

Windows 11 User Folder

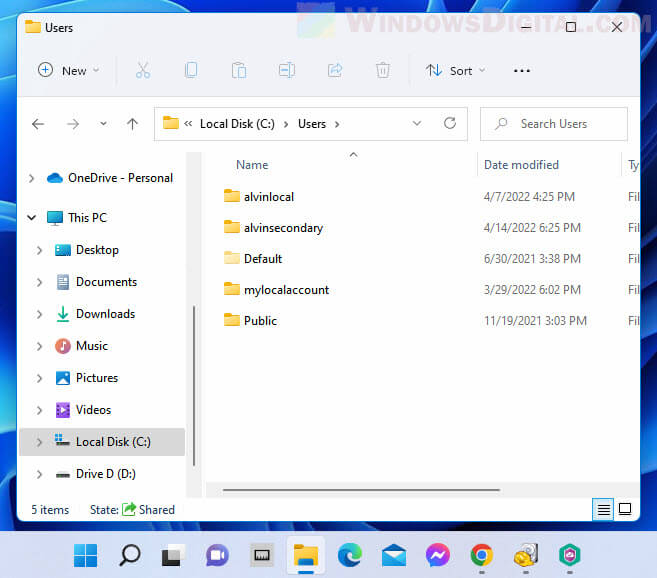
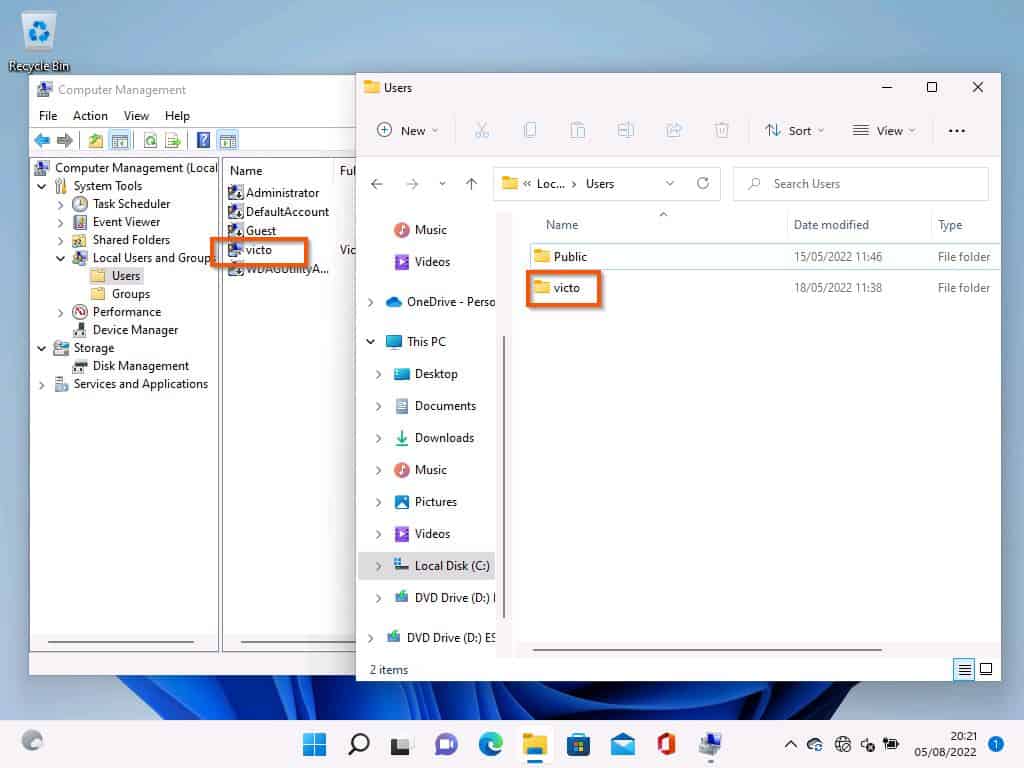
Windows 11, like its predecessors, employs a user-centric file organization system. Each user account on the system is assigned a dedicated folder, often referred to as the "user profile folder," which serves as a central repository for their personal data, settings, and applications. This folder, typically found within the "Users" directory on the system drive, is crucial for maintaining user-specific preferences and ensuring a personalized computing experience.

Understanding the User Folder Structure:

The user profile folder is a hierarchical structure, containing various subfolders and files that cater to different aspects of a user’s digital life. These include:

  • Documents: This folder stores user-created documents, such as text files, spreadsheets, presentations, and images.
  • Downloads: This folder is the default destination for downloaded files from the internet.
  • Music: This folder stores music files, including audio tracks, albums, and playlists.
  • Pictures: This folder stores images and photographs.
  • Videos: This folder stores video files, including movies, TV shows, and personal recordings.
  • Desktop: This folder contains shortcuts to frequently used applications and files, as well as any files placed directly on the desktop.
  • AppData: This hidden folder contains application-specific data, settings, and configuration files.
  • LocalAppData: This folder stores temporary data and application cache files.
  • Favorites: This folder stores links to websites and files that users have marked as favorites.
  • Contacts: This folder stores contact information, such as names, phone numbers, and email addresses.

The Importance of User Folder Management:

Renaming the user folder, while seemingly a simple action, can have significant implications. It is often necessary in situations such as:

  • Troubleshooting System Issues: A corrupted or problematic user profile can lead to various system errors. Renaming the folder can help isolate the issue and facilitate troubleshooting.
  • Migrating User Accounts: When transferring user data from one computer to another, renaming the user folder can streamline the process and ensure proper data transfer.
  • Creating Multiple User Accounts: Renaming the user folder allows for the creation of distinct user accounts without conflicts.
  • Customizing User Experience: Renaming the user folder can be a way to personalize the computing environment, particularly for users who prefer a specific naming convention.

Renaming the User Folder in Windows 11:

While the process of renaming a user folder is relatively straightforward, it’s crucial to exercise caution and follow the correct steps to avoid data loss or system instability. Here’s a step-by-step guide:

  1. Log out of the User Account: Before attempting to rename the user folder, ensure that you are logged out of the account associated with the folder. This is essential to prevent data corruption and ensure a smooth renaming process.
  2. Open File Explorer: Navigate to the "Users" folder within the system drive. You can access File Explorer by pressing the Windows key + E or by clicking the File Explorer icon on the taskbar.
  3. Locate the User Folder: Identify the folder representing the user account you wish to rename. The folder name will usually match the user account name.
  4. Rename the Folder: Right-click on the user folder and select "Rename" from the context menu. Enter the desired new name for the folder and press Enter.
  5. Restart the System: After renaming the folder, it’s essential to restart the system to ensure that the changes are applied correctly.

Important Considerations:

  • System Stability: Renaming a user folder can potentially affect system stability. It’s crucial to ensure that all applications and processes associated with the user account are closed before renaming the folder.
  • Data Loss: Renaming a user folder without proper precautions can lead to data loss. It’s advisable to back up important data before proceeding with the renaming process.
  • System Permissions: Renaming a user folder may require administrative privileges. If you encounter any issues, ensure that you are logged in with an administrator account.

FAQs about Renaming the User Folder:

Q: What happens if I rename the user folder while the account is logged in?

A: Renaming a user folder while the account is logged in can lead to data corruption and system instability. It’s crucial to log out of the account before attempting to rename the folder.

Q: Can I rename the user folder to an existing folder name?

A: Renaming the user folder to an existing folder name will likely result in a conflict. It’s advisable to choose a unique name for the renamed folder.

Q: Will renaming the user folder affect my applications and settings?

A: Renaming the user folder will not directly affect your applications and settings. However, it can potentially disrupt the ability of applications to access their data and settings.

Q: What if I accidentally rename the user folder to an incorrect name?

A: If you accidentally rename the user folder to an incorrect name, you can undo the change by right-clicking the folder and selecting "Rename" again. Enter the original folder name and press Enter.

Tips for Renaming User Folders:

  • Back up your data: Before attempting to rename the user folder, back up all important data to an external storage device or cloud service.
  • Check for running processes: Ensure that all applications and processes associated with the user account are closed before renaming the folder.
  • Use a unique name: Choose a unique name for the renamed folder to avoid conflicts.
  • Restart your system: After renaming the folder, restart your system to ensure that the changes are applied correctly.
  • Consider using a system restore point: Before making any major changes to your system, it’s advisable to create a system restore point. This allows you to revert to a previous state if any issues arise.

Conclusion:

Renaming a user folder in Windows 11 can be a necessary step for troubleshooting, migrating user accounts, or customizing the user experience. However, it’s crucial to approach this task with caution and follow the correct procedures to avoid data loss or system instability. By understanding the importance of user folders and adhering to the best practices outlined in this guide, users can navigate the user folder landscape effectively and maintain a stable and personalized computing environment.

Buy Windows 11 User Guide for Beginners: A Comprehensive Guide to Master Windows 11 Operating How to Show or Hide Navigation Pane in Windows 11 File Explorer? 10 Steps to Successfully Change Your User Folder Name in Windows 11: A Comprehensive Guide
Buy Windows 11 User Guide: A Complete Guide to Master the New Windows 11 OS with Tips and Tricks Change User Name Windows 11, Rename User Folder Windows 11 How To Change Your User Folder Name In Windows 11 - vrogue.co
How to Move Default User Folders on Windows 11 How to Change Your User Folder Name in Windows 11

Closure

Thus, we hope this article has provided valuable insights into Navigating the User Folder Landscape in Windows 11: A Comprehensive Guide. We thank you for taking the time to read this article. See you in our next article!

A Comprehensive Guide To Microsoft PowerPoint On Windows 10

A Comprehensive Guide to Microsoft PowerPoint on Windows 10

Introduction

In this auspicious occasion, we are delighted to delve into the intriguing topic related to A Comprehensive Guide to Microsoft PowerPoint on Windows 10. Let’s weave interesting information and offer fresh perspectives to the readers.

A Comprehensive Guide to Microsoft PowerPoint on Windows 10

A Guide to Microsoft Powerpoint and How to Use It

Microsoft PowerPoint, a ubiquitous presentation software, remains a cornerstone of professional communication. Its versatility and user-friendly interface make it ideal for creating visually engaging presentations, reports, and even multimedia content. This article delves into the intricacies of obtaining and utilizing PowerPoint on a Windows 10 operating system, highlighting its significance in today’s digital landscape.

Understanding the Importance of PowerPoint

PowerPoint’s prominence stems from its ability to transform complex information into digestible and impactful visual narratives. Its features allow users to:

  • Organize and Structure Information: Slides provide a logical framework for presenting data, arguments, or ideas in a clear and concise manner.
  • Enhance Visual Appeal: PowerPoint offers a wide array of design elements, including templates, themes, and multimedia capabilities, to create visually stimulating presentations.
  • Engage Audiences: Interactive features like animations, transitions, and video embedding can captivate audiences and enhance information retention.
  • Promote Collaboration: Shared editing and presentation capabilities enable seamless teamwork, facilitating efficient communication and idea exchange.

Obtaining PowerPoint on Windows 10

There are several ways to acquire PowerPoint on Windows 10, each catering to specific needs and preferences:

1. Microsoft 365 Subscription:

  • Benefits: Access to the latest version of PowerPoint, along with other Microsoft Office applications, including Word, Excel, and Outlook. Cloud storage and collaboration features are included.
  • Considerations: Requires a recurring subscription fee.

2. Standalone Purchase:

  • Benefits: One-time purchase of PowerPoint for individual use.
  • Considerations: Users may not have access to the latest features or cloud storage capabilities.

3. Free Trial:

  • Benefits: Allows users to explore PowerPoint’s functionalities without commitment.
  • Considerations: Limited in duration, and may require registration.

4. Educational Versions:

  • Benefits: Available at discounted rates for students and educators.
  • Considerations: Eligibility requirements may apply.

5. Open Source Alternatives:

  • Benefits: Free to use and often offer comparable functionality to PowerPoint.
  • Considerations: May lack the same level of feature integration or user-friendliness as PowerPoint.

Installation and Setup

Once acquired, installing PowerPoint on Windows 10 is typically a straightforward process:

  1. Download: Download the installation file from the Microsoft website or your preferred source.
  2. Run: Double-click the downloaded file to initiate the installation process.
  3. Follow Instructions: Follow the on-screen prompts to complete the installation.
  4. Activate: If required, activate your copy of PowerPoint using a product key or subscription.

Navigating PowerPoint’s Interface

PowerPoint’s interface is designed for intuitive navigation:

  • Ribbon: The topmost bar contains various tabs with groups of commands related to specific tasks, such as "Home," "Insert," "Design," and "Transitions."
  • Slide Pane: The left-hand side displays thumbnails of all slides in the presentation.
  • Slide Area: The main central area where you create and edit slides.
  • Notes Pane: At the bottom, a section for adding speaker notes visible only to the presenter.

Creating a Presentation

  1. Choose a Template: Select a pre-designed template or start with a blank slide.
  2. Add Content: Insert text, images, charts, graphs, videos, and audio into slides.
  3. Format and Design: Customize the appearance of slides using themes, fonts, colors, and animations.
  4. Add Transitions and Animations: Enhance visual flow and engagement with slide transitions and animation effects.
  5. Insert Multimedia: Embed videos, audio files, and interactive elements to enhance presentation impact.
  6. Review and Edit: Proofread content, adjust formatting, and ensure slides flow logically.

Presenting Your Work

  1. Slide Show View: Transition to slide show mode to present your presentation.
  2. Navigation: Use keyboard arrows, mouse clicks, or remote controls to advance slides.
  3. Presenter View: Utilize presenter view to see upcoming slides, speaker notes, and a timer.

PowerPoint’s Versatility: Beyond Presentations

PowerPoint’s functionality extends beyond traditional presentations. It can be used for:

  • Creating Infographics: Visualize data and information in an engaging and easily digestible format.
  • Designing Brochures and Flyers: Create visually appealing marketing materials with professional layouts.
  • Developing Training Materials: Design interactive modules for employee training or educational purposes.
  • Storyboarding: Visualize scenes and sequences for video production or film projects.

FAQs Regarding PowerPoint on Windows 10

1. What are the system requirements for running PowerPoint on Windows 10?

PowerPoint requires a minimum of 1 GB RAM, 3 GB free hard disk space, and a screen resolution of 1024 x 768. However, for optimal performance, it is recommended to have a more powerful system with at least 4 GB RAM and a higher resolution display.

2. Is PowerPoint compatible with other Microsoft Office applications?

Yes, PowerPoint integrates seamlessly with other Microsoft Office applications, allowing for easy data transfer and collaboration.

3. Can I access my PowerPoint presentations from multiple devices?

Yes, by using cloud storage services like OneDrive, you can access and edit your presentations from various devices, including PCs, tablets, and smartphones.

4. What are the best practices for creating effective PowerPoint presentations?

  • Keep slides concise and visually appealing.
  • Use high-quality images and graphics.
  • Limit text on each slide.
  • Use clear and consistent formatting.
  • Practice your presentation beforehand.

5. Are there any free alternatives to PowerPoint?

Yes, there are several free open-source alternatives, such as Google Slides and LibreOffice Impress.

Tips for Optimizing Your PowerPoint Experience

  • Utilize Templates: Start with pre-designed templates to save time and ensure professional aesthetics.
  • Explore Animations and Transitions: Use animations and transitions sparingly and strategically to enhance visual flow without overwhelming the audience.
  • Embrace Multimedia: Incorporate videos, audio clips, and interactive elements to engage audiences and make presentations more memorable.
  • Practice and Rehearse: Practice your presentation beforehand to ensure smooth delivery and confidence.
  • Seek Feedback: Share your presentation with colleagues or friends to gather constructive criticism and improve its effectiveness.

Conclusion

Microsoft PowerPoint remains an indispensable tool for effective communication in today’s digital world. Its versatility, user-friendliness, and extensive features empower individuals and organizations to create compelling presentations, reports, and multimedia content. By understanding the nuances of obtaining, installing, and utilizing PowerPoint on Windows 10, users can unlock its full potential and elevate their communication skills to new heights.

Microsoft PowerPoint for Beginners - Complete Course - YouTube Microsoft Power Point  How to open PowerPoint in Windows 10  How to open PowerPoint  - YouTube How to Record Your Screen with Microsoft PowerPoint in Windows 10 - Dignited
Microsoft PowerPoint - Microsoft Office & Windows 10 - Research guides at Camosun College Library The Ultimate Beginnerโ€™s Guide to Microsoft PowerPoint: From Newbie to Master How To Record Windows 10 Screen Using Microsoft PowerPoint  LaptrinhX
Ppt Windows 10 The Top Features Powerpoint Presentati - vrogue.co MS-PowerPoint Interface and components - Tutorial

Closure

Thus, we hope this article has provided valuable insights into A Comprehensive Guide to Microsoft PowerPoint on Windows 10. We hope you find this article informative and beneficial. See you in our next article!

A Fresh Look Every Day: Exploring Windows 11’s Dynamic Wallpapers

A Fresh Look Every Day: Exploring Windows 11’s Dynamic Wallpapers

Introduction

With great pleasure, we will explore the intriguing topic related to A Fresh Look Every Day: Exploring Windows 11’s Dynamic Wallpapers. Let’s weave interesting information and offer fresh perspectives to the readers.

A Fresh Look Every Day: Exploring Windows 11’s Dynamic Wallpapers

Windows 11 - Dynamic Wallpaper Club

Windows 11, Microsoft’s latest operating system, introduces a captivating feature that breathes life into the desktop experience: dynamic wallpapers. This innovative functionality presents users with a new, visually stunning background image every day, transforming the user interface into a dynamic canvas that reflects the ever-changing world around us.

Understanding the Essence of Dynamic Wallpapers

Dynamic wallpapers are more than just a cosmetic enhancement. They represent a shift in the way users interact with their digital environment. By seamlessly transitioning between a curated selection of images, these wallpapers create a sense of novelty and engagement, fostering a more personalized and visually stimulating desktop experience.

The Mechanics of Dynamic Wallpaper Functionality

Windows 11’s dynamic wallpapers leverage a carefully curated collection of high-quality images that are automatically updated on a daily basis. The selection process involves a combination of factors, including:

  • Time of Day: The wallpaper may change based on the time of day, reflecting the transition from dawn to dusk, or the vibrancy of midday.
  • Seasonal Changes: Images can be tailored to reflect the current season, showcasing the beauty of spring blossoms, the warmth of summer sunsets, the crispness of autumn foliage, or the serenity of winter landscapes.
  • Events and Holidays: Special occasions like holidays or significant events might trigger unique wallpaper themes, adding a touch of festivity or commemoration to the desktop.

Benefits of Embracing Dynamic Wallpapers

The implementation of dynamic wallpapers in Windows 11 offers numerous benefits, enhancing the user experience in various ways:

  • Visual Stimulation and Engagement: The constant flow of fresh imagery keeps the desktop visually engaging, preventing monotony and fostering a sense of discovery.
  • Personalization and Expression: Users can customize their wallpaper preferences, selecting themes and styles that resonate with their individual tastes and interests.
  • Mood Enhancement: The carefully curated images can evoke positive emotions, creating a more enjoyable and inspiring desktop environment.
  • Improved Focus and Productivity: By providing a visually stimulating backdrop, dynamic wallpapers can help users stay focused and engaged with their tasks.
  • Enhanced User Experience: The overall aesthetic appeal of the desktop is elevated, creating a more visually appealing and dynamic interface.

Exploring the Customization Options

Windows 11 empowers users to tailor their dynamic wallpaper experience to their preferences. Users can:

  • Choose Preferred Themes: Select from a range of themes, including nature, cityscapes, abstract art, or even personalized collections.
  • Adjust Wallpaper Update Frequency: Determine how often the wallpaper changes, whether it’s daily, hourly, or based on specific events.
  • Disable Dynamic Wallpapers: If desired, users can disable the feature and revert to a static wallpaper of their choice.

FAQs: Addressing Common Queries

Q: How do I enable dynamic wallpapers in Windows 11?

A: Dynamic wallpapers are enabled by default in Windows 11. However, if you wish to customize the settings or disable the feature, you can navigate to Settings > Personalization > Background and adjust the options accordingly.

Q: Can I choose my own images for dynamic wallpapers?

A: Currently, Windows 11 does not support using custom images for dynamic wallpapers. The feature relies on a curated library of images provided by Microsoft.

Q: What if I don’t like the current dynamic wallpaper?

A: You can easily change the wallpaper by right-clicking on the desktop and selecting "Choose a new background." You can also adjust the wallpaper update frequency to your liking.

Q: Does dynamic wallpaper affect system performance?

A: Dynamic wallpapers are designed to be resource-efficient and have minimal impact on system performance. The image updates are optimized to ensure a smooth user experience.

Tips for Maximizing the Dynamic Wallpaper Experience

  • Explore Different Themes: Experiment with various themes to find the ones that best suit your tastes and interests.
  • Adjust Wallpaper Update Frequency: If you find the daily updates too frequent, consider adjusting the frequency to suit your preferences.
  • Maximize Visual Impact: Ensure your display settings are optimized for high-quality image rendering to fully appreciate the visual beauty of the dynamic wallpapers.

Conclusion: A Dynamic Desktop for a Dynamic World

Windows 11’s dynamic wallpapers represent a significant step forward in the evolution of the desktop experience. By offering a constant stream of visually captivating images, they elevate the user interface, fostering a sense of personalization, engagement, and visual delight. This innovative feature not only enhances the aesthetic appeal of the desktop but also provides a dynamic backdrop that reflects the ever-changing world around us.

Windows 11 - Dynamic Wallpaper Club Windows 11 - Dynamic Wallpaper Club Windows 11 Wallpaper 2 Monitors 2024 - Win 11 Home Upgrade 2024
Windows 11 Bloom - Dynamic Wallpaper Club Windows 11 Abstract - Dynamic Wallpaper Club Windows 11 - Dynamic Wallpaper Club
Steam Workshop::Original 4K, Windows 11 Dynamic Wallpaper (Internet Based) Windows 11 - Dynamic Wallpaper Club

Closure

Thus, we hope this article has provided valuable insights into A Fresh Look Every Day: Exploring Windows 11’s Dynamic Wallpapers. We hope you find this article informative and beneficial. See you in our next article!

Understanding Windows 11: The Key To Unlocking Your Digital Experience

Understanding Windows 11: The Key to Unlocking Your Digital Experience

Introduction

With enthusiasm, let’s navigate through the intriguing topic related to Understanding Windows 11: The Key to Unlocking Your Digital Experience. Let’s weave interesting information and offer fresh perspectives to the readers.

Understanding Windows 11: The Key to Unlocking Your Digital Experience

Unlocking Windows 11: Navigating Pricing Options and Editions  HTML KICK

Windows 11, the latest iteration of Microsoft’s operating system, presents a refined and innovative digital landscape for users. This comprehensive guide delves into the intricate workings of a Windows 11 key, its significance in unlocking the full potential of the operating system, and the various aspects that contribute to a seamless and efficient user experience.

The Significance of a Windows 11 Key

A Windows 11 key serves as a unique digital identifier, acting as a license to activate and use the operating system on a specific device. It is akin to a digital passport, verifying the legitimacy of the software installation and granting access to its full range of features and functionalities.

The Role of Activation

Activation is the process of verifying the authenticity of the Windows 11 installation using a valid key. This process ensures that the user has obtained the software through legitimate means and is entitled to use its features. Activation also enables access to critical updates and security patches, safeguarding the device from vulnerabilities and ensuring optimal performance.

Types of Windows 11 Keys

Windows 11 keys are categorized into different types, each tailored to specific user needs and scenarios:

  • Retail Keys: These keys are typically purchased individually and can be used to activate Windows 11 on a single device. They offer flexibility and are suitable for individual users or small businesses.
  • OEM Keys: These keys are pre-installed on new devices by manufacturers. They are typically tied to the specific hardware configuration of the device and cannot be transferred to another machine.
  • Volume License Keys: Designed for large organizations, these keys allow for the activation of multiple devices with a single license. They often offer cost-effective solutions for businesses with extensive IT infrastructure.
  • Upgrade Keys: These keys are used to upgrade an existing Windows 10 installation to Windows 11. They provide a convenient pathway for users who want to experience the latest features without a complete system reinstallation.

The Benefits of a Genuine Windows 11 Key

Using a legitimate Windows 11 key offers a range of benefits, ensuring a secure and optimized digital experience:

  • Full Feature Access: A genuine key unlocks the full spectrum of Windows 11 features, including advanced security measures, multimedia capabilities, and productivity tools.
  • Software Updates: Regular updates deliver critical security patches, bug fixes, and performance enhancements, ensuring a stable and secure operating environment.
  • Technical Support: Users with genuine keys are entitled to receive technical support from Microsoft, ensuring prompt assistance with any issues encountered.
  • Legal Compliance: Using a genuine key complies with licensing agreements and avoids potential legal repercussions associated with software piracy.

FAQs about Windows 11 Keys

1. Can I use a Windows 11 key on multiple devices?

No, a Windows 11 key is typically tied to a specific device. However, some keys, like volume license keys, may allow for activation on multiple devices within a defined network.

2. What happens if I don’t activate Windows 11?

An unactivated Windows 11 installation will have limited functionality. Certain features, like personalization options and access to updates, may be restricted. The operating system might also display constant reminders to activate the installation.

3. Can I transfer my Windows 11 key to a different computer?

In most cases, a retail Windows 11 key can be transferred to a different computer after deactivating it on the original device. However, OEM keys are typically tied to the specific hardware and cannot be transferred.

4. What if I lose my Windows 11 key?

If you lose your Windows 11 key, you may be able to retrieve it from your Microsoft account or through the product packaging. However, if you cannot locate the key, you may need to purchase a new one.

5. Can I use a Windows 10 key to activate Windows 11?

No, Windows 10 keys are not compatible with Windows 11. You will need a separate Windows 11 key to activate the operating system.

Tips for Managing Your Windows 11 Key

  • Store Your Key Securely: Keep your Windows 11 key in a safe and easily accessible location, such as a password manager or a secure document.
  • Back Up Your Key: Make a backup copy of your key in case of data loss or accidental deletion.
  • Verify Your Key: Before purchasing a key, ensure its authenticity by checking the vendor’s reputation and legitimacy.
  • Avoid Pirated Keys: Using pirated keys is illegal and can expose your device to malware and security risks.
  • Contact Microsoft Support: If you have any issues with your Windows 11 key or activation, contact Microsoft support for assistance.

Conclusion

A Windows 11 key is an essential component of the operating system, unlocking its full potential and ensuring a secure, reliable, and fully functional digital experience. By understanding the different types of keys, their benefits, and proper management practices, users can navigate the world of Windows 11 with confidence and maximize their digital productivity.

Unpick the Potential of Windows 11 Enterprise: Your Guide to Product Key Activation  by How to unlock taskbar on windows 11, Turn-off Taskbar Lock Left, Right, Top, Bottom & Resize The key to unlocking the value of the digital revolution - Med-Tech Innovation
The key characteristics for unlocking digital transformation success. [Tip] How to Unlock and Resize the Taskbar in Windows 11 โ€“ AskVG How To Unlock Taskbar Windows 11 Tutorial - YouTube
Lock Keyboard Windows 11 How to Lock and Unlock Function (Fn) key in Windows 11/10 - YouTube

Closure

Thus, we hope this article has provided valuable insights into Understanding Windows 11: The Key to Unlocking Your Digital Experience. We thank you for taking the time to read this article. See you in our next article!

The Power Of The Command Line: Exploring The PS App For Windows 10

The Power of the Command Line: Exploring the PS App for Windows 10

Introduction

In this auspicious occasion, we are delighted to delve into the intriguing topic related to The Power of the Command Line: Exploring the PS App for Windows 10. Let’s weave interesting information and offer fresh perspectives to the readers.

The Power of the Command Line: Exploring the PS App for Windows 10

How to Check Windows 10 Version in 4 Easy Ways

The Windows 10 operating system offers a diverse array of tools and features to manage and interact with the computer. Among these, the PowerShell application, commonly referred to as the PS app, stands as a powerful and versatile command-line interface that empowers users to automate tasks, manage system settings, and perform advanced operations. This article delves into the intricacies of PowerShell, highlighting its significance, benefits, and applications within the Windows 10 ecosystem.

Understanding the PS App: A Gateway to System Control

PowerShell serves as a scripting language and a command-line shell, providing a robust platform for interacting with the Windows operating system. Unlike the traditional Command Prompt, PowerShell offers a more sophisticated environment with advanced features and capabilities. It leverages the .NET Framework, enabling users to execute commands, manipulate data, and automate complex tasks with greater efficiency.

Key Features and Capabilities of the PS App

  1. Command-Line Interaction: PowerShell allows users to execute commands directly within the console window, providing immediate feedback and control over system operations.

  2. Scripting Language: PowerShell supports a powerful scripting language, enabling users to create and execute automated scripts for repetitive tasks or complex workflows. Scripts can be used to manage user accounts, configure system settings, or automate software deployments.

  3. Object-Oriented Design: PowerShell operates on a foundation of objects, allowing for more structured and efficient data manipulation. Objects represent real-world entities, such as files, processes, and system services, enabling users to interact with them in a more intuitive manner.

  4. Modules and Cmdlets: PowerShell utilizes a modular structure, providing a library of pre-built components known as modules and cmdlets. Modules contain a collection of related cmdlets, which are individual commands designed to perform specific tasks. This modularity allows for easy expansion and customization of PowerShell functionality.

  5. Remote Management: PowerShell enables users to manage and control remote computers, facilitating centralized administration and automation across a network. This capability is particularly valuable for organizations with multiple systems.

Benefits of Using the PS App

  1. Increased Efficiency: PowerShell automates repetitive tasks, saving time and effort for users and administrators.

  2. Enhanced System Control: PowerShell provides a comprehensive platform for managing system settings, user accounts, and software installations, empowering users with greater control over their environment.

  3. Advanced Scripting: The PowerShell scripting language enables users to create sophisticated and customized scripts, automating complex workflows and tailoring solutions to specific needs.

  4. Centralized Management: PowerShell facilitates centralized management of multiple systems, allowing administrators to manage and control remote computers efficiently.

  5. Improved Security: PowerShell offers enhanced security features, including access control mechanisms and the ability to perform actions with elevated privileges, ensuring secure and controlled system operations.

Applications of the PS App in Windows 10

PowerShell finds widespread application in various domains, empowering users and administrators to perform a wide range of tasks:

  1. System Administration: PowerShell is an indispensable tool for system administrators, enabling them to manage user accounts, configure system settings, monitor system health, and automate routine tasks.

  2. Software Deployment: PowerShell can be used to automate software deployments, ensuring consistent and efficient installation across multiple systems.

  3. Data Management: PowerShell can be used to manipulate data, extract information from various sources, and automate data processing tasks.

  4. Network Management: PowerShell provides tools for managing network devices, configuring network settings, and troubleshooting network issues.

  5. Security Management: PowerShell offers capabilities for managing security policies, monitoring security events, and responding to security threats.

FAQs about the PS App for Windows 10

Q: What are the prerequisites for using PowerShell?

A: PowerShell is integrated into Windows 10, so no additional installations are required. However, some advanced modules may require separate installation.

Q: How can I access PowerShell?

A: You can access PowerShell by searching for "PowerShell" in the Windows search bar or by opening the "Windows PowerShell" app from the Start menu.

Q: Is PowerShell suitable for beginners?

A: While PowerShell offers advanced features, it also provides a learning curve. Beginners can start with basic commands and gradually explore more complex functionalities. There are numerous online resources and tutorials available to assist with learning PowerShell.

Q: How can I learn more about PowerShell?

A: Microsoft provides extensive documentation and tutorials on PowerShell, accessible through the official website and online resources. There are also numerous books and online courses dedicated to teaching PowerShell.

Q: Can PowerShell be used to perform malicious actions?

A: Like any powerful tool, PowerShell can be used for malicious purposes. However, Windows 10 implements security measures to mitigate risks associated with PowerShell, and proper usage practices can minimize security vulnerabilities.

Tips for Using the PS App

  1. Start with Basic Commands: Begin by familiarizing yourself with fundamental PowerShell commands and syntax.

  2. Explore Help Documentation: Utilize the Get-Help cmdlet to access detailed information about specific commands and modules.

  3. Utilize Online Resources: Leverage online resources such as Microsoft documentation, community forums, and tutorials to learn and troubleshoot PowerShell.

  4. Practice Regularly: Consistent practice is key to mastering PowerShell. Experiment with different commands and scripts to develop proficiency.

  5. Use Scripts for Automation: Leverage PowerShell scripts to automate repetitive tasks, saving time and effort.

Conclusion

The PS app, or PowerShell, represents a powerful and versatile tool within the Windows 10 ecosystem. Its command-line interface, scripting language, and object-oriented design empower users to manage system settings, automate tasks, and perform advanced operations with greater efficiency. By leveraging the capabilities of PowerShell, users and administrators can enhance system control, improve productivity, and optimize their overall Windows 10 experience.

Playstation App For Windows 10 - Splash Windows Command Line Tutorial - 1 - Introduction to the Command Prompt  command prompt windows Command prompt commands for windows 10 - gameskurt
Windows Command Line Tutorial - 1 - Introduction to the Command Prompt  command prompt windows Introduction to the Windows Command Line with PowerShell  Programming Historian Windows command line - mommyaca
How to use a Command Line switch on Windows 10 Command prompt commands windows 10 list - hopperkurt

Closure

Thus, we hope this article has provided valuable insights into The Power of the Command Line: Exploring the PS App for Windows 10. We thank you for taking the time to read this article. See you in our next article!

Mastering Graphics Performance: A Guide To MSI Afterburner On Windows 11

Mastering Graphics Performance: A Guide to MSI Afterburner on Windows 11

Introduction

With enthusiasm, let’s navigate through the intriguing topic related to Mastering Graphics Performance: A Guide to MSI Afterburner on Windows 11. Let’s weave interesting information and offer fresh perspectives to the readers.

Mastering Graphics Performance: A Guide to MSI Afterburner on Windows 11

How to monitor FPS, CPU, and GPU usage in Games using MSI Afterburner in Windows 11  Step by Step

In the realm of gaming and graphics-intensive tasks, optimizing performance is paramount. For Windows 11 users seeking granular control over their graphics card and system performance, MSI Afterburner emerges as a powerful and versatile tool. This comprehensive guide delves into the intricacies of MSI Afterburner, exploring its functionalities, benefits, and essential considerations for effective utilization.

Understanding the Power of MSI Afterburner

MSI Afterburner, developed by the renowned hardware manufacturer MSI, is a free and open-source utility renowned for its ability to overclock and monitor graphics cards. It transcends the limitations of basic driver settings, granting users unparalleled control over key performance parameters. This control extends to both NVIDIA and AMD graphics cards, making it a universal solution for enhancing graphical performance.

Key Features of MSI Afterburner

1. Overclocking:

MSI Afterburner enables users to fine-tune the core clock speed and memory clock speed of their graphics card. By increasing these values, users can push the limits of their hardware, unlocking higher frame rates and improved graphical fidelity in demanding applications.

2. Fan Control:

Effective cooling is crucial for maintaining graphics card stability and preventing thermal throttling. MSI Afterburner offers advanced fan control features, allowing users to create custom fan curves based on GPU temperature. This ensures optimal cooling while minimizing noise levels.

3. Real-time Monitoring:

MSI Afterburner provides real-time monitoring of vital system parameters, including GPU temperature, core clock speed, memory clock speed, fan speed, and voltage. This information is displayed in an overlay on the screen, allowing users to track performance in real-time and identify potential bottlenecks.

4. On-Screen Display (OSD):

The OSD feature allows users to display key performance metrics directly on the screen during gameplay or other applications. This provides a convenient and immediate understanding of system performance without the need for additional monitoring tools.

5. Benchmarking and Stress Testing:

MSI Afterburner includes integrated benchmarking and stress testing capabilities. Users can run benchmarks to evaluate the performance of their graphics card under various workloads and stress test the system to identify potential stability issues.

6. Customization:

MSI Afterburner offers extensive customization options, allowing users to personalize the user interface, create custom profiles, and configure various settings to suit their specific needs.

Installing MSI Afterburner on Windows 11

Installing MSI Afterburner on Windows 11 is a straightforward process:

  1. Download: Visit the official MSI Afterburner website and download the latest version of the software.
  2. Run the Installer: Double-click the downloaded installer file and follow the on-screen instructions.
  3. Restart: After the installation is complete, restart your computer to ensure the changes take effect.

Utilizing MSI Afterburner Effectively

1. Initial Configuration:

Upon launching MSI Afterburner, users are presented with a user-friendly interface. The main window displays essential system information and provides access to various configuration options.

2. Setting Custom Fan Curves:

To optimize cooling performance, navigate to the "Settings" tab and select "Fan". Users can then create custom fan curves by adjusting fan speed based on GPU temperature. Aim for a balance between cooling efficiency and noise levels.

3. Overclocking Considerations:

Overclocking graphics cards requires caution and knowledge. Excessive overclocking can lead to instability and potential damage to the hardware. Start with small increments to the core and memory clock speeds, gradually increasing until the desired performance is achieved. Monitor system temperatures and stability closely during the process.

4. Monitoring Performance:

The real-time monitoring feature is invaluable for identifying potential bottlenecks and ensuring system stability. Pay close attention to GPU temperature, core clock speed, and fan speed during demanding tasks.

5. Using the On-Screen Display (OSD):

The OSD feature provides real-time performance insights during gameplay or other applications. Users can customize the OSD to display the metrics most relevant to their needs.

6. Stress Testing and Benchmarking:

Regularly stress testing and benchmarking the graphics card can help identify potential stability issues and monitor performance over time. This is particularly important after overclocking or making significant changes to system configuration.

FAQs: Addressing Common Concerns

Q: Is MSI Afterburner safe to use?

A: MSI Afterburner is a reputable and widely used tool. However, as with any overclocking software, it is essential to exercise caution and follow recommended guidelines. Excessive overclocking can lead to instability and potential damage to the hardware.

Q: Is MSI Afterburner compatible with my graphics card?

A: MSI Afterburner supports both NVIDIA and AMD graphics cards. It is compatible with most modern graphics cards, but it is always advisable to check the software’s compatibility list for specific models.

Q: Can I use MSI Afterburner on a laptop?

A: MSI Afterburner can be used on laptops, but the effectiveness of overclocking may vary depending on the laptop’s cooling system and power limitations.

Q: What are the potential risks of overclocking?

A: Overclocking can lead to instability, system crashes, and potential damage to hardware if not done correctly. It is essential to exercise caution, monitor system temperatures, and start with small increments to the clock speeds.

Q: How do I revert to default settings after overclocking?

A: MSI Afterburner allows users to save custom profiles. To revert to default settings, simply load the default profile or reset the software to its factory settings.

Tips for Maximizing MSI Afterburner Performance

1. Update Drivers: Ensure that your graphics card drivers are up to date to ensure optimal compatibility with MSI Afterburner.

2. Monitor Temperatures: Closely monitor GPU temperatures during overclocking and demanding tasks to prevent thermal throttling.

3. Experiment Gradually: Start with small increments to the clock speeds and gradually increase them until the desired performance is achieved.

4. Use Stress Tests: Regularly stress test your system to identify potential stability issues and ensure the overclocked settings are stable.

5. Consider Cooling Solutions: If your graphics card runs hot during overclocking, consider investing in a more powerful cooling solution, such as a custom water loop or a high-performance air cooler.

Conclusion: Unleashing the Potential of Your Graphics Card

MSI Afterburner is an indispensable tool for Windows 11 users seeking to maximize graphics performance. Its comprehensive features, including overclocking, fan control, real-time monitoring, and customization options, empower users to push the limits of their hardware and achieve optimal graphical fidelity. By understanding the functionalities and best practices associated with MSI Afterburner, users can harness its power to enhance their gaming experiences, streamline graphics-intensive workflows, and unlock the full potential of their graphics cards. Remember, responsible use and careful monitoring are essential for a safe and rewarding overclocking experience.

Msi Afterburner Windows 11 MSI Afterburner Windows 11 MSI Afterburner Windows 11
Msi afterburner windows 11 - oseskill Msi afterburner windows 11 - gaicentre Msi afterburner windows 11 - gaicentre
Msi Afterburner Windows 11 64-bit How To Setup MSI Afterburner on Windows 11 (2021)  Complete MSI Afterburner Tutorial - YouTube

Closure

Thus, we hope this article has provided valuable insights into Mastering Graphics Performance: A Guide to MSI Afterburner on Windows 11. We appreciate your attention to our article. See you in our next article!

Unlocking The Power Of PlayStation Remote Play On Windows 10: A Comprehensive Guide

Unlocking the Power of PlayStation Remote Play on Windows 10: A Comprehensive Guide

Introduction

With great pleasure, we will explore the intriguing topic related to Unlocking the Power of PlayStation Remote Play on Windows 10: A Comprehensive Guide. Let’s weave interesting information and offer fresh perspectives to the readers.

Unlocking the Power of PlayStation Remote Play on Windows 10: A Comprehensive Guide

Ps remote play windows 10

The world of gaming has evolved significantly, transcending the boundaries of physical consoles and dedicated gaming rooms. Remote play technology has emerged as a game-changer, enabling players to enjoy their favorite PlayStation games on a variety of devices, including Windows 10 PCs. This guide delves into the intricacies of PlayStation Remote Play on Windows 10, exploring its functionalities, benefits, and potential challenges.

Understanding the Essence of PlayStation Remote Play

PlayStation Remote Play is a revolutionary feature that allows users to stream their PlayStation 4 or PlayStation 5 games directly to a compatible device, including Windows 10 PCs, tablets, and smartphones. This technology essentially transforms your chosen device into a remote control for your console, enabling you to play games on a larger screen or on the go.

The key to this seamless experience lies in the powerful combination of streaming technology and network connectivity. The PlayStation console acts as the source, transmitting game data over the internet to the connected device, while the device acts as a receiver, displaying the game in real-time. This dynamic interaction allows you to enjoy the full PlayStation experience, including game visuals, audio, and controller input, regardless of your physical location.

The Benefits of Embracing PlayStation Remote Play on Windows 10

The adoption of PlayStation Remote Play on Windows 10 offers a multitude of advantages for gamers:

  • Expanded Gaming Landscape: Remote play expands the horizons of gaming by freeing players from the limitations of a dedicated TV or console setup. You can now enjoy your favorite PlayStation games on your Windows 10 PC, whether at home, at work, or on the road.

  • Enhanced Visual Fidelity: Windows 10 PCs, with their larger displays and superior resolution capabilities, can deliver a visually enhanced gaming experience compared to smaller screens. This is particularly beneficial for games that rely on intricate details and stunning graphics.

  • Enhanced Control and Precision: The use of a mouse and keyboard for certain games can offer a level of precision and control that may not be achievable with a traditional PlayStation controller. This can be particularly advantageous in games that require precise aiming or rapid input.

  • Seamless Integration with Windows Ecosystem: The integration of PlayStation Remote Play with Windows 10 allows for a seamless gaming experience, leveraging the familiar Windows interface and peripherals. This minimizes the learning curve for new users and promotes a smooth transition from console to PC gaming.

  • Cost-Effective Alternative: For players who may not have the resources to invest in a high-end gaming PC, PlayStation Remote Play offers a cost-effective alternative to experience console-quality gaming on their existing Windows 10 device.

Setting Up PlayStation Remote Play on Windows 10: A Step-by-Step Guide

Setting up PlayStation Remote Play on Windows 10 is a straightforward process:

  1. Download and Install the PlayStation Remote Play App: Begin by downloading the official PlayStation Remote Play app from the Microsoft Store on your Windows 10 PC. This app serves as the bridge between your console and your PC.

  2. Connect Your PlayStation Console to the Internet: Ensure that your PlayStation console is connected to the internet via a wired or wireless connection. A stable internet connection is crucial for smooth streaming.

  3. Connect Your Windows 10 PC to the Same Network: Your Windows 10 PC must be connected to the same network as your PlayStation console. This can be a wired or wireless network, but it’s recommended to use a wired connection for optimal performance.

  4. Configure Your PlayStation Console: Navigate to the Settings menu on your PlayStation console and select "Remote Play Connection Settings." Ensure that "Enable Remote Play" is turned on. You may also need to adjust the video quality settings for optimal streaming.

  5. Launch the PlayStation Remote Play App: Once your console is configured, open the PlayStation Remote Play app on your Windows 10 PC. The app will automatically search for your PlayStation console on the network.

  6. Connect to Your Console: Select your PlayStation console from the list of available devices and follow the on-screen instructions to establish a connection.

  7. Start Playing: Once connected, you can browse your PlayStation library and start playing your favorite games. The game visuals and audio will stream directly to your Windows 10 PC.

Optimizing Performance for a Smooth Gaming Experience

To ensure a smooth and enjoyable gaming experience with PlayStation Remote Play on Windows 10, consider the following optimization tips:

  • Use a Wired Connection: A wired connection between your PlayStation console and your router, as well as between your PC and your router, can significantly reduce latency and improve streaming stability.

  • Upgrade Your Network: Ensure that your network infrastructure is capable of handling the bandwidth demands of streaming high-quality game data. This may involve upgrading your router or internet plan.

  • Adjust Video Quality Settings: The PlayStation Remote Play app allows you to adjust video quality settings to optimize for your network conditions. Lowering the resolution or frame rate can reduce bandwidth consumption and improve streaming stability.

  • Close Unnecessary Applications: Close any applications or programs running on your Windows 10 PC that might consume bandwidth or processing power. This helps allocate resources for smooth game streaming.

  • Optimize Your PlayStation Console Settings: Explore the Remote Play Connection Settings on your PlayStation console to adjust video quality, frame rate, and other parameters for optimal performance.

  • Utilize a Dedicated Controller: While the PlayStation Remote Play app supports keyboard and mouse input for certain games, using a dedicated PlayStation controller can provide a more intuitive and comfortable gaming experience.

Troubleshooting Common Issues and Challenges

While PlayStation Remote Play on Windows 10 offers a seamless gaming experience, it’s not without its challenges. Here are some common issues and troubleshooting tips:

  • Connection Issues: If you’re experiencing connection issues, ensure that both your console and PC are connected to the same network and that your internet connection is stable. You can also try restarting your router and devices to resolve connectivity problems.

  • Latency Issues: Latency is a common issue with remote play, as it represents the delay between your controller input and the on-screen response. To minimize latency, use a wired connection, close unnecessary applications, and adjust video quality settings.

  • Video Quality Issues: If you’re experiencing video quality issues, such as stuttering or lag, try lowering the video quality settings in the PlayStation Remote Play app. You can also try restarting your console or PC.

  • Controller Compatibility: While most PlayStation controllers are compatible with PlayStation Remote Play on Windows 10, some older models may not work properly. Ensure that your controller is connected via Bluetooth or USB and that it’s compatible with the app.

  • Compatibility Issues: Not all PlayStation games are compatible with Remote Play. Check the game’s description or the PlayStation Remote Play website for compatibility information.

Addressing Frequently Asked Questions about PlayStation Remote Play on Windows 10

Q: What are the minimum system requirements for PlayStation Remote Play on Windows 10?

A: The minimum system requirements for PlayStation Remote Play on Windows 10 are:

  • Operating System: Windows 10 (64-bit)
  • Processor: Intel Core i5-5600K or AMD equivalent
  • Memory: 8 GB RAM
  • Storage: 10 GB available space
  • Network: Broadband internet connection with a minimum download speed of 5 Mbps

Q: Can I use PlayStation Remote Play on a Windows 10 PC that’s not connected to the same network as my console?

A: While PlayStation Remote Play primarily relies on a local network connection, you can also use it over the internet if you have a stable and reliable internet connection. However, this may result in higher latency and potential video quality issues.

Q: Can I use a keyboard and mouse with PlayStation Remote Play?

A: Yes, the PlayStation Remote Play app supports keyboard and mouse input for certain games. However, using a PlayStation controller is generally recommended for a more intuitive gaming experience.

Q: Can I stream PlayStation games to my Windows 10 PC from a PlayStation 4 or PlayStation 5 console?

A: Yes, PlayStation Remote Play is compatible with both PlayStation 4 and PlayStation 5 consoles.

Q: Does PlayStation Remote Play require a subscription service?

A: No, PlayStation Remote Play is a free feature that is included with all PlayStation consoles.

Q: Is there a limit to the distance I can stream PlayStation games using Remote Play?

A: While there is no official distance limit, the quality of your streaming experience will depend on the strength of your internet connection.

Q: What happens if my internet connection is interrupted during a Remote Play session?

A: If your internet connection is interrupted, the streaming session will be interrupted as well. You will need to reconnect to the console to resume playing.

Q: Can I use PlayStation Remote Play to access my PlayStation Plus cloud saves?

A: While you can access your cloud saves through the PlayStation Remote Play app, you cannot directly play games from your cloud saves using Remote Play.

Conclusion: Embracing the Future of Gaming with PlayStation Remote Play on Windows 10

PlayStation Remote Play on Windows 10 represents a significant leap forward in gaming accessibility and flexibility. By bridging the gap between consoles and PCs, this technology empowers players to enjoy their favorite PlayStation games on a larger screen, on the go, or with enhanced control options.

As technology continues to evolve, we can expect even greater advancements in remote play technology, enabling even more immersive and seamless gaming experiences across various devices. Whether you’re a seasoned gamer or a casual enthusiast, PlayStation Remote Play on Windows 10 offers a compelling and versatile way to experience the world of PlayStation gaming.

How to set up PS4 Remote Play in Windows 10 Ps remote play windows 10 [STEP BY STEP GUIDE] Bluetooth PS4 Controller to Windows 10 for Remote Play : remoteplay
Ps remote play windows 10 - gulubo How to set up PS4 Remote Play in Windows 10 REMOTE PLAY WILL NOT OPEN EZ FIX  PS REMOTE PLAY EZ FIX ! (Windows 10 PC) - YouTube
How to set up PS4 Remote Play in Windows 10 How to download PS Remote Play on windows 10 - YouTube

Closure

Thus, we hope this article has provided valuable insights into Unlocking the Power of PlayStation Remote Play on Windows 10: A Comprehensive Guide. We hope you find this article informative and beneficial. See you in our next article!

Mastering Microsoft 365 Deployment: A Comprehensive Guide To Streamlined Installation

Mastering Microsoft 365 Deployment: A Comprehensive Guide to Streamlined Installation

Introduction

In this auspicious occasion, we are delighted to delve into the intriguing topic related to Mastering Microsoft 365 Deployment: A Comprehensive Guide to Streamlined Installation. Let’s weave interesting information and offer fresh perspectives to the readers.

Mastering Microsoft 365 Deployment: A Comprehensive Guide to Streamlined Installation

Streamline Your Office 365 Deployment with Valto

The modern workplace thrives on efficiency and seamless integration of technology. Microsoft 365, a comprehensive suite of productivity tools, plays a pivotal role in achieving this goal. However, the process of deploying Microsoft 365 across an organization can be complex and time-consuming without the right tools and strategies. This is where the Office Deployment Tool (ODT) emerges as a powerful solution, offering a streamlined approach to deploying Microsoft 365 applications.

Understanding the Office Deployment Tool (ODT)

The Office Deployment Tool (ODT) is a command-line utility provided by Microsoft that simplifies the process of deploying Microsoft 365 applications. It empowers administrators to customize installations, control the deployment process, and ensure consistency across the entire organization.

Key Features and Benefits of the ODT:

  • Customization: The ODT enables administrators to tailor installations to specific user needs. This includes selecting desired applications, customizing language settings, configuring user interface options, and even incorporating specific features.
  • Centralized Deployment: The ODT allows for centralized deployment of Microsoft 365 applications, ensuring consistency and reducing administrative overhead. This centralized approach simplifies the management of updates and patches, ensuring all users are on the same version.
  • Streamlined Installation: The ODT automates the installation process, eliminating the need for manual intervention and reducing the potential for errors. This streamlined approach significantly reduces the time and effort required for deployment.
  • Offline Installation: The ODT supports offline installations, allowing for deployments in environments with limited or no internet connectivity. This is particularly beneficial for organizations with geographically dispersed offices or limited network infrastructure.
  • Scalability: The ODT is designed for scalability, enabling the deployment of Microsoft 365 applications to hundreds or even thousands of users with minimal effort. This scalability is crucial for large organizations with a distributed workforce.

Steps for Implementing the ODT:

  1. Download the ODT: Begin by downloading the Office Deployment Tool from the Microsoft website. Choose the appropriate version based on the desired Microsoft 365 applications and the operating system of the target devices.
  2. Create a Configuration File: The ODT utilizes configuration files (XML format) to define the desired installation parameters. These files specify the applications to be installed, language settings, user interface options, and other customizations.
  3. Deploy the Applications: Once the configuration file is created, use the ODT command-line utility to deploy the applications. The ODT will leverage the configuration file to install the specified applications on the target devices.
  4. Monitor and Troubleshoot: After deployment, it is essential to monitor the installation process and troubleshoot any issues that may arise. The ODT provides detailed logs that can be used to identify and resolve problems.

Beyond the Basics: Advanced ODT Techniques

The ODT offers a wide range of advanced features and techniques for experienced administrators:

  • Automated Deployment with Scripts: The ODT can be integrated with scripting languages like PowerShell to automate the entire deployment process. This allows for seamless integration with existing IT infrastructure and simplifies large-scale deployments.
  • Group Policy Integration: The ODT can be integrated with Group Policy to enforce consistent deployments across the organization. This ensures that all users receive the same applications and configurations, regardless of their location or device.
  • Custom Branding: The ODT allows for custom branding of the Office applications, enabling organizations to personalize the user experience and enhance brand recognition.
  • Conditional Installation: The ODT supports conditional installation, allowing administrators to deploy specific applications based on user roles, device type, or other criteria. This ensures that only the necessary applications are installed, optimizing performance and reducing storage space.

FAQs Regarding the Office Deployment Tool:

Q: What is the difference between the Office Deployment Tool and the Click-to-Run installer?

A: The Click-to-Run installer is a user-friendly interface that allows users to download and install Office applications individually. The ODT, on the other hand, is a command-line utility designed for administrators to deploy applications to multiple users and devices.

Q: Can I use the ODT to deploy Office 2019 or older versions?

A: The ODT primarily focuses on deploying Microsoft 365 applications, which are subscription-based services. However, it can also be used to deploy perpetual versions of Office, including Office 2019 and older versions.

Q: How do I troubleshoot installation issues using the ODT?

A: The ODT provides detailed logs that can be used to troubleshoot installation issues. These logs contain information about the installation process, any errors encountered, and the actions taken by the ODT.

Q: Can I use the ODT to deploy Office applications to mobile devices?

A: The ODT is primarily designed for deploying Office applications to Windows devices. However, Microsoft 365 applications are available on various platforms, including iOS and Android. These applications can be deployed through other methods, such as app stores or mobile device management solutions.

Tips for Successful ODT Deployment:

  • Thorough Planning: Before deploying the ODT, it is essential to plan the deployment process carefully. This includes defining the target devices, selecting the desired applications, configuring language settings, and addressing any specific requirements.
  • Testing and Validation: Before deploying the ODT to the entire organization, it is crucial to test and validate the installation process in a pilot environment. This ensures that the chosen configuration works as expected and identifies any potential issues.
  • Documentation: Maintaining detailed documentation of the deployment process, including the configuration files used, is crucial for troubleshooting and future deployments.
  • Regular Updates: Microsoft regularly releases updates for Microsoft 365 applications. It is important to keep the ODT and the configuration files updated to ensure compatibility and security.

Conclusion:

The Office Deployment Tool (ODT) is an indispensable tool for administrators looking to streamline the deployment of Microsoft 365 applications. Its ability to customize installations, centralize deployments, and automate the process significantly reduces administrative overhead and ensures consistency across the organization. By leveraging the advanced features and techniques of the ODT, organizations can optimize their Microsoft 365 deployments, enhancing productivity and user satisfaction.

eBook: Microsoft 365 Deployment Guide - Infotechtion Office 365 Deployment Guide Mastering Microsoft 365 program
Install Office 365 using the Office Deployment Tool - TechLabs Install Office 365 using the Office Deployment Tool - TechLabs How to Deploy and Install Office 365 Software Updates with SCCM CB ADR - anoopcnair.com
Choose how to deploy Office 365 ProPlus - Office Support Deploy Office 365 Pro Plus Suite To Windows 11 Using Intune HTMD Blog

Closure

Thus, we hope this article has provided valuable insights into Mastering Microsoft 365 Deployment: A Comprehensive Guide to Streamlined Installation. We hope you find this article informative and beneficial. See you in our next article!

Transitioning To A New PC: A Comprehensive Guide

Transitioning to a New PC: A Comprehensive Guide

Introduction

With great pleasure, we will explore the intriguing topic related to Transitioning to a New PC: A Comprehensive Guide. Let’s weave interesting information and offer fresh perspectives to the readers.

Transitioning to a New PC: A Comprehensive Guide

Transitioning to a new Windows PC - Intranet - University of South Australia

The decision to acquire a new PC is often driven by a desire for enhanced performance, increased storage capacity, or the need for updated features. This transition, however, can be a daunting task, especially for those unfamiliar with the intricacies of data transfer and system configuration. This comprehensive guide aims to demystify the process of migrating to a new computer, offering a clear understanding of the steps involved, the potential benefits, and the crucial considerations to ensure a smooth and successful transfer.

Understanding the Transition Process

The process of transitioning to a new PC can be broken down into distinct phases, each with its own set of considerations and tasks:

1. Pre-Transfer Preparation:

  • Data Backup: Before initiating any transfer, it is paramount to create a comprehensive backup of all essential data from your old PC. This includes documents, photos, videos, music, software installations, and any other files you wish to retain. The backup can be stored on an external hard drive, a cloud storage service, or a network drive.
  • Software Inventory: Make a detailed list of all software programs currently installed on your old PC. This will help you identify which applications need to be reinstalled on your new PC.
  • Hardware Compatibility: Ensure that your new PC is compatible with all your existing peripherals, such as printers, scanners, and external drives. Check the specifications of the new PC and the peripherals to confirm compatibility.
  • Operating System Compatibility: If you are upgrading from an older operating system, confirm that your existing software programs are compatible with the new operating system.

2. Data Transfer:

  • Direct Transfer: For transferring large amounts of data, a direct connection between the old and new PC is often the most efficient method. This can be achieved using a USB cable, an Ethernet cable, or a network drive.
  • Cloud Storage: Cloud storage services provide a convenient way to transfer data between computers, particularly for smaller files and data that needs to be accessed from multiple devices.
  • External Hard Drives: External hard drives offer a portable and reliable method for transferring large amounts of data.
  • Data Migration Software: Specialized data migration software can automate the process of transferring data and settings from your old PC to the new one.

3. Software Installation:

  • Operating System Installation: The first step is to install the operating system on your new PC. This may involve using a bootable USB drive or DVD.
  • Software Installation: Once the operating system is installed, you can start installing the software programs you need. This can be done by using the installation discs, downloaded files, or by accessing the software from your account on the software vendor’s website.
  • Driver Installation: Ensure that the necessary drivers for your peripherals are installed. These drivers enable the operating system to communicate with your hardware.

4. Configuration and Customization:

  • Personalization: Once your software is installed, you can personalize your new PC by adjusting settings, customizing the desktop, and installing themes.
  • Network Setup: Connect your new PC to your network and configure internet access.
  • Security Setup: Set up security measures, including antivirus software, firewall, and password protection.

Benefits of Transitioning to a New PC

  • Enhanced Performance: Newer PCs often boast faster processors, more RAM, and improved graphics capabilities, resulting in a significant performance boost.
  • Increased Storage Capacity: New PCs typically come with larger hard drives or SSDs, providing ample space for storing data, applications, and multimedia files.
  • Updated Features: Newer PCs often incorporate the latest features, such as advanced security protocols, improved connectivity options, and support for newer technologies.
  • Improved Reliability: Modern PCs are built with more robust components and have undergone rigorous testing, resulting in improved reliability and longevity.
  • Enhanced Security: Newer PCs come with enhanced security features, such as built-in anti-malware software, secure boot options, and encrypted storage.

Crucial Considerations

  • Budget: Consider your budget and the features that are most important to you.
  • Operating System: Decide whether you want to stick with your current operating system or upgrade to a newer version.
  • Hardware Specifications: Research the specifications of different PCs to find one that meets your needs in terms of processing power, RAM, storage capacity, and graphics capabilities.
  • Software Compatibility: Ensure that your existing software programs are compatible with the new PC’s operating system and hardware.
  • Warranty: Check the warranty period and coverage offered by the manufacturer.

FAQs

Q: What is the best way to transfer data from my old PC to my new one?

A: The best method depends on the amount of data being transferred and your preferred level of convenience. Direct transfer via USB cable or network drive is efficient for large amounts of data. Cloud storage services are convenient for smaller files and data accessible from multiple devices. External hard drives offer portability and reliability.

Q: Do I need to reinstall all my software on my new PC?

A: Most software programs require reinstallation on a new PC. However, some programs, such as Microsoft Office, allow for transferring licenses to a new computer. Refer to the software vendor’s website for instructions.

Q: How do I ensure that my data is safe during the transfer process?

A: Always create a backup of your data before initiating any transfer. Use reputable data transfer tools and services. Ensure that your backup is stored on a separate device or in a cloud service.

Q: What should I do with my old PC after transferring my data?

A: You can either sell or donate your old PC, or securely erase all data and store it for future use.

Tips for a Smooth Transition

  • Plan Ahead: Allocate sufficient time for the transition process, especially if you have a large amount of data to transfer.
  • Backup, Backup, Backup: Create multiple backups of your essential data using different methods to ensure redundancy.
  • Test Before Transferring: Test the transfer process with a few files before transferring your entire data.
  • Seek Professional Assistance: If you are unsure about any aspect of the transition process, consider seeking professional assistance from a computer technician.

Conclusion

Transitioning to a new PC can be a rewarding experience, offering access to enhanced performance, increased storage, and the latest features. By carefully planning, understanding the steps involved, and following the tips outlined in this guide, you can ensure a smooth and successful migration, maximizing the benefits of your new computer. Remember, with proper planning and execution, the process of transitioning to a new PC can be a seamless and empowering experience, allowing you to fully embrace the advantages of your new technology.

Tips for Making the Transition to a New Computer Less Painful  Tubarks - The Musings of Stan Mastering Windows 11: Tips & Tricks Transitioning from Console to PC - YouTube
GET (๏ธPDF๏ธ) DOWNLOAD THE NEW UPDATED GAMING PC GUIDE: A Comprehensive Guide On To Build Your Computer Parts and Components Guide for Beginners: Comprehensive Quick Guide on How to Build a Computing Transitions โ€“ Pushkar Ranade โ€“ Medium
Paper book transitioning to a computer How can I make the transition to a new computer easy and convenient?  The Seattle Times

Closure

Thus, we hope this article has provided valuable insights into Transitioning to a New PC: A Comprehensive Guide. We appreciate your attention to our article. See you in our next article!

Unlocking The Vault: A Guide To Opening Password-Protected ZIP Files In Windows 11

Unlocking the Vault: A Guide to Opening Password-Protected ZIP Files in Windows 11

Introduction

In this auspicious occasion, we are delighted to delve into the intriguing topic related to Unlocking the Vault: A Guide to Opening Password-Protected ZIP Files in Windows 11. Let’s weave interesting information and offer fresh perspectives to the readers.

Unlocking the Vault: A Guide to Opening Password-Protected ZIP Files in Windows 11

How to Password Protect ZIP files on Windows 11

In the digital age, data security is paramount. ZIP files, often used to compress and organize data, provide an additional layer of protection through password encryption. This ensures that only authorized individuals can access the contents. However, situations arise where the need to open a password-protected ZIP file becomes essential, whether for retrieving important documents, accessing project files, or recovering lost data.

This comprehensive guide explores the various methods available to open password-protected ZIP files in Windows 11. From the conventional use of built-in tools to the utilization of dedicated software, we will delve into the intricacies of each approach, providing a clear understanding of the process and its associated considerations.

Understanding the Challenge:

Before embarking on the journey of unlocking password-protected ZIP files, it is crucial to grasp the nature of the challenge. The encryption employed in these files transforms the data into an unreadable format, rendering it inaccessible without the correct password. This encryption serves as a robust safeguard against unauthorized access, but it also presents a hurdle when the password is forgotten or unavailable.

Methods for Opening Password-Protected ZIP Files:

1. Utilizing the Built-in Windows 11 Tool:

Windows 11 incorporates a native ZIP file handling capability, allowing users to extract the contents of a ZIP archive. However, this functionality does not extend to password-protected files. If you know the password, you can simply enter it when prompted by the system during the extraction process.

2. Employing Third-Party Software:

A plethora of third-party software applications are specifically designed to handle password-protected ZIP files. These programs employ advanced algorithms and techniques to attempt to crack the password, providing a potential solution when the original password is unknown.

Popular Options:

  • 7-Zip: A widely-used open-source file archiver known for its efficiency and support for various archive formats, including ZIP.
  • WinRAR: A commercial archiver with a long-standing reputation for its robust features and comprehensive support for password-protected archives.
  • PeaZip: A free and open-source archiver that offers a user-friendly interface and advanced password recovery capabilities.

3. Password Recovery Techniques:

When the password is completely forgotten, recovering it can be a daunting task. Several methods exist, each with its own level of complexity and success rate:

  • Brute Force Attack: This technique involves systematically testing every possible password combination until the correct one is found. However, it can be extremely time-consuming and resource-intensive, particularly for longer and complex passwords.
  • Dictionary Attack: This method utilizes a predefined list of common passwords and phrases to attempt to match the password used for the ZIP file. While faster than brute force, its effectiveness depends on the complexity of the password and the comprehensiveness of the dictionary.
  • Password Cracking Tools: Specialized software applications are designed to exploit vulnerabilities in encryption algorithms and attempt to crack passwords. These tools often employ a combination of brute force, dictionary attacks, and advanced techniques to increase their chances of success.

Considerations and Risks:

It is crucial to acknowledge the inherent risks associated with attempting to unlock password-protected ZIP files. Using third-party software or password recovery tools can expose your system to potential security threats if the software is not reputable or if it is infected with malware.

Furthermore, attempting to crack passwords without authorization can be considered illegal in many jurisdictions. It is essential to ensure that you have the legal right to access the contents of the ZIP file before employing any password recovery techniques.

Tips for Safe and Effective Password Recovery:

  • Use reputable software: Download software from trusted sources and ensure that it is updated regularly to mitigate security risks.
  • Be aware of potential scams: Beware of websites or software that claim to offer guaranteed password recovery, as these are often scams designed to steal your personal information.
  • Consider the ethical implications: Ensure that you have the legal right to access the contents of the ZIP file before attempting to crack the password.

FAQs:

Q: Can I open a password-protected ZIP file without the password?

A: While it is possible to attempt to recover the password using specialized software, there is no guaranteed method to open a password-protected ZIP file without the correct password.

Q: Is it safe to use third-party software to open password-protected ZIP files?

A: Using third-party software carries inherent security risks. It is essential to download software from reputable sources and ensure that it is updated regularly to mitigate potential threats.

Q: What are the legal implications of attempting to crack a password-protected ZIP file?

A: Attempting to crack passwords without authorization can be considered illegal in many jurisdictions. It is crucial to ensure that you have the legal right to access the contents of the ZIP file before employing any password recovery techniques.

Conclusion:

Opening password-protected ZIP files in Windows 11 presents a multifaceted challenge, requiring a combination of technical knowledge, caution, and ethical considerations. While the built-in tools offer basic functionality, third-party software and password recovery techniques provide more comprehensive solutions, albeit with inherent risks. Ultimately, the decision of whether to attempt to unlock a password-protected ZIP file should be made with a clear understanding of the available methods, associated risks, and legal implications. Remember, protecting your data is paramount, and employing strong passwords and secure storage methods can help mitigate the need for password recovery in the future.

How do you password protect a zip file in Windows 11? How to Password Protect ZIP files on Windows 11 How To Password Protect Zip Files On Windows 11  techviral
How to Password Protect Files and Folders in Windows 11 (2022)  Beebom How to Password Protect ZIP files on Windows 11  LaptrinhX How To Unlock Password Protected ZIP File - Tech Strange
How to Password Protect Zip Files in Windows 11 [3 Tips] How to Password Protect ZIP files on Windows 11

Closure

Thus, we hope this article has provided valuable insights into Unlocking the Vault: A Guide to Opening Password-Protected ZIP Files in Windows 11. We appreciate your attention to our article. See you in our next article!