Archives September 2023

Understanding Overscan: The Hidden Boundaries Of Your TV Display

Understanding Overscan: The Hidden Boundaries of Your TV Display

Introduction

With enthusiasm, let’s navigate through the intriguing topic related to Understanding Overscan: The Hidden Boundaries of Your TV Display. Let’s weave interesting information and offer fresh perspectives to the readers.

Understanding Overscan: The Hidden Boundaries of Your TV Display

How can I adjust overscan on my TV? : crtgaming

In the realm of digital displays, the seamless flow of images often masks a subtle yet crucial aspect – the phenomenon known as overscan. Overscan, a feature inherent to traditional analog television systems, involves extending the displayed image beyond its intended boundaries, effectively cropping the edges of the original content. While this might seem inconsequential at first glance, overscan can have a significant impact on the viewing experience, particularly when connecting a personal computer (PC) to a television.

The Origins of Overscan: A Legacy of Analog Television

The concept of overscan originated in the analog television era, serving a practical purpose. Analog signals, inherently susceptible to noise and interference, required a buffer zone around the image to ensure accurate reception. This buffer zone, known as the "overscan area," effectively masked any potential distortions or artifacts that might occur at the edges of the broadcast signal. Overscan also addressed the limitations of analog television receivers, which lacked the precision to display the entire signal accurately.

Overscan and Digital Displays: A Clash of Standards

The advent of digital television and high-definition displays brought about a significant shift in signal processing. Digital signals, being inherently less susceptible to noise, eliminated the need for the overscan buffer. However, the legacy of overscan persisted, and many television manufacturers continued to implement it, even in their digital models. This created a dissonance between the digital signals generated by PCs and the overscan behavior of televisions, leading to a range of issues for users.

The Consequences of Overscan on PC Displays:

When a PC is connected to a television with overscan enabled, the displayed image is cropped, resulting in several undesirable consequences:

  • Loss of Information: The overscan area effectively hides a portion of the image, potentially obscuring important elements like menus, toolbars, or even vital information within the content itself.
  • Aesthetic Distortion: The cropped image can lead to an uneven aspect ratio, distorting the intended proportions of the displayed content.
  • Reduced Viewing Area: The overscan area limits the usable display space, effectively reducing the overall viewing area.
  • Interface Issues: Overscan can interfere with user interfaces, making it difficult to navigate menus, select options, or interact with elements located near the edges of the screen.

The Importance of Overscan Control:

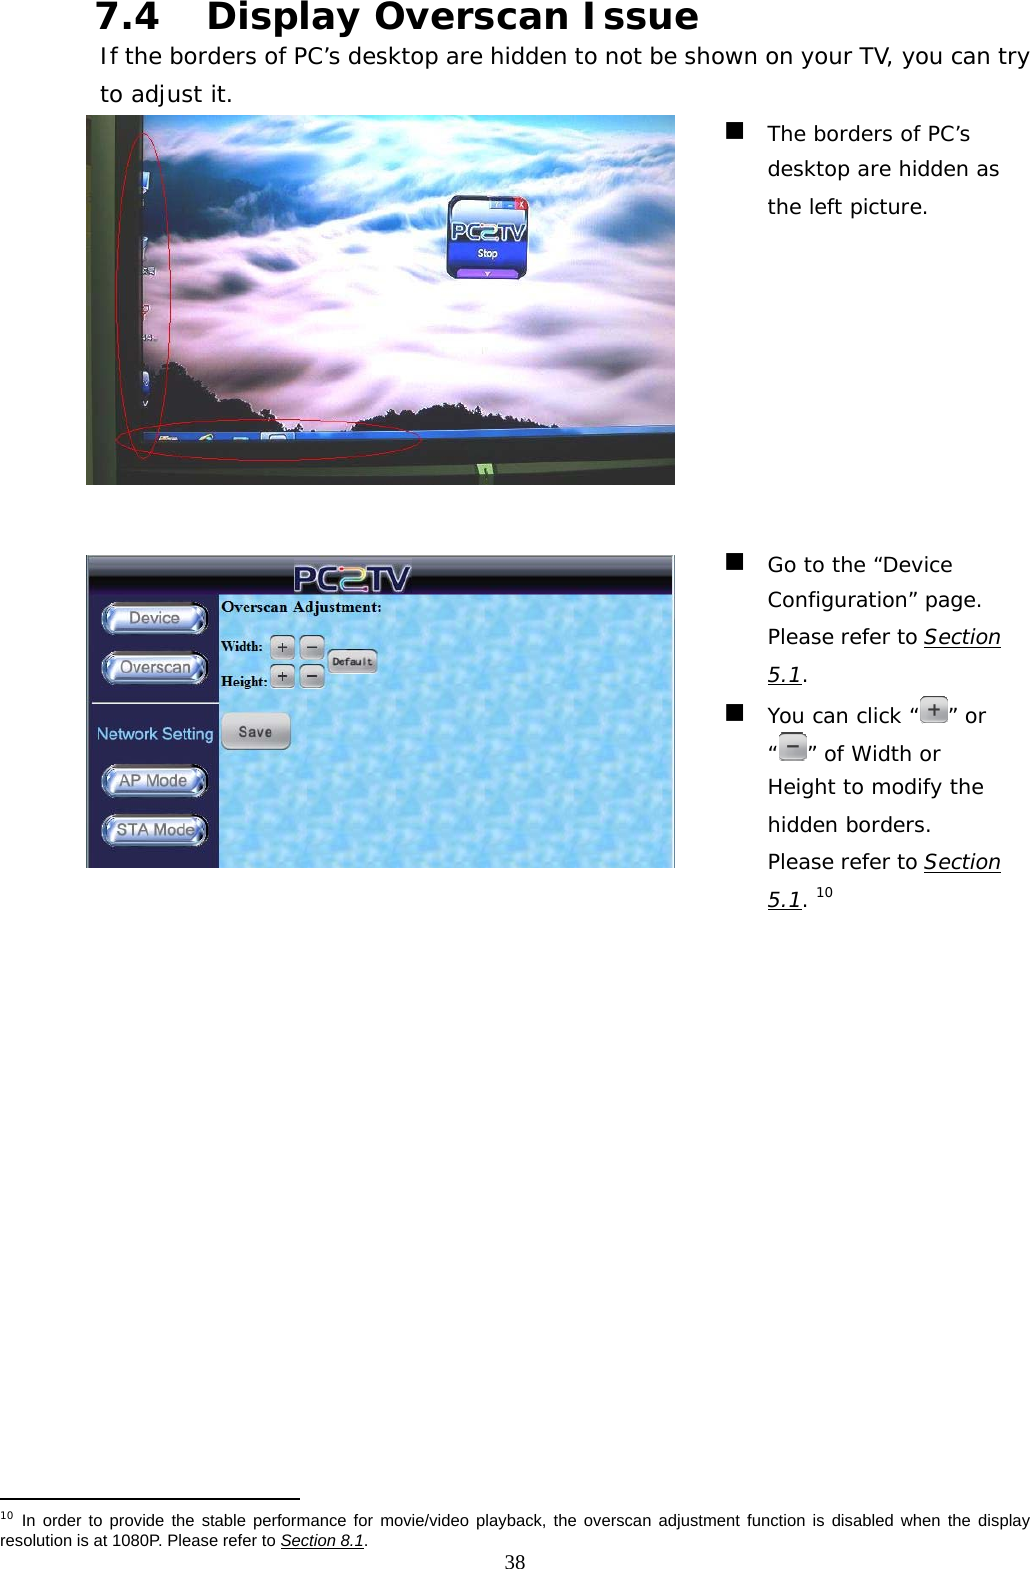
Recognizing the limitations imposed by overscan, modern televisions and display devices offer settings to adjust or disable overscan. These settings provide users with greater control over the displayed image, allowing them to ensure that the entire content is visible and displayed accurately.

Understanding Overscan Settings:

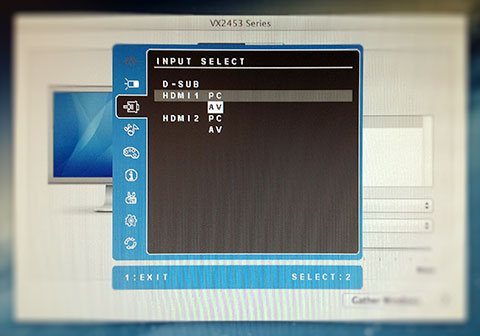
Most televisions provide a range of settings related to overscan:

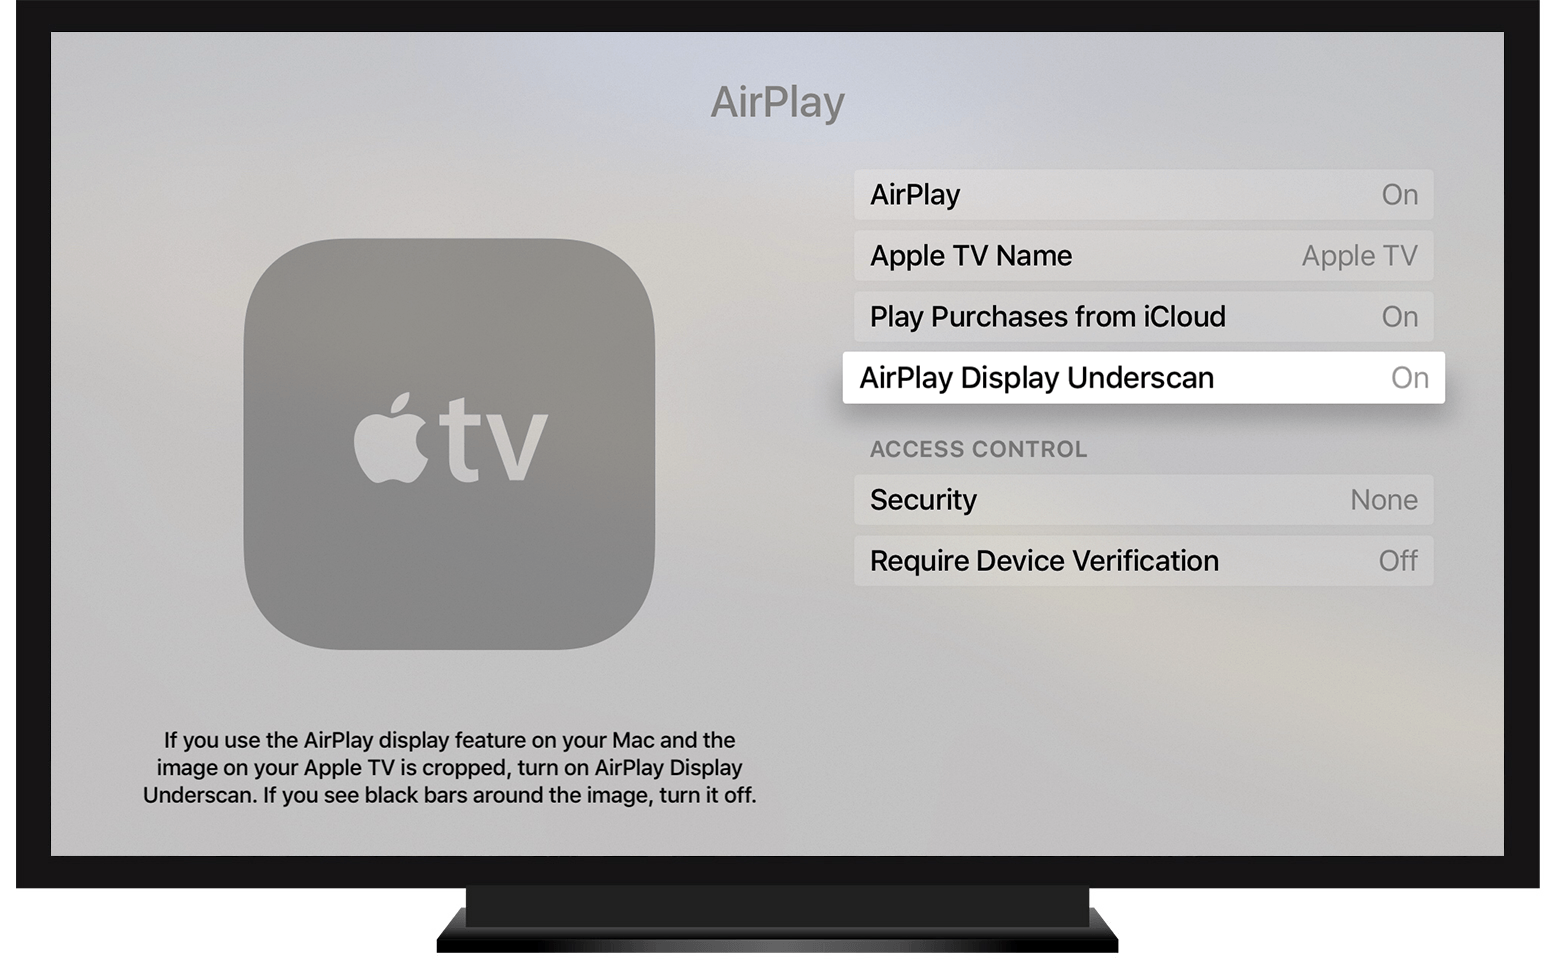
  • Overscan: On/Off: This setting allows users to completely disable or enable overscan. Disabling overscan is generally recommended when connecting a PC to a television.
  • Underscan: This setting allows users to adjust the image size to fit within the boundaries of the display, effectively reducing the overscan area.
  • Aspect Ratio: This setting allows users to select the desired aspect ratio for the displayed content. Choosing the correct aspect ratio ensures that the image is displayed in its intended proportions.
  • Pixel Mapping: Some televisions offer advanced settings that allow users to manually adjust the pixel mapping, providing fine-grained control over the displayed image.

Tips for Managing Overscan:

  • Check the User Manual: Consult the user manual for your television to identify the specific settings related to overscan.
  • Experiment with Settings: Experiment with different overscan settings to find the optimal configuration for your setup.
  • Use a Test Pattern: Utilize a test pattern or a dedicated overscan detection tool to visually assess the overscan area and ensure that the entire image is being displayed.
  • Consider an External Display: If your television does not offer sufficient overscan control, consider using an external display, such as a monitor, which typically does not exhibit overscan behavior.

FAQs on Overscan:

Q: Is overscan always a problem?

A: While overscan can be problematic in certain scenarios, it can also be beneficial in some cases, such as when viewing analog television broadcasts. However, for most modern digital content, particularly when connecting a PC to a television, disabling overscan is generally recommended.

Q: How do I know if my television has overscan?

A: You can visually assess overscan by observing the displayed image for any cropping or missing content, especially near the edges. You can also use a test pattern or a dedicated overscan detection tool to confirm the presence of overscan.

Q: Can I disable overscan on all televisions?

A: Not all televisions offer the option to disable overscan. Older models may lack this feature. However, most modern televisions, especially those with HDMI inputs, provide settings for adjusting or disabling overscan.

Q: What is the difference between overscan and underscan?

A: Overscan extends the displayed image beyond its intended boundaries, effectively cropping the edges. Underscan reduces the image size to fit within the boundaries of the display, minimizing the overscan area.

Q: How can I fix overscan issues with my PC display?

A: You can attempt to fix overscan issues by adjusting the overscan settings on your television, using a test pattern to identify and correct the problem, or by using a dedicated overscan detection tool. If your television does not offer sufficient overscan control, consider using an external display.

Conclusion:

Overscan, a relic of the analog television era, can pose challenges for users connecting PCs to televisions. Understanding the implications of overscan and utilizing the available settings to manage it are crucial for achieving an optimal viewing experience. By disabling or adjusting overscan, users can ensure that the entire content is visible, the aspect ratio is preserved, and the user interface remains functional. In the digital age, where high-resolution displays and precise image reproduction are paramount, mastering overscan settings becomes essential for a seamless and immersive viewing experience.

About overscan and underscan on your Mac, Apple TV, or other display - Apple Support About overscan and underscan on your Mac, Apple TV, or other display - Apple Support Zinwell ZIN2100T PC to TV Transmission Kit User Manual
Laserdisc Players and Comb Filters - Not on Blu-ray Fixing Overscan on a 24" ViewSonic VX LED Monitor · Tim G. Thomas Understanding the Arc Flash Boundary  Fluke
Simple visual difference between super 8 and regular 8. Super 8 advanced to smaller sprockets Séura TV Mirrors are changing the way people watch television, breaking down the boundaries of

Closure

Thus, we hope this article has provided valuable insights into Understanding Overscan: The Hidden Boundaries of Your TV Display. We hope you find this article informative and beneficial. See you in our next article!

Creating A Bootable USB Drive For Windows 10: A Comprehensive Guide

Creating a Bootable USB Drive for Windows 10: A Comprehensive Guide

Introduction

In this auspicious occasion, we are delighted to delve into the intriguing topic related to Creating a Bootable USB Drive for Windows 10: A Comprehensive Guide. Let’s weave interesting information and offer fresh perspectives to the readers.

Creating a Bootable USB Drive for Windows 10: A Comprehensive Guide

How to Create a Windows 10 Bootable USB - Using a Media Creation Tool

A bootable USB drive, containing the Windows 10 installation files, serves as a crucial tool for various scenarios. It enables users to install a fresh copy of Windows 10 on a new computer, upgrade an existing operating system, or troubleshoot system issues. This guide provides a detailed explanation of the process, covering essential steps and addressing common queries.

Understanding the Importance of a Bootable USB Drive

The ability to boot a computer from a USB drive is essential for several reasons:

  • Clean Installation: A bootable USB drive allows for a clean installation of Windows 10, removing any existing files and applications, which can be beneficial for resolving software conflicts or starting with a fresh system.
  • Upgrading Existing Systems: A bootable drive facilitates upgrading to the latest version of Windows 10, ensuring compatibility with the latest features and security updates.
  • Troubleshooting System Errors: In cases of system malfunctions, a bootable USB drive can be used to access recovery options, repair corrupted files, or perform a system restore.
  • Dual Boot Environments: A bootable USB drive allows users to create a dual boot environment, enabling them to choose between multiple operating systems at startup.

Essential Tools and Requirements

Before embarking on the process, ensure the following prerequisites are met:

  • Windows 10 Installation Media: Download the Windows 10 ISO file from the official Microsoft website. This file contains all the necessary installation files.
  • USB Drive: A USB flash drive with at least 8GB of storage space. Ensure that the drive is empty or contains data that can be deleted.
  • Rufus: A free and open-source utility designed to create bootable USB drives. It is a reliable and user-friendly tool available for download from the official Rufus website.
  • Computer with Internet Access: A computer with an internet connection is needed to download the Windows 10 ISO file and Rufus.

Step-by-Step Guide to Creating a Bootable USB Drive

  1. Download the Windows 10 ISO File: Navigate to the official Microsoft website and download the Windows 10 ISO file corresponding to your preferred version (Home, Pro, etc.).
  2. Download and Run Rufus: Download Rufus from the official website and run the application.
  3. Select the USB Drive: Connect the USB flash drive to your computer. Rufus will automatically detect the connected drive. Select the drive from the "Device" dropdown menu.
  4. Choose the Boot Selection Method: Select "Create a bootable disk using" and choose "ISO Image" from the dropdown menu.
  5. Select the Windows 10 ISO File: Click on the "SELECT" button and browse to the location where you saved the Windows 10 ISO file. Select the file.
  6. Configure Additional Settings (Optional): Rufus offers various settings for customizing the bootable USB drive. For standard use, the default settings are usually sufficient. However, advanced users can adjust settings like file system, partition scheme, and cluster size based on their specific needs.
  7. Start the Creation Process: Click the "START" button to begin creating the bootable USB drive. The process might take a few minutes depending on the size of the ISO file and the speed of your computer.
  8. Confirmation and Final Steps: Once the process is complete, Rufus will display a confirmation message. Ensure that the "Close window after" option is selected to automatically close the window. The bootable USB drive is now ready for use.

Frequently Asked Questions (FAQs)

Q: Can I use a different tool to create a bootable USB drive?

A: While Rufus is a widely recommended and user-friendly tool, other options are available, such as the Windows 10 Media Creation Tool or the Universal USB Installer. These tools offer similar functionalities and can be used to create bootable USB drives.

Q: What if the USB drive is not detected by Rufus?

A: Ensure that the USB drive is properly connected to the computer and that the drive is formatted with a compatible file system (usually FAT32 or NTFS). If the issue persists, try a different USB port or USB drive.

Q: What happens to the data on the USB drive during the process?

A: All data on the USB drive will be erased during the process. Ensure that any important files are backed up before proceeding.

Q: Can I create a bootable USB drive for multiple versions of Windows 10?

A: You can only create a bootable USB drive for a single version of Windows 10 at a time. You will need to create separate USB drives for different versions.

Q: How do I use the bootable USB drive to install Windows 10?

A: Once the bootable USB drive is created, you can use it to install Windows 10 on a new computer or upgrade an existing one. To do this, you need to change the boot order in the BIOS settings to prioritize the USB drive. This allows the computer to boot from the USB drive and start the installation process.

Tips for Creating a Bootable USB Drive

  • Use a high-quality USB drive: A reliable and durable USB drive is essential for a successful bootable drive creation process.
  • Check the USB drive’s space: Ensure that the USB drive has sufficient space to accommodate the Windows 10 installation files.
  • Back up important data: Before creating a bootable USB drive, back up any essential data from the USB drive as the process will erase all data.
  • Verify the integrity of the ISO file: Before creating the bootable drive, verify the integrity of the downloaded Windows 10 ISO file using a checksum tool. This ensures that the file is not corrupted.
  • Use the latest version of Rufus: Always download and use the latest version of Rufus to ensure compatibility and access to the latest features.

Conclusion

Creating a bootable USB drive for Windows 10 is a straightforward process that can be accomplished using readily available tools like Rufus. It offers users a versatile solution for installing, upgrading, and troubleshooting Windows 10 systems. By following the steps outlined in this guide, users can successfully create a bootable USB drive and leverage its functionality to manage their Windows 10 environment effectively.

Creating A Windows 10 Usb Boot Windows 10 how to make a usb drive bootable - managesexi How to Create Windows 10 Bootable USB Flash Drive  RUFUS
How to Create a Windows 10 Bootable USB Drive using DiskPart  Computer Systems Servicing Guide How To Create Bootable USB Drive from Windows 10 ISO With CMD - YouTube Bootable Windows 10 USB Flash Disk. How to Create Windows 10 Bootable USB Disk? - YouTube
How To Create Bootable Windows 10 Usb Flash Drive Using The Media - Vrogue How To Create A Bootable Usb With Easybcd On Windows 10

Closure

Thus, we hope this article has provided valuable insights into Creating a Bootable USB Drive for Windows 10: A Comprehensive Guide. We appreciate your attention to our article. See you in our next article!

Navigating The Digital Landscape: A Comprehensive Guide To Outlook On Windows 11

Navigating the Digital Landscape: A Comprehensive Guide to Outlook on Windows 11

Introduction

In this auspicious occasion, we are delighted to delve into the intriguing topic related to Navigating the Digital Landscape: A Comprehensive Guide to Outlook on Windows 11. Let’s weave interesting information and offer fresh perspectives to the readers.

Navigating The Digital Landscape: A Comprehensive Guide To The Best Map And Directions Websites

In today’s interconnected world, effective communication is paramount. Whether managing personal correspondence, collaborating on professional projects, or staying informed about global events, the need for a robust and reliable email platform is undeniable. Microsoft Outlook, a cornerstone of the Microsoft 365 suite, emerges as a powerful solution for individuals and businesses alike, offering a comprehensive suite of features designed to streamline communication and enhance productivity.

This article provides a comprehensive guide to downloading and utilizing Outlook on Windows 11, exploring its key features, benefits, and potential challenges.

Understanding Outlook’s Significance

Outlook transcends the limitations of a basic email client. It serves as a central hub for managing emails, calendars, contacts, tasks, and notes, effectively consolidating various aspects of digital communication and organization. This integration streamlines workflows, reduces the need for multiple applications, and fosters a more efficient and organized approach to digital interaction.

Methods for Downloading Outlook on Windows 11

There are two primary ways to obtain Outlook on Windows 11:

  1. Microsoft 365 Subscription: This approach provides access to the full Microsoft 365 suite, including Outlook, Word, Excel, PowerPoint, and more. This option is ideal for individuals and businesses requiring a comprehensive suite of productivity tools and the benefits of cloud storage and collaboration features.

  2. Standalone Outlook Download: For users solely interested in Outlook, a standalone download is available. This option grants access to the core features of Outlook, such as email management, calendar, and contacts, without the inclusion of other Microsoft 365 applications.

Navigating the Download Process

  1. Microsoft 365 Subscription:

    • Visit the official Microsoft 365 website.
    • Choose a suitable subscription plan based on individual or business needs.
    • Complete the registration process and payment details.
    • Download and install the Microsoft 365 suite, which includes Outlook.
  2. Standalone Outlook Download:

    • Access the Microsoft website and navigate to the Outlook download page.
    • Select the appropriate version for your Windows 11 system.
    • Initiate the download and install the software.

Setting Up and Configuring Outlook

Upon successful installation, users are guided through a straightforward setup process.

  • Account Configuration: Enter your email address and password to connect your existing email account. Outlook supports various email providers, including Gmail, Yahoo, and Outlook.com.
  • Customization: Tailor the interface to personal preferences. This includes adjusting themes, fonts, and layout options to enhance the user experience.

Exploring Outlook’s Core Features

Outlook offers a wide array of features designed to enhance communication and organization:

  • Email Management:

    • Organize emails into folders for efficient sorting and retrieval.
    • Filter emails based on sender, subject, or keywords for quick access.
    • Utilize the search function to locate specific emails within seconds.
    • Schedule emails to be sent at a later time.
    • Utilize the "Do Not Disturb" feature to minimize distractions.
  • Calendar:

    • Schedule appointments, meetings, and events with ease.
    • Set reminders to ensure timely attendance.
    • Create recurring events for regular appointments.
    • Share calendars with colleagues or family members for improved coordination.
    • Utilize the calendar view to visualize schedules and plan effectively.
  • Contacts:

    • Store contact information, including names, phone numbers, email addresses, and physical addresses.
    • Organize contacts into groups for streamlined communication.
    • Utilize the "People" tab to access and manage contacts effortlessly.
    • Integrate contacts with other Microsoft 365 applications for seamless communication.
  • Tasks:

    • Create and manage to-do lists for improved productivity.
    • Assign deadlines and priorities to tasks for effective time management.
    • Utilize the task view to monitor progress and ensure timely completion.
    • Share tasks with colleagues for collaborative project management.
  • Notes:

    • Capture ideas, notes, and reminders for easy reference.
    • Organize notes into notebooks for better categorization.
    • Share notes with others for collaborative brainstorming and project development.

Leveraging Advanced Features

Beyond the core features, Outlook offers advanced functionalities to enhance communication and productivity:

  • Rules: Automate email management by setting rules that automatically sort, filter, or move incoming emails based on specific criteria.
  • Quick Steps: Create customized actions for frequently performed tasks, such as forwarding emails or marking them as read.
  • Calendar Sharing: Share calendars with colleagues or family members for improved coordination and collaboration.
  • Task Management: Assign tasks to others, set deadlines, and monitor progress for efficient project management.
  • Integration with Other Microsoft 365 Applications: Seamlessly connect Outlook with other applications, such as Word, Excel, and PowerPoint, for enhanced collaboration and workflow optimization.

Addressing Potential Challenges

While Outlook offers a comprehensive suite of features, users may encounter certain challenges:

  • Learning Curve: The initial setup and familiarization with the various features may require a learning curve for new users.
  • Troubleshooting: Occasional technical issues or compatibility problems may arise, requiring troubleshooting and potential technical support.
  • Security Concerns: Maintaining data security and preventing unauthorized access is crucial for email communication.

FAQs Regarding Outlook on Windows 11

Q: Can I use Outlook without a Microsoft 365 subscription?

A: Yes, a standalone version of Outlook is available for download. However, certain advanced features may be limited compared to the full Microsoft 365 suite.

Q: Is Outlook compatible with other email providers?

A: Yes, Outlook supports various email providers, including Gmail, Yahoo, and Outlook.com.

Q: How do I configure Outlook for multiple accounts?

A: You can add multiple email accounts to Outlook by following the account configuration steps during setup.

Q: Can I access Outlook on multiple devices?

A: Yes, Outlook is accessible on various devices, including computers, smartphones, and tablets.

Q: How do I ensure the security of my email data?

A: Utilize strong passwords, enable two-factor authentication, and keep your software updated to enhance security.

Tips for Optimizing Outlook Usage

  • Utilize Folders: Create and organize emails into folders for efficient retrieval.
  • Set Rules: Automate email management by setting rules for sorting and filtering.
  • Customize Quick Steps: Create shortcuts for frequently performed tasks.
  • Utilize Calendar Sharing: Share calendars with colleagues or family members for improved coordination.
  • Explore Advanced Features: Experiment with features like task management and integration with other Microsoft 365 applications.

Conclusion

Microsoft Outlook on Windows 11 emerges as a powerful and versatile tool for individuals and businesses seeking to streamline communication, enhance productivity, and manage digital interactions effectively. Its comprehensive suite of features, seamless integration with other Microsoft 365 applications, and user-friendly interface make it a valuable asset for navigating the complexities of the digital landscape. By embracing the features and functionalities of Outlook, users can unlock a world of possibilities for efficient communication, collaborative projects, and enhanced organization.

Navigating the Digital Landscape E-Book Visual refresh of Office apps for Windows Webinar - How to navigate the new digital landscape  BIMobject
How to Use Microsoft Outlook (Essential Tutorial Guide) Business Tutorials  Envato Tuts+ Navigate Outlook  CustomGuide Wondered how the digital landscape worked? Take a look here… – howtododigital
PPT - Navigating the Digital Landscape: A Comprehensive Guide to GDPR Compliance PowerPoint Navigating The Digital Landscape: A Comprehensive Guide To The EWashington Map - Map of West Las

Closure

Thus, we hope this article has provided valuable insights into Navigating the Digital Landscape: A Comprehensive Guide to Outlook on Windows 11. We hope you find this article informative and beneficial. See you in our next article!

QBittorrent For Windows 10: A Comprehensive Guide To Secure And Efficient File Sharing

qBittorrent for Windows 10: A Comprehensive Guide to Secure and Efficient File Sharing

Introduction

With great pleasure, we will explore the intriguing topic related to qBittorrent for Windows 10: A Comprehensive Guide to Secure and Efficient File Sharing. Let’s weave interesting information and offer fresh perspectives to the readers.

qBittorrent for Windows 10: A Comprehensive Guide to Secure and Efficient File Sharing

Qbittorrent for windows 10 - ersap

In the digital age, downloading files from the internet has become an integral part of our lives. From software updates and movies to music and games, torrents have emerged as a popular method for obtaining large files quickly and efficiently. Among the plethora of torrent clients available, qBittorrent stands out as a robust and reliable option, particularly for Windows 10 users. This comprehensive guide will delve into the intricacies of qBittorrent, exploring its features, benefits, and how to effectively utilize it for a seamless downloading experience.

Understanding qBittorrent: A Free and Open-Source Alternative

qBittorrent is a free and open-source BitTorrent client that offers a user-friendly interface and a wide array of features. Unlike many other torrent clients that rely on advertising or bundled software, qBittorrent remains entirely free, ensuring a clean and secure download environment. Its open-source nature allows for constant development and community contributions, fostering a reliable and transparent platform.

Key Features of qBittorrent for Windows 10:

1. User-Friendly Interface: qBittorrent boasts an intuitive interface that is easy to navigate, even for novice users. Its clean layout and clear labeling make it simple to find and manage torrents.

2. Comprehensive Torrent Management: The client provides advanced features for managing torrents, including scheduling downloads, prioritizing files, and setting download speed limits. This allows users to fine-tune their download process for optimal efficiency.

3. Integrated Search Engine: qBittorrent integrates with popular torrent search engines, enabling users to find desired files directly within the application. This eliminates the need for external websites, streamlining the search and download process.

4. Advanced Filtering Options: Users can filter torrents based on various criteria, such as file size, upload speed, and file type. This allows for targeted searches and helps to identify torrents that meet specific needs.

5. Built-in Torrent Creation: qBittorrent allows users to create their own torrents, enabling them to share files with others. This feature is particularly useful for individuals who want to distribute large files or collaborate on projects.

6. RSS Feed Support: qBittorrent supports RSS feeds, allowing users to automatically download torrents based on specific criteria. This feature is ideal for staying updated on the latest releases or keeping track of files from specific sources.

7. Secure and Privacy-Focused: qBittorrent is known for its commitment to user privacy and security. It does not track user activity or share personal information, ensuring a safe and anonymous download experience.

Benefits of Using qBittorrent:

1. Enhanced Download Speed: qBittorrent utilizes the BitTorrent protocol, which allows for faster downloads by distributing files across multiple peers. This significantly reduces download times, particularly for large files.

2. Improved Efficiency: With its advanced management features, qBittorrent optimizes download processes, allowing users to schedule downloads, prioritize files, and manage bandwidth effectively.

3. Reduced Resource Consumption: Compared to other torrent clients, qBittorrent is known for its low system resource consumption, ensuring a smooth and efficient download experience without impacting other applications.

4. Enhanced Security: qBittorrent prioritizes user privacy and security, offering a clean and ad-free experience. Its open-source nature allows for community scrutiny, further enhancing its security and reliability.

5. Free and Open-Source: qBittorrent is completely free to use, offering a cost-effective alternative to paid torrent clients. Its open-source nature fosters transparency and allows for continuous improvement.

Downloading qBittorrent for Windows 10:

Downloading qBittorrent for Windows 10 is a straightforward process:

  1. Visit the Official Website: Navigate to the official qBittorrent website: https://www.qbittorrent.org/.
  2. Select the Windows Version: Locate the download section and select the appropriate version for Windows 10.
  3. Download the Installer: Download the installer file to your computer.
  4. Run the Installer: Double-click the installer file to initiate the installation process.
  5. Follow the On-Screen Instructions: Follow the prompts to complete the installation.

Setting Up qBittorrent for Optimal Performance:

Once installed, configure qBittorrent for optimal performance:

  1. Set Download and Upload Limits: Adjust the download and upload speed limits based on your internet connection and preferences.
  2. Enable Bandwidth Prioritization: Prioritize specific torrents or files for faster download speeds.
  3. Configure Download Location: Specify the folder where downloaded files should be saved.
  4. Enable Advanced Features: Explore additional features such as scheduling downloads, RSS feed support, and torrent creation.

Frequently Asked Questions (FAQs):

1. Is qBittorrent Safe to Use?

qBittorrent is a secure and reliable torrent client. Its open-source nature allows for community scrutiny, ensuring transparency and minimizing the risk of malicious code. However, it’s crucial to download torrents from reputable sources and avoid suspicious files.

2. Is qBittorrent Legal to Use?

The legality of torrenting depends on the content being downloaded. Downloading copyrighted material without permission is illegal in most countries. However, qBittorrent itself is a legal tool and can be used for legitimate purposes, such as downloading open-source software or sharing personal files.

3. How Does qBittorrent Work?

qBittorrent uses the BitTorrent protocol, which allows for peer-to-peer file sharing. When downloading a torrent file, users connect to a network of peers who also have parts of the file. By sharing and receiving pieces of the file, the download process is accelerated.

4. What are the System Requirements for qBittorrent?

qBittorrent has minimal system requirements. It runs smoothly on most Windows 10 computers with a modern processor and sufficient RAM.

5. Can I Use qBittorrent on Multiple Devices?

Yes, qBittorrent can be installed and used on multiple devices, including computers, laptops, and mobile devices.

Tips for Using qBittorrent Effectively:

1. Choose Reputable Torrent Sources: Download torrents from trusted websites and sources to minimize the risk of malware or viruses.

2. Verify File Integrity: After downloading a torrent, use a checksum tool to verify the integrity of the downloaded files.

3. Use a VPN for Enhanced Privacy: Consider using a VPN to encrypt your internet traffic and protect your privacy while torrenting.

4. Keep qBittorrent Updated: Regularly update qBittorrent to benefit from the latest security patches and bug fixes.

5. Manage Download Limits: Set download and upload speed limits to prevent excessive bandwidth usage.

Conclusion:

qBittorrent offers a robust and reliable solution for downloading files from the internet. Its user-friendly interface, advanced features, and commitment to security make it an ideal choice for Windows 10 users. By following the tips and guidelines outlined in this guide, users can optimize their torrenting experience and enjoy a seamless and secure download process. Remember, always download files responsibly and ethically, respecting copyright laws and intellectual property rights.

How To Install qBittorrent in Windows 10 - YouTube qBittorrent Download With Qt Interface & Remote Control File Sharing Free 다운로드 qBittorrent Windows 10 (32/64 bit) 한국어
qBittorrent Free Download for Windows 10, 11, 7 (32 / 64-bit) Qbittorrent for windows - cclasbrands Qbittorrent windows 10 - productionsgai
Qbittorrent windows 10 - productionsgai Qbittorrent for windows 10 - ersap

Closure

Thus, we hope this article has provided valuable insights into qBittorrent for Windows 10: A Comprehensive Guide to Secure and Efficient File Sharing. We appreciate your attention to our article. See you in our next article!

Understanding Windows 10 ISO Files: A Comprehensive Guide

Understanding Windows 10 ISO Files: A Comprehensive Guide

Introduction

With enthusiasm, let’s navigate through the intriguing topic related to Understanding Windows 10 ISO Files: A Comprehensive Guide. Let’s weave interesting information and offer fresh perspectives to the readers.

Understanding Windows 10 ISO Files: A Comprehensive Guide

[GUIDE] How To Upgrade To Windows 10 Using ISO File

Windows 10 ISO files are digital representations of the Windows 10 operating system, providing a complete and self-contained installation package. These files are crucial for various scenarios, including clean installations, upgrades, and creating bootable USB drives. This guide delves into the world of Windows 10 ISO files, exploring their purpose, types, methods of obtaining them, and essential usage tips.

What are Windows 10 ISO Files?

An ISO file, short for International Organization for Standardization, is a disc image file that encapsulates the entire content of a physical disc, such as a CD or DVD. In the context of Windows 10, an ISO file contains all the necessary files and folders required to install the operating system on a computer. This single file acts as a comprehensive package, making it convenient for distribution and installation.

Types of Windows 10 ISO Files

Windows 10 ISO files come in various flavors, catering to different needs and scenarios. The most common types include:

  • Windows 10 Home: This edition is targeted towards home users and offers essential features for everyday computing, including basic productivity tools, multimedia playback, and web browsing.
  • Windows 10 Pro: Designed for professionals and small businesses, this edition adds advanced features like BitLocker encryption, remote desktop access, and domain join capabilities.
  • Windows 10 Enterprise: This edition is specifically tailored for large organizations and offers enhanced security features, management tools, and deployment options.
  • Windows 10 Education: This edition is primarily intended for educational institutions, offering features tailored for students and teachers, including educational software and access management.

Why Use Windows 10 ISO Files?

Using Windows 10 ISO files offers several advantages:

  • Clean Installation: ISO files allow for a fresh and clean installation of Windows 10, removing any existing software, files, or settings that might be causing issues.
  • Upgrading from Older Versions: ISO files can be used to upgrade older versions of Windows to the latest version of Windows 10, ensuring compatibility with the latest features and security updates.
  • Creating Bootable USB Drives: ISO files are essential for creating bootable USB drives that can be used to install Windows 10 on a computer without an existing operating system.
  • Troubleshooting and Recovery: ISO files can be used to troubleshoot system issues or to recover from data loss by reinstalling Windows 10.
  • Customization: ISO files can be customized with specific drivers, applications, or settings before installation, tailoring the operating system to individual needs.

Obtaining Windows 10 ISO Files

Several legitimate methods exist for obtaining Windows 10 ISO files:

  • Microsoft’s Official Website: Microsoft provides direct downloads of Windows 10 ISO files through their official website. This method ensures you receive a genuine and verified copy of the operating system.
  • Media Creation Tool: Microsoft offers a dedicated Media Creation Tool that allows users to download and create a bootable USB drive with the latest version of Windows 10.
  • Windows 10 Installation Media: If you have a physical copy of Windows 10 installation media, such as a DVD or USB drive, you can use it to extract the ISO file.
  • Third-Party Websites: While caution is advised, some reputable third-party websites offer Windows 10 ISO files for download. However, it’s crucial to verify the source and ensure the file is legitimate before downloading.

Using Windows 10 ISO Files

Once you have obtained a Windows 10 ISO file, you can use it for various purposes:

  • Installing Windows 10: The ISO file can be used to perform a clean installation of Windows 10 on a computer. This typically involves creating a bootable USB drive, booting from the drive, and following the on-screen instructions.
  • Upgrading Windows 10: The ISO file can be used to upgrade an existing installation of Windows 10 to a newer version. This process involves running the setup file from the ISO file and following the on-screen instructions.
  • Creating a Bootable USB Drive: The ISO file can be used to create a bootable USB drive that can be used to install Windows 10 on a computer without an existing operating system. Several tools are available to create bootable USB drives from ISO files, such as Rufus and Universal USB Installer.
  • Creating a Virtual Machine: The ISO file can be used to create a virtual machine running Windows 10 on another operating system, such as macOS or Linux. This allows you to experiment with Windows 10 without affecting your existing system.

FAQs about Windows 10 ISO Files

Q: What is the difference between a Windows 10 ISO file and a Windows 10 installation media?

A: A Windows 10 ISO file is a digital representation of the installation media, while the installation media itself can be a physical disc (DVD) or a bootable USB drive. The ISO file contains all the data needed to create the installation media.

Q: Can I use a Windows 10 ISO file to install a different edition of Windows 10?

A: No, you cannot use an ISO file for one edition of Windows 10 to install a different edition. Each edition has a unique ISO file.

Q: Is it safe to download Windows 10 ISO files from third-party websites?

A: While some reputable third-party websites offer Windows 10 ISO files, it’s always advisable to download from Microsoft’s official website or use their Media Creation Tool to ensure you get a genuine and secure copy.

Q: How do I verify the authenticity of a Windows 10 ISO file?

A: You can verify the authenticity of an ISO file by checking its digital signature and comparing it to the known signature for the specific edition and version of Windows 10.

Q: Can I modify a Windows 10 ISO file before installing it?

A: Yes, you can modify a Windows 10 ISO file before installing it. This can involve adding drivers, applications, or specific settings to customize the installation. However, proceed with caution as modifying the ISO file can potentially lead to instability or compatibility issues.

Tips for Using Windows 10 ISO Files

  • Back Up Your Data: Before installing or upgrading Windows 10 using an ISO file, always back up your important data to prevent data loss.
  • Use a Reliable Source: Download Windows 10 ISO files only from trusted sources, such as Microsoft’s official website or reputable third-party websites.
  • Verify the File Integrity: Verify the downloaded ISO file’s integrity using a checksum tool to ensure it hasn’t been tampered with during download.
  • Check System Requirements: Ensure your computer meets the minimum system requirements for the edition of Windows 10 you are installing.
  • Understand the Installation Process: Familiarize yourself with the installation process before proceeding, as it involves various steps and decisions.
  • Use a Bootable USB Drive: Creating a bootable USB drive is often the most convenient and reliable method for installing Windows 10 from an ISO file.
  • Be Patient: The installation process can take a considerable amount of time, depending on the hardware and the chosen installation options.

Conclusion

Windows 10 ISO files provide a versatile and convenient method for installing, upgrading, and customizing the Windows 10 operating system. By understanding their purpose, types, and methods of obtaining them, users can leverage these files to enhance their computing experience. Whether performing a clean installation, troubleshooting system issues, or creating a bootable USB drive, Windows 10 ISO files empower users to manage their operating system effectively and efficiently.

See Full Details about a Windows 10 ISO file  Windows 10 Tutorials [GUIDE] How To Upgrade To Windows 10 Using ISO File How to create a Windows 10 ISO file using an Install.ESD image  Windows Central
Windows 10 iso file - qlerotd [GUIDE] How To Upgrade To Windows 10 Using ISO File [GUIDE] How To Upgrade To Windows 10 Using ISO File
How to upgrade to Windows 10 using Windows 10 ISO file - Microsoft Community Windows 10 ISO files: What you need to know  Bingalo

Closure

Thus, we hope this article has provided valuable insights into Understanding Windows 10 ISO Files: A Comprehensive Guide. We appreciate your attention to our article. See you in our next article!

Notepad: A Timeless Tool For Windows 11

Notepad: A Timeless Tool for Windows 11

Introduction

In this auspicious occasion, we are delighted to delve into the intriguing topic related to Notepad: A Timeless Tool for Windows 11. Let’s weave interesting information and offer fresh perspectives to the readers.

Notepad: A Timeless Tool for Windows 11

How To Find And Use The New Notepad In Windows 11

In the ever-evolving landscape of computing, where sophisticated software reigns supreme, a simple, unassuming application continues to hold its own: Notepad. This seemingly basic text editor, a staple of Windows operating systems for decades, remains a valuable tool in Windows 11, offering a range of functionalities for users of all levels.

Notepad’s enduring appeal lies in its simplicity. Unlike its more feature-rich counterparts, it presents a clean, uncluttered interface, free from distractions. This minimalist approach allows users to focus solely on the task at hand: writing and editing plain text. This makes Notepad an ideal choice for a variety of tasks, including:

  • Quick note-taking: Jotting down ideas, reminders, or shopping lists becomes effortless with Notepad’s straightforward interface.
  • Basic text editing: Modifying simple text documents, such as configuration files or code snippets, is easily accomplished within Notepad’s familiar environment.
  • Creating simple web pages: While not a dedicated web development tool, Notepad can be used to create basic HTML documents, offering a hands-on learning experience for beginners.
  • Writing scripts: Notepad’s plain text format makes it suitable for writing simple scripts in languages like batch files or VBScript.

Understanding Notepad’s Features

While Notepad’s primary function is to provide a platform for text editing, it offers a range of features that enhance user experience:

  • Basic Text Formatting: Notepad supports basic text formatting options, including font size, font style (bold, italic, underline), and text alignment. While not as extensive as dedicated word processors, these options allow for simple text formatting for basic documents.
  • Find and Replace: This essential feature allows users to quickly locate and replace specific text within a document, saving time and effort.
  • Undo/Redo: Mistakes happen, and Notepad provides the ability to undo recent actions, allowing users to revert to previous states of their document. The redo function complements this, enabling users to reapply undone actions.
  • Line Numbers: This feature is particularly useful for code editors, providing visual cues for navigating through lines of code.
  • Word Wrap: This feature automatically wraps text to the next line when it reaches the end of the current line, improving readability for longer documents.

Beyond the Basics: Notepad’s Hidden Potential

While Notepad’s simplicity is its hallmark, it also possesses a surprising amount of flexibility and power. Here are some lesser-known capabilities:

  • Unicode Support: Notepad supports Unicode encoding, enabling users to work with documents containing characters from various languages and alphabets. This makes it a valuable tool for multilingual users and those working with international text.
  • Clipboard Functionality: Notepad seamlessly integrates with the system clipboard, allowing users to copy and paste text from other applications, including websites and documents.
  • File Association: Notepad can be associated with specific file types, allowing it to open and edit those files by default. This customization option allows users to tailor Notepad to their specific needs.

Notepad in the Modern Era

Despite the rise of more sophisticated text editors and word processors, Notepad continues to hold its place in the modern computing landscape. Its simplicity and ease of use make it an indispensable tool for everyday tasks, while its hidden capabilities offer a surprising level of functionality.

FAQs about Notepad in Windows 11

Q: Is Notepad still relevant in Windows 11?

A: Absolutely. Notepad remains a valuable tool in Windows 11, offering a simple and efficient way to edit plain text for a variety of purposes.

Q: Can Notepad be used for coding?

A: While Notepad is not a dedicated code editor, it can be used for writing simple scripts and code snippets in languages like batch files or VBScript. However, for more complex coding tasks, dedicated code editors with features like syntax highlighting and debugging are recommended.

Q: How can I customize Notepad in Windows 11?

A: Notepad offers limited customization options. Users can change the font, font size, and color theme through the "Format" menu. Additionally, Notepad can be associated with specific file types to open those files by default.

Q: What are some alternatives to Notepad in Windows 11?

A: There are many alternatives to Notepad, ranging from simple text editors like TextEdit (macOS) and gedit (Linux) to more feature-rich word processors like Microsoft Word and Google Docs. The best alternative depends on the specific needs and preferences of the user.

Tips for Using Notepad in Windows 11

  • Utilize Keyboard Shortcuts: Keyboard shortcuts can significantly speed up your workflow. Familiarize yourself with common shortcuts like Ctrl+C (copy), Ctrl+V (paste), and Ctrl+Z (undo).
  • Explore the "Format" Menu: The "Format" menu offers options for basic text formatting, including font size, font style, and text alignment.
  • Use Line Numbers for Code Editing: Enable line numbers in the "View" menu for easier navigation and debugging of code.
  • Experiment with File Associations: Associate Notepad with specific file types to open those files by default, streamlining your workflow.

Conclusion

Notepad is a testament to the enduring power of simplicity. While it may appear basic, it offers a surprising range of functionality and remains a valuable tool in the modern computing landscape. Its ease of use, uncluttered interface, and hidden capabilities make it a powerful tool for everyday tasks, from quick note-taking to basic text editing and even simple scripting. In the ever-evolving world of software, Notepad stands as a reminder that sometimes, the simplest tools can be the most effective.

Microsoft now rolling out highly anticipated Tabbed Notepad to Windows 11 Insiders - Neowin Microsoft rolls out revamped Notepad app to Windows 11 Insiders  Ars Technica New Notepad App in Windows 11 - YouTube
Windows 11: New Notepad App (Download & Install) - YouTube Hands on with Windows 11's redesigned Notepad app with dark mode Hands-On with the Redesigned Notepad for Windows 11 - Thurrott.com
Microsoft Brings Revamped Version of Notepad for Windows 11 Notepad app with Tabs for Windows 11 (Officially Available for Insiders)

Closure

Thus, we hope this article has provided valuable insights into Notepad: A Timeless Tool for Windows 11. We thank you for taking the time to read this article. See you in our next article!

Navigating The World Of Osu! On Windows 10: A Comprehensive Guide

Navigating the World of osu! on Windows 10: A Comprehensive Guide

Introduction

With enthusiasm, let’s navigate through the intriguing topic related to Navigating the World of osu! on Windows 10: A Comprehensive Guide. Let’s weave interesting information and offer fresh perspectives to the readers.

Download and install Osu in Windows 10 2024 tutorial - YouTube

osu!, a popular rhythm game, has captivated players worldwide with its unique blend of music, precision, and competitive gameplay. This guide aims to provide a comprehensive understanding of the process of installing and enjoying osu! on a Windows 10 operating system.

Understanding osu!: A Rhythm Game Revolution

osu! is a rhythm game that challenges players to click, drag, and hold their mouse in sync with the beat of various music tracks. The game utilizes a system of "hit circles" and other interactive elements that appear on the screen, requiring players to respond accurately and rhythmically.

Key Features of osu!

  • Diverse Music Library: osu! boasts a vast library of songs across various genres, allowing players to choose from a wide range of musical experiences.
  • Multiplayer Gameplay: Engage in online battles against other players, testing your skills and climbing the global leaderboards.
  • Customizable Gameplay: Modify the game’s appearance, difficulty, and even create your own custom beatmaps.
  • Community Driven: osu! thrives on its passionate community, creating and sharing new content, fostering a vibrant and supportive environment.

Downloading and Installing osu! on Windows 10

The process of downloading and installing osu! on Windows 10 is straightforward and can be completed in a few simple steps:

  1. Visit the Official Website: Navigate to the official osu! website (https://osu.ppy.sh/).
  2. Download the Installer: Locate the "Download" section and choose the appropriate installer for your Windows 10 operating system.
  3. Run the Installer: Once the download is complete, double-click the installer file to begin the installation process.
  4. Follow the Instructions: The installer will guide you through the necessary steps, including selecting the installation directory and accepting the terms of service.
  5. Launch osu!: After the installation is finished, you can launch the game from the start menu or the desktop shortcut.

Setting Up osu! for Optimal Gameplay

Upon launching osu! for the first time, you will be prompted to create an account. This account allows you to track your progress, participate in online multiplayer, and access various game features.

Customization and Configuration

osu! offers a wide range of customization options to personalize your gaming experience. These include:

  • Skin Selection: Choose from a variety of skins to alter the game’s visual appearance, including the interface, hit objects, and gameplay elements.
  • Input Settings: Configure your mouse sensitivity, button assignments, and other input preferences for optimal control.
  • Graphics Settings: Adjust the game’s resolution, frame rate, and other graphical settings to suit your system’s capabilities.

Exploring the World of osu!

After setting up your account and customizing your preferences, you can begin exploring the vast world of osu!

  • Beatmaps: Explore the extensive library of beatmaps, ranging from classic anime tracks to popular pop songs.
  • Multiplayer Modes: Engage in online matches with other players, compete in ranked and casual modes, and participate in tournaments.
  • Custom Content: Create your own beatmaps using the osu! editor, sharing your creations with the community.

Troubleshooting Common Issues

While the installation and setup process is generally straightforward, you may encounter some common issues:

  • Game Crashes: If osu! crashes frequently, ensure your system meets the minimum system requirements and update your graphics drivers.
  • Lag and Performance Issues: Network connectivity and system resources can impact performance. Optimize your network settings and close unnecessary programs.
  • Installation Errors: If you encounter installation errors, try downloading the installer again, ensuring you have administrator privileges, and temporarily disabling antivirus software.

FAQs about osu! on Windows 10

1. What are the minimum system requirements for osu! on Windows 10?

The minimum system requirements for osu! are:

  • Operating System: Windows 7 or later
  • Processor: Intel Core 2 Duo or AMD equivalent
  • Memory: 2 GB RAM
  • Graphics: Intel HD Graphics 3000 or equivalent
  • Storage: 2 GB available space

2. How do I update osu! on Windows 10?

osu! automatically updates itself when you launch the game. Ensure you have a stable internet connection for the update process to complete successfully.

3. Can I play osu! offline?

You can play osu! offline, but you will not be able to access online features such as multiplayer and leaderboards.

4. How do I create my own beatmaps?

osu! offers a dedicated editor that allows you to create your own beatmaps. The editor provides tools for mapping hit objects, setting difficulty levels, and adding custom effects.

5. How do I find new beatmaps to play?

You can browse the osu! website or use the in-game beatmap browser to discover new beatmaps. You can also search for specific songs or genres to find content that interests you.

Tips for Improving Your osu! Gameplay

  • Practice Regularly: Consistency is key to improving your skills. Set aside dedicated time for practicing and gradually increase the difficulty of beatmaps.
  • Focus on Accuracy: Aim for perfect hits rather than rushing through the beatmap. Accuracy plays a significant role in scoring and improving your overall performance.
  • Analyze Your Mistakes: Pay attention to your mistakes and identify areas for improvement. Analyze your gameplay, identify patterns, and practice those areas specifically.
  • Join a Community: Connect with other osu! players through forums, discord servers, or online communities. Sharing tips, strategies, and experiences can accelerate your learning process.
  • Experiment with Different Skins: Try out different skins to find one that suits your preferences and improves your visual feedback.

Conclusion

osu! is a captivating and rewarding rhythm game that offers a unique and engaging gameplay experience. By following the steps outlined in this guide, you can successfully install and enjoy osu! on your Windows 10 system. Remember to explore the vast library of beatmaps, engage in online multiplayer, and customize the game to suit your preferences. With dedication and practice, you can unlock the full potential of osu! and become a skilled and passionate player within its vibrant community.

How to Install osu! on Windows 10 [Tutorial] - YouTube how to download osu! on windows 10. - YouTube How To Fix Raw Input Osu Windows 10 - Caley Evout1997
osu! Screenshots for Windows - MobyGames Unleashing the Power of Osu! Open Source: A Comprehensive Guide – PeterElSt How to start playing Osu! (A comprehensive guide) - YouTube
How To Play Osu!: A Comprehensive Guide For Beginners - IHSANPEDIA How To Download Osu for Windows 10 And Up!!!!!!! - YouTube

Closure

Thus, we hope this article has provided valuable insights into Navigating the World of osu! on Windows 10: A Comprehensive Guide. We appreciate your attention to our article. See you in our next article!

Net Framework 4 6 1 Download For Windows 10

net framework 4 6 1 download for windows 10

Introduction

With great pleasure, we will explore the intriguing topic related to net framework 4 6 1 download for windows 10. Let’s weave interesting information and offer fresh perspectives to the readers.

A Comprehensive Guide to .NET Framework 4.6.1 for Windows 10

How To Install Latest .Net Framework 4.6 on Windows 10/8.1/8/7 -OFFLINE 2018 - YouTube

The .NET Framework is a fundamental software development platform for Windows operating systems, offering a robust set of tools and libraries for creating diverse applications. Its significance stems from its ability to enable developers to build a wide range of software, from simple desktop applications to complex web services. .NET Framework 4.6.1, specifically, is a significant release for Windows 10 users, offering enhanced capabilities and improvements over previous versions.

Understanding the Core Functionalities of .NET Framework 4.6.1

At its heart, the .NET Framework 4.6.1 provides a comprehensive environment for application development, encompassing the following key components:

  • Common Language Runtime (CLR): The CLR acts as the execution engine for .NET applications, managing memory, thread management, and security. It ensures that applications run efficiently and securely on the target system.
  • Base Class Library (BCL): The BCL provides a rich collection of pre-built classes and interfaces, offering ready-to-use functionalities for tasks such as file I/O, networking, string manipulation, and data access.
  • Framework Class Library (FCL): Expanding upon the BCL, the FCL offers specialized classes and libraries for specific domains, including Windows Forms (for desktop applications), ASP.NET (for web applications), and WPF (for rich user interfaces).
  • Language Support: The .NET Framework supports multiple programming languages, including C#, VB.NET, F#, and C++. This versatility allows developers to choose the language best suited for their project requirements.

The Advantages of Employing .NET Framework 4.6.1 on Windows 10

.NET Framework 4.6.1 introduces several notable enhancements and benefits for Windows 10 users, making it a valuable asset for both developers and end-users:

  • Improved Performance and Efficiency: The .NET Framework 4.6.1 features performance optimizations that enhance application speed and responsiveness, ensuring a smoother user experience.
  • Enhanced Security: The framework incorporates security enhancements, including improved encryption and authentication mechanisms, to protect applications and sensitive data from malicious threats.
  • Modernized Development Tools: Developers benefit from modern development tools, including Visual Studio 2015, which offer advanced features like code completion, debugging tools, and integrated unit testing.
  • Support for Latest Technologies: .NET Framework 4.6.1 supports the latest web technologies, including HTML5, CSS3, and JavaScript, enabling the creation of modern and engaging web applications.
  • Cross-Platform Compatibility: .NET Framework 4.6.1 provides support for cross-platform development, allowing developers to create applications that run on multiple operating systems, including Windows, macOS, and Linux.

Installing .NET Framework 4.6.1 on Windows 10

Installing .NET Framework 4.6.1 on Windows 10 is a straightforward process:

  1. Check for Existing Versions: Before installing, it’s crucial to verify if any older versions of the .NET Framework are already installed on the system.
  2. Download the Installer: Download the appropriate installer for your system architecture (32-bit or 64-bit) from the official Microsoft website.
  3. Run the Installer: Execute the downloaded installer file. The installation process is automated and should be completed without user intervention.
  4. Verify Installation: After installation, ensure that .NET Framework 4.6.1 is successfully installed by checking the "Programs and Features" section in the Windows Control Panel.

Frequently Asked Questions (FAQs)

Q: Is .NET Framework 4.6.1 compatible with Windows 10?

A: Yes, .NET Framework 4.6.1 is fully compatible with Windows 10. It is designed to work seamlessly with the operating system and provides the necessary components for running .NET applications.

Q: Do I need to install .NET Framework 4.6.1 if I already have an older version?

A: While older versions may still function, it’s recommended to install the latest version, .NET Framework 4.6.1, to benefit from the latest features, security improvements, and performance enhancements.

Q: Can I uninstall .NET Framework 4.6.1 if I no longer need it?

A: Uninstalling .NET Framework 4.6.1 might lead to issues with applications that rely on it. It is generally advisable to keep it installed unless you are certain that none of your applications require it.

Q: What happens if I have multiple versions of the .NET Framework installed?

A: Windows 10 intelligently manages multiple versions of the .NET Framework, ensuring that applications run with the appropriate version.

Tips for Utilizing .NET Framework 4.6.1 Effectively

  • Regular Updates: Keep the .NET Framework updated to the latest version to ensure you have access to the latest security patches and performance improvements.
  • Choose the Right Version: If your application requires specific features or compatibility with older systems, ensure you select the appropriate version of the .NET Framework.
  • Utilize Visual Studio: Visual Studio is the recommended development environment for creating .NET applications, providing a comprehensive set of tools and features for efficient development.

Conclusion

The .NET Framework 4.6.1 is a vital component for Windows 10 users, enabling the development and execution of a wide range of applications. Its enhanced features, improved security, and compatibility with modern technologies make it a valuable asset for developers and end-users alike. By understanding its functionalities and benefits, users can leverage the full potential of this powerful development platform, ensuring a seamless and efficient application experience.

-net framework 4-6-1 download - hoolilux Download Microsoft .NET Framework 4.6.1 Offline Installer Microsoft .NET Framework 4.6.1 Télécharger et Installer  Windows
NET Framework 4.6 Offline Installer - Versión completa Microsoft net framework 4-6-1 download - onestopvast Microsoft .Net Framework 4 Free Download
Microsoft .Net Framework 4 Free Download -net framework 4-6-1 download windows 10 - faplora

Closure

Thus, we hope this article has provided valuable insights into net framework 4 6 1 download for windows 10. We hope you find this article informative and beneficial. See you in our next article!

Navigating The New Landscape: Exploring Recent Additions To Windows 11

Navigating the New Landscape: Exploring Recent Additions to Windows 11

Introduction

With enthusiasm, let’s navigate through the intriguing topic related to Navigating the New Landscape: Exploring Recent Additions to Windows 11. Let’s weave interesting information and offer fresh perspectives to the readers.

Windows 11 Landscape Wallpaper

Windows 11, the latest iteration of Microsoft’s operating system, has been a subject of much discussion since its release in October 2021. Beyond its visual overhaul and design refinements, the operating system has seen a steady stream of additions and improvements, aiming to enhance user experience and cater to evolving needs. This article delves into some of the most noteworthy programs and features introduced in Windows 11, analyzing their significance and potential benefits for users.

1. Windows Subsystem for Android:

Perhaps the most significant addition, the Windows Subsystem for Android (WSA) bridges the gap between the Windows and Android ecosystems. This feature allows users to run Android apps directly on their Windows 11 machines, expanding the available software library considerably.

Benefits:

  • Enhanced Productivity: Access to a vast repository of Android apps, including productivity tools, social media platforms, and entertainment apps, enhances user productivity and expands the functionality of Windows 11.
  • Cross-Platform Compatibility: Users can seamlessly switch between Windows and Android apps, facilitating a more unified and efficient workflow.
  • Mobile App Integration: The integration of Android apps with Windows 11 allows for smoother integration with mobile devices, creating a more interconnected user experience.

2. Microsoft Teams Integration:

Microsoft Teams, a collaborative communication and productivity platform, has been deeply integrated into Windows 11. This integration aims to streamline communication and collaboration within the operating system.

Benefits:

  • Centralized Communication: Teams is now a central hub for communication, allowing users to access chat, meetings, and file sharing directly from the taskbar.
  • Enhanced Collaboration: The integration facilitates seamless collaboration on documents and projects, fostering a more efficient and productive workflow.
  • Simplified User Experience: The integration minimizes the need for multiple applications, simplifying the user experience and reducing clutter.

3. Focus Assist:

Focus Assist, introduced in Windows 10, has been refined and enhanced in Windows 11. This feature helps users minimize distractions and maintain focus by controlling notifications and alerts.

Benefits:

  • Increased Productivity: By reducing distractions, Focus Assist allows users to concentrate on tasks and improve productivity.
  • Improved Work-Life Balance: By controlling notifications, users can create dedicated work or relaxation time, enhancing work-life balance.
  • Personalized Focus: Users can customize Focus Assist based on their needs, setting specific times or using triggers like active apps or location.

4. Snap Layouts and Snap Groups:

Windows 11 introduces improved multitasking capabilities with Snap Layouts and Snap Groups. These features allow users to arrange windows efficiently and easily switch between different layouts.

Benefits:

  • Enhanced Multitasking: Snap Layouts and Snap Groups allow users to manage multiple windows simultaneously, increasing efficiency and productivity.
  • Improved Screen Management: The ability to create and switch between different layouts optimizes screen space and improves user interface clarity.
  • Streamlined Workflows: Snap Layouts and Snap Groups facilitate smooth transitions between tasks, creating a more streamlined workflow.

5. Widgets:

Windows 11 introduces a dedicated widget panel, offering quick access to information and applications. These widgets provide personalized and dynamic content, enhancing the user experience.

Benefits:

  • Personalized Information: Widgets provide users with tailored information based on their interests and preferences.
  • Increased Efficiency: Quick access to frequently used applications and information through widgets saves time and enhances efficiency.
  • Enhanced User Experience: The dynamic and personalized nature of widgets creates a more engaging and user-friendly interface.

6. Enhanced Security Features:

Windows 11 has been designed with enhanced security features, aiming to protect user data and devices from threats.

Benefits:

  • Improved Protection: Advanced security features like Windows Defender Antivirus and Secure Boot provide robust protection against malware and unauthorized access.
  • Enhanced Privacy: Windows 11 offers improved privacy controls, allowing users to manage their data and control how it is used.
  • Increased Trust: The enhanced security features foster trust in the operating system and provide users with a secure environment for their data.

7. New File Explorer:

Windows 11 features a redesigned File Explorer with a cleaner interface, improved navigation, and enhanced functionality.

Benefits:

  • Enhanced User Experience: The new design offers a cleaner and more intuitive interface, simplifying navigation and file management.
  • Improved Organization: Features like tabs and a new ribbon interface enhance file organization and access.
  • Increased Efficiency: The streamlined design and improved functionality increase efficiency and allow users to manage files more effectively.

8. New Start Menu:

The Start Menu in Windows 11 has undergone a significant revamp, featuring a centered design and improved search functionality.

Benefits:

  • Modern Design: The new Start Menu offers a cleaner and more modern look, aligning with the overall design aesthetic of Windows 11.
  • Enhanced Search: The improved search functionality allows users to quickly find files, applications, and settings.
  • Simplified Access: The centralized design and improved organization provide easier access to frequently used applications and files.

FAQs:

Q: How can I install the Windows Subsystem for Android on my Windows 11 PC?

A: To install the Windows Subsystem for Android, you need to enable the "Virtual Machine Platform" and "Windows Subsystem for Linux" features in Windows Features. You then need to download the Amazon Appstore from the Microsoft Store and follow the instructions to install it.

Q: What are the system requirements for running Android apps on Windows 11?

A: To run Android apps on Windows 11, you need a PC with an Intel or AMD processor that supports virtualization technology, at least 8GB of RAM, and at least 20GB of available storage space.

Q: Can I use my existing Android apps on Windows 11?

A: You can install Android apps from the Amazon Appstore on Windows 11. However, you cannot directly transfer apps from your Android phone to your Windows PC.

Q: Is the Windows Subsystem for Android compatible with all Android apps?

A: The Windows Subsystem for Android is compatible with most Android apps. However, some apps may not be compatible or may not work as expected.

Tips:

  • Use Focus Assist: Set specific times or triggers for Focus Assist to minimize distractions and improve your focus during work or study sessions.
  • Experiment with Snap Layouts: Explore different Snap Layouts to find the most efficient way to manage multiple windows and optimize your screen space.
  • Customize Widgets: Add and remove widgets based on your preferences and interests to create a personalized widget panel that provides relevant information and quick access to your favorite applications.
  • Explore the new File Explorer: Take advantage of the new features in File Explorer, such as tabs and the ribbon interface, to improve file organization and navigation.
  • Utilize the new Start Menu: Explore the improved search functionality and the centralized design of the Start Menu to find applications and files quickly.

Conclusion:

Windows 11 is more than just a visual refresh. It represents a significant evolution in the Windows operating system, incorporating new features and programs that cater to the evolving needs of users. From the introduction of the Windows Subsystem for Android to the enhanced security features, these additions aim to improve user experience, enhance productivity, and solidify Windows 11 as a platform for seamless work, play, and communication. As Microsoft continues to develop and refine Windows 11, we can expect further innovations and improvements in the future, further enhancing the user experience and solidifying its position as a leading operating system.

Windows 11 Landscape Scenery [1920x1080] : r/wallpaper Download Windows 11 Landscape Microsoft 4k Wallpaper - vrogue.co This! 15+ Little Known Truths on Windows 11? Discover the new windows 11 and learn how to
Install Windows 11 On Virtualbox Virtual Machine How To Guide - Riset Navigating the IT Landscape: Exploring the Latest Trends and Innovations Navigating the AI Landscape: Exploring ChatGPT Alternatives
Navigating the New Landscape: Michigan Builders License Renewal 2024 - Blog Navigating the Learning Landscape: Exploring Technologies for Diverse Sectors

Closure

Thus, we hope this article has provided valuable insights into Navigating the New Landscape: Exploring Recent Additions to Windows 11. We thank you for taking the time to read this article. See you in our next article!

Reliving The Arena: A Guide To Downloading And Enjoying Quake III Arena On Windows 10

Reliving the Arena: A Guide to Downloading and Enjoying Quake III Arena on Windows 10

Introduction

In this auspicious occasion, we are delighted to delve into the intriguing topic related to Reliving the Arena: A Guide to Downloading and Enjoying Quake III Arena on Windows 10. Let’s weave interesting information and offer fresh perspectives to the readers.

Reliving the Arena: A Guide to Downloading and Enjoying Quake III Arena on Windows 10

Quake III Arena (1999) - PC Gameplay 4k 2160p / Win 10 - YouTube

Quake III Arena, a seminal first-person shooter (FPS) released in 1999, continues to hold a special place in gaming history. Its lightning-fast gameplay, iconic level design, and revolutionary engine set a new standard for the genre, influencing countless titles that followed. Despite its age, Quake III Arena remains remarkably playable on modern systems, particularly Windows 10. This article provides a comprehensive guide to downloading, installing, and enjoying this classic FPS on contemporary hardware.

Understanding Quake III Arena’s Legacy

Quake III Arena’s significance lies not only in its innovative gameplay but also in its enduring impact on the esports scene. Its fast-paced, skill-based combat, combined with its robust multiplayer features, made it a natural choice for competitive gaming. The game’s iconic maps, like "q3dm6" (commonly known as "The Longest Yard"), became battlegrounds for legendary players, fostering a vibrant community and paving the way for modern esports.

The Benefits of Playing Quake III Arena on Windows 10

While Quake III Arena’s original release predates the widespread adoption of Windows 10, the game’s design and engine have aged remarkably well. Here’s why playing it on a modern system offers a compelling experience:

  • Enhanced Performance: Windows 10’s powerful hardware and advanced operating system capabilities allow for smoother gameplay, higher frame rates, and improved visuals. This translates to a more responsive and immersive experience, especially for competitive play.
  • Accessibility: Modern PCs are generally more powerful than the systems available when Quake III Arena was released. This makes the game more accessible to a wider range of players, eliminating the need for expensive upgrades or specialized hardware.
  • Community and Legacy: Despite its age, Quake III Arena boasts a dedicated and active community. Numerous online servers offer a variety of gameplay modes, ensuring that players can find matches and connect with others who share their passion for the game.
  • Modding and Customization: Quake III Arena’s open-source nature has fostered a vibrant modding community. Players can customize their gameplay experience with new maps, skins, weapons, and even entire game modes, ensuring a constant stream of fresh content.

Downloading and Installing Quake III Arena on Windows 10

Several methods exist for acquiring and installing Quake III Arena on Windows 10. Each method offers its own advantages and considerations:

1. Steam: The most convenient and widely accessible option is purchasing Quake III Arena through Steam, the popular digital distribution platform. This method offers automatic updates, access to the Steam community, and integration with Steam’s networking features.

2. Quake III Arena: Team Arena: This version, available through the official Bethesda website, includes the "Team Arena" expansion pack, which introduces new game modes, weapons, and maps. While it offers additional content, it may require manual updates and lacks Steam integration.

3. Free Download (Legacy Version): The original version of Quake III Arena can be downloaded for free from various websites, including the official id Software website. This option offers a more authentic experience but lacks updates, online multiplayer support, and the content included in "Team Arena."

4. Quake III Arena: Open Source: The game’s source code is available publicly, allowing developers and enthusiasts to modify and distribute their own versions. This option offers maximum customization but requires technical knowledge and may lack official support.

Setting Up and Playing Quake III Arena on Windows 10

Once downloaded and installed, setting up Quake III Arena on Windows 10 is relatively straightforward:

  • Compatibility: Ensure your system meets the minimum requirements for the game. Quake III Arena is generally compatible with most modern systems, but older hardware may require adjustments to settings.
  • Graphics Settings: Adjust the game’s graphics settings to optimize performance and visual quality based on your system’s capabilities. Consider lowering settings for smoother gameplay on less powerful hardware.
  • Controls: Customize the game’s controls to your preference. The default controls are generally well-suited for the game’s fast-paced action, but you may find it beneficial to adjust them to your playing style.
  • Multiplayer: Find and join online servers through the game’s built-in browser or through dedicated third-party websites. Connect with other players, participate in matches, and experience the game’s competitive nature.

Troubleshooting Common Issues

While generally straightforward, downloading and playing Quake III Arena on Windows 10 may present some challenges. Here are some common issues and their solutions:

  • Compatibility Issues: If the game fails to launch or encounters errors, ensure you have the latest compatible drivers for your graphics card and operating system.
  • Network Connectivity: Ensure your internet connection is stable and that any firewalls or antivirus software are not blocking the game’s network access.
  • Game Crashes: Try updating your graphics drivers, lowering the game’s graphics settings, or verifying the game files for corruption.
  • Multiplayer Issues: Check the game’s official forums or websites for information on server issues or connectivity problems.

Frequently Asked Questions (FAQs)

Q: Can I play Quake III Arena online with friends?

A: Yes, Quake III Arena offers robust online multiplayer capabilities. You can connect with friends through dedicated servers, LAN parties, or through online matchmaking services.

Q: Does Quake III Arena support modern resolutions and aspect ratios?

A: Yes, Quake III Arena can be played in modern resolutions and aspect ratios. However, some older maps may not display correctly in widescreen resolutions.

Q: Are there any mods or custom content available for Quake III Arena?

A: Yes, a vast library of mods and custom content is available for Quake III Arena. These modifications can enhance the gameplay experience with new maps, weapons, skins, and even entirely new game modes.

Q: Does Quake III Arena require a specific controller?

A: Quake III Arena is primarily designed for mouse and keyboard controls, but it can also be played with controllers. However, the game’s fast-paced nature may be better suited for precise mouse movements.

Tips for Enjoying Quake III Arena on Windows 10

  • Master the Rocket Launcher: The rocket launcher is a powerful weapon in Quake III Arena, but it requires practice to master its trajectory and timing.
  • Utilize the "Strafe Jump": This technique, commonly used in Quake III Arena, allows players to quickly move around the map and dodge enemy fire.
  • Experiment with Different Maps: Each map in Quake III Arena offers unique gameplay opportunities. Explore different maps and discover the best strategies for each one.
  • Join a Community: Connect with other Quake III Arena players online or through dedicated forums. Sharing tips, strategies, and experiences can significantly enhance your enjoyment of the game.
  • Embrace the Fast-Paced Action: Quake III Arena is a game of quick reflexes and skillful maneuvering. Embrace the fast-paced action and enjoy the thrill of competitive gameplay.

Conclusion

Quake III Arena, despite its age, continues to offer a compelling and engaging gaming experience on modern systems like Windows 10. Its fast-paced gameplay, iconic level design, and enduring legacy make it a worthwhile addition to any gamer’s library. Whether you are a seasoned veteran or a newcomer to the arena, Quake III Arena offers a unique and rewarding experience that transcends time. By following this guide, you can download, install, and enjoy this classic FPS on your Windows 10 system, reliving the golden age of competitive gaming.

Quake 3 arena windows 10 - ballslaneta Quake III: Arena Screenshots for Windows - MobyGames Quake III: Arena Screenshots for Windows - MobyGames
Quake III: Arena Screenshots for Windows - MobyGames Quake III: Arena - Download Quake iii arena downloads - gplasopa
Quake III: Arena PC Download Completo - WiseGamer Quake III: Arena Screenshots for Windows - MobyGames

Closure

Thus, we hope this article has provided valuable insights into Reliving the Arena: A Guide to Downloading and Enjoying Quake III Arena on Windows 10. We thank you for taking the time to read this article. See you in our next article!